


Processing
Likes
5
Share


@pegonter
Follow
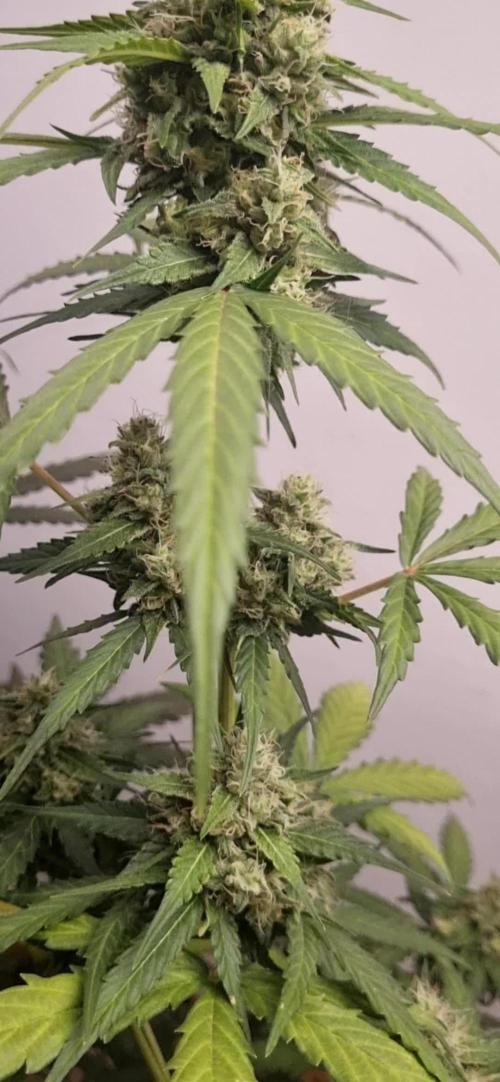
Planta cresceu em repouso nas últimas duas semanas e voltarei a praticar o LST na próxima semana.
Planta está crescendo em um grow com outras 4 plantas em estado vegetativo e uma em revegetativo.
todas as outras 4 plantas da mesma semente não germinaram.
Likes
8
Share


@ButterfliesLittleFarm
Follow
Hello Diary,
Milky Way F1 is ready for harvest after exactly 10 weeks.
79 days since I put the seed in the ground.
75 days since Apollo F1 rose from the ground.
All 10 weeks passed without any problems, Milky Way F1 as well as her roommates proved how resilient, fast and hopefully generous they are.
I'm very happy with how things look so far.
Finally, as seen in the photos, Milky Way F1 looks impressive, the flowers are hard packed, full of trichomes.
For the last week, watering was usual, every three days.
After cutting off the stem at the bottom, I put the plant upside down in the grow box to dry.
Here's what the last week looked like.
02/07/2023 - Day 64.
Watering. I watered the plant with about 2 liters of water.
05/07/2023 - Day 67.
Watering. I repeated the procedure as I did three days earlier.
08/07/2023 - Day 70.
Photography and harvesting. I put it to dry upside down and will leave it to dry for at least 2 weeks.
That's it from me. I wrote everything I thought was important.
If you have any questions related to this strain, feel free to write.

Likes
11
Share


Likes
13
Share


@knicko
Follow
Auf der Waage im getrockneten Zustand waren es 130g somit habe ich mir den Fixkosten ein €/g von 2.55€/g das finde ich nicht schlecht

Likes
74
Share


Likes
43
Share


@Growshh
Follow
Chop Day Today....66 days and I feel the runts and Mac could have gone longer but the godfather is crossings 30% ambs and the stash is almost empty!


Likes
16
Share


@Chaos85
Follow
everything coming along nice density being created benefits from the added cal mag can be seen even in the old damaged leaves turning out to be a great grow


Processing
Likes
14
Share


@420Somewhere
Follow
Day 14 of flower and all 4 plants have stretched over a foot in the last week. Should start putting all of their energy into flowering now.
Looking really good so far. Really, really good.

Likes
201
Share


@Hattiwatti
Follow
Hola 🐴
This diary must be doomed 🤣
Auto kabul seems not to flower properly under 24h of light at day 60 . I think its not auto. More likely "early". Overgrowed closet so it's time to move on and give stage to next warrior.
Hopefully Auto Kabul is now growing in greener fields 🙏
With lot of hope and trust for next try 🤣
Lets go KANNABIA 🤝


Likes
44
Share


@TragicTerps
Follow
This week I changed the whole tent. I switched over to a MarsHydro TS1000 and have it cranked up to 100%.
The light came in and I immediately had to separate the controller from the light and fix the mounting hardware. But that led me to realize I can have a much more temperature controlled and consistent environment. This light is a cool running light.
Shout out to the light sponsor MarsHydro for the opportunity to break it in and let her loose next grow!

Likes
12
Share


@chrisss
Follow
Week 8 Day 50) Fed her 4ml bloom nutes plus 1 ml calmag to a half gallon plus some recharge in a separate container, she’s looking real purple n much more healthier
D51) looking good , new growth is very healthy
Day52) Fed 75% of gallon lmaoo w.e ts is then also 7 ml bloom and 4ml calmag -small Rust spots were popping up still and it was yellowing like it needed N
Day53) they got noticeably bigger I think it’s cuz of the nutes from yesterday, I didn’t want to give her them cuz her tips were so Burnt but said fuck it , also yesterday I raised the lights cuz I think it was to close
54) added fan
55) Fed 75% gallon , 1 ml calmag , 4 ml bloom
56) waiting for my shit to get plump
Likes
37
Share


@Reyden
Follow
Sto aspettando anche per di raccogliere corbezzolo che sta asciugando da un flush con 5 litri circa di acqua 🚿 fredda (14ºC) e penso di farlo ancora tra qualche giorno e forse una settimana, che bei colori questa ragazza e un profumo molto particolare, sarà una di quelle che terrò stretto anche sono pochi grammi e cercherò di curare il più possibile prima di tirarla fuori dal barattolo! Ora intanto prepariamo il terreno per i prossimi 4 😀 ???
Likes
2
Share

@Pechu420
Follow
Ak1 is already quite fat, the smell is very strong. Being born with natural pruning made her very fat, just 2 thick branches.
Ak2 is doing well too, very pretty.
12/12 from seed
Watering with filtered tap water every 2/3 days, when the pot is lighter
Soil:
peat, coconut powder, perlite, carbonized rice husk, sheep manure and worm humus. essential mineral mix, vegetable flours, vegetable cakes, biochar, bokashi EM1 and other organic inputs, Algae ascophyllum nodosum
small pots 3,7liters // 1gallon
light: lm301h-evo
120watts with other plants
Processing
Likes
5
Share


@Mr_nugs_lover_David
Follow
Very healthy looking seedling, starting to grow very fast, she's got a great size for 14 days only and I think I'll transplant her in a couple of days more when she is 17 days or so like the other ones in this run, they grow extremely fast under the tsl2000 by mars hydro, very happy with the results I'm achieving in terms of growth, I hope the same in flower! I have Transplanted this lady into her definitive 11l pot on February 6th which is her day 17 since she was planted, she's 4 days younger than the rest of the plants in this 2x4 run, she's looking very healthy and strong, let's see how she keeps developing herself!

Likes
3
Share


@Ryno1990
Follow
The Grapes an Cream is comming along great she shot up in the begining of life an now is starting to even out under this medic grow fold 6
The Grapes an Cream from Atlas seeds is doing really good as she is the tallest of all the strains as of now an has been growing great since day 1
Likes
10
Share


@byte_me
Follow
Overall happy with the grow, I will try this strain again outdoors when I get the opportunity.
A very good all day smoke that doesn't get boring 😁

Likes
20
Share


@Lazuli
Follow
Final 2 weeks maybe 3,
Therese so many flowers on this plant its insane haha
A heavy blueberry smell she got
Likes
35
Share


@The_Bearded_Grower
Follow
welcome to Day 22 not a whole lot to tell I increase the light schedule to 20 hours of light for the remainder of flower so far everything is healthy no signs of any deficiency whatsoever

