The Grow Awards 2026 🏆 


Likes
Comments
Share
@Whosaysgirlscantgrow
Follow
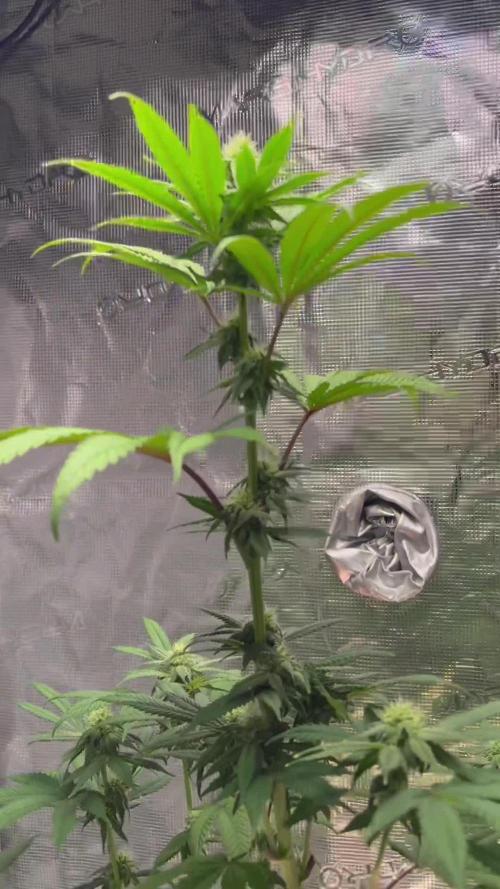
Well I’ve flipped the light schedule. We’re on 12/12. It’s only been 4 days and they’re definitely getting their stretch on! Let’s see what happens over the next week or so…
Likes
81
Share
@UnorthadoxDude
Follow
Transplanted to 40l container on week 4 day 1. Container has approx 30l in it.
Also added a photo of the setup for size reference.
Let me explain my thinking behind the repotting strategy. Firstly I should say that I am quite an old school kind of grower, although I've never grown cannabis before I have grown hundreds of other plants. Due to my experience with other plants, I understand the value of well planned and executed transplants, they can have an absolutely transformative effect upon root systems when done properly, as far as I know it's the main reason why they are done at all. It is fair to say I have never grown any auto-flowering plant indoors before, and I have read all about how you should not transplant autos, and all the good reasons why not. Ultimately though, as I am not called UnorthadoxDude for nothing, I believe that I can make it work with an auto, and get the benefit of improved root growth pattern, without delaying or interrupting the growth. I want to have my cake and eat it, as it were.
So the strategy is to avoid transplant shock, which admittedly I have already failed in the first unplanned transplant, but in my hopeful naivety I still believe I can make the second one work! I'm using coco, and I have had the larger pot prepared and have been watering and feeding them as well as the plant. If I am careful not to disturb the plant at all, and move the entire contents of the pot gently into the larger pot (which is exactly the same medium in broadly the same state), then I may be able to avoid shocking the plant and just let it crack on. We will find out in a few days! If it stops growing or slows at all then I failed, otherwise it worked!
A note about my use of organic nutes with coco. I have read a lot about coco and nutes and microbes and PH and TDS and what have you, and I know that the overwhelming majority of people believe that you can't or at least shouldn't use organic nutes with coco. The thing is, I like organic gardening, I prefer to cultivate a beneficial microbiota and keep it healthy. I recycle, and reuse all my compost except where a plant is diseased and this has worked well for me for a long time. I've never grown with coco before though, I always used soil. I wanted to gain the benefits of coco (better drainage, more air to roots, lighter, less inviting to pests, etc) - but I wanted to use a method of nutrition that I was already familiar with. I think I've mentioned that I am not called UnorthadoxDude for nothing, so I am using BioBizz and coco. By adding bacterial, mycorrhizal, and trichoderma inoculants and having the unplanted coco in the tent being fed and watered I hope to have cultivated a nice microbiota which will feed my plant. That's the theory. However just in case, I have a trick up my sleeve.
Now, I do not know if you are aware of this, but there is a fiery debate raging on the internet about using BioBizz organic nutes with coco for cannabis. Some people try it, most people shout it down, and I have not found much in the way of solid evidence of it being a good idea. Except one! I found a commercial grower that has used biobizz nutes, and he said that as long as you are using "Acti-Vera" you can use anything from the BioBizz organic range. Apparently the enzymes in the mix break down nutes chemically in a similar way to what the theoretically missing microbes do.
So I have ordered a bottle of that, and if my microbial cultivation attempts don't work out, I at least know I have a fallback that should work.
Those are my thoughts on it, let's see how it pans out.
Oh I should also probably point out that I am growing some companion plants, specifically alfalfa (nitrogen fixing), basil (improved flavour), and German Chamomile (increased essential oil production).
Update week 4 day 2 dropped PH to 5.8 after advice from a grow question. Look! It's carried on growing... maybe there was no transplant shock?
Update week 4 day 3: Growth continues, interveinal chlorosis lessening. Plant is pushing out node five at the moment.
Update week 4 day 4: Growth continues, interveinal chlorosis further lessening. Apologies for the poor quality photos for the last few days, I was lazy and didn't want to move everything out to photograph. Today I have done that and the pic is better. I am declaring the second transplant a complete success. I do not believe that plant was in any way shocked.
Update week 4 say 5: I think I've finally managed to overwater. Going to skip watering today.
Update week 4 day 6: Photo taken just before lights on hence wilting. Growth continues to accelerate. I believe the alfalfa has been raising the PH so I've removed it. Today I will flush through with PH lowered water and then fertigate. The colour is still too pale but the growth and overall look and feel of the plant screams to me that it's happy and about to explode.
Day 27.5 flushed with 30l of PH lowered water then fertigated with 5l.
Day 28: Height 12cm Width: 28cm Nodes: 6
Weekly growth data:
From 5cm Height to 12cm +140%
From 12cm Width to 28cm +133%
From 4 primary nodes to 6 +50%
Summary: Wow, wow. Wow. What else can I say. What a crazy week, amazing and unexpected given the problems. I am really excited to see what happens over the next seven days!!
It looks like it has quite severe chlorosis, but otherwise seems robust and is seriously stretching. Almost unbelievable growth. Pre-flowers appeared a few days ago, so I guess this was the final week of veg. Let's see how the first week of flowering stretch goes!
Update 7/2/23: My instincts about this plant on week 4 day 6 were absolutely correct, she was happy and, she was about to explode. Since my early attempts at transplanting, I practiced multiple times with Citronella (a photoperiod plant) and then I did it again with an auto (Polly) - this one went flawlessly and further demonstrates that you can transplant an auto without shocking it. Time will tell, because I can compare Polly to both Misty and Nesia both of whom were sown directly in their final pots.

Likes
109
Share
@ButtersStotch
Follow
So, Nitrogen deficiency SEEMS to have slowed down or stopped (hopefully). I've upped the FloraMicro as well as the frequency of feedings, from once a week to 2-3 times. Next year I will plant in soil as I'm going to fly through nutes, and the Midget that's planted in my flower bed has received nothing but water and has shown ZERO deficiencies.
The girls have now also began to show a Calcium deficiency as can be seen in the pics on new growth, as a result I've upped the amount of CaliMagic as well. Weird as I see many people feeding 1/2 the dose as recommended by GHE while i'm feeding the recommended and then some. I'm guessing it may be because the girls are big, not sure. Oh well I ordered a gallon of each of the nutes and a gallon of KoolBloom from WEGROWBUDS.ca Highly Recommended.
As soon as my prize comes in from @HumboltSeeds I will be planting 4 girls indoors!
And FYI I may break this diary up into the Blue Cookies and White Widow individually, we'll see.

Processing
Likes
26
Share
@rhodes68
Follow
9/14 Week 9 and she is doing fine
Little vid she is center
Nuets not changing for now
9/15
Ok major changes
Brought up the alternate tent and placed her in it alone under a 150w Mars
This is a test to see if we can help the crowding issue in the Flower tent
Video enjoy
9/16
Doing well but some white tips are saying we gotta reduce the salts so will be dropping CT nuets 10% and upping PK to 2.5
Extra space is really doing them well
Defoliation again tonight the war on stemmed leaves has begun
9/17
Held a meeting of the minds and decided the best course of action is to flip the light schedule so I can feed them more appropriately, twice a day.
Leaving nuets as they are as this will drop pot EC. Setting the alarm for the AM before lights out at 7:30 and changing the sched to 6AM-6PM summer is done no need for current schedule. Lights be out from 7:30AM to 6AM long I know but should not bother them.
9/19
Lights on girls feed buds look fine
Video enjoy

Likes
10
Share
@L1lium
Follow
Ich habe mich für die Keimung direkt in dem BioBizz Light-Mix entschieden.
Mit etwas Glück, keimten auch alle Samen wie erwartet.
Die Keimung hat etwas länger gedauert, schätzungsweise 2-3 Tage, bis die ersten Samen aus der Erde schauten.
Ich habe einfach dafür gesorgt, dass es die Samen immer schön warm und feucht haben, schien gewirkt zu haben - immer mal wieder besprühen - dann sah alles gut aus.
Für den Anfang standen die Töpfe daheim, um sicherzustellen, dass es warm genug war.


Likes
23
Share
@NorwegianNugs
Follow
Week 16!
Week 8 of flowering.
She is foxtailing on the topmost buds due to light stress. I measured 90k lux(!) at some buds, which is way too much (she got a little out of hand during the stretch, and grew way too tall)
She is drinking less and less water and eating less nutrients. I think she is in the harvest window now, even though she is sprouting lots of new pistils.
I will cut down and hang to dry next week, in about 5/6 days.
Excited!!
EDIT: BANANA ALARM
Found a banana. There is probably more of them that I can't see because the lower canopy is so packed. Unsure if to harvest now or not. As it is late in flower I don't know if quality will suffer because of a few more days with herming. Opinions?
EDIT II: BUD ROT
As I inspected the plant today I saw a dead leaf on one of the tops, which I was able to pull right off. Turned out there was bud rot inside the bud. I cut the bud off. Will harvest later today or tomorrow.

Likes
22
Share
@Basementganja
Follow
Day 46 - Defoliation video!
Day 49 - Bulking up big time now!
She is watered with a 2.5 gallon dosage of the above listed nutrients, every 5-6 days!

Likes
18
Share
@DevelGrow
Follow
Hallo Freunde 👋 Auto Candy ist von uns gegangen! 😢 Aber 😀😋sie hat uns schöne Zucker Blüten hinterlassen 🤩☺️✌️🍀💚🍀

Likes
25
Share
@Grower_Of_Persia
Follow
week intel:
we getting close to end of ripening , this week i raised drought , Nitrogen and E.C stress by feeding them 2 times per week and raised e.c to 3 to cause real stress that will help increase terpenes production
stresses :
Nitrogen deficiency Stress by removing the fertilizers that has N in them
Drought stress via removing one meal in week
high E.C stress around 1.7 and the other feeding day 3.0 , 2 times a week
feeding:
no more Nitrogen
i feed them 2 times this week with this order :
day 1 : i feed them high with Bio-Bizz Top-Max + Feeding Booster about 850 ppm - 1.7 e.c to cause a medium e.c stress.
day 3 : no more feeding this day
day 5 : i feed them very high dose of Bio-Bizz Top-Max + Feeding Booster around 1500 ppm - 3 e.c to cause high e.c stress
guide of the week :
be patient in the last weeks, never hurry for harvest because its the time of ripening in last 2 weeks you should let plants to do their work
last weeks of ripening is the time to break the limits we should cause 3 stresses as i said above Nitrogen stress , Drought Stress , E.C Stress

Likes
20
Share
@hellobecka
Follow
Her pistols are starting to turn and the smell is delicious 😍 I think it'll be only another week or 2 until she's ready to harvest; it's been a fun learning experience for my 1st grow; very happy with my results so far 🌱
Likes
38
Share
@Green_Mountains
Follow
A lot going on this week!! Feeding 3 quarts every Sunday and Wednesday at this point. I did a light defoliation on Monday and did a more thorough defoliation on Friday! I opened up a lot of bud sights and it shows in the pics from late in the week!!
I just turned the fan and carbon filter on. Temps are currently holding at 73-74F and the humidity is between 43-45%. I'm very happy with that!
I hope to keep them both happy!!
Enjoy!
Likes
73
Share
@Rwein93
Follow
Ciao ragazzi e bentornati qui con me le sorelle Mimorange.🍊😉
Ci siamo! Fra un paio di giorni taglierò loro. I buds sono estremamente compatti, profumati e di un colore favoloso, come potete vedere nei ravvicinati delle apicali.😍
Ho eseguito un lavaggio delle radici massivo nel giorno 92 con ben 20 L di acqua ciascuna per pulire bene e poi dopo aver aspettato che asciugasse per bene, ho innaffiato loro nel giorno 96 con 1,5 L di acqua.💪
Nel giorno 98 ho eseguito anche una voluminosa defogliazione per dare concentrare le energie suo buds negli ultimi giorni.👍
Eh niente ragazzi! Anche per questa settimana è tutto. 👊
Grazie a tutti per aver guardato e restate sintonizzati per nuovi aggiornamenti.🙏
Buona settimana e felice crescita 🌱 🌱 🌱

Likes
7
Share
@Ninjabuds
Follow
My ELUFAH UAP 1500 test grow is showing excellent results, with the plant thriving under my care. The addition of the ELUFAH Saturn Ring under canopy light has been a game-changer, significantly boosting growth. It's clear that the supplemental lighting is providing the plants with the extra energy they need for robust development and impressive yields.


Likes
17
Share
@foxbberg
Follow
Day 22:
Drain EC 3 feet high and risin'😅( average 3.3 to be exact...)
dunno how much whatever-salt is building up in that pots, but it obviuosly doesn't bother the ladies.
Dark green colour, very few 'claws', no signs of tipp-burn, new foliage appears in a juicy green and turns dark in an instant, leafs point upwards.......
looks like they're happy😊.
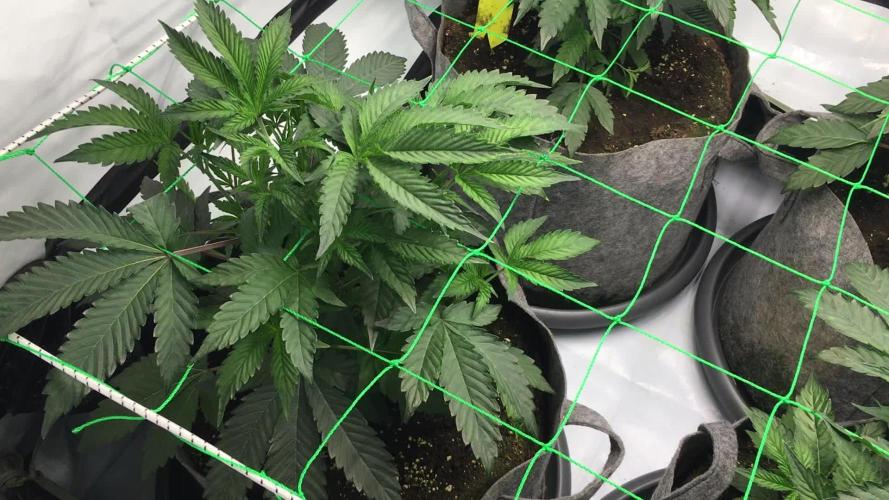
Planns for this week:
- Install the scrog-net
- Obsereve plants/soil ( when do i have to feed nutrients again?)
otherwise there will be no changes......
Thoughts:
These bushy babies will be kind of a challlenge to create this scrog the way i'm used to (basically bending the 4 main main colas to the corners of the tent, upper branches to the walls and spaces between the pants, lower branches to the very center).
Now these ladies make so many branches, so close togehter and so equal in length, underneath huge fanleafs..... i'd love to have them in a 100 square meter canna-crib....but in a tent...????? I really hate doin' things without having them planned - but in this case i guess i will have to install the net, start weaving and see what's happening😯
Day 23
Let's keep it positive...... indoor-climate of 64% rh is perfect for my health💪😁!!! ......but in my tent it's killing the vpd😖.
at a lousy 24 degrees C, i'm readin' about 60-64 % rh wich results in about 0.7 to 0.8 kPa.*
More figures? Here come the crazyones👻!:
pH 5.5; EC 4.2😨
but thats only drain from plant 3....... average was 6.1/3.6
The girls busy produce roots, shoots and leafs....... still very green, still not unhealthy.......few claws, no tipp-burn.
Basically a comfortable place to be: It's not bad yet - no work but watering - and it can only get better!!!😁
*VPD issue solved:
The sensor hung too close to a fanleaf - didn‘t expect this thing beeing so sensitive 😅.
Day 24
Climbed new hights this morning: Plant 1 had an EC of 3.8 - the others didn't climb any higher than yesterday.
So maybe we've reached the climax..... 😇
Visible growth now - so i installed the scrog-net and will start bending and weaving these days:-)
Thoughts:
Did beeing out of VPD-range for one day harm my plants? How exact can my sensor measure VPD?
after a bit of research i found out: Whatever you buy for less than 200 bucks is far from beeing exact! Even professional sensors have a margin of about +/- 1% in relative humidity. Thermometers at least +/- 0.5 degrees C. This could give some a good guess of the actual VPD BUT: Leaf-temperature-offset is absolute key! Many of our trusted homegrow-equippment isn't even able to measure it (some offer default temp-offset) ....don't wanna go further here - but there's no way to achieve something like a precise VPD-measurement in homegrowing.
So why caring for VPD?
Even with those less accurate instruments, you may be able to keep your plants in something like a comfort-zone. Way better than only guessing 👆!!!
In case i ran a much higher VPD than planned, yesterday (due to a missplaced sensor) , it will not harm or kill my plants. they might have had a bit of stress from dry air - but nothing to worry about!
Day 24:
Decreasing salt-levels in the drain - excepting plant 4, wich had an EC of 4.0 - so i guess i'm slowly draining exess-salts from top to bottom and might have collected some build-up.
The girls seem to be quite okay. Root-growth is vigorous (there are thick, white roots penetrating through the pots, everywhere), the stems are relatively thin.
removed the LST-lines.
the Sc.r.o.g:
only materiels needed, were a climbing-net for gardening (HDPE) cut to 90x90 for my 1x1 tent, 4 cable-ties and 2 meters of strong rubber-cord.
Pre-installed the net with the cable-ties, then weaved the cord around the outter cords of the net, led it aroud the posts and pulled tight.
Then brought the net into it's final position. Not as sturdy as with a wooden frame - but i had less than half the work and a bit of freedom to move things if necessary.
Any shoot will now be put to the next outter square (relative to the center of each plant) as soon as can be held by the net, without harming the top.
Once i moved all of the dominant colas to the next square, i'll have to take 10-15cm steps (vertical growth), to reach the next square.
As soon as i have about 70 of my 81 squares filled, i'm going to flip to 12/12. Since i'm plannin' to have them full of sugar when flippin', i don't expect too much of a stretch. This way i hopefully have the longest and strongest shoots framing the shorter ones in the center - so the canopy shapes like a bowl, in order to achieve the most even light distribution possible.
Day 25:
The main colas visibly reached out for the light - but yet i only moved 1 single shoot to the next square.
Girls look good, EC is dropping slowly, climate fine.
CU tomorrow👋
day 26:
on Track... nothing to worry about......
till day 28.......
Due to high EC levels in the soil, i couldn't do much more than pour out some water and prepare the scrog this week.
Next week i will have to do some weaving. If the nutrientlevels allow, i'll do some defoliation.
Likes
3
Share
@natta98
Follow
semana tranquila me olvide de anotar cuando regue, flora booster no me acuerdo, y 06/07 riego con agua, una de las plantas ya se esta comiendo todos los nutrientes disponibles, mientras que la otra todavia sigue teniendo reservas, cada vez mas resinosas, la planta que se esta comiendo todos los nutrientes ya manifiesta en algunas partes tricomas color ambar, aunque esperare 2 semanas mas para ver si la corto o no

Likes
6
Share
@Ninjabuds
Follow
My Runtz plant is finally taking off! It took a little while to get going, but it's growing really well now. The leaves are a dark, rich green and have a really unique, wild shape to them – long, pointy, and unlike anything else in the garden.
Okay, This past week has been absolutely fantastic! The weather has been incredible, and I've been able to keep the windows open almost the entire time. My plants are thriving in the humidity, and the VPD has been perfect. Everything just feels so balanced and in check.


