


Processing
Likes
13
Share


@TheAutoflowerShow
Follow
Day one of this week entailed me going to the hydro shop, grabbing so blue sky organics super soil, some 1 gal fabric pots and off I went. I always pot my soil then water the pots down and wait 24 hours for everything to acclimate so as to not shock my seeds. I germinate straight into the soil. I will post more pics to beef up this week! I will be planting 2 fastbuds orange sherbet beans, 1 in a 1gal fabric pot and 1 in a 3gal from the bucket company.

Likes
Comments
Share


@Uneasy
Follow
Towards the end of the harvest, mold developed due to high temperature and humidity. I lost about 30% of my harvest. The buds did not fully mature. Despite all the setbacks, we managed to get a harvest.

Likes
20
Share


@usere
Follow
Not much to say, probably i overfeed gorilla a little,, for the week 7 to the end i ll dim my lamp to 75% of power (150W) and the reason is bill cost:D


Likes
3
Share

@Centollo
Follow
Inicio de la quinta semana de floración. He aumentado la dosis de Topmax y de Biobloom. Todo va de maravilla y están engordando bien. Poco más que decir, feliz semana a tod@s!


Likes
10
Share


@CoastalEisenberg
Follow
Pictures added!
Too much info to add right now but got several autos and photos going right now.
Let me know your thoughts!


Likes
45
Share


@masterofsmeagol
Follow
7/3 Hot as fuck today. Japanese beetles were around. I killed a few. I'm going to have to go over and keep an eye on things. It reached 90° today for the majority of the day. I watered around 1pm as I noticed most of the bags were very light. I'm glad I held off on the BT. I've dealt with jpn beetles before so hopfully that won't be an issue. Things are getting big. It won't let me upload any pictures or the video I did. I may upload it to past week. Went back over at night and and plants looked dropy but it was after 7pm and they were just going to sleep.
7/4 Didn't take photos this morning. Found some jpn beetles. That's the damage I've been seeing. I went back over last night to hunt them but I only got two. There weren't any others. No biggie. I'll put some pics up from today after I get back
7/5 Didn't get a chance to check the plants out today. My intuition tingled around 1pm and I had just gotten home and I ran over to check them. They displayed minor signs of heat stress as seen in the pics (due to the super high humidity and 90° weather) and the bags were light. A few were REALLY light. I could see they needed water. I WATERED 4 1/2 GALLONS TO THE GARDEN. DO TO THE HIGH TENPS AND WINDS IVE HAD TO WATER THE LAST THREE DAYS IN A ROW. IVE SLOWLY STRARTED INCREASING VOLUME. I don't want to water until I get a shit ton of run off because I want to keep the nutes in my soil as long as possible. As you can see things are going great. Minor pests but notjing major. They're growing at a very rapid pace. I'll need to add another layer of supports soon and begin to LST some of these girls. I've got one seedling in a 10 gal and I'm pretty sure it's a feminized red runtz but it's in preflower and looks and SHOULD be a female but I haven't seen the white hair yet. Looks like a female preflower though. I do have one auto though in a 5 gallon tjats doing good too. I have a bunch of pics but the internet is too slow. I'll upload tomorrow. Started pouring around 6.
7/6 Poured sheet rain all night. After it had Bern super fucking hot and I watered my plants with 4 1/2 gallons. Oh well. If I didn't water we wouldn't have gotten the rain. The fabric bags makes watering easier. The wind will dry out the medium. We do have some rain in the forecast. A pallet fell over and knocked my 5 gal bucket with tje auto into a 10 gal seedling but it held the pallet up and didn't damage anything. Out of all the ways it coyldve landed it landed just right to not hurt anything. Everything is super healthy. I do have some random pest damage but it's minimal. I'll decide whether to use a spray or not. Didn't take pictures this morning. Was pressed for time.
7/7 Super hot even at 8a.m. Rained the majority of the day yesterday. Plants are getting HUGE. I'm going to have to build a second round of supports and should probably start some LSTing. They seem to like growing natural how they are (besides the original topping and FIMed. You can tell these are ALL very high % indicas. I'm seeing pistols spitting out everywhere. Event horizon and sherb cake seem to be in the lead. The seedlings have realky taken off. The one I put in the 50 has fan leaves the size of my hands.
7/8 Wow it has been extremely hot. It's going to be in the 90's again today. Checked my plants and it seems the GMOs seem to be using more water. Those bags were a little lighter. Seeing how there is no rain in for a few days I had to water. WATERED 3 1/2 GALLONS. LAST SEEDLING FINALLY SHOWED AS A FEMALE.
7/9 Bags are still heavy. Found ONE jpn beetle this morning. Plants seem to be bigger everytime I look.starying the stretch and spitting out some pistols. I took some pics of the pistles. I'll update
7/10 should've started a new week but I didn't. I'll make next week six days. Plants are starting ro stretch. Minor random pest damage but woth the heat they need lots of water. Noticed a couple dead interior leaves so I should probably go through everything and defoliate. I need to add another layer of supports as well.

Likes
5
Share


@SkunkyDog420
Follow
Keine Probleme gehabt mit der Pflanze.
Kann ich nur empfehlen 🤙.
Bis dann.
Ende
Likes
5
Share


@Ninjabuds
Follow
I'm really happy with the gas tax x obama runtz plant is doing. It started out so small, I wasn't sure if it was gonna make it. But lately it's taken off. The leaves are a lot bigger and the colors are so vibrant. I can tell it's happy and healthy now.
Well, it's Christmas again. This year feels a little different, though. Maybe it's the snow blanketing everything, or the way the tree lights up the whole living room. Either way, it's cozy and warm, even when it's freezing outside. I'm really looking forward to seeing what Santa brings. I hope I get that new video game I've been wanting. But most of all, I can't wait to spend time with my family. We always have so much fun
This past week was a good one for the plants. They started the first week of their stretch, and they've already grown a decent amount. I can really see them filling out. It's cool to watch them grow so fast. I can't wait to see how big they get by the end
I always get a little worried at this stage, like they're not gonna get as big as I want them to. But then I remember how they always end up surprising me. By the end, they're always perfect.
Likes
1
Share


@ChubbyBudBros
Follow
-
Day 57
Watering day. Gave 3 Liters today, see how fast she'll drink that up.
Day 59
Not much too report other than that the buds keep bulking up for now ^^.
Day 61
Gave her another 2.5 liters today pot was fully dry after 4 days, so gave her a bit less this time.
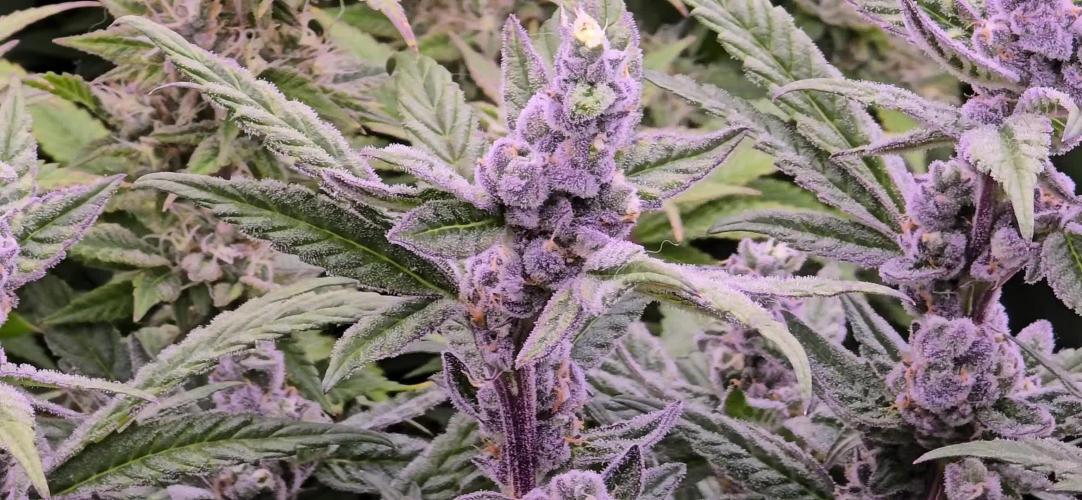
She smells great, very deep smell, almost smells like tobacco somehow, but sweet. Buds still have quite a few white pistils so she will still take a few weeks to finish I think.
Day 63
Buds are definitely still bulking up 😍 definitely strong buds, very colorful and got a really nice smell going. I removed some yellowing leaves today and my fingers got stiiiiicky.

Likes
16
Share


@Bread_n_Buds
Follow
I like to take CBD especially in the form of oil but we thought of growing some CBD autoflowering both for medical use, for cooking etc. and to send to the most anticipated contest of the year in terms of autoflowering, the annual Barcelona autoflower world cup.
Our Green Cure F1 Hybrid Automatic seems to be just right for us, let's see if it throws fire.
Growing projects for autoflowering plants ----- As for autoflowering plants I really love preserving the Main Cola. So I will try to make the plants grow well or badly without affecting the main cola. Nowadays topping autoflowering plants is very accepted but it is not my favorite thing to transform a baby born to finish in 10 weeks into a baby that finishes in 14, I say at this point I do photoperiodic. But in times of people who only grow autoflowering everything is permitted for goodness sake if you want to do it, do it I won't be the one to stop you. Also because the results are excellent nothing to really discuss about anything except time.
All this to tell us that I recommend for example fimming on plants that tend to grow tall to give power to the lateral branches, LST as much as you want, I don't like too much spread out I need space. HST and splitting are with experience. These are my tips not the absolute truth please do not mistake me for a great wise holder of the truth I speak as I see it.
The first week went only with Power Roots 1 Ml/l and Pure Zym 1 ml/l from now on we will start with ALga Grow. The plants were transplanted shortly after germination because the biodegradable pots were very small. The soil is Plagron Pro Mix 100% organic renewed with 30% new soil and 20% Perlite added. (Pro mix has no perlite but is airy, we added it anyway)
Plagron nutrients are available at Zamnesia in convenient pack formats for all growing styles. I used this one with a simple search you can find the other products.
---- https://www.zamnesia.io/it/12119-plagron-top-grow-box-100-naturale.html
Try a seed of this strain that drives us crazy...
---- https://www.zamnesia.io/en/10672-zamnesia-seeds-green-cure-cbd-f1-automatic.html
Zamnesia Description // Zamnesia's breeding team has harnessed F1 genetics to bring you Green Cure CBD F1 Automatic. This autoflowering cultivar is easy to grow, accessible and reliable for all levels of experience. Ready in just 11 weeks, growers can expect impressive yields of tasty buds with a clear-headed effect that's ideal for meditative moments.
Growbox and Air System - Secret Jardin DS120w + fans + exhaust fans and filters DF16 kit ---- https://www.secretjardin.com
All the best that mother nature has to offer is at ----www.zamnesia.com
Collaboration request: I am available for collaborations with companies of lights and various growing equipment (please no seed and nut companies) I would like to renovate my 120x120 space that has slightly outdated lights and I would like to try some controllers. If you have any proposals available.

Likes
14
Share


@Mr_Dior21
Follow
So It’s now week 8 on seedsman’s website flowering is done in 65 days so I have 1 more week left before the dark period. Yesterday I watered with a couple tbps of molasses other than that ive been doing regular watering with just tap.


Likes
20
Share


@UKBUDDOCTOR
Follow
Pheno #1/2 are coming up to 4 weeks in a couple of days and they are doing great… just set up my 4x4 so more room!! Pheno #3 is just 3 weeks and as big as the rest which is great the node space is just amazing on these and I can wait to see the flower results on these 💪

Likes
11
Share


@CanabisLoverHobbyGrower
Follow
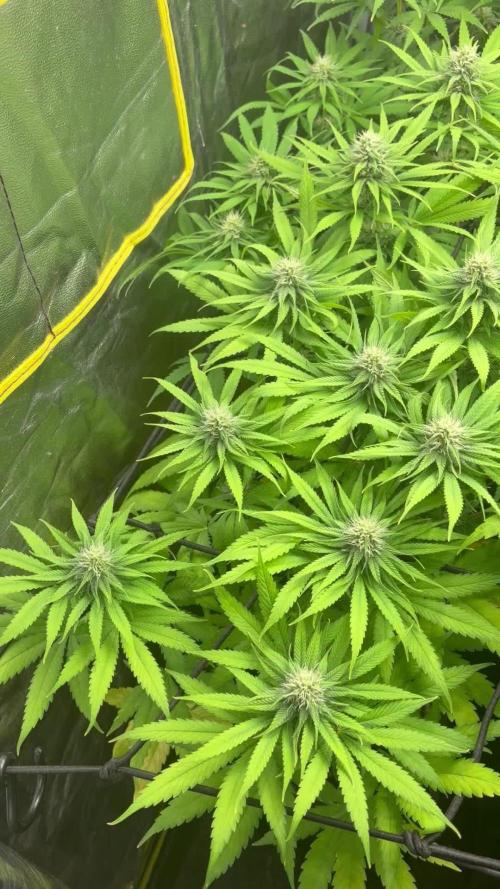
Put on alot of size, I think they are coming to the end of the stretch now, loads and loads of bud sites and both look so healthy, roll on next week 😀 👌

Likes
52
Share


@Santica_Garden
Follow
So we've reached the end of Week 4 from Seed, day 28 and things are looking much better than they did before..... Apart from one of the plants which I explain in the video I have uploaded. Happy Growing guys, any questions just ask away! 👍🏾🌱💚😎
Likes
16
Share


@borneogrower
Follow
Recovery from pruning n 2nd topping. Waiting for 3 weeks for 3rd topping.
Planning to transfer the plant for flowering