
Likes
Comments
Share


@LoganatorDude
Follow
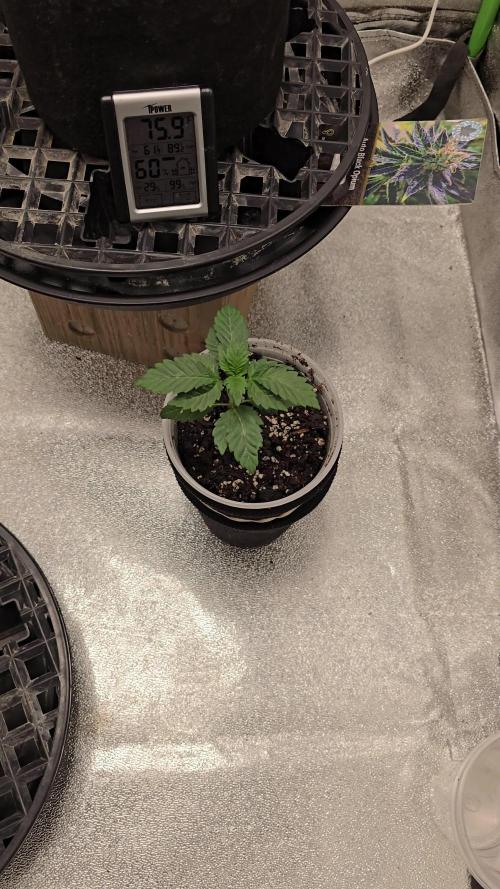
I know they look rough. It’s just because I didn’t want to feed them too much in those little pots, now they are getting established into bigger pots with a lot more food!


Likes
5
Share


@Ensign420
Follow
Greetings fellow growers 🖖 and welcome to my first grow ever. This adventure actually started several months ago when I decided to stop buying flower from dispensaries and just grow my own bud. How hard can it be!?
This is actually my second seed of this strain. The first bean sadly died due to over watering (sorry girl, RIP). I was literally watering the cube to the point where water was dripping from the bottom, then heavily sprayed the humidity dome and tray with the vents completely closed. Everyday. Multiple times. I never let the dome or try dry out. So after about 8 days of not sprouting, there was a funky smell of rot. So that was that.
Later I learned that rockwool retains a lot of water and can easily drown seeds. So a wet/dry cycle is best for rockwool germination.
So even after hours of researching and digging through forums and tutorial videos, I was still under prepared for this journey. Did not consider how delicate the germination phase is. Oh well. Lesson learned. Reset and try again!
I hope everyone is safe and stoned during this corona crisis. Just like everyone else in the world, I want this pandemic to be over with. But in the meantime, let's grow some weed! 🖖
[START OF WEEK 01]
Day 01 - Monday - 08/03/20 - Total Days: 001
-----------------------------------
- [0830]: Light Schedule: 24Hrs/0
--- Soaked cube in 5.5 PH water for 10 min. Did not shake water out.
--- NO NUTES! Only PH'd down to control the PH levels.
--- Did not use the default hole (way too deep).
--- Flipped cube upside down and made a shallow hole for the seed (less than 0.25" deep).
--- Placed seed in and pinched hole close. No additional water added.
--- Sprayed the tray and dome with straight water (5.5 PH).
--- Vents are cracked opened a for ventilation (about 1/4 opened each).
--- Distance between the light and tray was 53"
--- AC was set to 80 °F
--- Exhaust fan was set to 86 °F
--- Room average temp was at 85 °F
--- Dome humidity was at 85-99% when sprayed.
--- Allowing to completely dry before respraying.
- [2200]: Dome and tray were completely dry! Sprayed only tray and dome with more water.
Day 02 - Tuesday - 08/04/20 - Total Days: 002
-----------------------------------
- [0845]: Sprayed dome and tray in the morning. Everything was dry.
--- Hoping for the best!
- [2130]: Everything was dry again, so sprayed dome and tray at night along with a light spray on the cube.
Day 03 - Wednesday - 08/05/20 - Total Days: 003
-----------------------------------
- [0830]: Everything was dry again. Resprayed dome and tray. Slightly sprayed cube.
- [2125]: Hooo damn!! She popped! Am little stub is visible! Resprayed dome and tray again.
--- Still going 24/0 for lights.
- [+0033]: Just checked up on her and I swear she grew a bit taller! Getting excited!
Day 04 - Thursday - 08/06/20 - Total Days: 004
-----------------------------------
- [0845]: Wow! Went from a little stub to fully sprouted overnight! Everything was pretty dry again so resprayed dome and tray.
- [2200]: Tap root is visible! Over 1" long too! Just resprayed dome and tray again.
-- Going to prep for hydroton transplant tomorrow!
Day 05 - Friday - 08/07/20 - Total Days: 005
-----------------------------------
- [0930]: She keeps growing!
-- Added a bit of CalMag to the spray bottle (8 drops to 650ml of distilled water). Resprayed dome and tray. Water was at a 5.4 PH with 141 PPM.
- [1045]: Prepped the bubble bucket with 4.5gal of water. Water is high enough to reach about 0.25" above the bottom of the net pot.
--- Added 3 drops of Superthrive
--- Added 3.5ml of CaliMagic
--- Added 2ml Hydroguard
--- Then PH'd down to 5.6
--- Solution Strengh: 120 PPM
--- Water chiller is set to 20 °C
- [1100]: Transplant time!
--- Filled the net basket 1/3 with hydroton. When placed in the bucket, air bubbles are not visible, but are slightly below the surface (slight digging will reveal the water/bubbles below).
--- Removed plastic on rockwool cube and placed in basket, then filled around and covered with hydroton. Making sure to block any light from passing through the net pot and into the nutrient solution.
--- Covered with a half-bottle dome sprayed with the CalMag water from earlier.
--- Hoping for the best!
- [1300]: Raised Bucket 5" higher. Now light distance is 48" to top of bucket.
- [1820]: Lowered tent exhaust temp to 76 °F
--- Lowered AC to 75 °F
--- Raised bucket even higher so light distance is 30" to top of bucket.
- [2300]: Looking good!
--- Sprayed dome and surrounding hydroton with more CalMag water.
--- Attached timer to light! So new 18 Hrs On/6 Hrs Off light schedule.
--- Lights On: [1600] (4pm)
--- Lights Off: [+1000] (10am the next day)
--- Decided to go with lights on during the evening/night and off during the later mornings/afternoon (the hottest part of the day) to see if temps can be controlled better.
--- Please survive girl!
Day 06 - Saturday - 08/08/20 - Total Days: 006
-----------------------------------
- [0800]: Everything was dry. Resprayed hydroton and dome.
- [2000]: Here first night cycle seemed to go well! Get'n taller!
--- Dry again. Removed the dome.
--- PH went up to 6.5 so PH'd down to 5.7
--- Ran the top feed drip ring for a bout a minute to wet the hydroton and rockwool with the nutient solution.
---Too scared to leave the top feed on 24hrs (I don't want over water her and cause dampening-off). Will let dry before re-watering.
- [2100]: After closer inspection, I think she's looking a bit yellow.
--- Decided to add a bit of grow nutes to the bubbler solution.
--- Added 2ml of Sensi Grow A
--- Added 2ml of Sensi Grow B
--- Solution strength after adding more nutes: 176 PPM
--- PH went up to 6
--- I hope that the extra chelating properties of the 'PH Perfect' solution is enough of a buffer for proper nutrient uptake.
Day 07 - Sunday - 08/09/20 - Total Days: 007
-----------------------------------
- [0800]: Water dropped a bit (mostly due to evaporation) so solution strength was at 190.
--- Checked PH again. Was still at 6, so PH'd down to 5.4
--- Ran the top feed for a minute to wet the hydroton a bit.
- [0915]: Since she's looking perky but still a bit yellow. So decided to up the nutrient concentration even more before lights out.
--- Added 2ml more of Sensi Grow A
--- Added 2ml more of Sensi Grow B
--- Solution strength after adding more nutes: 199 PPM
--- PH went up to 5.8
- [1700]: Checked nutrients.
--- PH: 5.9
--- Solution strength: 202 PPM
--- Added 4ml of Voodoo Juice
--- Added 4ml of B-52
--- PH after adding more nutes: 5.9
--- Solution strength after adding more nutes: 238 PPM
- [2130]: Decided to make a new foliar spray to address the continued yellowing.
--- Started with 500ml of distilled water.
--- Added 3 drops of CaliMagic
--- Added 3 drops of Sensi Grow A
--- Added 3 drops of Sensi Grow B
--- Added 3 drops of B-52
--- Added 1 drop of Superthrive
--- Solution strength: 164 PPM
--- PH was at 5.9 and did not adjust.
--- Gave her one spray.
--- Also sprayed the surrounding hydroton.
[END OF WEEK 01]

Likes
3
Share


@jardinprimitivo
Follow
El sabado 10/8 se pasa temporizador a 13 horas de luz.
El domingo se sacan ramas bajas para hacer esquejes.
Se agrega trampa para mosquitas.


Likes
14
Share


@Reyden
Follow
Penso che questo seme non abbia ereditato il tratto autofiorente perché adesso ho appena spostato a 12/12 e dopo 25 e passa giorni la ragazza non è entrata nella fase di fioritura e non si è nemmeno allungata, invece LSD-25 è già con pistilli visibili e ha la forma sta salendo per allungarsi e formare i siti di fiori, vediamo se starà al passo delle Fast Flowering ma a questo punto non penso 😄💚🌱👋

Likes
13
Share


@Sublyme_ness
Follow
Just look at it. All deformed and shit. Already has a fat stem on it.. maybe the nutes should be toned down? God knows.
4/2. It's like it's growing sooooo many leaves... plain water at end of week. Contemplating defoliating it...

Likes
20
Share

@Hempface86
Follow
She's had a rough start starting off with only one of her coytlions and last week I knocked the pod over and had to put her back together ... i was told from my buddy that it was probably gonna be a slow start with the groedots and this strain and he is definitely right... All good though as I have more weed than I could smoke, so time is not of the essence .. God bless.I hope everybody is doing well and happy going ✌️


Likes
57
Share


@Zurban_Poison
Follow
this week I made the decision to transplant both plants .. the 20 liter pot was already too small .. and it was bad for development and growth ..
two-headed SATORI :-) transplanted into a 50-liter basket for dirty clothes))) I had to buy it because everything is closed !! I could not find a 50 liter pot for plants due to restrictions on Covid-19 .. for this reason this basket became an alternative .. which seemed to me not a bad replacement for AirPot .. it is 35-40% transparent through .. and the air will flow better to roots .. after transplantation, she began to grow oochen rapidly))
I transplanted the fat SATORI into a smartpot 15 gallons .. a little depressed after the transplant, but I think everything will be fine))
the gender has not yet been shown, but as you can see in some of the photos, the hope is that both of them are girls all growing and growing ..
and not a little important factor .. already 4 days as a regime 12-12 .. I want to make sure that they are girls and wait until they show the sex by 100% then with a new transfer to the growing season ..


Likes
14
Share


@AngryBird
Follow
Day42 from seed. Day15 of flowering.
Going to feed today as shes dried out in the greenhouse.im abit worried about moisture levels inside the greenhouse during the night. Especially when it rains because you can actually see the condensation on the inside. Overall shes really blooming.
Day 45. Greenhouse is working a treat. Fed again today. Shes sticky and sweet smelling abit piney and lemony look at the growth
Day 48. Due a feed again as shes dried out again. Taking alot more feed in the tent. Shes bloody beautiful 😍
Likes
5
Share


@Deltatigrou0169
Follow
Bonsoir à tous
Voilà encore de nouvelles photos et vidéos que je viens juste de faire, mes fifilles grandissent bien encore une bonne semaine et elles passent en floraison je pense vivement 😜 j'ai hâte de là sentir et Surtout de la goûter 😋😋😋 je vous dis à bientôt bye bye

Likes
21
Share


@Cali_Grown_420
Follow
Day 78, I switched plant #2 to an all PK diet with FloraFlex Full Tilt. She’ll take up the whole 3.5 gals of nutes by Wednesday. I’m then going to begin my 3 day flush Wednesday evening. And I will chop her on Saturday evening.
I also took a little sample nug off plant #2 just want to compare non-flushed to flushed weed. Also see how much they shrink in size.
Day 79, Plant #2 is on schedule to start flush in 2 days. And I will give her the chop this coming weekend. Going to try a ice flush using frozen water bottles to see if I can help bring out more color.
The other plants #1 and #3 are still a two weeks or so away from being chopped.
Day 81, started the 3 day flush on Plant #2. And took some more photo shots of her buds and a 360° view video.
Day 84, Plant #2 got the chop. Wet weight, before light trim and removing large stems is 760 grams!!! I will update once they finish drying, and then again once I finish the trim and about to jar them for cure.
Plants #1 & #3 are still flowering, probably another week or two before they are ready to be chopped.


Likes
13
Share


@HIAZ_urbanbudfarmer
Follow
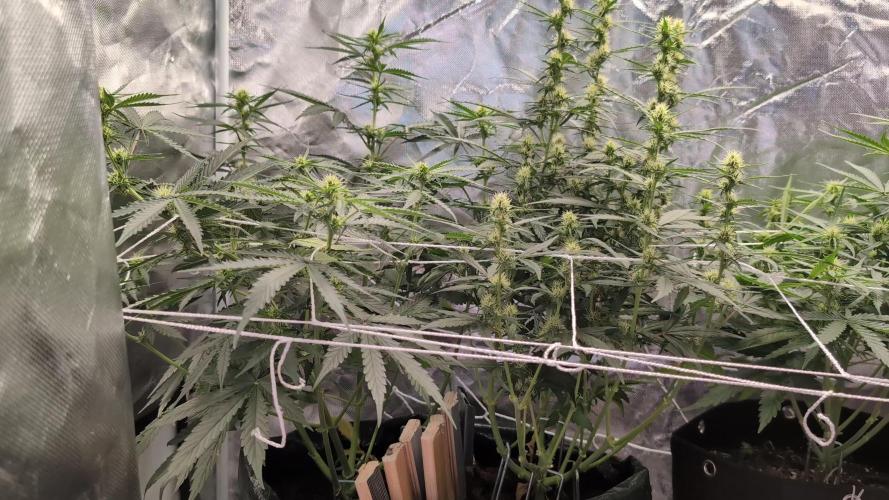
Moved these 2 girls into flowering tent, on 11/1/24. Changed them from 15ltr pots to 20ltr insulated buckets. Gave them a defoliation & lollipoping today .
Processing
Likes
7
Share


Likes
21
Share


@TriangleBotanistProject
Follow
I hit it with a top dress last week after i posted:
Top Dress:
Earth dust 2-3-6 boost 2 cup per plant
Down to earth 4-8-4 1 cup per plant
20g w-20 wollastonite
20g epsom salts
4 cups black kow manure compost
Then i watered with molasses water.
Day 21 is today and resin almost doubled overnight on the acapulco gold. Its getting white out on the leaves and looks so beautiful.
I think the strawberry cough was getting bleached on the tops so i cut it back to about 60% and moved it up and will readjust once it heals up a but. still getting 1000-1200 ppfd evenly
Likes
72
Share


@Sider79
Follow
It was a small auto but also it was grown in a 2 gallon,
Smells delicious, always issues with heat end of summer but i think it still did its thang .
Really lime green covered in trics smelling like berry's 👍
I Will grow again for sure & recommend 👌 thanks Seedsman 😊 !!


Likes
2
Share


Likes
20
Share


@Robin87
Follow
Day 51! Had a week of some high temperatures, had them peaking at 33c, but they seem to of took it. The lemon cherrys will definitely be done first, the smell of 🍋 is beautiful, the 🦍 slowly starting to make its mark, each plant been averaging 5 litres of water every 2 days, thirsty girls, looking forward to the week ahead!
Likes
33
Share


@Titoff
Follow
Début de semaine 8 remplies de surprises, la tente de culture qui avait du retard selon moi par rapport à la deuxième tente, a progressé à une vitesse fulgurante, certes les plantes qui composent celle-ci sont plus petites mais la canopée est plus uniforme et il est à présent difficile de différencier dans ce que l’on voit de qui appartiens à qui tellement chaque plante à des ramifications remplies de bourgeons, un vrai régal pour les yeux et le nez. Elles font rêvées, ces jolies demoiselles...
Ma deuxième tente que je pensais nickel si ce n'est que je n'ai pas su contrôler leurs hauteurs et que je me suis retrouvé avec les pointes qui touchaient la lampe, enfin après avoir tricoté un peu et diriger les branches en les attachants des fois avec de la laine, j'ai pu reprendre un peu le contrôle et m assurer que la lumière transite bien dans toute l'espace de culture devenu une vraie forêt. Et la surprise à 2 semaine de la fin, alors que je comptais commencer mon rinçage, je me suis aperçu que certaines de mes feuilles de la partie basse, comportaient des taches suspectes, après investigations et recherche sur internet, j'avais des thrips ! Etant en phase de floraison très avancés, mes moyens de traitements contre ces nuisibles sont donc presque nul, traitement chimique interdit, me reste donc comme solution le protoxyde d’hydrogène mais très discutés sur la toile ou les avis divergent beaucoup... le savon noir, dont beaucoup de sites présentes des recettes qui peuvent nous être très utiles , les bandes adhésives bleu prévus pour les thrips, et la dernière solution éliminé manuellement a la main...
Après avoir lu et fouiller le net, je me suis tourné vers growdiaries et je me suis rendu sur le chat du site ou j'ai fait la connaissance de chouettes personnes qui me sont venus en aide et je les remercie encore grandement. Pour ma pars face à ce nuisible, j'ai suivi leurs conseils : savon noir plus éliminé à la main et contrôle minution chaque jour. Si je peux les nommes, merci à laBOSSANOVA, bird_of_prey et weedawan pour leurs conseils et leurs sympathies, première demande d’entraide réalisé à merveille. Ce site est juste top.
Likes
20
Share


@Divs_darkroom
Follow
The alien vs Triangle has been putting on some weight this last week. Doing my version of the nectar flush. She is very resinous and is definitely the biggest auto that I have grown. Even her lowers look great. Fading out nicely from the bottom, up.