
Likes
Comments
Share


@Skinnytalls420
Follow
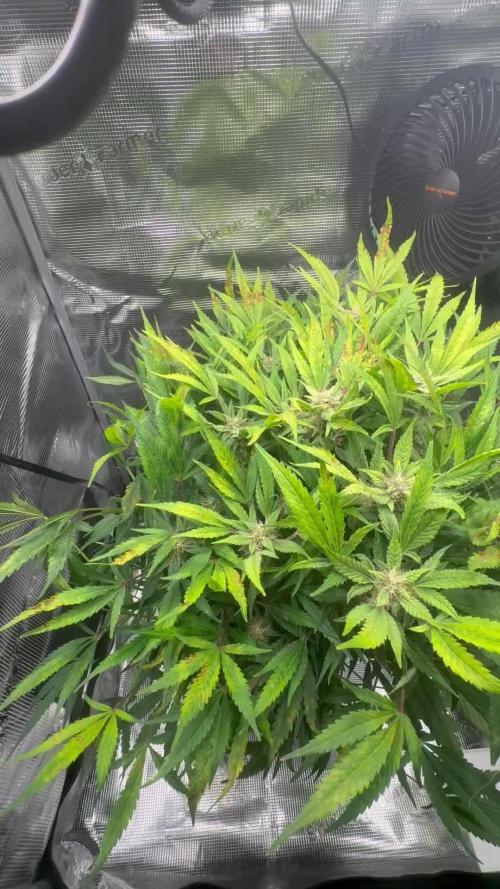
This was a easy grow had some heat issues for a few days during Flower because of a heatwave but everything was smooth and easy going very easy plant to grow


Likes
6
Share


Likes
1
Share


@Pierrougarou21
Follow
Ne domez pas la strcture des fleurs commencent a eclater c est jolie a regarder


Likes
7
Share

@RealGrowDiary
Follow
Day 63
The Plant looks Yellow becuase of some Nutrient inbalanced, but shes growing good under 13/12 Light.
I will switch the last photo in the small tent because of the 12 hours light only

Likes
10
Share


Likes
7
Share


@420DeepGrow
Follow
📆 Semana 4: Primeros Pistilos
Las Auto Pablo Escobar inician floración. 🌸
Los primeros pistilos blancos ya asoman en los nudos, mientras el crecimiento vertical sigue controlado, con ese porte sativo elegante.
Esta semana arranca el plan de floración:
🔹 Master Bloom como base
🔹 Sugar Shot para azúcares y resina
🔹 Enzymes para mantener las raíces limpias
🔹 Silica Force para reforzar tallos y defensa
Se mantiene unos días más el Master Root como apoyo radicular.
Riegos ligeramente más frecuentes, sin encharcar.
Clima estable, luz generosa y sin estrés: el entorno perfecto para esta nueva etapa.
Seguimos creciendo fuerte! 💪

Likes
2
Share


@LokalGrenz
Follow
Nothing serious topped dressed with power bloom Gaia green going to flip in day or two
Likes
17
Share


@Gordy
Follow
Overall I'm very happy with this grow. There were a lot of small buds, and I realize with more skill as a grower I'll train my plants properly and defoliate the lower leaves and branches before they develop into buds. It took me about 5 hours to trim this entire plant down, and I feel a lot of that was because of all of the small buds. Hopefully the only real loss on these small buds is bag appeal. Really this is all for myself so I don't care if the buds are small... this round 😜
The smell in my apartment while harvesting was so nice. It smelled like super sweet citrus weed... beautiful.
I didn't get as much fade as I expected leading up to harvest. I've been too timid with watering and was afraid to give this plant a good flush. Hopefully since she was fully organic it should still taste fine.
I won't be growing a single plant in a 10 gallon bucket for a while, I feel this was just too big for an inexperienced grower. It made watering this thing difficult.
I'll post more updates once this fully dries and cures for a while.
Thanks for following my grow if you have. I had a blast growing this girl and I'll continue to grow this strain for a while.000

Likes
22
Share


@Chumpkilla
Follow
7/1/23 - Day 19 I do water changes weekly. The new weeks start off with a water change. Water changes always scare me, it's the mixing of nutes and balancing the PH. It sounds easy in theory but in practice you want to interfere with the PH asap. But I was able to let the LEAF box empty the water, I filled it up with RO water, LEAF then dosed all my nutes. After that i came in a PH balanced it. (PH balance is something LEAF will be able to do, but there was a bug in the software so instead of having LEAF dose the PH i decided to do it manually for now.
The Roots are INSANE! I bet by time I'm done there will be 1+ gallons of water displaced by the roots.
I almost started cutting her lower leaves at the base, but I decided to let them grow for a bit. If they grow out some more i will be able to scrogg them and then cut the leaves below after they are trained up a bit.
The lights have kicked on and everything looks in order. The plant looks great too, she might be in a small amount of WTF because of all the PH changes but i think the drastic changes were kept to a minimum. She looks happy. As always ill update you tomorrow.
7/3/23 - Day 21- I trimmed some of the lower leaves on the bottom, I'm leaving her bushy still, I won't want to cut any more branches if I can, I need the branches from the bottom to reach the sides of the Scrogg net. In the next couple of days being apple to Scrogg and stretch her while Shes still moldable.
7/5/23 - Day 23 - I added some training lines to some of the branches. I need them to be as spread out as possible going into the Scrogg net.
I'm a big fan of not trimming too much as she grows. I don't mind there being some foliage down below. I will cut as needed if it looks like the lower areas are sprouting too much of the little leaves, but for the most part, I let nature do its thing. She's drinking a ton of water now. I am getting my RO water dropped off by the five gal loads. I just got the membrane for my RO150 unit that I plan on having up and running within a couple of weeks so I can start making my own water.
7/6/23 - Day 24 - I added a picture of my RO water setup. It cannot be set up permanently, so this was a great solution. You can see how I was able to tie my branches down, next time I will drill a few holes on the side of the pot. This is a great solution for anyone looking to Scrogg and manage the vertical height. Also, you can see on the top branch there was some pulling, so much so that it started to pull the plant and it created a small lump. All good but just goes to show how pliable these plants are.
Looking good and I'm excited for the next couple of weeks!
If you are looking for this experience check out https://www.getleaf.co/

Likes
216
Share


@CRiSPrGrow
Follow
Dutch Passion Week 0
DP is a new company for me so let me just say that their unboxing experience is truly fantastic. You get a nice little sealed tin box, loads of nice writing on it , inside a vacuum sealed bag, some cool story about the gens and how to grow on the inside of the lid aswell, it's an absolute pleasure opening these, if you want more pics of this just drop me a message, truly one of the best efforts i've seen for this for sure. I made a 1L solution with just a few drops of my specially made kelp extract, see the video how thick it is compared to store-bought stuff lol, and put some of that in a glass, dropped these seeds in the glass, cover to protect from the light and let that sit for one night to activate the seed. The next day one of these had cracked its shell already, i'm digging these genetics already, let's see how they do ! placed them in a propagator , covered with some dirt to protect from the light, now they're chilling covered, let's see how many sprout ! hopefully all of them ! they came out strong within a day 2 had cracked the surface, the second day they all had cracked the surface, the third day they already started stretching due to my broken propagator, on the fourth day you can see their roots sticking out on the picture, i decided to transplant them early because they were already stretching and the broken propagator wasn't making me happy. fed them plain tap water with a tea spoon once. I do like the RQS propagator i got from Zambeza, and even though it was broken it did make the whole germination much easier, i would definitely recomend the starter kit from zambeza so far, but i decided not to try any of their genetics until next round, which starts soon anyway... see you for next week's update !


Likes
44
Share


@Saint
Follow
Welcome to the first flowering week
Day 29
Growth is promising.
Day 30
Started with a bad news. Main stem, center, got broken due to lst. Lower rope got released, and it made upper one to snap quickly... I noticed quite late sadly. I gotta admit, it's like tradition that main stem breaks whenever I grow 😂 I still tried to fix it back. I don't know if it's gonna work or not, but Jeffrey was through A LOT, and hopefully she will get through it aswell. I will update photos later today
What's most important, hopefully it won't stunt my plant.
Update.
She seems okay.
Day 31
Reviving center top is not working as I see. If it gets worse I will remove the tape and check it out, if no luck, it will be removed.
Added 5 liters of fresh water, balanced out pH and added nutrients.
Something is telling me I will see difference by tomorrow.
Day 32
Added brick under the pot, so when I need to completely drain reservoir, it's gonna be on higher level, which will make the cycle easier.
Did some defoliation, and took photos 2-3 hrs later.
Center did not survive, so completely removed it. Duct taped the snapped open top.
Day 33
All good. She's drinking almost 2 liters +- a day
Day 35
So final day of this week. She is bushy. She is drinking like 2.5 liters a day.
Quite appetite she got with those PPM-s 😀
I didn't defoliate much this week, but I will make a good one next week.
I have no idea if this lights I am using gonna be enough or not.
Let's see, maybe I can get her additional 240 watts?
Let's see ❤️☘️

Processing
Likes
13
Share


@Canadian
Follow
The plants seem to be growing very fast very strong.
thank you for reading I will continue to update have a happy grow.

Likes
4
Share


@Gisbert
Follow
Auch in dieser Woche gehen die Schwestern getrennte Wege, eine wird weiter mit 18-6 beleuchtet, die andere darf nur 12h im Sonnenlicht verbringen. An Tag 37 hat die eine Schwester 250ml Compo Grow Organic Wachstum bekommen, die andere Compo Grow Organic Blüte. An Tag 39 Mal ein Video des Gewächshauses von mir und meiner Frau, ihr seht drei verschiedene Genetiken von Sensi Seeds, ganz links sind unsere Purple Buds zu sehen. An Tag 40 gab es noch einmal Dünger für beide, diesmal einen ganzen Liter.

Likes
19
Share


@Sublyme_ness
Follow
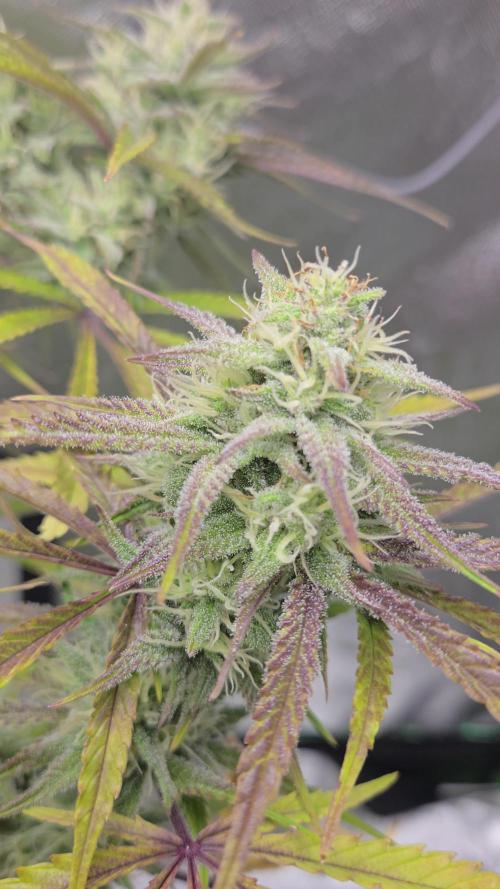
i think another week or 2 on these... *shrug* loving the lime greens and red/oranges. super frosty now. :)
Likes
3
Share


@Firepharmer
Follow
Got the 2 new LED’s set up from futur vert Flora nurse 85 watts each killer bars !! FSG spectrum perfect for seedlings too flower.. working on a sea of green one veg closet to a 4x8 flower tent


Likes
1
Share


@Cannerd
Follow
How ya doing mates?? Awesome week last week - all photos and logs have been added so be sure to check it out! This week is going great so far! I've switched to an early vegetative state nutrient system. As you'll see in the daily logs early this week, this bumps up the micro and grow nutes, and keeps the bloom at 0.6ml/gal. A quick note about last week - I'm unable to update the measurements, but please note that those nutrient amounts are measured in ml/gal, NOT ml/l.
Anyhow, this week I'm just waiting to get my order of diatomaceous earth so that I can make up another batch of soil. I'm still debating between topping this week before repotting or letting them take root in the new pots first. Decisions decisions lol. I think at the very least I'll clean up some of the lower growth to make sure the energy is being spent at the right places. I've been switching back and forth between just LST and mainlining in the past - but I think I really like the ease and cleanliness of mainlining. The draw back is the recovery time they take in the process haha.
UPDATE:
The D.E. has come in, and I repotted the girls this week. I mixed in about 1.5-2 cups D.E. for the whole pot, as well as some Bat Guano and Kelp Meal for micro and macro nutrients to use on dry cycles.
I've also included some photos of the mother plant to give an idea of what's to come! I've just started to flower it, which is the first time for this strain - so I'm pumped!
Day 15:
M.C. 01-21 After reviewing the last set of photos from last week, I figured I'd play it safe and dimmed the light back down to 25% strength. The mother plant is almost ready for flower, and I'm down some tents so she'll be taking this one over shortly. These photos were taken shortly after the lights went off, and they look quite happy! You can see some of the side branch developement in today's photo for MC-01. The pots are fairly dry now, and I've decided to move to the next stage in the nutrient regime. This kicks up the Micro and Grow nutes, while maintaining the Bloom amounts.
M.C. 02-21 A nice top photo for MC-02, you can really see the lighter green in this photo. Not to worry though, as these will darken back to a vibrant green as long as I give her what she needs shortly! The pots are fairly dry now, and I've decided to move to the next stage in the nutrient regime. This kicks up the Micro and Grow nutes, while maintaining the Bloom amounts.
M.C. 03-21 Look at that little leaf poking out from the 2nd node! Some slight yellowing you can see too, but again, not to worry. The new mix should rectify that. I've decided to move to the next stage in the nutrient regime. This kicks up the Micro and Grow nutes, while maintaining the Bloom amounts.
Day 16:
M.C. 01-21 Today is the day - for the mother! I've cleared out some space and moved plants around. So back out to the grow room these girls go! MC-01 seems much better today with the reduction in light. The 5th node is almost flattened out and the 6th coming through still. Most notably though, you can really see the work she's put into the side branches! The branches at nodes 2 and 3 are starting to produce more leaves - great sign! The new growth at the top is also a nice dark green. Added 500ml water to the tray.
M.C. 02-21 MC-02 seems to have liked the adjustment of light as well. She's got nice dark green growth at the top, and the little branches at the 2nd node seem to have a full leaf! Added 500ml water to the tray.
M.C. 03-21 The photo from today is cool, because you can see how close MC-01 & 03 are, even though there's almost a full node difference. MC-03 is stretch out a bit to compete with her sister for the light haha. She's also put some more effort into the side branches that you can see. Added 500 ml water to the tray.
Day 17:
M.C. 01-21 I figured a video would be the best way to illustrate the changes today! They've been back in the grow room under the Veg dedicated light for a day now and seem to be loving it! MC-01 has its' 5th node out, splitting the 6th node, and I can JUST see the 7th node coming in. I don't think they'll get too much more height, as you can see that the side branches are starting to stretch now! She's definitely going to be well tangled in the roots by the end of the week when I hope to repot her.
M.C. 02-21 MC-02 is doing great despite the difference in height! You'll notice the side branches stretching out at nodes 2 & 3. The pots are also still fairly wet at their center, so I'll hold off on water most likely. At least this clone will have time to root more while we wait for the supplies!
M.C. 03-21 MC-03 also has great side branching! If you take a look at the group photo from today, you'll see that both MC-01 & 03 are practically the same height, but MC-03 snuck in there by the stretch haha.
Day 18:
M.C. 01-21 My order of D.E. came in last night, perfect timing! As you can see, her roots have fully reached the bottom, and have started to migrate upwards with the water that's absorbed. The soil was a little dry for my liking, which made things a little difficult/dusty but still no mishaps! Watered around the root-zone before covering with more soil to keep the gnats down.
M.C. 02-21 Not quite as much lateral root growth as MC-01, but still plenty enough for a repotting! Her soil was a little dry as well. Ideally I should have given them a light misting from the top of the soil and let is drip down to keep the dusty bits together haha.
M.C. 03-21 Nice and thick root growth, no issues with repotting, and strong stalk. The extra spacing in the nodes may prove to be helpful during the training phase.
Day 19:
M.C. 01-21 Some nice top shots today as they slowly get acclimated to their new homes. Once I see them push out a new node, I'll probably top them. This is to make sure that they're taking to the new pot without causing any extra stress before they can take it. Today I watered them with an early veg nutrient. I like to stay cautious with nutrient boosts since they're in soil - not to mention the added nutrients from the repotting.
M.C. 02-21 Top shots for the girls today. Not much change, but also no immediate signs of shock either, so I'll take it.
M.C. 03-21 You can't really see it in this angled shot, but the small branch at the second node is coming along nicely! I think the girls are happy that they each have their own tray not haha.
Day 20:
M.C. 01-21 Definitely noticing some slow changes to the top nodes when comparing the pictures from the previous day. The leaves are slowly starting to separate, and I'm not noticing too much yellowing yet which is good. Watered with 500ml water to keep water migrating upwards to meet the roots.
M.C. 02-21 Not noticing much change in this girl today, but that's okay. She's most likely focusing on the root developement instead which I can't complain about! Watered from the bottom.
M.C. 03-21 Maybe seeing some separation in the top leaves, however more notably are the small branches at the 2nd node that you can see better here. Still a bit of stretching with them as they get longer. I might even keep them on for clones later on. Watered from the bottom.
Day 21:
M.C. 01-21 Looks like she gained some distance last night, as the top node is now above the fan leaves, unlike 2 days ago. I'm really getting eager to top them, as I don't want them to waste too much time and energy growing tissue that I'll just end up cutting off. I'll be bumping the nutrients up starting next week to keep the progress going, moving to a mid-veg stage shortly. I'm going to let things dry up tonight for a fresh boost of water tomorrow to give it a dry cycle as the pot is still a bit heavy.
M.C. 02-21 MC-02 really worked hard last night it seems, as she almost completely flatted out her top leaves! I think she's ready for a topping, but I'll let her benefit from the headstart and let the other two catch up and root before. dry cycle for her tonight as well.
M.C. 03-21 MC-03 was busy last night too and is now slowly flattening out the top node as well! Maybe tonight they'll have enough progress to go topless afterall haha. Dry cycle in prep for watering tomorrow.


Likes
62
Share


@Wicked_Stix
Follow
Day 3 for the gutter hoes and they are in the system. I am using a 4 ft section of gutter with caps on both ends. The bottom is lined wit about half an inch of pea gravel for better drainage. Then filled with perlite. A feed line will pump nutrients to the end of the gutter that is elevated about an inch. The nutrients drain back to the reservoir and will be circulated 24 hours a day. This alleviates the need for an air pump since the return water oxygenates the 4 gallon reservoir. Just a cheap nft style setup I guess you would call it.
