
Likes
Comments
Share


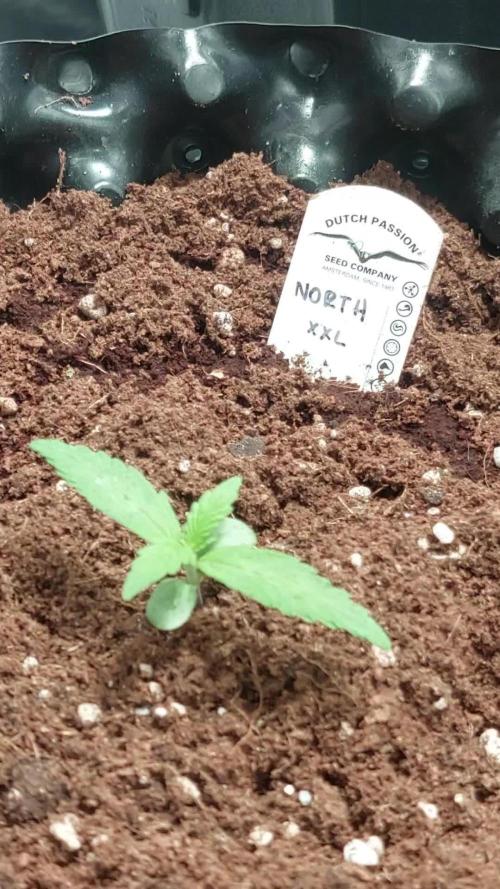
@RegadorDeCactus
Follow
BIGGER:STRONGER:FASTER
#NITROHAZE
#OUTDOORGANG
D115 Han engordado más los cogollos, se ven resinosos-atricomados-nevados y eso que aún no entra mucho en floración. Veo que aún crece y se sigue estirando haciendo caso omiso a entrar en floración y queriendo directamente crecer aún más y estirar sus brazos(todos). Se ve que es muy buena compañera.
En las noches la estoy entrado a un cuarto oscuro para que pueda cumplir sus 12 horas de oscuridad.
D120 (26julio)Avanzando en su floración, intento no regar mucho porque la humedad de noche es mucha y cuesta que baje lo húmedo del sustrato. Ah entregado muchos tricomas, ah comenzado a nevar. Lento pero Seguro.
D121 Me encantan esas fotos nocturnas donde se ve la nieve ❄️🌨️

Likes
5
Share


@thenotillwizard
Follow
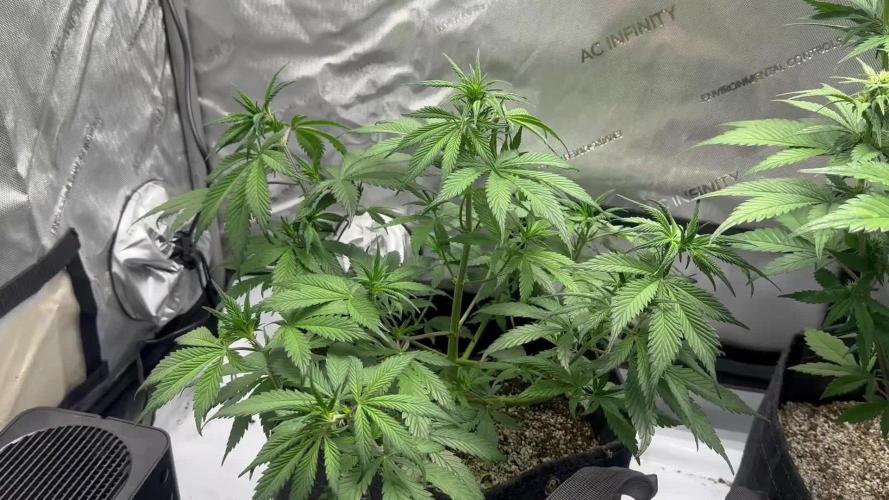
This strain is very heterozygous. 4 seeds were started. The 4 phenos were very different. I saved 2 of those phenos for my arsenal, which is quite exceptionnal. I ususally save just one pheno from a strain.
The Pheno #1 was mainly sativa (75%). Long branches. Lots of fluffy buds. The more resistant to mold, but it has to be with the fluffiness.
The taste was cheesy and spicy, which has nothing to see with the 3 other phenos. Not a single ressemblance with ak-47 parents as well.
It shares the musky undertones of the strain, but nothing else.
That pheno is gone. Not enough potential. Terpene profile was deceiving, just as the cannabinoid content.
The Pheno #2 has more indica in it (45% indica). robust and tall plant with dense heavy buds. No mold resistance at all. Biggest producer.
The taste was earthy and musky with hints of wood.
That pheno is gone. Not enough potential.
The Pheno #3 is my favorite one. It reminded me of the good old Ak-47, with her flowery/sweet/skunky smell and taste. Pure nostalgia!
Tall and quite robust plant with huge fluffy buds coated with trichomes. She grows pretty similar to Lemon Skunk if you know the reference. Great producer of top quality buds. So sticky! In my top 3 sativa for 2 years.
The aroma is very close to the old school Ak-47: sweet, flowery and skunky.
It tastes like sweet lemon on the inhale, with a sharp touch of spicy lavender and earth on the exhale.
IMO, that is the pheno we want to save from that heterozygous strain.
Backcrossing this one would be a very good idea.
The Pheno #4 is just as interesting as my favorite #3. The only issue with this one is about mold resistance.
Crazy compact and heavy budst! One of the most productive I’ve ever seen too. More traits of the Ak-47 in the aromatic profile, but nothing like the #3.
On the structure side, we can immediately recognize the sturdy and bushy structure of Ak-47.
THC content is very high too. I suspect the CBD content to be high as well.
The effect is a mood elevation, with good focus and a deep body relaxation; a bit similar to what White widow does.
The aroma is earthy and pungent. Very skunky and musky.
It tastes very sweet and earthy on the inhale, with hints of skunk on the exhale.
That pheno #4 expresses the best traits of the Ak-47 in its structure, while pheno #3 kept the aromatic profile.

Likes
6
Share


@Cannabis4Crohns
Follow
Started LST on day 14.
Feeding the plant Seaweed extract.
Light set to 50% (approx 48W) and height kept at 12" (30cm) above the plant.

Likes
71
Share


@xmackobox
Follow
Hola!! pues si no me equivoco llevamos 75 dias desde que se empezaron a germinar y estamos en el segundo dia de la 5º semana de floracion.
Son 12 plantas, 9 Mimosa GB y 3 Harlequin CBD de @gbstrains @GbTheGreenBrand @growbarato
Os he dejado muchas fotos de todas las plantas para que veais como se van formando todos los cogollitos. En especial he metido varias fotos de una de las Mimosa GB que ha sido la mas baja y a la vez con mas ramas satelites de todas y en una de esas ramas satelites la cola principal esta mutando como veis en las fotos. Dicha cola es mas grande y esta mas alta que la cola ppal.
He estado leyendo sobre ese mutacion que se llama "poliploide" y bueno muchas cosas que no entiendo jajajajjj pero bien, es bonita y se fumara :D
CORREGIDO XD la poliploidia es cuando le pasa atoda la planta xd, lo mio es fasciacion xd fascinacion es lo que siento :D
La pasada 4º semana de floracion, he regado practicamente todos los dias con nutrientes dado que aprecie una carencia de nutrientes en general, ya sabeis hojas claritas incluso con tonos amarillentos. Creo que se esta corrigiendo y muestra de ello es que no ha avanzado ese color amarillo y ademas las plantas estan todas de punta, pidiendo luz con mucha fuerza, resinando y engordando como nunca.
Gracias. Bendiciones.


Processing
Likes
49
Share


@AsNoriu
Follow
Day 36. Girls are flying !!!
Was comparing my previous dairies here and they look really good, have in mind, two heavy waves of training involved, each time i had a bag full of leaves ...
One more training and i think on day 42 its 24 hours of darkness and FLOWEEEEERRRR ;))
Day 37. Its hard to add anything, because everything going kind off well ;))))
Last night watered them with 6.2 ph, they stop drinking, at least as fast as before, usually my ph is 6.5-6.8, but sometimes i drop to 6.2-6.4 for one feed in a month or so ..SweetSeeds don't like that trick ...
Still leaves praying, loads of new grows after each night , just Kushes overgrew others a bit. Will supercrop them soon.
Day 39. All is going smooth, they drink biobizz nutes feed in one day, phed water in 2, so you would want to overfeed them, Kushes could eat more 4sure now.
Installed last wall fan. Now setup is full...
Kind off ;))) need to find exhaust silent and powerfull 5 inch fan ...
Day 41. This is official - JUNGLES !!! ;)
Change in plans :
Killer Kushes are moved to veg/dry tent, Autos started there will come instead of them. Thinking that way ill lower canopy a bit and make more space for rest 8.
Tomorrow it will be done together with heavy training for Skunks and Cheeses. They will be sent to flower at the end of next week.
Happy Growing !

Likes
27
Share


@TheCannaProphet
Follow
~ FASTBUDS TESTER #2205 ~
Well friends, here we go on another 'canna-venture' together!
The grow room has had a complete remodel and some upgrades done to it including brand spanking new 4x8 and 4x4 tents and a Trolmaster Hydro X controller along with a new Control Panel.
This tester strain is one of six tester strains that FastBuds has graciously provided me with and I'm looking forward to seeing what this girl has to offer when she's grown to her full potential!
One drawback of 'testers' is I have little to no information on it other than its number and that it's an autoflower... 🤪 But, it's ALWAYS a blast growing them for me because not knowing a lot allows me to just concentrate on the essentials: Light, Environment, Water, Nutrients and possibly a bit of LST... not complicated, just basics like keeping a constant temperature and RH in the tent at a level that gives a good VPD, watering when almost dry and maintaining proper light levels according to their stage of growth.
____________________________________________________________________________________________________________________________________________________________________________________________________________________________________________________________________________________________________________________________________________________________________________________________________________________________________________________
~THE SETUP~
~Initially seeds were lightly scuffed, then soaked for 3 hours in 78℉ distilled water after which they were transferred to moist paper towels laid out in a Jiffy Pellet plastic starter tray with lid. Underneath the tray was placed a Mars Hydro Heat Mat with Controller that was set to 78℉ where they stayed until their tap roots emerged.
~Planted into Jiffy Peat Pellets that were hydrated with distilled water warmed to 78℉ with a 7.0 ph.
~Once roots emerge from the Jiffy Pellet they're transferred to their fabric pots.
~Grown 100% organic in a 4g Gronest fabric pot and a 3g fabric pot by Wraxly filled with Mother Earth 70/30 Coco/Perlite medium and initially amended with Dr. Earth 4-4-4 / Earthworm Castings / Dr. Earth Flower Girl 3-9-4 and Coast of Maine Stonington Blend Organic Plant Food 5-2-4.
~19/5 light cycle for the entire run with supplemental UVA added during flower. Lights are controlled by a Trolmaster Hydro X controller set for a 15min Sunrise/Sunset simulation.
~Top dressing every 3-4 weeks with slow release dry amendments and Earthworm castings.
~Straight water ph'd @ 6.2-6.8 when needed and bi-weekly Compost Tea's.
____________________________________________________________________________________________________________________________________________________________________________________________________________________________________________________________________________________________________________________________________________________________________________________________________________________________________________________
Weekly Updates:
12/1- I soaked both seeds for 3 hours in 78℉ distilled water after which they were transferred to moist paper towels laid out in a Jiffy Pellet plastic starter tray with lid. Underneath the tray was placed a Vivosun Heat Mat with Controller that was set to 78℉ where they stayed until their tap roots emerged which usually takes roughly 24 hours. These seeds however didn't follow the rules and took their fine time to pop out their tap roots.
12/3- Today their tap roots were about 1/4 to 3/8" so at 11 am I transferred them into Jiffy Peat Pellets that were hydrated with distilled water warmed to 78℉ with a 7.0 ph using a tine off of a plastic fork as a 'mini trowel' to make a hole in the pellet and to gently cover the tap root, leaving only the seed head slightly exposed. This method accomplishes most of the initial work the seed has to do by eliminating having to orientate itself, push it's root down and head up. By 10pm the #1 seed had her cotyledon leaves opened ...waiting on the #2. 🧐
I was concerned that one of the seeds may fail as she took so long to germinate so I soaked two more as an insurance policy. Naturally, BOTH of the second set of seeds popped their tap roots within 24 hours. One of the first round seeds failed to germinate which left me with three viable seeds, one in a pellet already and two showing tap roots. I planted both of the second round seeds into the same peat pellet that I had previously soaked.
12/5- Well this is Day ONE for the #1 FBT #2205 and I anticipate seeing one or both of the second round poking their heads out real soon! I'll keep them in the covered/heated Jiffy tray until I see their roots beginning to emerge from the peat pellet, then I'll transfer them gently into their respective fabric pots. The #1 will be going into the 4g Gronest pot from FastBuds and the #2 will reside in a 3g pot by Wraxly, which I'm trying out for the first time.
12/7- Yesterday I checked the #1 tester and she had roots starting to emerge from her pellet so tomorrow I'll transfer her into her 4g Gronest pot.
The second round seeds finally made an appearance and I decided to yank the smaller of the two keeping me from having to stress them when I separated them.... this will be Day One for the #2! She looks really healthy and I'm confident that she should be ready to transfer into her fabric pot in the next couple of days!
😎💚 Thank you for checking out my passion in life! Please visit as often as you wish and I hope you enjoy this journey as much as I know I will! Grow Strong! 💪😎🤙


Likes
105
Share


@Natrona
Follow
Frostbanger Plants 1-6
Week 9 May 18– 24
FLOWER 5
Nutrients : 3 gal
GH Micro 20 ml
GH Gro 10 ml
GH Bloom 30ml
CalMag 15 ml
Recharge 10ml
Green sensation 15ml
Power buds 7.5 ml
5/18 PH 6.67, PPM 935, temp 68.5 1 ltr each
5/20 PH 6.67, PPM 1330, temp 68.5 2ltr each
5/23 PH 6.6, PPM 1570, temp 68.5 2ltr each
5/24 pics & vid
Since all 6 gals are getting frosty, I did some trichome pics. The statistics on Frostbanger indicate 50-day flower. Pics show mostly clear and milky.
There are a few with amber trichs and many orange pistils indicating maturation. At least 3 more weeks for maturity on these gals.
I continue manual control of the environment and using 3 circulating fans and the 4” exhaust vent from my 3x3.
I have the AC pushing air in and the exhaust pulling air out. This creates a neutral pressure tent environment-neither positive nor negative.
It looks like growth has stopped and plant height has been reached. Now is the time for buds to fatten and frost up. All 6 of them are short remaining less than 3 ft. They range from 15 to 31 inches. #4, 5 &6 are showing some fade, particularly #4.
Upon opening the tent, a melon smell comes off the buds if I get close, and more stickiness was observed during the process of defoliation. They are living up to the new strain’s name. #5 is the frostiest followed by #2. Wow week 3 of flower and that much frost already. Before FastBuds announced the strain name and characteristics, I was disappointed that FBA2502 could be an indica sleepy strain but the universe provides what you need at the time. The new strain profile indicates a whopping 29%THC with mainly sativa uplifting, euphoric, social effects with sweet fruity flavors which I love and enjoy. In addition, I recently bought a dap press and this strain is frosty and resinous. She will be great to press for live rosin.
FBA2502 is FROSTBANGER. Meet Frostbanger Auto, an autoflowering and Indica-leaning hybrid packing a staggeringly high THC content averaging 29%, making this one of the most potent strains on the market. It was created by Fast Buds through crossbreeding Gorilla Glue and Chemdawg, two equally iconic strains. Growers must know that these difficult-to-grow plants will pose specific challenges in terms of environmental control and nutrition, making them best suited for cultivators with some experience under their belt. The flowering cycle is short, averaging only 50 days, and yields are usually around 300g/m². The Frostbanger Auto flavor and aroma are both mouthwatering with a delightful combination of sweet, fruity, and flowery notes. The high is mainly Sativa-driven with uplifting and happiness-inducing effects that lead to euphoria and a general sense of well-being. You might feel sociable and talkative, but too spacey to say something. Following this surge of energy comes a deepening sense of relaxation, leaving you sedated and completely at ease with the world. Due to its potency and these long-lasting effects, medical patients hail Frostbanger Auto for treating chronic pain, stress, and even depression.
Measurements:
#1 15”
#2 20”
#3 17”
#4 30”
#5 31”
#6 24”
P.S I added a no churn ice cream recipe in week 4 of Natronas recipes. It is easy 3 ingredients. I bought Mango puree instead of fresh and reduced that to reduce water content. Try it. 😋
Your likes and comments are appreciated. Thanks for stopping by.
Growers love 💚🌿
💫Natrona💫


Likes
567
Share


@Rock_n_Roll_Randy
Follow
This grow with the TSW2000, FC4800 and 8x8 Grow Tent has come to an end🤘🤘. I'm so happy with the results mars hydro has done👍. Best lights you can get in my opinion and TONS of other people agree with me on this too👍. I always say mars hydro gets em frosty and their lights DID get em nice and frosty and the buds are so tasty and smell awesome🤘. I trimmed up 6 plants so far. Got 9 more to go. And it seems like I get a 1liter Mason jar per plant and is about 2 ounces per plant. Some are a bit more than 2. Not a huge haul per plant but I'm still very happy with it because the quality is amazing. I will never want to use anything but MARS HYDRO. Extremely satisfied with the entire grow with mars. The weed quality is very good and controlling the heat was simple because they don't get that hot. The lights were very easy to setup and so was the tent. I STONGLY recommend any products from Mars Hydro. You will not be disappointed 👍
Thanks for following my grow and good luck to all my friends and remember to have fun with your grows🤘🤘 rock n roll a joint everyone🤘🥁🎸
FOR EVERYTHING MARS HYDRO VISIT:
www.mars-hydro.com
PROMO CODE: rocknroll
VISIT THE ALIEXPRESS STORE:
@marshydro_aliexpress2
Instagram: @marshydropenny
https://youtube.com/channel/UChU5ZWwNi-DvnO3oWVU3ceA
Thanks for taking the time to read and check out my shit🤜🤛
GET THE MAX FROM MARS👍: Welcome one of the newest members of the Mars Hydro family🤜🤛🤘. The Mars Hydro FC 4800 480W LED Grow Light can accommodate up to a 4' x 4' area for flowering. It has OVER 2000 LED chips consisting of the best selling Samsung LM301B diodes which has a Luminous Efficacy of: 220 lm/W
0.2 W, 3 V mid power,
Osram 660nm Diodes, Infrared light and UV LIGHT👍. It boasts the incredible efficiency of 2.8 µmol/J, maximum 2.5gram yield per watt with 30% higher Average PPFD. This High-intensity spectrum is beneficial for plants at all stages - from veg to bloom, and creates Big dense Buds👍. achieve 50% higher yields & quality compared with the old lights! Only consumes 480W for 4x4ft personal grows, and 3x3ft for commerical grow. It comes with a dimmer and daisy chain function with a maximum of up to 15 lights, the master light controls the rest👍. Wide 6-bar design offers even & wide canopy coverage and can maximizes your grow space. slim 180° FOLDABLE DESIGN... YES I SAID FOLDABLE🤘🤣 , making it compact and easy to install, it's IP65 WATERPROOF and will give you no worries while growing in a humid environment and makes it a flexible high performance commercial grow light for enormous SUPER FROSTY yields.😛😛😛. MARS GETS EM FROSTY BOYS👍
AWESOME HEAT DISSIPATION: The Low energy consumption FC4800 growing light has 6 passive-cooled bars and an aluminum heat-sink a removable driver you can upgrade later or have it outside your tent. with zero noise you can save up to 50% in your electricity bill compared to HID's or HPS lights!
It also has a removable driver so you can upgrade it in the future or have it outside your grow space for better heat control in your growroom👍
UPGRADED FULL SPECTRUM: Yield Max Spectrum with enhanced red (Top-Bin Samsung 3000k-5000knm, Osram 660nm Deep Red), speed up blooming & fruiting, perfectly suited for full-cycle growing. The FC4800 LED grow lamp was born for Big Buds, perfect for commercial, grow tent, grow room, hydroponics, and all soil grows.👍
THE BEST SAMSUNG DIODES: THE FC4800 has Top Bin genuine Samsung Osram Diodes, combined with remarkable 2.8 µmol/J Efficacy, 30% higher Average PPFD, 50% less energy consumption, to maximize your yields. They give you a TRUSTED 3 years warranty 100% Satisfactory guaranteed!!!
The MARS HYDRO 8x8 Grow Tent interior is made of a unique diamond design mylar which is highly reflective. (Other companies mylar and reflective rate is as low as 50%, and it won't provide efficient light. They use thick 1680D oxford canvas, and being double stitched, it is tear proof and perfect for locking in the light. Their grow tent keeps 100% of the light inside the tent and helps your plants absorb more light. EXTRA-THICK material means No light leaks or rips at all.👍
Strong Stable metal corner adapters and poles are the trustful supporters of the tent. It's very sturdy, neither rusting or paint flaking off. quick and easy tool-free setup. They use heavy-duty metal zippers, with double layer black lining, by far the best on the market which creates a light-proof seal.
The Easy observation windows are made by double layers of cloth. Observe the growing conditions of your plants without opening the tent and avoid disturbing your plants. The observation windows also serves to dissipate heat and ventilate the air.
The tent includes 2 removable waterproof floor trays to hold soil and water. The removable tray can be taken out to wash easily.
They guarantee the grow tents are easy to install even if you've never done something like this before. Clear Instructions and no tools needed! They also offer 30-day unconditional refunds for quality problems. Just contact their friendly 24 hours customer service 👍
Likes
6
Share


@pzwags420
Follow
Week 6 went well. The buds are putting out a second wave of pistils and are starting to fatten up. Jilly is starting to smell more and put out more trichs on sugar leaves. She smells very sweet and fruity so far.

Likes
Comments
Share

@deseed_uy
Follow
Esta semana las molesté bastante, estuvieron afuera dos dias mientras limpiaba toda la carpa pero ya quedo todo instalado y controlado.
La black domm quemada se recuperó, la daikiri sigue estancada.. puse a germinar la ultima q quedaba y no salió asiq supongo fue falla del pack. Las demas vienen hermosas y ahora se van para arriba con todas las condiciones lo mas posible ajustadas, lo unico malo es que sigo sin medidor asiq estoy regando a ojo de temoeratura y ph


Likes
3
Share


@Hempcules
Follow
WEEK 4 (Day 22-28)
These Runtz are growing really well. I'm thrilled with this Barneys genetics.
I applied two different topping techniques to my two plants. The larger plant was topped once after four nodes to create eight main shoots, while the second plant was topped at the second node to create four shoots and then topped again to reach eight. That's it for cutting now. I think the plants are handling it very well and will continue to thrive beautifully.

Likes
3
Share


@GrowInBavaria
Follow
Tag 34 - 03.01.2025
Es gibt keine Veränderungen.
Tag 40 - 09.01.2025
Es wurde etwas enlaubt, die Pflanze wächst weiterhin sehr kompakt.

Likes
1
Share

@GrowdadGage
Follow
One plant is entering flowering stage beautiful while my one sad stunted plant continues to struggle. Lots of lessons learnt with this grow, was my first time trying out HP Pro Mix and I’m definitely enjoying it but have some notes for the next round of seedlings I can improve upon.
Excited to see how the buds turn out on both these ladies. 💚 Happy growing everybody!
Likes
14
Share


@danwho
Follow
8/14/2024
Topped plant A due to the node spacing and side branching. Hopefully, this will cause this pheno to bush out a bit more.
Intentionally FIMed plant B due to the short internodal spacing and difficulties getting a clean cut for a topping. This plant is already quite bushy and condensed - hoping that it will respond nicely to FIM.
Water was not changed over entirely, only added one fresh gallon of nutrient water with additional nutrients added to step up entire system to close to 575-600ppm. Both plants are looking great, root zone needs some improvement with water temperatures. I have ordered a larger water cooler and hope that will help reduce the water temperature inside the tent. Although water temps are a bit high in the buckets, the roots are flourishing and are pearly white!
8/16/2024
Noticed Plant A is showing signs of potassium issues. Added one fresh gallon of non-nutrified water as I was unable to complete a water change.
8/17/2024
Pumped out 5 gallons of nutrient water and refreshed with 5 new gallons. Both plants look to be responding well to the water change. The resulting PPM was 650 after allowing time for the system to reach equilibrium. Extra insulation on the buckets is helping to maintain lower water temperatures throughout the day with lights on in the tent. The environment is pretty well dialed in at an average 1.2-1.6 VPD.
8/19/2024
Replaced water cooler with one that is twice the size and rated for 15-gallon systems. Running reservoir temp target at 18.5 C. Conducted some minor LST on the bushy plant (Plant B) to get the middle opened up a bit more. Did some leaf tucking on plant A to get the lower branches some more direct light.
8/20/2024
Both plants are looking phenomenal. There is a very slight cannabis smell in the tent at all times.
Likes
21
Share


@gr3g4l
Follow
Esta semana mostraron sus primeros pistilos.
Aprovecho que subió la humedad en el exterior y que mostraron los pistilos para quitar el humidificador , ahora me molesta dentro del armario xd
seguimos doblando alguna rama


Likes
17
Share


@Chucky324
Follow
Hello. This is the end of week 7 and the beginning of week 8 of flowering.
I'm a bit bummed about this grow. I've read that you just need to force a plant to flower, that's 12 hours of light and 12 hours of dark for the first 3 weeks (I had a tent inside the greenhouse) and then put it outside and it will continue to flower. I thought that was amazing, so I wanted to give it a try. Well, here we are at the end of the 7th week and it looks like the plants are going back into veg. Last year I didn't do up the tent for the last 2 weeks and everything was fine so I thought I would give this keeping it open after the 3rd week a try. Now I know. I can always turn it into hash, maybe dry ice hash.
Here's another reason I'm bummed about this grow. I've got spider mites. I'm doing my best to knock them down with my hypochlorous acid. I'm spraying twice a week, but had some yellowish looking leaves, I reread the article (I put up a pic of it a few of weeks ago) and found I had to rinse the indoor plants. So after I sprayed the 1/2 strength acid I waited 10 minutes and rinsed with water. Today I can see more mites than when I sprayed before. So next time I'll wait till the 1/2 acid mix is dry before I rinse the leaves and see if that knocks them down more.
If you don't try new things you don't learn. That's what this grow is about, to see if the plants can still keep flowering at my latitude and now that I have mites, to see if the hypochlorous acid will work without killing the plants. Yes, I'm 60 something and still learning. 😃
Be Great.
Chuck.
