


Likes
61
Share


@Esoteric_growing
Follow
They have stretched a lot more than I anticipated for the first week of 12/12. Very happy so far and have about 19 cuts ready to test the strain in coco in my spare two grow chambers. I have numbered all the cuts in relation to which plant they came off so I will be keeping only the best two out of the 5 plants.
Very happy with the growth structure so far, I normally top and train or scrog my canopies but want to just let them go to see their natural growth structure. In the next 5-12 days I will swap out the metal halide for my sodium bulb depending on how much they stretch.

Likes
8
Share

@JoLatto
Follow
Week 9 - Apple Strudel Auto 2-3 weeks left these autos are bigger than anything I’ve grew. Buds Are super frosty and extremely Gassy. To be honest wasn’t even gonna go with this strain but something just kept telling me go with it. Terps are Freshly Baked Apple Pie Gas is coming in extremely heavy. I’ll update next week good luck everyone!

Processing
Likes
24
Share


@MadeInGermany
Follow
Hi all 🤗.
Runtz did the topping very well :-).
I think I will top her 2 more times before she finally goes to the flower tent
She grows nice and bushy, 😍👍.
This week will be topped again.
I wish you all a nice week, stay healthy 🙏🏻 and let it grow 🌱
Type:
Runtz
☝️🏼
Genetics:
Zkittlez x Gelato
👍
Vega lamp: 2 x Todogrow Led
Quantum Board 100 W
💡
Bloom Lamp : 2 x Todogrow Led
Cxb 3590 COB 3500 K 205 W
💡💡☝️🏼
Soil : Canna Bio
☝️🏼
Nutrients : Canna bio
☝️🏼🌱
Water: Osmosis water mixed with normal water (24 hours stale that the chlorine evaporates) to 0.2 EC. Add Cal / Mag to 0.4 Ec Ph with Organic Ph - to 6.0 - 6.3
💦💧

Likes
2
Share

@Hou_Stone
Follow
Last week of bloom,
After watering the last weeks whith only water I have let the soil getting more dry and after 57 day of flowering i cut this ztrawberry and will let her dry in the same tente where she grow. See you soon for the harvest report!
Have a good day everybody! 🌞

Likes
6
Share


@KivzBudz
Follow
Overall I’m very happy to end my first run like this. I think I made a pretty decent job and I can’t wait to try the finished product after curing.
Happy growing everyone! 🍀🌱

Likes
12
Share


@Hawkbo
Follow
They are all putting on weight quickly and taking shape very impressed with all of them and they prob have another week or so before flush/harvest.
REMEMBER , IF YOUR SHOPPING FOR GEAR YOU CAN USE THE CODE “BANGDANG” FOR 10% OFF YOUR ENTIRE PURCHASE FROM ANY OF THE FOLLOWING COMPANIES.
@greenbuzzliquids
@rainscience_growbags
@gorilla_grow_tent
@growlightscience.led
NEW* @Rocbudinc Seeds on his website *
*****Gorilla grow tent discounts extend to all companies affiliated with grow strong industries which include..*****
@super.closet
Lotus Nutrients
Kind LED grow lights
Likes
142
Share

@MadeInGermany
Follow
Hi everyone 🤗
This week the two Kosher Tangie Kush were harvested by Amsterdam Genetics 😍.
extremely good phenotypes. The blue cheese pheno 2 and 3 were placed in the darkroom according to the video.
These were harvested yesterday, from which the pictures will come in the next update :-).
All others need 2-3 weeks.
I wish you lots of fun with the diary, stay healthy 🙏🏻 and let it grow 🌱


Likes
15
Share


@Venabr96
Follow
Começando a semana 4 com o lollipopping para dar força aos tops buds. Planta com otimo desenvolvimento. Adcionarei 6ml.l de mel para a cura dos cortes feitos.
4 dias depois de fazer o lollipopping a planta começou a desenvolver polem.


Likes
36
Share


@pifflestikkz
Follow
Day 85
Day 1 Flower
26/07/24 Friday
Big feed today full 5L a little run offusimg de-chlorinated water pH 6.
So we are through her first transition week.
Starting to see sex pistils forming at end of last week.
Picture and video update ✌️💚
Day 88
Day 4 flower
29/07/24 Monday
Just de-chlorinated tap water pH 6 today, full 5L with just under a 1L run off.
Day 89
Day 5 Flower
30/07/24 Tuesday
De-chlorinated tap water pH 6 today but I'm adding in Plagron Power Buds AND Plagron PK13-14 only 5ml each to 5ml water.
It says to use on every irrigation from early flower so here we go. If I start getting burns I'll cut out a few advanced nutrients extras and go again from there.
She is just ridiculous, robust, never stresses, healthy and just wants to throw arms out everywhere 🤣💚
Day 91
Day 7 flower
01/08/24 Thursday
End of week.
Another feed today using de-chlorinated tap water pH 6, there now taking 3L every evening.

Likes
8
Share


@CanarianGrow92
Follow
Already, this is going to be the last week, next week im switching to 12/12 lets see what this marshydro TS1000 can do, i want to see if i get the same results as my LEC, if thats the case its a real winner as its half of electricity costs, and electricity starts to get expensive as every indoor grower knows 😁😝
As expected some clones are bigger than others but thats normal, some clones came out like 4 or 5 days before others, but i dont care, i also have some other bigger plants around the clones, i have some older biscotti mintz clones also in there and some other plants
Likes
9
Share


@chapothegrower
Follow
Photos 2 days ago there were some defiences you could see them on lower leafs but added them strong nutrient mix and now they growing very vigorous, made some topping a few days ago next update soon they will grow dynamic now everything is good organic grow 💪👌 they also closer to the light now as soon as they are bigger😍 i will train them more in next few weeks lets go!!

Likes
7
Share


@100Trillion
Follow
Week 3 of Flower we focus on Defoilation. This really is going to test the genetics response to extreme stress. Performed a 5 day Schwazze to minimize stress instead of ripping off most leave in one day. Plant seem to have reacted well so far. This technique has really opened the canopy and expose many bud sites. Preparing for a top feed at start of new week.

Likes
7
Share


@Epwood
Follow
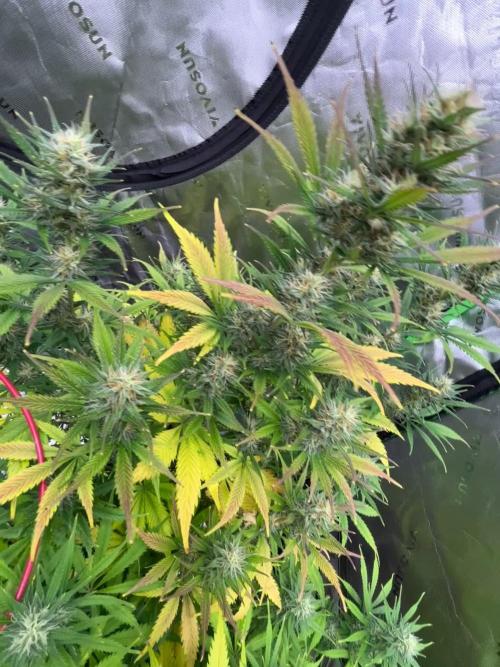
After checking the grow yesterday (2021-01-01), I noticed some of the yellowing I've seen in previous grows that served as early warning signs for an impending grow failure.
I checked my reservoir and found it was down to about two gallons left and the pH had shot up to 7.1. I then checked my AutoPot runoff in the tray and found it was at 7.2. I then took my Remedy CBD out and flushed it with 10 gallons of pH 5.8 tap water until the runoff measured about pH 5.8. The plant has been returned to the tray and the pictures you see this week are the following day and I'm continuing to measure at the tray more closely now as well.
I've continued to pull off some of the larger yellowing fan leaves but, other than that, I've kept this grow as simple as possible. The flowering stage is continuing as expected and the pictures show about how far along we've come.


Likes
10
Share


@BodyByVio
Follow
This week I Supercrop all the plants and spred them out over both lights. One more week of Veg and they are ready to explode
Check me out on Instagram @growmorestressless
Processing
Likes
10
Share


@GrowerGaz
Follow
A straight forward week as the autopots are doing the watering and the plants are growing fast and strong. I have given them a KNF foliar feed today , see video for content. Two of the Radio Z ate looking quite similar. Radio z 2 is a beats real thick stems. Looks male .
@lumatekeu attis 300w is set at 80% , have added a Inkbird hygrometer. Which I love .
Likes
22
Share


@valiotoro
Follow
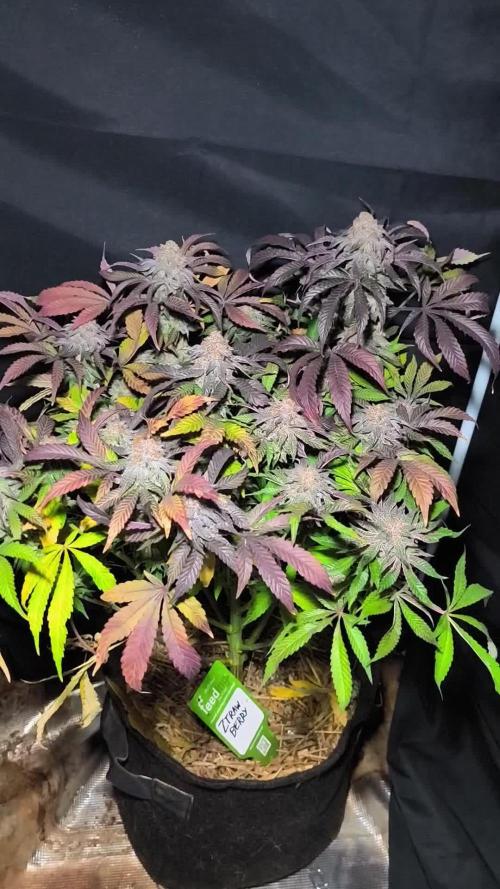
Sooooo impressed with the size & quality of the buds😳
Super dense & sticky✂️
The smell is sweet fruity mix berries🤤🍓
Likes
22
Share


@J_diaz420
Follow
Muy olorosa genética, me encantó mucho, termino de engordar al 100% los cálices absorbiendo los postilos de las flores y eso para mi es muy importante, muy agradable al fumar con un efecto inmediato apto para el día a mi pensar ya que su efecto se nota mucho pero no es para dejarte tumbado si no que con mucho ánimo en fin muy agradable para conectar tu mente a la música que es algo que me encanta al fumar, en fin muy fácil de cultivar, crece mucho así que procura dar poca vegetación, creo que yo me excedí un poco, y no olvidar alimentar a tiempo ya que beben mucho.
Realmente contento con esta experiencia
Muchas gracias por pasar y felices cultivos!!