The Grow Awards 2026 🏆 


Likes
Comments
Share
@A1RCRYPTO420
Follow
Gro buckets held great while I was away! Top soil was a lil dry but the plants thrived through the bottom feed they got. Smoothie is a lil slow to the party, not showing strong signs of growth.. Will be brewing a tea for them to give in about 24 hrs. I see signs of pre flower on most, will top dress with bloom and girl flower power.

Likes
18
Share
@Leonweed10
Follow
comenzando un nuevo cultivo sog desde semillas,sera en espacio 120x120.

Processing
Likes
21
Share
@LittleBigTrees
Follow
I harvested just under an ounce from each of the two plants grown in 4ltr pots.
Likes
6
Share
@blackhole
Follow
The auto flowering have started to flower...The feminized ones are growing very fast.

Likes
2
Share
@ao_grows1978
Follow
Week 3 for the solo is officially complete. She's been growing with no trouble. Root development has been excellent. As you can see, I decided to mainline. Seeing as she's in a solo cup, I'm not too worried about stunting. I'm horrible at measuring the water intake, but the cup needs to be watered daily. It's as lite as a feather everyday.
Likes
17
Share
@Budophile
Follow
9 plants, 5 different strains, 3 different seed banks.
So yeah, some background info.. I was going to go 6 girls in 15l pots at first for even distribution but fucked up the germination process sticking them seeds eagerly straight to soil and some didn't germinate and some took almost two weeks to push above soil so I popped a few more and here we are. Oldest ones are about 6-7weeks old and the rest are around 3-4weeks.. not sure about exact days since I wasn't planning on running a diary but then again figured it could be helpful IF(when) running into problems. Been mainlining/topping/defoliating/binding when necessary to keep them at pretty much the same height before flipping the switch. First photos shown here are from the last session of high stress training.. now we're just playing the waiting game for them to recover and then it's off to flowering time baby!
This week is the first time dem bitches have been getting the full recommended dosage of Bio-Bizz nutrients I still have available (bought the "try-pack" for best bang for buck.) Gonna run out of root-juice and bio-heaven after next watering but think that's ay-ok since we're going to flowering anyways and in the last grows haven't really seen any notable difference using the insanely expensive bio-heaven. Fucked up topping few plants taking "wrong" nodes being way too drunk but we'll see how it goes. Also start of this week is the first day I hanged Viparspectra V900 to accompany Mars Hydro TSW-2000 which has done an amazing job so far!😍😍 Using only the blue grow spectrum on the V900 for the recovery since I know from experience the bloom mode runs hot as fuck and I still need to figure out how to improve the airflow in the cabin without ruining good nights sleep.
Day 3: After last trimming session
Girls are recovering quite nicely. Watered today and just like I suspected ran out of root-juice and bio-heaven, the runtier Sunset Sherbet didn't get to taste any of that sweet sweet nectar:( Everyone took about the same amount of water (2l) with pretty much no runoff so boy were they thirsty. SS runt was having a little bit of trouble drinking since the soil was way too dry and had become a bit hydrophobic but with patience took it all like a champ. Had to remove some of the bindings to avoid snapping the stems but looks like they're still at pretty even height. OG Kush has a trunk thicker than my thumb already although she's less than 20cm high!
Ditched the tower fan from taking up too much space and replaced it with Garden Highpro oscillating clip-fan which is like a frigging hurricane even at lvl1! Lets see how it affects the temps which are quite high after adding the Viparspectra: topping at almost 30c during the last hours of day and I'm not even using the red blooming leds yet!😐
Still giving them the full 4ml/l of bio-grow every feeding but I'm thinking about cutting it back a bit since ran out of the snakeoils and not sure yet does that affect the uptake in a bad manner. Been also foliar feeding them w/ bio-grow every second day with 1-1.25ml/l to keep the humidity at around 60-70% all times and they seem to like it, leaves are nice dark green colored.
Realized just how tightly packed the tent will be so I'm going to put them into flowering as soon as they have at least 2-3 healthy nodes per branch so guessing at around start of the next week. Probably going to defoliate most of the leaf mass day before flipping the switch.. might even get excited enough to try schwazzing 1-2 plants since I've never tried that technique before and I really need to promote some airflow.
Day 4: Well that lasted long.. The fan cut its lead wires loose while oscillating because the cable clamps were set too tight straight out of the package, not giving it enough slack to turn full cycle.. Goddamn it.. Seems like an easy fix but got no time to start tinkering before going to work so I'll get it replaced by tomorrow and hope I wont get a dud made on mondays. Cranked up the inline duct fan a bit to compensate the loss of airflow and temps are staying in the 28C range but there's definitely some hotspots forming.. hopefully that leads to nothing too serious.


Likes
21
Share
@MrWolfe
Follow
Last few weeks have been fantastic and I can't wait to see how they all respond to the first big stress event. Topping any sites that are at canopy while letting the rest develop but keeping the best 6 primaries and keeping it nice and simple.
3/9 ok so I kept more than 6 on these, I think there's one of them that has 7 but the rest all have 8-9 main branches, if they were within 3-5" of the top of the canopy I just kept them, that much variation will even itself out with just some slight bending.
3/12: So I've topped all primaries once now, should be 14-18 new tops on all of these, I'm hoping to top again next week assuming they can keep growing 1" per day, that should give me an excellent structure for a big fat canopy in the flower room.

Processing
Likes
14
Share


Likes
87
Share
@beenSlayin
Follow
What I thought to be a cal deficiency at first glance appears to be rust fungus or leaf septoria, but nothing rubs off of the spots, which confuses me. I freaked out and tore the hell out of the plant my buddy left on my doorstep, stripped all the freakin spotted leaves. I'm hesitant to toss it, dont know why, I did notice spots on 2 other plants, barely, bastard being one of them. Ill be keeping a great hawk eye on them, ready to pluck anything I notice with a rust spot or toss that one plant out of there if I see too much appear. I need to grab some neem oil as well. Maybe I shouldn't run the tent sealed anymore, as I think it could be a big reason for the fungus. I never let humidity get over 60 and I had pretty decent air movement, but they are squeezed in there. I'm freaking scared.
Nothing rubs off these spots. My run off PH has been low which makes me think calcium still. Guess I'll do some big-time flushing.
Flushed all with 6.8 water until run off reached 6.5, roughly 10-12 gallons each. I'll l feed them tomorrow. Usually, I flush around day 45. I was trying to see if i could get away without doing so, with that scrog n all.
Whew, I was trippin out there there, after reading n shit I got thinking the worst, should've stuck with my original diagnosis. I'm sure they'll be ok.👍
Zipper broke off the tent the other night, so it's now "sealed" with a red blanket🤣
Likes
51
Share
@GreenHouseLab
Follow
Transplanted 7 days ago they are back into high gear. Two different phenos is nice to see also nice to be back in flowering with colder weather on the horizon. Regular Gaia Green amendment mix of 4-4-4, 2-8-4, kelp meal, EWC & Glacial Rock Dust. No issues with Mg, finally solved with the rock dust.
Plants looks out of shape ever so slightly it’s cause I’ve been leaf tucking. No under carriage bs going on here and I only removed dozen lower nodes on the biggest that’s it. Trying to maintain plant height will be near impossible, plant elevators will be a must.
Still no signs of pistils I’ll need to look under canopy further to see. The higher PK food will be kicking in just now and should help with the shift in priorities.
Both drink 1.5L every 2 day's at Day 35
Likes
75
Share
@WhiteEdge
Follow
Flowering W8 D1
Light intensity HLG Diablo - 750-800 PPFD , Light distance - 45/50cm, DLI - 40, Light Interval 12/12,
SCL @ 40% - DeepRed @ 100%, FarRed @ 30%, UCL-40%
Midea 22c5% day/23night, TM 54/48%RH, AC Infinity AUTO - off
Day RH - 55/60%, Night RH - 49/55%,
Day Temperature - 24/25c, Night Temperature - 19c/21c
Leaf temperature 23/24,
VPD Day - 1.1/1.2 , VPD Night 1.0/1.2
CO2 - 600+PPM
Nutrient Tank - 1.45EC, PH-5.90, Temperature - 17/18c, ORP-600/650mV
Day Misting - 25sON/20minOFF
Night Misting - 30sON/59minOFF
Flowering W8 D7
End off week 8, harvest day. Girls have probably one week more to finish properly, but need to cut them cos new grow is already coming and tent is needed for next flowering

Likes
3
Share
@jaydee702
Follow
No hermi flowers from these two clones from a hermi.This grow has been hard to keep contained ive been bending branches for 4 weeks and it sill stretches 4to 6 inches every few days i am out of space under the lights its been a jack n been stalk grow
Likes
74
Share
@Mr_Maes
Follow
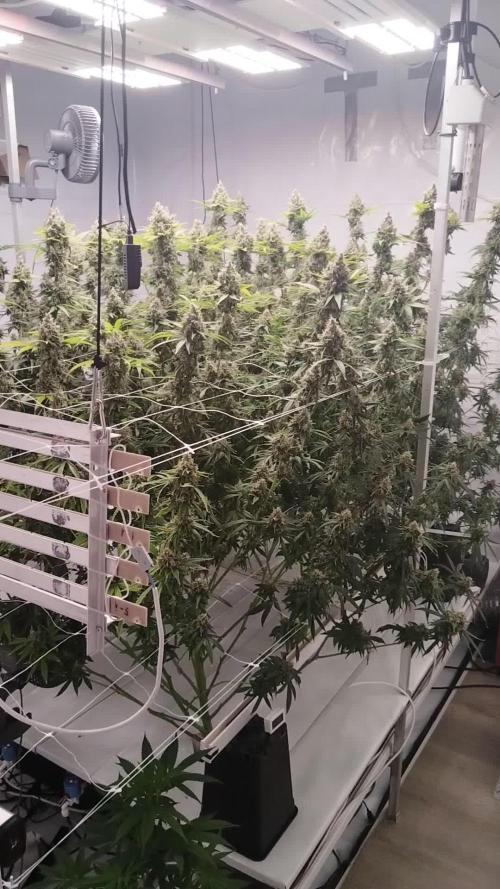
Nothing but colas on all 3 this is going to be a big harvest. Another 2 or 3 weeks max.


Likes
41
Share
@WolverineGreens
Follow
Day 1 down...will connect the blumats tonite 😁. Blackberry moonrock and girl scout cookie were damaged during transplant but look good and bounced back nicely. Was waiting for them to recover to flip.
Light compost tea bubblin since 8 pm yesterday to help start the process. In the next day or 2 ill get the last trim and take the last few clones.
At the end of week 2 ill quit sprayin labs and em5.
Grow cam still sux but its all i got at the moment so ill have to make due with it and my cell.


Likes
9
Share
@my420experiment
Follow
Realized when I setup the soil that I forgot to give it a good soak and allow to sit for 24 hours.
It's just straight out of the bag and I feel like I'm not watering them enough.

Likes
46
Share
@PureMedicin
Follow
Been switching between LED and hps as well as mixing the 2 lights. Now im only using hps in the big tent. With the Philips Green power 600w bulb. Running on 400w atm 🙂

Likes
2
Share


Likes
20
Share
@420DeepGrow
Follow
Gracias al equipo de Divine Seeds, Marshydro y XpertNutrients sin ellos esto no seria posible.
💐🍁Fractal:
La semilla de marihuana Fractal es una cepa especialmente psicodélica que Semillas Divinas desarrolló para experiencias esotéricas y místicas, meditación y creatividad. La potente y vívida Skunk#1 fue cruzada con una pegajosa Afghani Indica, y el resultado es ahora conocido como Fractal. Este exótico híbrido es resinoso, picante y productivo. La mejor opción para el cultivo comercial: un compromiso entre mayores rendimientos y maduración rápida.
En interiores se espera una altura de 1,70 m, en exteriores las plantas crecen hasta 2 m. Fractal se adapta a todo tipo de entorno de cultivo: cajas de cultivo, instalaciones hidropónicas o aeropónicas, plantaciones exteriores, balcones, terrazas e invernaderos. Para un mejor rendimiento se recomienda entrenar a las plantas de Fractal para ampliar su estructura y limitar su crecimiento vertical. Usar ScroG o SoG, LST, FIM o topping.
Fractal tiene una inmunidad inherente al moho y a las plagas de insectos, pero como sus colas son gruesas, proteja sus plantas del aire viciado. También durante las semanas de lluvia su plantación puede necesitar ser cubierta. Listo para la cosecha al aire libre en octubre. Grandes y densos cogollos.
Los cogollos de marihuana de la variedad Fractral huelen a hachís y algo a tierra, desprenden cedro y notas afrutadas al romperse. Mida su porción con cuidado: su potencia está por encima de la media. Con Fractal experimentas un apedreamiento general que te hace sentarte o frena tu movimiento. Perfecto para pasar una noche junto a una hoguera. Es mejor consumirlo por la noche.
🚀🌻 Consigue aquí tus semillas:
https://divineseeds.net/es/fractal-fem/
💡FC6500: Eficiencia líder en el mercado: la lámpara de cultivo LED FC-E6500, que ostenta un estatus líder en el mercado, es una solución rentable con un PPE de 2,8 µmol/J y un rendimiento máximo de 2,5 g/vatio. Ofrece un PPF alto de 2026 umol/S y es adecuada para una cobertura de vegetación de 1,50 m x 1,50 m y una cobertura de flores de 1,20 m x 1,20 m.
Iluminación versátil y uniforme.
https://marshydro.eu/products/mars-hydro-fc-e-6500-730w-commercial-led-grow-light/?gad_source=1&gclid=Cj0KCQjw1qO0BhDwARIsANfnkv9IIrYSbmJqz8PqpJOIyWwJfp5bc3SGJgUV68USLQ4tjmXDYwoBuAsaAue3EALw_wcB
🚥 MarsHydro ADLITE UV/IR/RED:
Para lograr un crecimiento óptimo de las plantas y maximizar los rendimientos es un arte simple que depende en gran medida de las condiciones ambientales adecuadas. Reconociendo las limitaciones de la iluminación natural y las soluciones de iluminación tradicionales para satisfacer estas necesidades únicas, lanzamos ADLITE. Estas luces especiales UV, IR y roja están diseñadas para llenar áreas del espectro, proporcionando las altas longitudes de onda que las plantas necesitan para un crecimiento y desarrollo óptimos.
Consigue aqui tu Adlite:
https://marshydro.eu/collections/adlite-supplemental-lights/
🏠 : Marshydro 1.50 x 1.50 x 1.80, carpa 100% estanca con ventanas laterales para llegar a todos los lugares durante el grow
https://marshydro.eu/products/diy-150x150x200cm-grow-tent-kit
🌬️💨 Marshydro 6inch + filtro carbon para evitar olores indeseables.
https://marshydro.eu/products/ifresh-smart-6inch-filter-kits/
🍣🍦🌴 Xpert Nutrients es una empresa especializada en la producción y comercialización de fertilizantes líquidos y tierras, que garantizan excelentes cosechas y un crecimiento activo para sus plantas durante todas las fases de cultivo.
Consigue aqui tus Nutrientes:
https://xpertnutrients.com/es/shop/
📆 Semana 8:
Gran semana, el engorde de los cogollos se ha notado de forma considerable, las plantas tienen una gran capa de resina y estan listas para su última etapa antes de pasar a una mejor vida.
El olor es tan fuerte que al filtro le cuesta disimularlo. Última semana aplicando agua de manantial.
Potencia del foco 90%.

Processing
Likes
96
Share
@The_Projexx
Follow
Not much to say about whats going on Obi#2 kicking in overdrive as we had to say RIP to OBI#1 for being hermie life is life and we are rocking and rolling anyways !
I like to to thank all the people that come down and check out the diary you guys KICKASS much love and respect for you folks
-Happy Growing!
