
Likes
Comments
Share


@Probation2Propagation
Follow
Will put final dry weight numbers up. I’m expecting around 6oz

Likes
2
Share


@TheHazeMeister420
Follow
The video says enough. Week 3 of flowering. I put them in a dark place for 12 hours so the flowering begon earlier. I live in the Netherlands so the autumn is not nice for weed plants.


Likes
9
Share


@wheedtobeus420
Follow
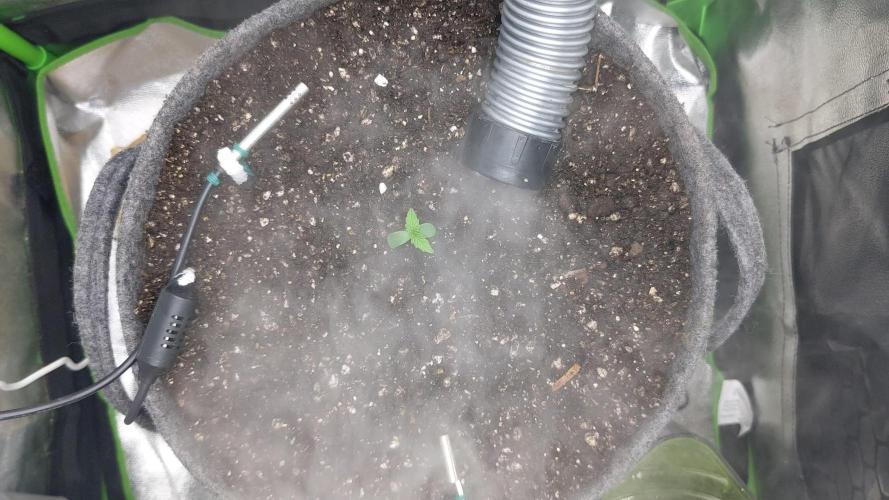
Day 62. Realized my hose water was sitting at ph of 8.5 or higher. Which the ladies really didn’t like. Got that dialed in. Jesus this water issue with the new home has been a bitch. Glad she is bulking and looking wonderful. The smell is off the chart.

Likes
6
Share


@CeGrow
Follow
begining week 7
day 44: flowers more, but bad wheather :(
end of week 7
still bad wheather :(
flower turned a little bit bigger, but not much
and I have some fleas now :( (see video)
I picked them manually
hope they dont increase
day 48 nutrition: 0,4 litre water+ 0,8 ml Mairol Blütenwunder
day 49: nutrition 0,5 litre water + 1,5 ml Mairol Blütenwunder


Likes
6
Share


@Trichom420CZ
Follow
Alga Bloom was add.
Nothing to do this week, no problems with plant.
Plant stretching
PH 6.2 - 6.6

Likes
62
Share


@Roberts
Follow
Do-Si-dos autoflower is doing okay. She develop some spots upon getting into the solution. I think it is a little strong. She had her first lst, and defoliation today. The ph and everything has been very stable. Nothing else to report at the moment. Thank you Zamnesia seeds, Athena, and Medic Grow. 🤜🏻🤛🏻🌱🌱🌱
Thank you grow diaries community for the 👇likes👇, follows, comments, and subscriptions on my YouTube channel👇.
❄️🌱🍻 Happy Growing 🌱🌱🌱
https://youtube.com/channel/UCAhN7yRzWLpcaRHhMIQ7X4g
Processing
Likes
1
Share


@DocChronic420
Follow
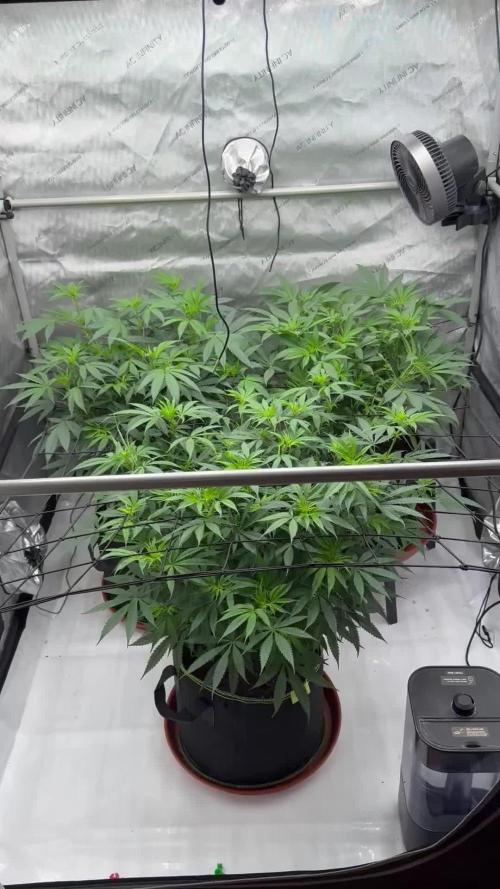
Now we have the selected plants for indoors, I am choosing to run 5 indoor. At this point I’m waiting or the plants to grow a bit more before setting the first layer of trellis up.
Likes
Comments
Share


@SkunkyDog420
Follow
Hallo zusammen 🤙.
Sie wächst sehr schön und macht keine Probleme.
Likes
20
Share


@m0use
Follow
Ok, I'm back and the plants seem to be doing fine. Bit dry and maybe hungry at some points but overall just dandy.
Gave them a good one two and removed any dead/dying leaves and fertilized them. This should be it till the end I think.
All the herbs are dead as my buddy did not water them only the weed plants, but also forgot to water the smaller weed plants in the baby containers. Gave them about 1L after 5 days and 1.5L after another 5days. wanted it to be on the lower vs the over side of things.
Will know more in the next Few days once they drink everything up. the CBD and CBG plants are looking strong. the THCv ones are looking toasted and done. curious if they will need to be harvested before the rest.


Likes
12
Share


@HerbalBlazer
Follow
Training went well gonna leave them to ride abit longer and go again

Likes
6
Share


@eldruida_lamota
Follow
Que pasa familia, vamos con la cuarta semana de vida de estas Wedding Cheesecake Fast Flowering, de FastBuds.
Agradezco a Agrobeta todos los kits obtenidos de ellos 🙏.
El ph se controla en 6.2 , la temperatura la tenemos entre 21/24 grados y la humedad ronda el 50%.Tienen un color espectacular,esta semana cambió el foco a 12-12, el tetra 9 lo añadí vía foliar, iremos viendo cómo avanzan.
Agrobeta:
https://www.agrobeta.com/agrobetatiendaonline/36-abonos-canamo
Hasta aquí todo, Buenos humos 💨💨💨

Likes
16
Share


@UnkleSkunk
Follow
il tutto prosegue per il meglio ho tagliato qualche rametto basso e un po' di foglie...
continuo con la sistemazione regolare dei tiranti..
ora sta iniziando a far vedere il sesso vediamo come si comportera'...
Likes
5
Share

@GerHardGrows
Follow
So here we are: the seed sprouted after three days and was effectively born on Christmas Day, 25th December.
25 Dec – Day 1
Sprouted!
- Temperature: 23 °C
- Light cycle: 18/6
- Light intensity: 25 % → 17 W (measured with Tapo app)
- PPFD: ~180
- Humidity: 80 %
27 Dec – Day 3
- Temperature: 19–22 °C
- Humidity: 70–80 % (Humid Pro set to 75 %, step 2)
- Growth: healthy, slightly leggy
- Added small amount of soil for stem support
- Watered approx. 150 ml + light misting
- Water contained very small traces of BioBizz Grow, Alg-A-Mic, and CalMag
- pH: 6.1
- Measured plant height (before soil addition): ~7 cm
- Approx. 3 cm of stem later buried in soil
- Light distance: 30 cm
- Light: 25 % → 17 W
28 Dec – Day 4
- Light distance: 28 cm
- Light cycle: 19/5
- Added approx. 2 L additional soil, leaving seedling ~2 cm above soil surface
- Soil mix: BioBizz Light Mix + ½ tsp rock dust + ½ tsp INOQ 1001 Mycorrhiza + Perlite + Vermiculite
- First single-finger leaves started growing
- Light watering
- pH: 6.1
- Visible plant height after soil addition: ~2 cm
- Estimated total stem length: partially buried, ~7–9 cm
29 Dec – Day 5
- Single-finger leaves continuing to grow
- Overall condition: healthy, compact
30 Dec – Day 6
- Installed Vivosun AeroFlux W70 heater
- Previous days: temperature occasionally dropped near 18 °C, avg around 20 °C, now with the heater I hope to achieve better conditions
- Heater set to 24 °C
- Humidifier set to 70 %


Processing
Likes
27
Share


@Fullmeltalchemist
Follow
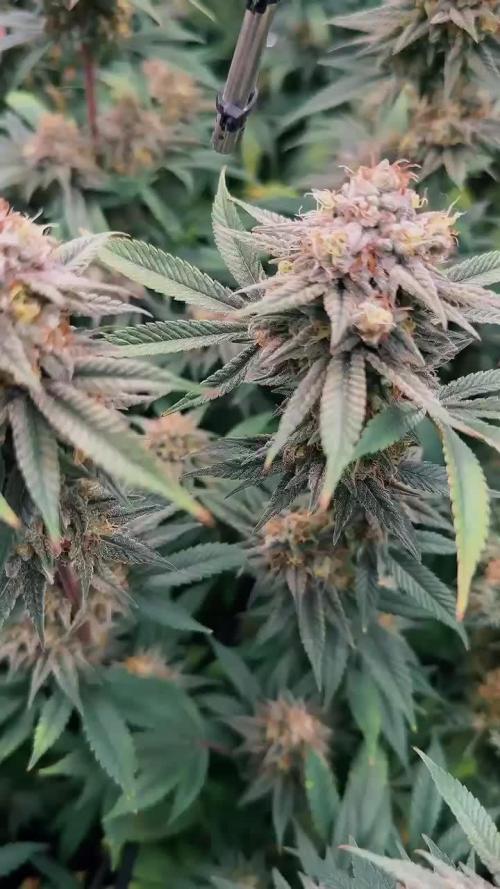
9.30 - I build a little fermenting CO2 generator this week, mostly for shits since I'm not going to seal the tent up. Otherwise things are going as expected. Noticed a really big change in bud structure and how they are densing up. Really enjoying the show and the change in colors and pistil behavior. Got her propped up to increase circulation and get a better idea of when she needs water.
10.1 - Just documenting the bud evolution for fun :)
10.4 - Whatchu guys think of my rescue marijuana plant!? Not bad, huh?!
10.6 - Plant grew some new whites and oranges and buds are bigger
10.7 - changing every day. What a wonderful thing
Likes
10
Share


@4Ganic
Follow
This is mid-week four. These pictures are up-to-date taken today. I have LED light so and little other lighting on, so excuse the picture quality. I am no longer using Air, which is an iron supplement. I only used air 2 twice in Veg. Very powerful and boosts growth rate and health.
Likes
17
Share


@Patf2027
Follow
Week 7 went well. Had some good weather. I went away for four days, watered (no nutes) day before I left and think they had a little rain one day while I was gone. Buds have been getting fatter and look healthy. Think I might do water/nutes tomorrow ( 4/5 days after last water) then maybe one more round of nutes before I start flush. Will research when to stop nutes for next update
Likes
2
Share

@Gardens_of_Of
Follow
They completed lfirst week of Flower. Decreasing Humidity gradually to increase VPD to 1.5.
Heady OG turned out to be a male one so removed it :(
But, the ladies seem to enjoy life and they keep stretching every day. They have doubled in size just in one week
Humidity is fluctuating between 52-58%. Temp is 22-26 Celsius. VPD is relatively constant around 1.30 except for very rainy days where my dehumidifier gets info play.
PPFD is around 900 uMol.

Likes
47
Share


@GreenHouseLab
Follow
These ladies are looking damn fine and of the two they are what seems identical - 👍 Sweet Seeds for gen stability.
Both were topped 7 days ago and the inside lower nodes all removed. I’m only looking for A,B grade colas on both.
Stay safe, keep the ✌️

Likes
10
Share

@Just_Rabbit
Follow
Das war’s mit der Peachy … nicht so meins … obs am Pheno lag … ich weiß nicht .. schnuppert gut … sicherlich kein Reinfall aber nochmal würde ich sie nicht reinstellen
