
Likes
Comments
Share


@AfroBlooming420
Follow
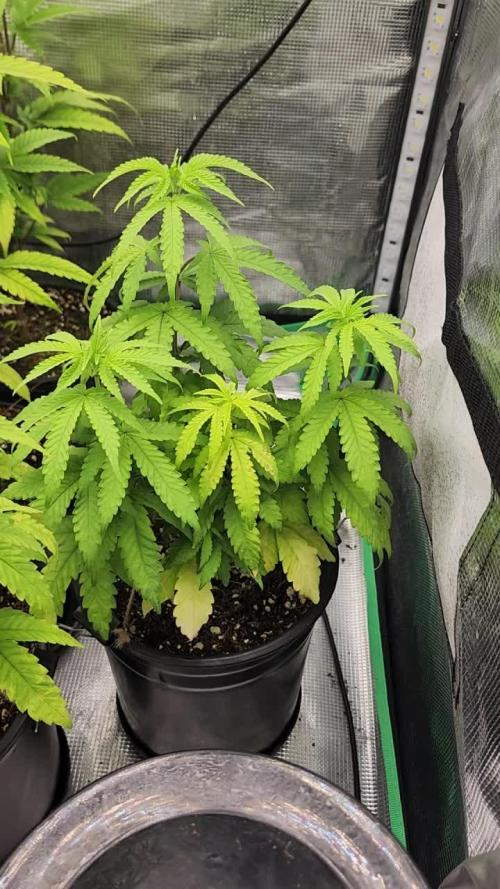
I got a week and a half notice that I had to go on a work trip out of country for 10 days, so the clown show continued.
I was definitely overwatering them. Thanks @shinsimilla, I saw the difference after waiting a few extra days. Also, I definitely should have started LST at least a week earlier than I did.
Now for work issues: I found an old security camera that the cats had knocked over a million times and damaged. With a lot of tape, I got it working again and set up in the tent so I could see what’s going on while gone. Be warned, the photos are NOT good quality. I also looked up DIY self-watering systems. I needed it as simple as possible to reduce the risk of something breaking while I was thousands of miles away.
I found one where it wicks water up a cotton or wool string. Here's the link: https://youtu.be/P0hn5cKZ0Z0 I cut up an old 10K shirt that was made of cotton. I had just broken down my balcony garden since it’s already getting cold here. I took two long planters, lined them with a construction garbage bag to be the reservoirs. Even though the floor of the grow tent is waterproof and I put plastic between the floor and outside of the grow tent, I didn’t want to risk any water getting out while I was away. I was nervous y’all.
Basically, you wet the fabric then use a chopstick to run the it through the plant from bottom to top. It needs to be long enough to have a few inches sitting in the bottom of the reservoir. I filled each with 3L of water with the BioBizz nutrients mixed in and ph’d to 6.1.
More info in week 5.


Likes
35
Share


@nonick123
Follow
Día 108 (16/09) Tras el flush las plantas muestran tímidamente nuevos pistilos blancos! 😍
Hoy no es necesario regar!
Día 109 (17/09) Me he encontrado a OnionOG #1 y a Purple Punsh completamente sedientas! Con las hojas caídas!
Riego con 1,25 litros de H2O a cada una de ellas (el resto no necesitan riego)
Día 110 (18/09) Riego con 500 ml H2O
Las plantas con el bloqueo empiezan a mostrar nuevos pistilos, sobre todo en las partes inferiores
Día 111 (19/09) Riego con 250 / 500 ml H2O
Se vuelven a formar pistilos blancos en todas las plantas que han sufrido el bloqueo! 😍💥
OnionOG #1 va como un cohete formando y apilando flores 💪 🚀 😍
Día 112 (20/09) Día lluvioso. Riego ligero 250 ml H2O
Día 113 (21/09) Otro día lluvioso. Riego ligero con 250 ml
Día 114 (22/09) Detecto algunas moscas blancas apoderándose de las plantas y decido hacer una aplicación foliar de piretrinas (Spruzit a 15 ml / l)
Riego con 1 Litro de Té Floración de Lurpe Solutions. Preparación: 24 horas con bomba de aire (oxigenación) con ingredientes:
Healthy Harvest 8 ml/L + Insect Frass 16 ml/L + Kelp Hidrolizado 0,3 g/L
💦Nutrients by Lurpe Solutions - www.lurpenaturalsolutions.com
🌱Substrate PRO-MIX HP BACILLUS + MYCORRHIZAE - www.pthorticulture.com/en/products/pro-mix-hp-biostimulant-plus-mycorrhizae

Likes
35
Share


@IndicaVibeMe
Follow
Going to yield POUNDs off this girl!!
12/19/23-- Update: Shogun is a big girl- for an INDOOR grow!. She's 3ft tall, and still shows vertical growth!
Considering I did not veg long. Shogun popped up out of soil on Oct 4th 2023, and she was switched to flower same day & time as my Royal Dwarf (aka Itty-Bitty) they've both been on 12/12 for over a month now. Itty-Bittyis an Autoflower, and Shogun is a photoperiod.
I can see now the difference between Autos& fotos in growth &bud development,
Shoguns trichomes have not appeared yet! She's definitely going to be in the flower stage for a few more weeks, perhaps another month?
As I said She's in middle of flowering and still showing vertical growth, and to measure HER I use a yard stick now lol
I think she's my favorite, along with the Cookies gelato (but don't tell my other plants!)

Likes
96
Share


@CBD_Sweden
Follow
The growing cycle it self worked out as expected, except that the pH-level was way off from where it should be, and I found out a bit too late. Because of this the outcome of the harvest didn't say much about the potential of this strain, but as soon as I got enough time and space, she will get a new chance to shine.
----------------------------------------------------------------------------------------------------------------------------------
2018-02-27.
This is my review / smoke report of this lovely cbd flower.
There are rock hard buds and almost no give at all, even in those smaller buds.
When you grind it the scent will appear more than just smelling on the buds.
It smells a little weak of grass, hay, pepper, some spicy and sweet.
The taste is grass, soil, pepper and exceedingly sweet fruit.
The effect is directly, the thc feeling above the eyes and in the forehead.
A little light ringing in the ears and a dry mouth.
After 10 minutes, the cbd kicks in and one feels that the neck and shoulders begin to relax and the feeling continues down over the back and chest down to the stomach.
A calm and well-being is found in the body.
After 15-20 minutes it is down in the legs.
But in a strange way, you also feel like doing something, or meeting some friends and just sitting and talking about fun things.
It is a very well-balanced strain and it fits in all sorts of contexts.
I also think it might be good for someone who needs something that makes you more social and dampens enough anxiety and rushing thoughts effectively.
I think this is a lovely strain and I highly recommend it to everyone but especially for more inexperienced people who want to soften with a pleasant medicine.
Likes
6
Share


@Groweedo
Follow
3 dernier jours avant rinçage, demain je met pour la dernière fois les nutriments, l’odeur est à tomber par terre surtout la runtz qui sent le bonbon 🍬 🍭


Likes
3
Share


@RunicKevin58675
Follow
Good morning to all growers!! This has been another rewarding week for my eyes but the real satisfaction has yet to begin especially for my nome ;D! The plants are getting very large, the one with the bucket pot has responded very well, the one with the cardboard a little too well and is towering over the others, although the LST is struggling to keep it at bay... While the one with the tissue pot has answered a little badly but he is recovering slowly

Likes
32
Share


@GODSGIFT_2005_JM
Follow
🍼Greenhouse Feeding BioGrow & BioBloom
⛺️MARSHYDRO
The ⛺️ has a small door 🚪 on the sides which is useful for mid section groom room work. 🤩
☀️ by VIPARSPECTRA (models: P2000 & XS 2000)
🌱 DUTCH HEADSHOP SEEDS:
www.dutch-headshop.eu
www.dutch-headshop.nl
ONE STOP SHOP
. 100% germination success on first try! with HUGE seed selection!
. Very friendly customer service
. Best bio-seed packaging
. Sells other products @ best prices:
. Nutrients
. Vaporizers
. Smoking accessories (grinders, cones)
. CBD Tinctures
. Resin Extracts
. Boveda humidity packs
. Ziplock bags
. Other health supplements such as:
. Lion’s Mane Organic Capsules
. Hemp Seed coffee

Likes
142
Share


@MadeInGermany
Follow
Hi everyone 🤗.
Everything is going great 👍.
There are no defects or anything unusual :-).
Today the Blue Cheese Pheno 1 became the first time rinsed, and now only gets 0.4 Ec water for the next 10 days ca :-).
Everyone else needs a while.
otherwise there is not much to report this week.
I wish you all a nice week, stay healthy 🙏🏻 and let it grow 🌱


Likes
8
Share

@GREENPHOENIX6262
Follow
04/11 - Both plants are coming along accordingly on time - As stated previously I got careless with the PH and they suffered a harsh PH burn - Since then they have been flushed and nutes in coco stripped - Began introducing nute in micro-dosing stages.

Likes
Comments
Share


@acidblue
Follow
OMG, so much has happened since my last post, this is way overdue.
My soil went totally hydrophobic, my PH pen was outta calibration so my soil ph was way of, combined with another gnat infestation.
Things are much better know. the gnats are gone, transplanted into larger pots with newly bought soil, changed lighting to 18/6, vegged for a couple more weeks .
One plant showed full male pollen sacs and one had suspicious looking male pre-flowers so I culled both. The last 2 showed what I think look like female pre-flowers.
I just flipped lights to 12/12 on 4/4 so hopefully I have 2 females, started weaving thru scrog net, canopy looks fairly even, plants due look super healthy aside from couple tips have a bit of yellow
But thats from early veg when I had the lights a tad too close.
Wish me luck ;).

Likes
11
Share


@Paflucy
Follow
Hello everybody :)
End of the seventh week of flow.
Wild Thailand and Power Plant are a bit hungry so I gave them an extra dose of P/K. You can clearly see them eating the leaves from upper parts.
SSH has calmed down and it's blooming nicely :)
Everything looks very tasty - Critical Haze smells like tangie and Wild Thailnd as a sweet mango :) WoW!


Processing
Likes
3
Share


@GanjaFarmerGrow
Follow
Week 6 is has just passed..
Haven't done anything different than last week...
She is in FULL FLOWERING...
producing hairs like crazy...
hope it keeps on like this...
fingers crossed👍

Likes
2
Share


@eldruida_lamota
Follow
Venga familia que ya viene la cosecha de estas Pink Runtz de RoyalQueenSeeds , que ganas que tenia ya de darles machetazo.
No veas que pinta que tienen estas plantas.
Las flores aparte se ven bien resinosas, y con unos tonos muy llamativos.
a sido una genética con la que disfruté mucho cultivarla, es algo complicada cultivarla pero merece la pena si eres cultivador con experiencia no te será problema cosechar.
Hasta aquí es todo , espero que lo disfrutéis, buenos humos 💨💨.


Likes
112
Share


@Dunk_Junk
Follow
This week she grew 23cm taller! I have been doing experiments through the week FIMing various upper growth sites. We will see what effects this will have in the weeks to come.. I've also been seeing upper leaf tips going a very light green. Is it nutrient burn? Light burn?
Nutrients used this week: 20 grams 20-20-20 powder mixed with 10 litres of water + 40ml of Cannazym = ~1470ppm
Timelapse sequence is:
Auto Jack
*** Pineapple express ***
CBD Lime
Blue Dream
Auto Jack
*** Pineapple Express ***
CBD Lime
Blue Dream


Likes
24
Share


@BudMunchies
Follow
03/31/25:
Today was a major milestone in the grow: all five plants were transplanted into 1-gallon AirPots and topped above the 3rd node. I also cleaned up everything below node two, leaving each plant with two strong, healthy nodes to begin shaping their structure for the vegetative phase.
Normally, I wouldn’t combine transplanting and topping on the same day, as both are stress-inducing events. However, the plants looked robust and healthy, showing no signs of weakness. Because of this, I felt confident they could handle the dual stress. Still, I expect them to take the next 2–3 days to recover, after which I anticipate they’ll bounce back with even more vigor.
Each plant was moved into a 1-gallon AirPot, which encourages air pruning and promotes a more fibrous, expansive root system. During transplant, I sprinkled mycorrhizal fungi directly near the rootball of each plant to help stimulate root colonization and increase nutrient uptake during this critical phase.
On inspection, the roots were healthy and white, showing no signs of being rootbound—making this the perfect window for transplanting without risking transplant shock or root constriction.
The newly potted plants were placed back into the 4x4 tent, now sitting about 36 inches (approximately 91.5 cm) below the AC Infinity S44 light, which is set to 40% power. This provides a PAR reading of around 360 µmol/m²/s, which is well-suited for early veg.
To begin early phenotype tracking, I’ve labeled the plants as PP1 through PP5:
• PP1: Most vigorous plant so far
• PP2: Slightly behind PP1 in size and growth rate
• PP3–PP5: Showing very similar growth characteristics, slightly more compact
If early vigor is any indication of sex, I would guess that PP1 and PP2 may be male, while PP3 through PP5 could be female. That said, this is purely speculative—true sex traits won’t reveal themselves until preflower, and many vigorous plants end up being female as well.
Likes
3
Share


@BushDoctor740
Follow
Well she is really doing well with the recent LST and will have lots of colas.Ill start training the other branches later on this week but she’s looking great day 22
Processing
Likes
28
Share


@GrowingisFunkO
Follow
Overall, the garden is doing great. Had a scare with the WW with letting it dry out a little but it looks like its going to be fine.
The pistils are starting to change color and leaves are starting to lose color but the buds are fattening up. I can't wait to see how they all turn out.
