
Likes
Comments
Share


@AustinRon
Follow
Week 10 - Flower Week 3
Ambassador Cartwright
Ambassador Cartwright by IRIE Genetics
Transition to Flower
Afterglow X Arise
(Clementine X Arise) X Arise
((Tangie X Lemon Skunk) X Arise) X Arise
______________________________________
Start of Week: Saturday 10 September 2022 AC3Q 57:F:3:1 to 17 September 2022
Summary:
Plant HeightBeginningOfWeek: [ 20, in]
Plant HeightEndOfWeek: [ 26, in] *TBD*
Temp: 74.8
RH: 70.7
VPD: 0.88 kPa # need to get into the 0.9 -> 1.1 Early Flower
Autofertigation - Enable
- [ ] Growtek RINGS Calibrated
- [ ] Growtek RINGS INSTALLED
- [ ] Growtek OPERATIONAL
LightSchedule: 12/12
amt: [ 1300, ml] #
period: [ 360, min]
frequency: [1, day]
times: { first: 2100, second: 0300 } # Auto Only!!! Otherwise 1.3 @ 2100
Environment:
EC Targets: #
rel.
|
abs (rel + source)
ECseedling:
[0.4, 0.5]
[ 0.7, 0.8]
ECearlyveg:
[ 1.1, 1.4]
[ 1.4, 1.7]
EClateveg:
[ 1.2. 1.5]
[ 1.7, 1.8]
ECearlybloom:
[ 1.1, 1.4]
[ 1.4, 1.7]
EClatebloom:
[ 1.3, 1.6]
[ 1.6, 1.9]
ECripen:
[ 0.8, 1.1]
[ 1.1, 1.4]
ECflush:
[ 0.0, 0.2]
Seedling Early Veg Late Veg Early Bloom Late Bloom Ripen Flush
400* – 500 1100 – 1400 1200 – 1500 1100 – 1400 1300 – 1600 800 - 1100 0 - 200
Fertigation Daily:
- {pid: 4, amt: 1300 ml, ec: 2.0, pHRange: [ 5.5, 6.5], time: 2130}
- {pid: 7, amt: 1300 ml, ec: 2.0, pHRange: [ 5.5, 6.5], time: 2130}
FertigationtheRootedLeafFullRatios: # Flower Week 3
Primer A: [ 10]
Primer B: [ 10]
CalMag Fuel: [ 6]
Silica Skin: [ 4]
Lush Green: [ 4 ]
Root Anchor [ 6]
Peak Bloom [ 4]
Resin Bloom [ 2]
Last Week of Foliar
FoliarMonday:
Solar Wind: [ 2.5, ml, 500, ml]
Silica Skin: [ 2.5, ml, 500, ml]
FoliarWednesday:
CalMag Fuel: [ 2.5, ml, 500, ml]
Lush Green: [ 0.63, ml, 500, ml]
FoliarFriday:
Solar Wind: [ 2.5, ml, 500, ml]
Peak Bloom: [ 0.63, ml, 500, ml] # Cease Begininning Flower Week 5
NEW WEEK
Week's Plan - (Added Veg week to allow SuperCropped Mains HEAL.)
- [ ] Install Growtek Fertigation w/ 8” Rings
- [ ] Run Feed Lines & Cut to Optimal Length
- [ ] Calibrate Feed
- [ ] Install Drain Lines, Cut to Optimal Length
- [ ] Notch Drain Tube end to eliminate vacuum against drain pan
_____
Sat 10 Sep 2022
AC3Q 57:F:3:1
# PM
- [x] As Below
Fertigation:
pid: 4, amt: [ 1300, ml], ec: 2.2
pid: 7, amt: [ 1300, ml], ec: 2.2
LightIntensity: [ 824, µMol/m2/s2]
LightDLI: [53.4, mol/m2/d]
Sun 11 Sep 2022 # AM IS 9PM Local TIme, the Night BEFORE.
AC3Q 58:F:3:2
NOTE:
- We’ve added a couple inches removing all restraints, and having flipped last week. As frequently observed, Both plants were clearly vibrant and vigorous after a nights sleep after restraint removal.
- Zymes/Bonners/Ascorbic Acid - Soil surface, container sides, and container bottom (exposed roots)
- [x] As Below
Fertigation:
pid: 4, amt: [ 1200, ml], ec: 2.4
pid: 7, amt: [ 1000, ml], ec: 2.4
# AM
- [x] Complete Previous Weeks GrowDiaries
- [x] As Below
Fertigation:
pid: 4, amt: [ 1200, ml], ec: 2.4
pid: 7, amt: [ 1200, ml], ec: 2.4
# PM - None
Mon 12 Sep 2022
AC3Q 59:F:3:3
# AM
- [x] As Below
Fertigation:
pid: 4, amt: [ 1200, ml], ec: 2.4
pid: 7, amt: [ 1200, ml], ec: 2.4
- [x] As Below
FoliarMonday:
Solar Wind: [ 2.5, ml, 500, ml]
Silica Skin: [ 2.5, ml, 500, ml]
Tuesday 13 Sep 2022
# AC3Q 60:F:3:4
# AM
- [x] As Below
Fertigation:
pid: 4, amt: [ 1200, ml], ec: 2.4
pid: 7, amt: [ 1200, ml], ec: 2.4
Wednedsay 14 Sep 2022
# AC3Q 61:F:3:5
#AM
- [x] As Below
Fertigation:
pid: 4, amt: [ 1300, ml], ec: 2.2
pid: 7, amt: [ 1300, ml], ec: 2.2
- [x] Apply as Below
FoliarWednesday:
CalMag Fuel: [ 2.5, ml, 500, ml]
Lush Green: [ 0.63, ml, 500, ml]
Thursday 15 September 2022
# AC3Q 62:F:3:6
# AM
- [x] As Below
Fertigation:
pid: 4, amt: [ 1200, ml], ec: 2.2
pid: 7, amt: [ 1200, ml], ec: 2.2
Friday 16 September 2022
# AC3Q 63:F:3:7
# AM
-
# PM
- [x] As Below
Fertigation:
pid: 4, amt: [ 1400, ml], ec: 2.4
pid: 7, amt: [ 1400, ml], ec: 2.4
_______
Saturday 17 AC3Q 64:F:4:1
CEASED FOLIAR Application: 2022-09-17T16:02:06-0500 #
- [X] Complete Week’s GrowDiaries


Likes
34
Share


@NewfieFarmer
Follow
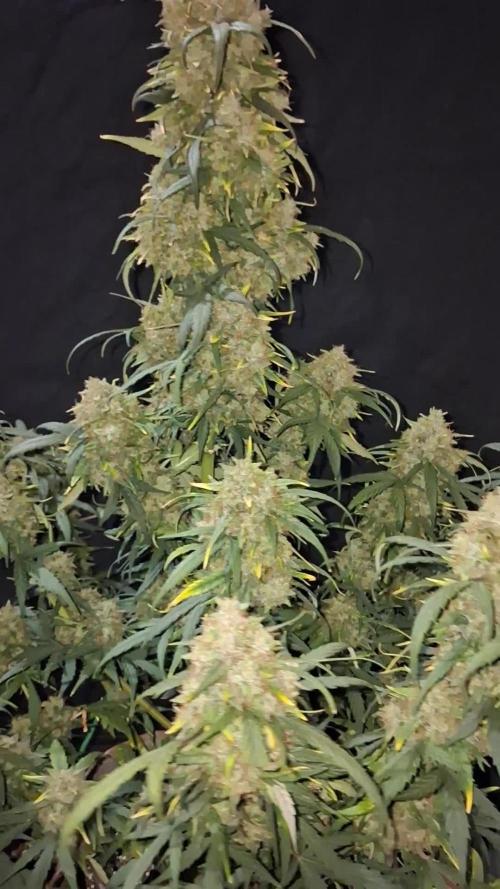
Number 1
Number 1 is browning out her hairs and putting on crystal. Seems to be another few weeks to go yet.
Number 2
Fall colours, purple, black, brown yellow.
A real treat to the eyes. She smells sweet and dripping with resin. No real strong pot smell, and no amber trichomes yet. She is close to getting the axe! The super mutant needs the lumens!
Super Mutant
This thing is huge.
This thing is hungry.
This thing is loaded with buds as big as my arms. If every plant was like this, I'd need 1 crop a year. Some of these buds look like they're going to be 2 ozs each!
Mammoth monster!
Out of these 3 seeds, looks like I got 3 phenos. Although my light is awesome, I think it concentrates blue and red to different areas, making the plants grow at different rates.
Number 1 and the super mutant are very similar in structure, except for size. Number 2 was the last to germinate and first to flower. It has a different smell, structure and look. It was from a single promo pack of the NL. The other 2 were from the same package.
Will number 2 make it until next week, or will it be a harvest?


Likes
26
Share


@Nebula420
Follow
Original Sensible Seeds this is the discovery of the year for me, just great genetics, I really liked Auto Destroyer, very tasty plant and easy to grow, suitable for beginners.
Refuse I liked fertilizers from Green Buzz Liquids, just amazing, great result.
Thanks to everyone who follow my grow report, love u all, Peace!


Likes
10
Share

@farah4weed
Follow
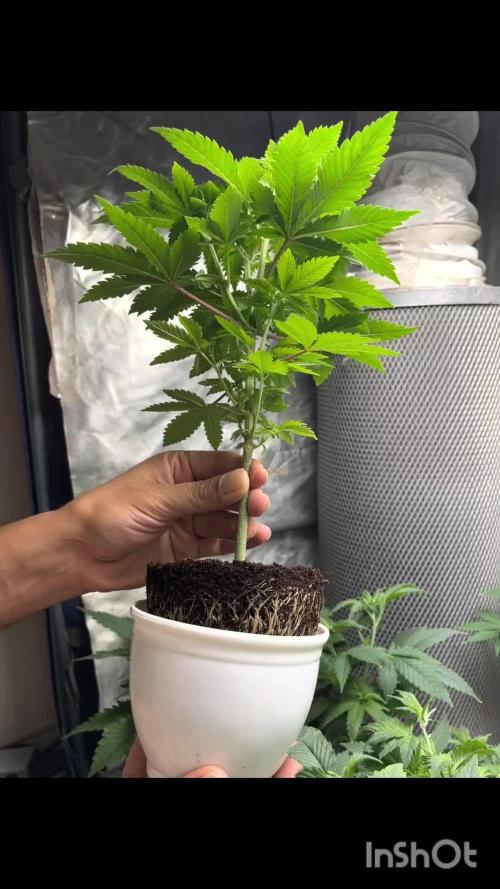
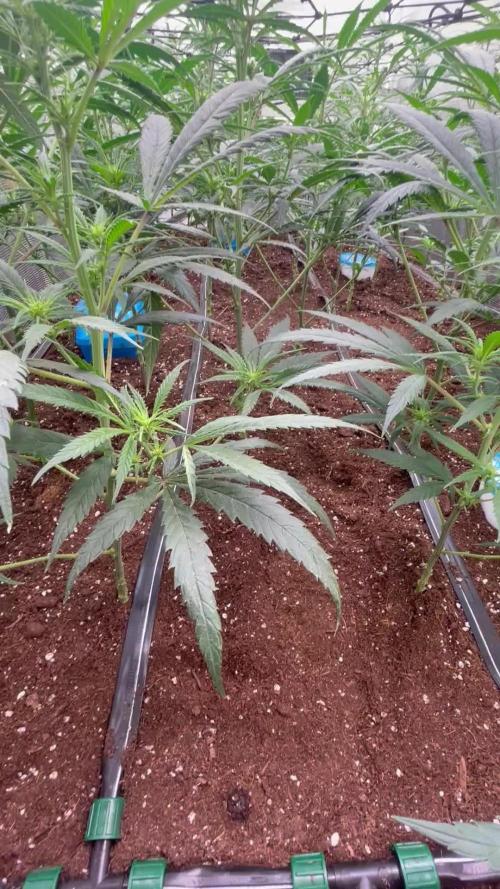
Hello guys😍😍
Fifth week of growth.
Last week, the plants were a little shocked after topping, but after a few weeks they returned to normal growth.
To reduce this shock, I used BioEnhancer fertilizer.
And this week I checked the roots.
The pots are ready to be Transplat.Thank you for following my project.
🌷farah4weed🌷


Likes
10
Share


@cezario
Follow
Most plants are looking good. One plant has some discolorartion tho. Tops are looking nice and thick.


Processing
Likes
24
Share


@Hawkbo
Follow
Finally got my buddy to come out and add in a 20 amp outlet so I can fire up a better light. Still using quantum boards but with a 4500k spectrum. Got in a foliar with the Growzyme from green buzz liquids. Fed them right before I took the pics they look a little sad but hopefully they bounce back quickly. Not much else going on.
The code bangdang will get you discounts at..
Gorillagrowtent.com
Rainsciencegrowbags.com
KindLEDgrowlights.com and more (see Instagram Bio for @bangdangbuds)
Also check out my Instagram if your interested in entering a giveaway for a green buzz liquids starter kit including some living organics, fast plants spray and some seeds of the winner choice.


Likes
6
Share

@carlitoshaze44
Follow
Así es como empezamos la tercera semana,seguimos con humedad alta pero la vamos controlando..
Estos días da buen tiempo la humedad en la calle será mucho más baja así podré meter aire sin tanta humedad..
De momento todo bien en el cultivo ningún problema hasta la fecha.
Ya podéis ver,y comentar sobre algo que veáis que yo no!
Como dicen! Ven veinte ojos mejor que dos!
🖖
Día 12
Último fungicida prevención mutritis,hongos humedad.
Primer riego foliar hormonas producción de flores.
🌹
Día 13
Nada en especial solo observar si veo algún cambio tras las hormonas,aún no veo grandes observaciones fuera de lo natural del paso de los días.
En el día de mañana por lo que me recomendó el fabricante se verán los resultados a la vista!
Comentar que seguimos con la iluminación al 100x100 de capacidad
Marshydro sp3000 x2
Hero led Ignator t720
Yxo led 60w ir+un espectro completo
En la siguiente semana me llega el nuevo driver de philips para poder conectar la lámpara de IR que pude adquirir a Yxo nuevamente! Lampara led espectro completo + IR 70w .
Me vendrá muy bien para el pequeño espacio de la puerta que necesita más iluminación para poder desarrollar bien esas dos plantas,de la entrada.
La humedad fue cosa del pasado.
Evite el uso de desumificador eléctrico añadiendo varios de sales,deciros que funcionan muy bien no dan un control exacto pero mantienen una humedad interior estable para todo el periodo de floración!
50% de humedad lo demuestra!
Hoy añadi un poco más de sustrato. 110 litros exactamente sobre la cama de cultivo que tenía de topcrop con humus de lombriz,tierra diatomeas y alimentada con npk.
Después de eso tengo en mi cama de cultivo 810 litros de sustrato para mis 44haze. 💐
Saludos
Día 14
Anulado el intractor,ya que el propio extractor mete aire fresco por las rendijas de ventilación..
En lo largo de la noche iré viendo el resultado en datos..
Ya coloque los soportes para la nueva iluminación que en estos días llega su driver de sustitución
E visto que algunas plantas en estos dos días están en 67-70cm..
Ya colocado el sistema de riego para evitar más pisadas en el cultivo ya que algunas se realentizaron por pisar encima de sus raíces..
Le e metido una pequeña poda de bajos para airear más la zonas bajas del cultivo.
Pequeño riego de folacion con remedio de agua azúcar para dos que estaban más estresadas.
Likes
16
Share


@Prototype0181
Follow
The colorscheme popped up finnaly 😃
And for the rest nothing to report they are a joy to grow


Likes
6
Share


@oregonian
Follow
Yellowsticky traps capture hundreds of thrips. She is just beginning to become a girrrrl.

Likes
28
Share


@cyberkyd
Follow
Just an OKAY Week. Nothing miraculous. Growth is as stunned as expected due to over exposure to high PPFD I presume since they all look healthy in every other way except the height and density for a 2 week old vegging plant. It's not that of a weed.
Transplanted them all into 3 Gal Fabric Pots, Except Gelato which is looking pointeless to plant at this stage.
Feeding every second day about 250 ml per plant.
Feeding Schedule
2 ML/Gal CalMag
2.5 ML Micro
2.5 Grow
1 ml Bloom.
PH Down at 5.8
to safeguard against the odd's I sowed another Gelato seed to the fam on 10th Feb. Will Create a separate diary for that grow.


Likes
2
Share


@Bigterpene
Follow
*all white spots are from nutrients + water* Titan has been entering flowering for a week or so its week 5 now and the pistils are are getting decently long seeing the buds starting to form and some pistils are orange many bud sites been doing lst to maximize bud sites, special kush #1 on the left has been doing pretty good for the torture it’s been through both plants are obviously stunted but special kush is pretty resilient, trimmed the edges of leaves as they were over nutriezed and touching soil, while I was doing lst a couple weeks ago I split the stem where the tops were growing on accident and I tied it together with a piece of rubber tightly and it’s been doing pretty good the 2 tops came back and they’re getting pretty big and developing more branches
Likes
7
Share


@XoticGROW666
Follow
( RUNTZ X F1DURB X GUSHERS )🍬🌈🍨🍧
PURP KICKIN INN END #WEEK4
CANT WAIT TILL THE BUDS SWELL UPP!!
SUPA INTENSE CANDY TERPS THIS ROUND
NOT BIG BUDS BUT SUPA HIGH IN BRIXX LEVEL WITH ALL THE ORGANIC CARBON INPUTS!! PPM 900/1200 1.2 max
(Face Off OG x Watermelon Zkittlez) X (Runtz x F1 Durb x Gushers) 🍉🍬🌈🍧🍨🍦
LIL PRUPLE TINT WIT MOUTH WATERING SUGARY TERPS KICK INN END #WEEK4 BY WEEK 7/8 SHE WILL BE PURPLE PURPLE WIT SUPER INTENSE CANDY MOUTH WATERING TERPS CANT WAIT TILL SEE THEM BUDS SWELL UPP!! PHENO A/B
NOT BIG BUDS BUT SUPA HIGH IN BRIXX LEVEL WITH ALL THE ORGANIC CARBON INPUTS!! PPM 900/1200 1.2 max