
Likes
Comments
Share


@SlowpokeFuegobud
Follow
DAY 84
Watered with 1ml Grow + 4ml Bloom 💧
DAY 86
Watered with 0,5ml Grow + 3ml Bloom + enzymes 💧
I don't know, today she looks wayyyy more ready, I need to check trichomes, keep you updated!! 😘
DAY 88
Watered with BioEnhancer. 🐚 🐡 🌊
DAY 90
Watered with pH adjusted water only. 💧
Checked trichomes, they look ok, mostly cloudy, maybe some are like milk-coffee.. I asked Delicious and they said it's a Sativa, few more days and then I'm done. 😎
I wish I could invite everyone to test smoke this, it is something completely new, the aroma is more than I ever expected to come out of a cannabis plant. And being a cannabis plant is awesome already on its own! So.. I think chop chop next week! 🔪
This is an Early Version for sure! Flowering went so fast and I want to grow it again! I understand the seeds will not have as much time to ripen as with a 8 weeks flowering mum, but they can sprout. I will order more next time. And also will order the photoperiodic normal version, Caramelo, I love you! 😍
💚 🤤 💚 🤤 💚 🤤 💚 🤤 💚 🤤 💚 🤤
Have a great week!! 😘
__________________________________________________
SET UP
240W Fullspectrum LED 660nm 730nm 3500K dimmable
custom exhaust fan 270/320 m³/h
3x Garden High Pro fans 5W
tap water EC 0,25 - adding Calmag to EC 0,4-0,6 - adding pH minus Bloom (AHH) to pH 6,5

Likes
25
Share


@Dunk_Junk
Follow
She's growing well this week. Flowers fattening up a bit but she's got quite a few weeks left yet. 💪

Likes
23
Share


@SativaSteve88
Follow
Both shot up in size over the past week or two, ones at 113cm other now at 130cm, tallest has been bent over and tied down to hopefully stop the growth, coming along well now and can't wait for the next few weeks to pass, First ever grow only done LST on 1 plant let the other grow naturally but put a few ties on it this week to get more light exposure as it seems way behind the other and there is only actually about 2 days in them, what are peoples thoughts on how its looking? Thanks


Likes
65
Share


@Roberts
Follow
Gold Sativa is doing well. She is in heavy bulking. I upped her nutrition. She is in a New Level Hydro bucket, under a Spider Farmer SE5000 light. Nothing new to report. Steady the course till the finish. Thank you New Level Hydro, Spider Farmer, and Quebec Seeds. 🤜🤛🌱🌱🌱
Thank you grow diaries community for the 👇likes👇, follows, comments, and subscriptions on my YouTube channel👇. ❄️🌱🍻 Happy Growing 🌱🌱🌱
https://youtube.com/channel/UCAhN7yRzWLpcaRHhMIQ7X4g
SE5000
https://amzn.to/3qFpAML
Spider Farmer Official Website Links:
US&Worldwide: https://www.spider-farmer.com
UK: https://spiderfarmer.co.uk
CA: https://spiderfarmer.ca
EU: https://spiderfarmer.eu
AU: https://spiderfarmer.com.au
Coupon Code: saveurcash (is stackable in most cases)
Www.newlevelhydro.com
Www.hygrozyme.com

Likes
Comments
Share


@Sativ_420
Follow
Vienen creciendo muy bien. Se nota la diferencia de tamaño entre las que están en 30L y las que están en 50(tienen la tierra por la mitad en maceta de 100. Espero en unos días poder transplantarlas también

Likes
15
Share


@Messypies
Follow
Buds are fattening by the day :). Some of the pistols are translucent purple which is really cool. Cant wait to test photoperiod vs autoflower


Likes
3
Share


@Whosaysgirlscantgrow
Follow
Last week or so on this one. She’s got one last feed and then we will be heading to flush in the next 3 or 4 days. Aiming for the chop in 7 days ish. She smells like a sweet shop, starting to change to purple in places! I can’t wait!
Still using Monkey Nutes


Processing
Likes
19
Share


@eldruida_lamota
Follow
Vamos familia, empieza lo bueno, y es que estás gorillas si han estirado, la primera semana de floración, aportamos algo de big bud para ir amoldándolas.
Es una cepa que se comporta bastante bien en indoor, tallo grueso y bastante distancia entre internudos, deseando ver que flores nos da.
ph controlado en 6,5 ahora va todo fenómeno, temperaturas ideales, humedad correcta 50 % , y pronto la bajaremos a 40 %.
Hasta ahora lo que hay, próximamente nos vemos familia.

Likes
5
Share

@ibbzy
Follow
Amazing growth. Pleased with these new LEDs.
Lollipopped & defoliated, tried to leave some on the bottom, will probably pick a few more off this week
Reducing lights to 11/13 and then to 10/14 at week 6. Trying something.(Emulating an autumn/fall environment with temprature drops also)
Hopefully I can get the nice purple colours to come out.
Will also be adding Deep Red now. UVA has been on all flower.

Likes
4
Share


@Erich2025
Follow
I really enjoy growing these plants. They change every day. The 2 bigger onee start to have purple all over the leafs. The tallest is craaaaazy frosty. When I open the growbox there comes a smell like a punch in my face. They smell very strong and they smell amazing. 3 different phenos, 3 different smells and structures. It is like growing 3 different strains but all 3 of them seem to be special.
I hope the grow finishes as well as it went till today.🙏🌴🍪
🌴🍪🌲🍊⛽️🔥

Likes
15
Share


@Pottstradomus
Follow
The buds put on some size this last week. This strain was supposed to be around 8 weeks but I’m day 58 since flipping the switch and they are still going.
Started flushing today with plain water and flawless finish. My runoff ppm was at 1000, I’ll keep flushing this week. My harvest date will be right at 10 weeks.

Likes
10
Share


@mutantfarmer
Follow
This week I turned on automatic watering 2 times a day for 10 minutes. After that, the plant began to overflow, then I realized my mistake and temporarily returned to manual watering. Otherwise, everything went quietly and calmly, since the killer is building up the root system, events and rapid growth have not yet taken place.
Likes
20
Share

@Dunk_Junk
Follow
Wow.......... 33cm vertical growth this week! She over doubled in height!!!!!!!
I'm getting a bit excited to see how she turns out 😍
Likes
26
Share


@Wicked_Stix
Follow
The end of week 1 has arrived. We all know how it goes. Just playing the waiting game. At this stage these girls are just working on building their root system. The roots should be hitting the reservoir in the bottom of the buckets soon then they should take off. Got the water pumping and the lights beaming 24 hours a day. Running a low dose of maxigro. Keeping the ph around 6. Will probably be topping them around day 12. Would be amazing if I can get them ready to switch to flower at the end of week 3. But for now I'm just going to check on them 420 times a day hoping they don't die. Might be back next week if they are alive. Happy growing!

Likes
34
Share

@Kirsten
Follow
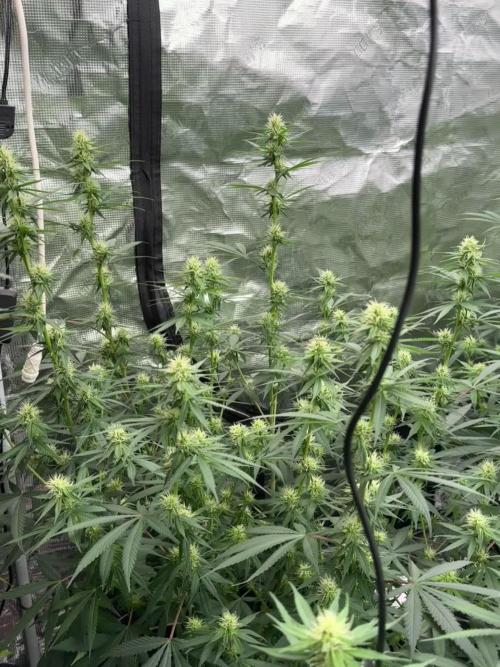
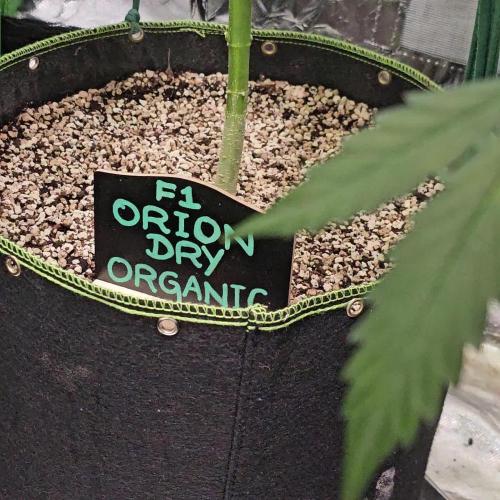
Orion Organic.
We are so close to being done. I was going to wait and see if the buds would bulk up in size a bit, but it doesn't look likely at this stage, so I am planning on harvesting this week. The trichomes are cloudy, with a small amount of amber.
9.8.25:
I watered with 3L of dechlorinated water PH'd to 6.5 with;
💜 1ml Trace
PH: 6.5
PPM: 381
12.8.25:
I watered with 2L of dechlorinated water PH'd to 6.3 with;
💜 1ml Trace
PH: 6.3
PPM: 349
13.8.25:
I watered with 2ltrs of dechlorinated water PH'd to 6.6 with;
💜 1ml Trace
💜 1 TSP Biosys
PH: 6.6
PPM: 351
17.8.25:
I watered with 3 ltrs of dechlorinated water PH'd to 6.5 with;
💜 2ml Trace
PH: 6.5
PPM: 364
Thanks for following on this one, it has been very interesting and helpful as the experiment. 😁💚✌️🍃🙏
Likes
19
Share


@Chubbs
Follow
420Fastbuds
TrainWreckAuto
Week 4
What up grow fam. Weekly update on these 2 wonderful ladies. This week I did introduce some nutes and the plants seem to respond amazing. Starting to see little pistols so guessing this will be the last week of veg before the transition into flower. All in all Happy Growing
Processing
Likes
27
Share

@Dunk_Junk
Follow
She's looking lovely this week!!!!!!!
Flowering in full swing.
Grew another 9cm too!!!!!!!!!!!

Likes
36
Share


@BrigadeDesTerps
Follow
Freaky se porte bien pour l’instant, elle n’a pas l’air d’attirer les limaces.
Je vais commencer à l’alimenter en thé de compost oxygéné pour la booster un petit peu

Likes
1
Share


@Elguacho420
Follow
Muy buenas a tod@s... Bueno otra semanita para las tropicanna poison... Me van gustando, las veo fuertes, crecen bien, aunque hay una que parece estresada x algo, aunque vallan las 3 dentro del mismo patro de riego y de más cosas se la ve decaída, de vez en cuando se anima pero está decaída, a ver q pasa... De momento todo en orden, buen ambiente y buena luz, una semana más y a floración... 💪🏻💪🏻 A ver q tal salen... Bueno espero les guste... Un saludo y buenos humos para tod@s... 🔥🔥💨💨💨
⚕️😎💎
🇦🇷🤝🏻🇪🇦