
Likes
Comments
Share


@6ix6ix6ix
Follow
Greeting of the day!
First of all, thanks to everybody who is engaging and interacting with my diary and myself. I truly enjoy and appreciate you all!
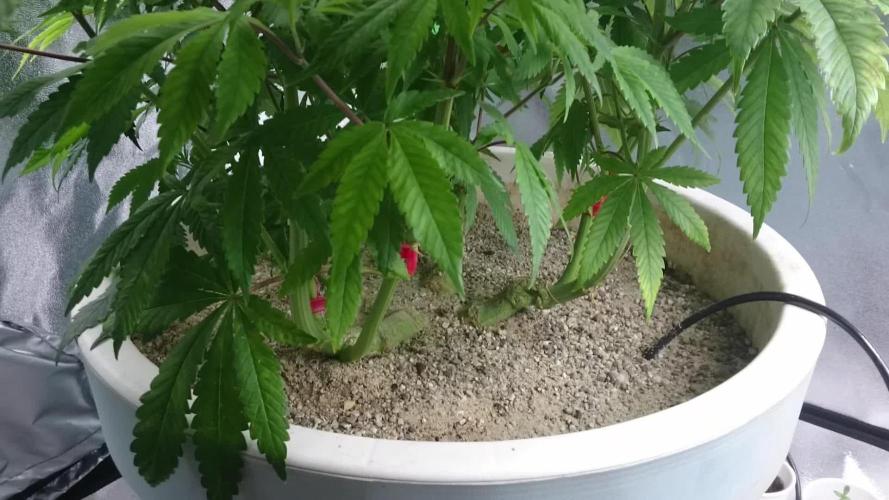
The time laps of the first LST is relevant to week 4, but decided to put it here as well for the contrast.
For the last week, i have increased watering volumes and put them on regular schedule, and i see pretty massive grow. Jumped from 15 to 35cm in height and thats after the first LST. I am not feeding the girls anything but water with regulated PH. Seems that the soil is rich enough to keep them fed.
Today (day 33), ive decided to perform another LST, more radical than the first one.
The main stems started to shoot up and it seems that the rest of the body is falling behind in growth, so i bended and twisted around the main columns of 2/3 girls.
Is seems that they have reacted extremely positively. I see immediate development of secondary columns (check out the photo right after lst and in 4 hours)
Also, I’ve defoliated, well… removed one leaf that I was not able to tuck anywhere.
P.S.
Oh! got the girls a new fan, specially designed for grow tents. They are happy and so am I.
The smell is so nice, if i leave the tent open it fills the room almost immediately.
Thanks for stopping by and reading, have a great day and good luck!
Will drop updates on the go.


Likes
8
Share


@GrownwithLED
Follow
Both plants grow with a nice healthy green color and develop well. Barbarian (=AK-47 x Barabara Bud) plant # 2 is a little taller than plant #1 at this time, but both show nice side-branching and overall growth. They love the Advanced Nutrients feeding schedule and are well protected inside the Secret Jardin grow tent.
Likes
19
Share


@ItsGreenjamin
Follow
nice plant 💚💚 she is so unpretentious 🙏 next time definitely will try other spliff genetics ✌️✌️

Likes
31
Share


@MadeInGermany
Follow
Info:
Unfortunately, I had to find out that my account is used for fake pages in social media.
I am only active here on growdiaries.
I am not on facebook instagram twitter etc All accounts except this one are fake.
Flowering day 22
since the time
was changed
to 12/12 h.
Hi everyone :-) .
This week she has had extreme growth :-).
In the next 5-10 days she gets 1 g GHSC Powder Feeding to 1 l coco.
It is poured every 2 days with 1.2 l per pouring.
Otherwise everything was cleaned and refilled.
Have fun with the update stay healthy .
You can buy this Strain at :
www.Zamnesia.com
Type:
Runtz
☝️🏼
Genetics:
Zkittlez x Gelato
👍
Vega lamp: 2 x Todogrow Led
Quantum Board 100 W
💡
Bloom Lamp : 2 x Todogrow Led
Cxb 3590 COB 3500 K 205 W
💡💡☝️🏼
Soil : Bio Bizz Coco
☝️🏼
Nutrients : Green House Seeds Company Powder Feeding Bio
☝️🏼🌱
Water: Osmosis water mixed with normal water (24 hours stale that the chlorine evaporates) to 0.2 EC. Add Cal / Mag to 0.4 Ec Ph with Organic Ph - to 5.8

Likes
7
Share


@JayBane
Follow
FastBuds? More like FatNugz!
What a delight this Strawberry Banana was to grow!
Smelling wonderful, trichome rich and compact buds!
Will update a harvest report once she's dried and trimmed up & ready to bottle.

Likes
23
Share


@MaltaHerbman
Follow
First 7 days of the Strawberry Gorilla from Fastbuds.
She was germination in glass of water than move to cotton and in 2 days it had more than an inch of root so i moved to her home 12 liters pot with biobizz,coco peat and perlite for the vegitation she will have the Marshydro Ts 600 in 80 x80 grow tent.
Likes
11
Share


@GREENPHOENIX6262
Follow
Week 3 Veg Update, (Please see the following)
Both Plants ( Seedsman -Critical +2.0 - Blimburn (Applefritter)
Thus far both plants are coming along nicely
WIll be using Bud clip bender this week to utilize PPF light usage.
*Mid-Week Update*
Introduced CaliMagic this week
LST and Bud clipped
Light Defoliation
Introduced Element Nutrient (Flower Fuel)
1 week until early Flower.
*End of week recap* 08/21
Light Defoliation
Bud Clip tie down
Thus far all is running smoothly, No changes from above.


Likes
28
Share


@GaiaGreenGiant
Follow
New strain, new led grow light, new organic dry amendment fertilizer, new climate controller. Kicking it up a notch this round.

Likes
26
Share


@BlackDragon22
Follow
Che dire ragazzi... Odori fortissimi nell'aria, come vedete gli insetti stanno a pranzo e cena sulle mie piccole.. Pazienza! Non dovrebbe mancare tanto, penso 2 settimane al raccolto, sono riuscito a farcele vedere di giorno finalmente è sono contento di poterle condividere con tutti voi 🙏🏽 aggiunte un po di noci in più, anche se si vede un po di fox talking, il resto perfetto.
Likes
5
Share


@HIAZ_urbanbudfarmer
Follow
Going to mainline this plant, was topped today at the 3rd node. Interested to see how this pheno turns out as I've done a few runs with this strain recently, both from seed & clone. Two very different phenotypes, 1 grew very bushy with bigger buds & the 2nd was quite different with smaller buds. Both were pretty similar when it came to quality & potency but phenotype 1 yielded more each time around an ounce +. She is in week 3 day 16
Likes
10
Share


@iLoveGoodWeed
Follow
The buds are really getting fat on this little CBD monster did not expect that. She will be small but heavy
Likes
14
Share


@MrReeferMadness
Follow
The psychosis looks like it's stopped growing right at it limit for the space that it is in... hopefully it doesn't grow anymore than 4 inches from now.
All plants are doing great tbh and the space is getting limited for maintenance now but after week five I won't need be inside the room until around harvest time !!

Likes
10
Share


@Gutismoke102
Follow
Supper cropped to get a even canopy girls looking great can’t wait to see there Bud production

Likes
18
Share


@SundancerS
Follow
Erste Blühwoche und der Sticky Brokoli hat beschlossen, dass Kompaktheit zwar nett war, Höhe aber jetzt auch ganz charmant ist. Der Stretch ist deutlich, aber wohlerzogen, kein wildes Spargeln, eher ein kontrolliertes „Ich könnte noch“. Viele Triebe mussten trotzdem gehen; keine Tragödie, sondern klassische Personaloptimierung. Wer es nicht rechtzeitig Richtung Licht geschafft hat, wurde höflich, aber endgültig aussortiert.
Nach der Entlaubung wirkt das Blätterdach wieder wie geplant und nicht wie ein schlecht gelüfteter Dschungel. Licht kommt durch, Luft zirkuliert, die verbliebenen Triebe stehen stabil und selbstbewusst da. Technisch bleibt alles angenehm unspektakulär: EC 1,8, pH 5,9
Bisher ein entspannter Grow, gute Struktur, Stretch unter Kontrolle. Der Brokoli wird langsam sticky, und man ahnt, dass das hier kein Snack, sondern ein Hauptgericht wird. 😎
Likes
3
Share

@PatriciaGant
Follow
Dane, We all should help one another.
Human beings are like that.
We should live by each other’s happiness - not by each other’s misery.
We don’t want to hate and despise one another, share the Joint.
And mother earth is rich and can provide for everyone.
We can Grow enough Happiness, In this paradise, there is room for everyone.
We only exist to bring joy into the world and The way of life can be free and beautiful,
but we have lost the way.
Grow High and Give the world A smile.
At the end we own nothing more then all our memories, lets make them amazing for everyone,
nothing to lose only everything to win.
for those who come after, right.
A last kiss goodby, a second one, softer and long as a sign, that you are woth it.
That Everyone worth, who loved and given.
Enought Hippie Talk, now have a nice day and an even better grow, thx for watching by.
((From Seed 🌱
((From Clone 🌿
week report:
shhhit those fking flys sand should be washed and not mineral heavy SHOULD well i let airpump in mabe it helpd sand could strangle off air suply we see
well well sadly she is dying

Likes
10
Share


@AsNoriu
Follow
Day 87. Thought will be trim jail with her, but nugs formmed very nice, think she was most mature from this run. All trim for bubble hash, rest hanging, two rows of colours and sparks ! ;)
Day 97. 98 g. went for curing
Happy Growing !


Processing
Likes
8
Share


@Joni2017
Follow
Hello everybody 👋🏻 today full moon 🌕. I put the seed in a tupper on top of the router where it gives a good temperature😊. I will put the led at half power (400W) during vegetation and at full power (800W) in flowering
Royal Dwarf
This variety, which removes the genetics of the first autoflowering plants, is reaffirmed in the sector as a plant of the most interesting.
Dwarft genetics comes from the crossing of 2 very specific indications that transmit its main characteristics. RQS crossed a Dwarft with a feminized Skunk to obtain the Royal Dwarft. Finally, he crossed the result with his autoflowering predecessor to stabilize this characteristic.
With a maximum height of around 50 cm, and a little branched structure, it becomes a compact and vigorous plant, perfect to cultivate in small spaces, discreetly.
With a maximum production of 40g per plant, and notorious for being the most productive genetics of Royal Queen Seeds, it will be a variety of the pleasure of the most impatient growers, being able to achieve an interesting harvest volume without having to wait for a whole harvest cycle .
We are talking about a marijuana genetics with a sweet but aromatic taste, and really strong in intensity. The taste picks up the bottom of the Dwarft part, but with the nuances of the Skunk marijuana variety.
As for the effect, we will obtain the mental clarity and the socializing effect of the Skunk with a pleasant physical effect coming from the indica part. Of moderate power, it seems a boil recommended for day to day.
THC: 13%
CBD: Low
Yield Indoor : 150 - 200 gr/m2
Yield Outdoor: 30 - 80 gr/plant
Height Indoor: 40 - 70 cm
Height Outdoor: 50 - 90 cm
Flowering time: 6 - 7 weeks
Harvest Month: 8-9 weeks after sprouting
Genetic Background: Skunk x Ruderalis
Type: Sativa 60% Indica 10% Ruderalis 30%
Effect: A motivating and inspiring feeling
Flavor: Citrus, Sweet
Climate: Cold
Bio Tabs
Now fertilizing your plants will be much easier; we only have to add the Bio Tabs and the other components that are included directly in the pot when we plant, and the rest of the crop will only add water to our pots.
In the middle of the crop you have to apply an irrigation with Orgratrex and Bactrex to reinforce the biological activity and that's it. We will have plants as always, the most productive and tasty, totally organic and without having to worry about excess nutrients or fertilize them.
Dosage and how to use the Starter Pack of Bio Tabs step by step:
Fill our pots to about 3/4 and add 3g of Mycotrex for each pot, no matter the size. More or less are 3 tablespoons of coffee rasas.
Then we add another 25g of Startrex (which comes to be 2 tablespoons) every 5L of soil, so if we have 10L of pot then 50g and so progressively.
We stir well to mix with our substrate and just fill the pot of earth.
Then we make the hole to transplant our plant to the final pot, and in that hole you have to throw another 2g of MycoTrex into the hole itself and we can now transplant our plants.
Then we have to add your Bio Tabs tablets, every 5L of earth a tablet on the substrate, if we have 10L then two tablets ... You have to bury them closer to the edge of the pot than in the center. They are buried about 5 cm deep in the substrate and we will have our plants fertilized for weeks.
We make a mixture with the last component that remains when we plant, Bactrex. Add 1g to a liter of water and give the first watering with that mixture.
From now on, you only have to water with water until the 5th week.
At the 5th week, we will have to contribute a new help to our plants, we will add 20ml of Orgatrex and 1g of Bactrex in 500ml of water and stir well. Water only with that half a liter a plant and only once.
Add water until the end of the crop, that's that easy.😋👏🏻👏🏻
Biobizz light mix
With Light Mix of BioBizz we will be 100% sure of having bought one of the best lands available for your seeds. Saving on the ground is one of the worst mistakes we can make, since we are starting a job that the final result is to seek the highest quality and production. To think that is where the plant will have to live all its days of life so it will have to be of the best possible quality.
With Light Mix you will have an excellent substrate, as each land has a different formula and composition, we will find out who will best resist this substrate, according to the climatic conditions where we are going to plant. It is characterized by its high proportion of water / oxygen retention, this soil pulls more towards water retention so it will be perfect for all those who live in warmer areas avoiding having to water the pots so often, it retains a lot of humidity. We will have to be careful with the first days of our plants so as not to soil the land too much, otherwise the roots will not shoot as they should and you could even drown your plants, this advice is worth all the autoflowering genetics that are more sensitive to root problems and excess irrigation.
This sack of earth comes very light of nutrients, so this substrate should provide practically nutrients in all phases of the crop from the second week.
Composition:
Peat moss
Perlite
Ec: 1.2
Ph: 6.2
