
Likes
Comments
Share


@The_Doctor_Green
Follow
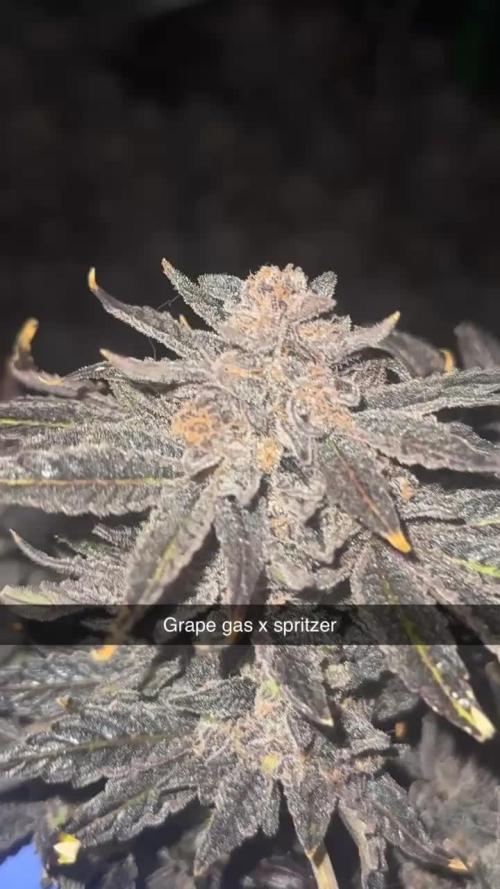
En la semana 14 de floracion se ha hecho más notoria la sobrefertilizacion pasada, ya que las hojas siguieron su curso y se han puesto crujientes, amarillas, al punto de que las amarillas entre los cogollos las he sacado, para que no se formen moho o algun hongo que arruine este proceso largo,por ende toda la planta se ha quedado casi sin hojas, entonces me surgen un montón de dudas con respecto a como proceder en estas semanas finales, me inclino por empezar con el lavado de raíces en la entrante semana 15, para así dar el corte final en la semana 17, según lo que aconseja el banco,(suelo darle 2 semanas más de floración, de las recomendaciones q brinda el bereber, aunque en esta ocasión, no lo considero posible).
También ha sido notoria la formación de la famosa, cola de zorro ,en algunos de los cogollos, (esto tiene relacion con el Stress que sufre una planta), una sobrefertilizacion es considerado algo stresante para una planta de marihuana.En otros casos la cola de zorro, también es una característica de algunas geneticas.
En las fotos principales de dicha genetica se pueden observar estos detalles, pero bueno,todo va salir bien✈️😎😅👺

Likes
11
Share


@masterofsmeagol
Follow
6/30 I messed up and put 8 days last week so I'll have tp do a six day week to get back on schedule. Pounded rain last night I guess. Very intense but very brief. As you can see in the video the plants are found great. A few have revegged so I'll need to defoliate the middle. I could make a TON of clones but it's pretty late for that. I might clone a couple outstanding plants to keep the genetics. Still seeing some pillar damage. Might do bt tonight. I'll keep this updated.
7/1 Super hot yesterday. Reached 90°. We are getting SOME rain today and thunder showers day after tomorrow. Bags still had some heft and everything looked good. I went back aroundcand found about half were at the point of needing water. He'll, they probably all did. My watering can is 2 gallons not 1.5 as advertised. So that means I used 5 gallons on the garden (not watering the 50) focusing the more water on the lightest bags. That tenth planet I'm seeing more septoria like leaves. This makes enough for me to be fairly positive ill need to treat it. I have plant doctor but I think copper works better. I also see more pillar damage so I've gotta apply something. I also need to lst more and I keep to clean put the interior of the plants so they don't get pm.
EDIT: IT WAS 80° and no rain at 6:30. Humidity close to 100% bit plants look AMAZING! I'm hoping this may be my best year yet! I won't grow a bigger plant than tjat blue cheese in the 50 but so far everything is looking good. I may add some nutes to the pink kush in the 50 due to tje slightly less green color. I assume it's just because the other soil is all New amd this was a mix. I defoliated lightly to prevent pm but I have more to do. I just wanted to get a video of the girls looking good.
7/2 82° at 9am. Glad I decided to water even thoughvi watered yesterday. I need to up my volume. Thirty degree temp swings don't help much either. I said I used 4 gals but I used 5. I had one phed already. I'm hoping this will be one of my best years. IT looks like it! I won't have that MONSTER blue cheese in the 50. It was the smallest plant anyway and shows the difference between using NEW soil and mixing old soil WITH new soil. It's a much lighter green. Still need to apply bt and do a little more defoliation.
EDIT: IT'S 90° WITH LIKE 100% RH. PLANTS LOOK A LITTLE HEAT STRESSED BUT OTHERWISE PRETTY DAMN GOOD. EVEN MY FATHER MENTIONED (KNOCK ON WOOD) "THAT I DONT HAVE ANY SHOT ON THEM THIS YEAR." LOL. I UPLOADED A VIDEO TO SHARE. HOPE YOU GUYS ARE HAVING AS MUCH FUN AS I AM!
7/3 83° at 9:40a.m. I need to increase my watering volume so I don't need to water every day. I used 5 gallons to water everything but the 50. I think I'm underwatering. However it was supposed to be severe thunder storms with torrential rain, high winds and hail. I'll gratefully take this hot sunny day instead. However in the future I think I'm not goingvto add in the predicted rainfall in my schedule. Unless it's a torrential down pour obviously. Everything g is still looking good and I've still got some work to do.


Processing
Likes
12
Share


@GrowGuy97
Follow
Day 28 - These ladies are growing like crazy! 2 of them are already almost as tall as my white widow autos that are about 2 weeks ahead!
Day 30 - Still stretching like crazy, starting to look much better though I have to say!
Day 32 - Ladies are starting to get nice & purple!


Likes
16
Share


@valiotoro
Follow
Hello everyone 😎
Week 5 of flower for the Tropi🌴🍪
The top buds are ready✂️
Harvest in 2-3 times…
Amazing buds solid as a diamond 💎
It’s not easy to get this result with an autoflower.
Exactly what I’m looking for and this is why I love so much Fast Buds🤩
And when you get this result the trim is easier😁
Likes
2
Share

@Swanbergs
Follow
This grow is looking phenomenal. Can’t wait to wash for rosin! Freezing as of now update: test run of bubble this shit is fucing crazy gas. So pungent and full of flavor. Tried some wet Melt in the Puffco it hits like crazy. Great effects and gas flavor. Will be pressing asap update did a 2nd wash tonight of all the trim from plant 3. I’d say 600 wet grams. Yielded great and awesome color

Processing
Likes
10
Share


@Claxdiok
Follow
Luego de agregar micorrizas las plantas están absorbiendo demasiados nutrientes y muy rápido lo cual hace que las tenga que fertilizar más porque aún tienen deficiencia del 5% así que está semana empezaré con fósforo potasio.
Likes
4
Share

@Elemental
Follow
Segunda dose de chá de banana dia 10 de novembro.
O caldo estava denso.
Os buds estão engordando lindamente.

Likes
5
Share


@Ieiogrow94
Follow
Eccoci di nuovo qui!!!
Super eccitato per questa nuova collab con Spliff Seed, che mi ha dato l’opportunità di testare questa nuova genetica e di condividere i progressi con tutti voi!!!
Come sempre partiamo nei bicchieri per poi travasare.. Questa volta verrà svolto tutto sotto la Lumatek Zeus 465 ProC, mi aspetto molto da questo ciclo!!
Purtroppo ho perso i file delle scorse settimane e dovrò reiniziare il report da ora scusate per il disagio
Grazie a tutti per il supporto ❤️🍀🔥

Likes
12
Share


@Naujas
Follow
Well, that day has come, the girl would have been really different if not for the high temperature, strong light, and a huge lack of potassium :( well, everything will be fine next time :) live and learn :) I am satisfied with the result, which is what I need :) got 200 gr of liquid :) gathered a lot of sugar leaf :) they are already in the sweet shop :D I will make an addition!! good growth and success :)

Likes
9
Share


@Cestlaweed
Follow
Se pegaron gran estirón y la floracion ya es evidente en todas las plantas a excepcion de lsd 25.
El calor ya es altísimo debido al verano y se empieza a notar en las hojas superiores, sin embargo, todas las plantas tienen un aspecto sano.

Likes
35
Share

@Mrs_Larimar
Follow
2025-09-26
well weather changed hardly
6 days continously heavy rain and cold winds.
and this year she seems to take longer - hmmpf
but sespite all this, shes sfe
standing in 2 SCROG- nets and has a roof
so no risk of mold
only watching the branches wich are not covered by the roof
Processing
Likes
11
Share


@Carpe_Diem
Follow
Update day 70
Water with nutrients
Defolage
Update day 72
dress code..Xmas
Hope you like it 😉
👌👌👌👌👌


Likes
70
Share


@Mosquito_Haarlem
Follow
Boy ooh boy Week 9 is vandaag 17 november begonnen.
Ze gaat snel.
Haar bloemen worden vetgemest en ik heb meer bladeren weggeknipt.
Ze ruikt heerlijk sterk overheersend.
Laten we kijken hoe ze zich deze week ontwikkeld, ik ben benieuwd. 🌲
Ik zal gedurende de week nog verse foto's/filmpjes updaten dus hou het in de gaten 🧐


Processing
Likes
12
Share


@jennamontana
Follow
Growbox 100x100x200 cm // 900W VIPARSPECTRA LED // Biobizz light mix // 185m3 exhaust air system // FAN 40W
1-3 days // Germination and Planting into 0,5l Cups of Biobizz light mix
DAY 1 Plants coming out doing well

Likes
7
Share


@Kushizlez
Follow
Day 52-64
(Day 54) I’m going to thoroughly inspect each plant and remove bananas if found. So far it’s only been the one on #7 but I don’t want to take a chance.
I’m also going to give a watering with some runoff.
(Day 55) Can’t find anymore bananas but that one. I will probably find a few bag seeds but who knows. It’s way too late for pollen to really have effect anyway.
These 5 plants finish nice and early compared to my other tent flipped on the same day. I would never take this strain 65+ days like last time. I would do 56-60 days next time I flower this strain
(Day 58) Holy shit this tent is fading like crazy now. They are starting to show some beautiful autumn colors. #1 #5 and #7 are definitely done. #3 and #6 could use a little more time so I’ve decided to take them down on the 24th.
I haven’t seen anymore bananas and the one that popped out on #7 has shriveled up and receded.
(Day 63) I’m seeing what look like seed pods starting to form in some of the main colas on my picture perfect pheno. #7 is showing 3 or 4 little bananas too. All of the top buds are definitely done so I’m going to harvest as soon as the lights come on tomorrow. I’m going to give one last watering right now and then harvest. I’ve noticed that harvesting a watered plant will extend the dry time by a few days and that’s exactly what I’m looking for. A nice slow dry. Plants are being full plant hung + dry trimmed and tent is being kept at 60-65 degrees and 60-65% RH.
Cutting everything down was a pain in the ass. I had to individually cut each square the scrog net so it wouldn’t contract and squish all the buds. I chopped down my other tent as well so I have no other plants in flower right now.
Likes
6
Share


@ChitownCannaChica
Follow
And she’s up and drying! Massive yield, piney earthy terps— perfect structure. Just a great plant all around! More to come
Likes
39
Share


@MrSpooky882
Follow
Es geht langsam dem Ende zu die Pflanzen zeigen voll schöne Farben und glitzern schon schön 🤩😎 es sind ja noch ein paar Wochen also da geht noch was
