Likes
Comments
Share
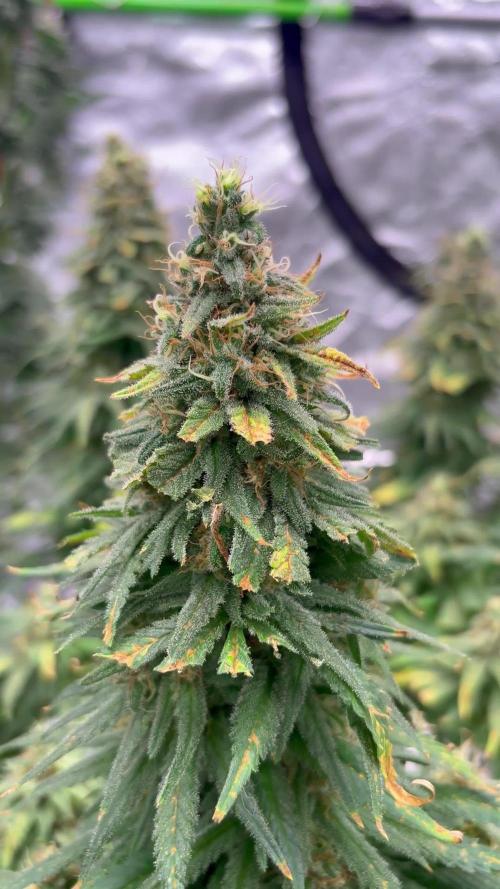
Noticed some yellowing tips. I think I need to dial back the nutrients a bit. I increased them last week to see what they could handle. 
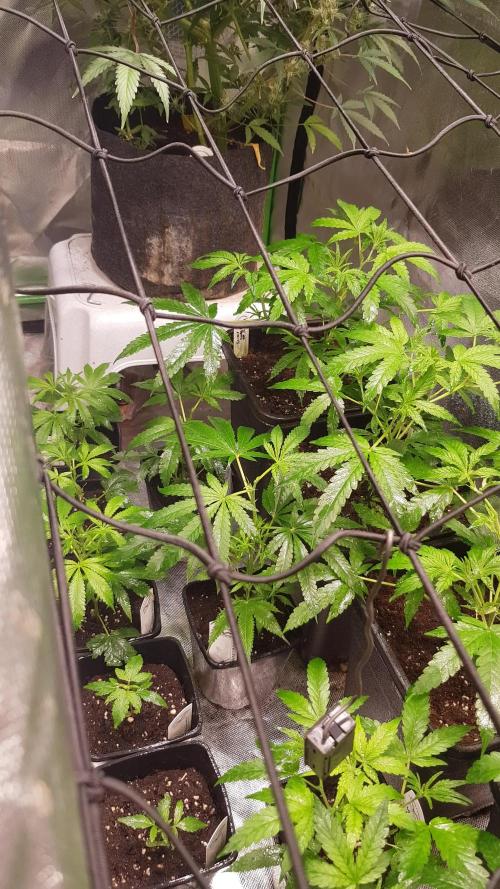
There is a lot more growth than I expected this time and I've let them veg longer than I usually like to but it was necessary to let them recover from my previous mistakes. Tomorrow will be a good day to defoliate and start the flip into flower. If it isn't nutrient burn, then what is causing the yellowing leaves and tips?
Likes
39
Share
Changed the res added the flowering feed. These all seem to like an e.c of 1. Let it creep up slightly and got a little bit of burn on the tips in a few places. They’ve all stretched nicely except the Runtz which are still quite short compared to the rest.
Processing
Likes
67
Share
@Ageddd
Follow
Whats up GD !!! ------------- GROWTH------------- I have been bending the plants like each 3 days, and topped again. ------------- IRRIGATION------------- 1l per plant, watering each 2 days. 1 of 2 irrigations with nutes, and the other with water. ------------- NUTRIENTS------------- Bio-Grow (2ml/l). --------------------------------------- Good vibes !! _06/05/2018_
Likes
6
Share
So just started giving them a bit of low stress training and upped the ml's nutrients. These are my first ever auto's and im a bit dubious to how they'll turn out. I do have high hopes for that tiny one i got there i think she'll put out most just you wait and see. Take care guy's n gals stay safe and happy growing :)
Processing
Likes
3
Share
Likes
11
Share
@goeser
Follow
More details and photos are coming when all buds are dried in about 6-7 days00
Likes
12
Share
@Pedro_88
Follow
ya estamos en las últimas semanas, aún falta un poco pero estamos ahí, con mucho esfuerzo y dedicación se que llegara a su etapa final
Likes
22
Share
Hey guys :-) . Today the plant was sprayed again with neem oil. There weren't any more trips to be seen after the second application, but to be on the safe side, you did it again today get a cure. That's why the beautiful dark shimmer on the leaves :-). She has developed very well this week. I will give you 7-10 days before I switch to flowering. This week it was poured 3 times with 1 l each (nutrients see table above) Otherwise everything was cleaned and, as always, everything was checked. Have fun with the update and stay healthy 🙏🏻 👇🏼👇🏼👇🏼👇🏼👇🏼👇🏼👇🏼👇🏼👇🏼👇🏼👇🏼👇🏼 A thank you for this wonderful strain goes out to Herzog https://instagram.com/herzog030?utm_medium=copy_link and the Exotic Seeds team You can buy this Nutrients at : https://greenbuzzliquids.com/en/shop/ With the discount code: Made_in_Germany you get a discount of 15% on all products from an order value of 100 euros. You can buy this Strain at : https://www.exoticseed.eu/ Water: Osmosis water mixed with normal water (24 hours stale that the chlorine evaporates) to 0.2 EC. Add Cal / Mag to 0.4 Ec Ph with Organic Ph - to 5.8 - 6.4 👆🏼👆🏼👆🏼👆🏼👆🏼👆🏼👆🏼👆🏼👆🏼👆🏼👆🏼👆🏼
Likes
7
Share
Que pasa familia, vamos con la cosecha de estas Black Muffin F1 de Sweetseeds. Esta variedad me resultó bastante sencilla de cultivary es bastante resistente, si no la maltratáis crece mucho y bien sana, la flor se ve increíble, tiene una cantidad de resina considerable y unos tonos rojos oscuros muy peculiares, se ven genial. El olor que desprende es bastante frutal con toques cítricos, no pinta nada mal, las flores están prietas. No da mayores problemas, el ciclo no es largo, cuiden con la altura ya que se desmadran un poco. IMPORTANTE destacar: En las fotos comprobaréis que ya no hay botes de cristal con sobres de bóveda, ahora hay Grovebags. Que son una especie de sobres o bolsas que retienen el peso, previene la aparición de moho y mantiene intacto el terpeno, para que el curado sea más óptimo. Hasta aquí todo, Buenos humos 💨💨💨
Likes
6
Share
Day 55 flower (day 109 since sprout). These girls are just getting nicer and nicer every week. I'm going to let them go for probably one more week since the temp and humidity has been really nice for them lately. The fade has really come in this past week and the flowers smell amazing. I'm getting a smell of berries and black licorice from them. Each plant got a 0.3L dose of recharge this week.
Likes
70
Share
Finally back to the garden after 4 weeks away. They were really in need of love by the time I got back to take care of the garden. BIG NEWS! Now running a California Lightworks Solarxtreme 500 as my main light. Will add a second SX500 light into the room once I start flower. Hit the LST on the again and just making sure they are getting fed and lots of love. Will have to push back my starting flower by another few weeks. See how the recover
Likes
53
Share
10 September Harvest - see pictures. While some growers leave the plant whole when they cut, I do not. It is a personal preference and situational convenience if your a home grower. I chose to cut large, long branches, and remove any whole water leaves, as long as it doesn’t interfere with the bud formation. I don’t trim yet. This is done for a few of reasons: 1) It’s my last good close-up look at her until another 5 days or more, 2) I don’t want wet leaves drying on my buds if I can help it, and 3) I occasionally like being able to shine a small LED flashlight on the flowers while its drying. Mold is our greatest problem as growers, it can destroy a beautiful grow right up until the end process. Then I hang it in a dark closet, provide circulation and ventilation. Light and heat, anything above 80 degrees F, will start a break down in cannabinoids during the dry, it is ideal to stay away from both. I’m fortunate that a humidity level of 50- 55% and temperature of 65-70 degrees F is fairly consistent and easy to maintain. Anything below 60 degree F will prevent the adequate drying out of chlorophyll. Almost all my flower routinely take 5-7 days, some a little longer, to properly dry out. 15 September Trim - see pictures. First you’ll notice the buds have shrunk up to half their original size. This is just a fact that we growers have to deal with. Due to evaporation without uptake of water, it takes about 3 days for the chlorophyll to dry up, then slowly go through a chemical change. Along with the leaves, cannabinoids also begin a chemical change after 3 days called decarboxylation. A slow process where the THC level increases while curing. You want the leaf to be dry so they can be hand trimmed easily, but you do not want that bud so dry that it starts to fall apart in your hand. Try to handle carefully by the main stem to avoid touching the bud all together. A lot of these cut leaves will be covered with trichomes, good for making oils, or other products, it’s an option worth looking into keeping it. After trimming, I do separate a few premium flowers for my first smoq. Then loosely fill wide mouth quart mason jars with about 1 oz/28 gr of product per jar. I seal the lids for a few hours to determine what relative humidity they are at, see hygrometer pic, before making a decision to put in a 62% humidity control pack of my choice or to wait, then place in secure in a cool dark place with stable humidity and temperature. It is very important to then observe/burp or exchange the air as needed, up to several times a day, until 62% rh is achieved. Once your close to to your mark, put in your desired RH level control terpene shield. If you have a problem getting there: 1) it has dried out too much, no real solution, try to put several large cut stems left over from harvest into the jars with the buds to try and increase humidty, 2) it has not dried out enough, in this case no problem, just remove and dry out a little more. This is also a personal choice, some people like it drier in the 50% plus range. Whatever you do, research and preserve. At that time burping is no longer required. Cannabis will reach its peak potency potential at about 40 or so days into the cure. The finished product should be a perfect grind when cured correctly without clogging up your grinder, this could take a month. Now that I’ve said that, I’m sure someone has grown something that they have not been able to grind. It can remain in this state for an easy 6 months with little change, locking in all the terpenes and potencies. All you need to do is occasionally check the product to ensure there are no molds. If your grow/harvest/cure techniques are good this should not be an issue. It would not be uncommon to find many cannabis strains will last, with small degradable change, for up to one year after being stored this way. Using an airtight glass container, controlled relative humidity, maintained low temperature, and kept in darkness will equal maximum shelf life. Always avoid direct sunlight and temperatures above 80 degrees F. The reasons I’ve ultimately chosen Deep Water Culture as a grow medium. Each has their own pros and cons indeed. I found the most efficient, less maintenance and ideal solution for my situation was DWC. Burdens to overcome depend on size up set-up; initial equipment cost, size of containers, ph monitors, air pumps, type of water to use-reverse osmosis, RO cost/set-up/maintenance, ways to transfer/change water and nutrients, what nutrients to use and schedules, takes several grows to learn and understand, a 1 year learning curv, easy to nutrient burn. The Benefits of growing in water; no dirt, no bugs, no diseases, rare nutrient deficiencies/toxicities, steady and rapid growth that enables the plant to reach its genetic potential. After harvest, there is about a 1 hour equipment cleanup, sterilization and turn around process before replanting. Cannabis will perform in so many different ways and mediums, no one way is the best and the best way is the one you are using, right. Chose what works for you in the long run. There will always be an initial cost in set-up. My advice if one were in need to cut corners, I would not recommend cheap lights. This single factor is the most critical, afford for the best. The notion that organic and water has a different taste, flavor and potency effect is absolutely debatable. The more we learn the better we grow and experience is always the best teacher. This is what works for me and my methods of growing in general from beginning to end. A BIG “Thank You” to everyone who stopped by to take a look. My next diary will start at the beginning of October 2023 with a Forbidden Runtz Auto. There will be minor differences during the grow. I enjoy Auto strains simply by what can be achieved in a short time. No matter the strain they will unveil one thing in common, the demand for attention. Many times over it is the anecdotal gardener that surmount plant scientist. Last should I mention, do not forget to stop and enjoy the fruits of your labour...
Likes
22
Share
This week went well. Started to see some good growth. Everything looking healthy, aside from one plant. I went into a state of concern again. Checked for pests, considered nutrient imbalances. Tried doing a bit of a heavier feeding on her. In the end, I think it came down to, too much wind on her. I removed the affected leaves. And closely monitored it. I also had one droopy plant. Which I think she was working on her root system. Because when she picked back up, she went into a growth explosion. And ever since has been my strongest healthiest plant by far. I am about to ready to try topping.
Likes
15
Share
@Chubbs
Follow
What up fam, weekly update on these lovely ladies. I put the scrog net out this week for support and am I glad I did. Only after a couple days they grew right through it. The greenhouse is 6'5 feet tall and they're pushing 5'6. I'll go in there and take off some of the lower fan leafs at the bottom but not to much defoliation needed. I'm seeing preflowers so I'll also switch the nutes from grow to bloom. All in all Happy
Likes
10
Share
@4F1M6
Follow
I started germination of 2 M.A.C beans on 29/12/2020. I pre moistened my rockwool cubes with ph balanced water to 6.4. Made sure the plugs were just damp and not soaked. Using a small wooden dowel I increased the size of the plugs pre made holes. Than I sowed my beans into the holes. Ripped off a small piece of rockwool and mulched it up. Lightly filled the holes in with the mulched rockwool. Than stuck the plugs into a misted humidity dome, to complete germination. Shouldn't take anymore than 4-5 days to see some sprouts. Once I see some cotlydon leaves bursting to the surface. I will get the plugs planted into some 1 gallon pots. Plus get these ladies situated into their home. Cant wait! Been itching to give this variety a go! Never givin pev seeds a try but... hopefully they keep this amazing powerhouse true to its name. Guess this grow will double up as testing the waters with pevs genetics. Always intresting to dive in to different breeders.
Likes
8
Share
Likes
12
Share
Week 5 , flower sites forming well, smell increase . Drop humidity to 45%
Likes
16
Share
@BLAZED
Follow
Week 18 (14-10 to 20-10) 14-10 Temps: 17.9 to 26.9 degrees Humidity: 42% to 67% Watering: 2000 ml. The buds are getting heavy and they are falling over, so i straightened them with some wires. Now i regret not topping and installing a scrog rack sooner haha 😅 I also removed some damaged leaves. 15-10 Temps: 17.3 to 26.4 degrees Humidity: 46% to 71% 16-10 Temps: 17.9 to 26.8 degrees Humidity: 51% to 73% 17-10 Temps: 18.9 to 27.6 degrees Humidity: 44% to 77% Watering: 2000 ml. 18-10 Temps: 18.6 to 27.8 degrees Humidity: 50% to 82% 19-10 Temps: 19.8 to 26.8 degrees Humidity: 46% to 75% Watering: 2000 ml. 0.8 calcium, 0.4 hybrids, 0.5 PK+ EC: 1.4 PH 6.2 The humidity at night is too high for my liking, i already have a dehumidifier running but its still too high. At the end of the day i opened an extra ventilation hole at the bottom (only had one open) I hope this will lower the humidity a bit. 20-10 Temps: 18.4 to 26.6 degrees Humidity: 48% to 65%