
Likes
Comments
Share


@Budking420
Follow
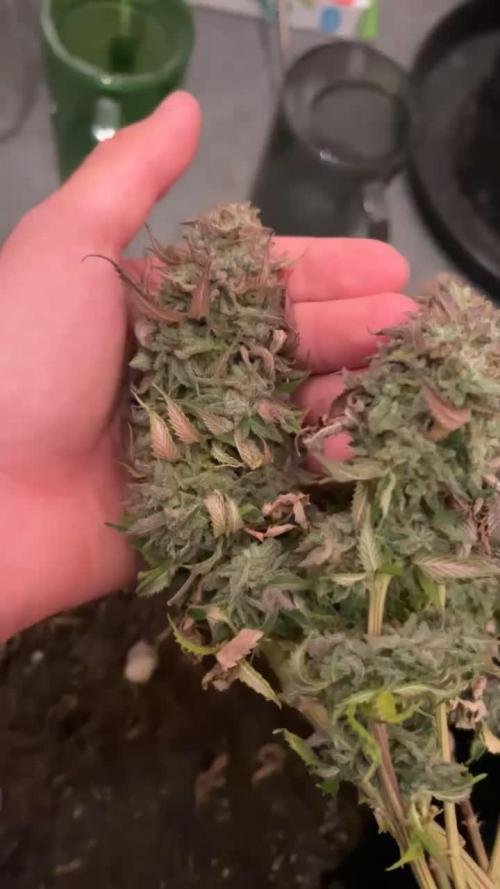
This nug is getting huge on top hole mackerel! I'm super excited for this idk what's I'm doing that it likes so much I just fed it grow dots and that's it just been keeping it wet with the self watering ac infinity bases! Check back in a week to see how far it has progressed!

Processing
Likes
142
Share


@MadeInGermany
Follow
Hey everyone :-).
There is not much to tell this week :) A few came to the flowering tent, 2 are still in the vegi phase for 2 days and then come last to the flowering tent :-)
The Blue Cheese and the Kosher Tangie Kush smell very good and how they should 😍👍
It will be difficult to choose 2 mums :-).
I wish everyone a nice week 👌 Let it grow


Likes
23
Share


@OutForReal
Follow
Day 86 - 04.04 - She is still pushing that nice sugary and seems healthy ❤️💛💚


Likes
8
Share


@Squaregrouper
Follow
Extremely resinous and sticky it is stickier Outdoors then it is indoors same cologne but this is the first time growing this plant outdoors.
So I humbly ask your opinion and definitely the opinion of the seed company.
Dinafem I need your guidance..


Likes
2
Share

@Mxlan10
Follow
Die Pflanze blieb insgesamt ziemlich klein, hat aber dicke Buds produziert. Leider farblich nicht so besonders wie ich das von einem Doja Strain erwartet hätte. Auch der smell ist nicht wirklich exotisch. Eine Sorte die wahrscheinlich nicht so schnell wieder angebaut wird.

Likes
6
Share


@MrPipi
Follow
Day 91: Tuesday , start of the 14th Week.
nothing crazy happened the last Days.
Day94: Gave her some Molasses. next watering maybe some liquid N , cause leafs start yellowing but i think she´s not close to harvest yet...so just a little bit, before we flush in about 1-2weeks


Likes
46
Share


@Crwfz1
Follow
She's a absolutely beautiful monster ohh myyy gawwwddd I'm so stoked to smoke this shit it is soooo stinky my entire house is absolutely wreck of citrus skunk thanks @originalsensible this shit looks fire she's old but it is huge and buds are Soo tight and heavy I'm super impressed beautiful purple on there but she's not liking the cold temps I have I think but buds so still fatting leaves keep turning yellow tho not sure if it's natural dying off or not but shes gonna pull out till the end gonna be kick ass !

Likes
3
Share


@HerrnLubitz98
Follow
Week of fade 😎
Entering the last couple weeks of their lifecycle they’re fading, getting colorful and fat! Smell is insane, keeping temps low now to preserve terpenes and reduce salt build up due to high vpd. Checking trichomes every 2-3 days, aiming for 10-20% amber for my harvest. Stay tuned!


Likes
Comments
Share


@Coconut
Follow
She's getting stronger and stronger, 3 main colas it seems and one of them split again on the top. Looking really good, hope for a XXL harvest :)

Likes
42
Share


@MrJoint
Follow
✌️🎃 Thank you for checking my cultivation.
🤤 She's surprising me, how she's getting fat!


Likes
9
Share


@Luv2Grow
Follow
Day 64 - Starting week 10 and I’m ready to chop her but gonna give her another week and possibly chop next weekend. Not sure yet though. She’s mostly milky but would like some ambers in there and if I’m not seeing any this week, I’ll give her more time.
Day 65 - Still continuing to give her straight pH’d water to flush her out. PPM’s are down to around 550 so thinking by the end of week 10, she should be completely flushed and ready for chop. Just watching to trichomes to tell me when.
Day 66 - Just did a flush with foxfarm’s sledgehammer and gonna let her dry out till the weekend and looking at the trichomes, she’ll be ready for a chop this weekend. Looking forward to finally starting to dry and cure this girl!
Day 67 - On track for chopping Saturday, day 70. Not seeing any clear trichomes, all are milky and some amber. Will most likely chop most of her and and maybe let the few bottom buds get light for a week or so and chop the rest.
Day 68 - Looking good and frosty and begging to be chopped but gonna wait till Friday or Saturday then start the drying process!
Processing
Likes
21
Share


@Dunk_Junk
Follow
Doubled her height this week! Now she's 13cm tall.
She was repotted a day short of 3 weeks into a 20 litre airpot with fresh compost that has been flushed.
I had concerns about her being rootbound....
In reality she was far from it, could have gone easily another week.
On she goes!

Likes
1
Share

@Bones_1986
Follow
Day 36
Stretching has slowed but not stopped. 28-29” today. Feeding 3L per plant now. The orange haze seems to be flawless, the other 2 needing a little extra calmag and N, but early flower can be expected. Humidity holding at around 50-55% little higher than I want but plenty of air blowing inside and strong extraction, so no problem.
Would like to see the bud sites fill out over the next few weeks, before swelling. White pistils everywhere very exciting to see these blossom.
Lovely mild fruity smell already from the tent
Likes
44
Share

@MadeInGermany
Follow
Info:
Unfortunately, I had to find out that my account is used for fake pages in social media.
I am only active here on growdiaries.
I am not on facebook instagram twitter etc All accounts except this one are fake.
Hey everyone :-)
Another nice week goes by and it is slowly becoming a bush from training 😊.
This week it was poured 2 times with 1 l each time (For nutrients, see the nutrient table above).
She was trained once again with topping.
You still have some time until it blooms until space is free :-).
Otherwise everything was checked and cleaned like every day.
Have fun with the update and stay healthy 🙏🏻
You can buy this Nutrients at :
https://greenbuzzliquids.com/en/shop/
With the discount code: Made_in_Germany you get a discount of 15% on all products from an order value of 100 euros.
You can buy this Strain at
https://www.amsterdamgenetics.com/product/super-silver-haze/
Type:
Super Silver Haze
☝️🏼
Genetics:
Haze x Skunk #1 x Northern Lights
Type:
70% Sativa – 30% Indica
👍
Vega lamp:
2 x Todogrow Led
Quantum Board 100 W
💡
Bloom Lamp :
2 x Todogrow Led
Cxb 3590 COB 3500 K 205W
💡💡☝️🏼
Soil :
Canna Coco Professional +
☝️🏼
Nutrients :
Green Buzz Liquids :
Organic Grow Liquid
Organic Bloom Liquid
Organic more PK
More Roots
Fast Buds
Humic Acid Plus
Growzyme Big Fruits
Clean Fruits
Cal / Mag
Organic Ph - Pulver
☝️🏼🌱
Water: Osmosis water mixed with normal water (24 hours stale that the chlorine evaporates) to 0.2 EC. Add Cal / Mag to 0.4 Ec Ph with Organic Ph - to 5.8
Likes
7
Share

@DogDoctorOfficial
Follow
Week 9 From Seed
Sour Diesel — 12/12 From Seed
(≈ Week 4 Flower)
First, a quick recap for anyone joining the journey now.
This Sour Diesel had a rougher start compared to the rest of the room. Earlier in the run she experienced stress that slowed her development, which is why she remains smaller than the other plants in the room.
That said, plants have an incredible ability to recover when given the right environment and a little patience.
And despite her size, she is now building beautiful flower structure and starting to frost up nicely.
Sometimes the smaller plants still carry the biggest character.
⸻
Current Room Conditions
The room is currently running slightly on the warm and humid side, but this is intentional and carefully controlled.
Environment
• Canopy temperature: ~28°C (gradually tapering toward ~26°C)
• Relative humidity: ~70% (slowly being reduced toward ~60%)
• CO₂: 1000+ ppm through passive enrichment
• PPFD across canopy: 800 → 1300 µmol
This might look risky on paper, but the room has very strong airflow and constant air exchange, including inner-canopy movement.
Good airflow changes everything.
Without proper air movement these numbers would be dangerous, but with healthy circulation and CO₂ availability, the plants are able to metabolize efficiently.
⸻
Nutrient Program (Current Week)
Feed EC: ~2.4
Soil EC: ~0.9
Current weekly top feed includes:
• CalMag Pro
• Terra Bloom (base nutrient)
• Power Buds
• Green Sensation
• Pure Zym
• Sugar Royal
• Vita Race (foliar where applicable)
⸻
Why Power Buds and Green Sensation Now
At this stage the plant has fully entered generative growth.
The stretch phase is finishing and the plant is shifting energy toward flower development and resin production.
Power Buds
Power Buds helps signal the plant to transition more strongly into flower formation. At this stage we want the plant focusing on bud site development and structure, and this additive helps push that direction.
Green Sensation
Green Sensation comes in as a flower booster, supporting:
• bud weight
• terpene production
• resin development
• potassium and phosphorus availability during peak demand
Around week 4 of flower, plants start increasing nutrient demand for flower building, which is why this product becomes relevant now.
⸻
Why Power Roots Was Removed
Early in the run the focus is on root system establishment.
Power Roots is excellent during:
• seedling stage
• early vegetative growth
• transplant stress
But once the root system is already developed and the plant has entered full flowering mode, the focus shifts from root expansion to flower production.
At this point it becomes more beneficial to direct the feeding program toward generative growth rather than root stimulation.
⸻
A Quick Note on Leaf VPD
Leaf VPD is always something to keep in mind, but we won’t go too deep here since we’ve covered it in previous reports.
What matters most is that:
• temperature
• humidity
• airflow
• light intensity
are all working together.
Even though humidity is currently around 70%, the strong airflow and active transpiration keep the plants functioning properly.
The leaves are still able to transpire and regulate themselves efficiently.
⸻
Plant Development
Despite the smaller plant size, the flower formation is looking excellent.
Bud sites are stacking well and trichome production is already beginning to show.
She is starting to frost up nicely, almost like a light snowfall on the sugar leaves.
The structure is surprisingly elegant for a plant that had a slower start.
Sometimes the plants that struggle early end up showing the most personality later in flower.
⸻
What to Expect Next Week
Over the coming week we should begin to see:
• increased bud stacking
• calyx swelling beginning
• more visible trichome development
• stronger aroma production
The plant should now start focusing more energy on resin production and flower density.
If conditions remain stable, the next weeks will likely show the true character of this Sour Diesel.
⸻
Final Words
To everyone following this journey:
Thank you.
To the OG growers, the new followers, the people quietly watching, the ones leaving comments, the ones sharing knowledge, and yes — even the haters.
Energy is energy, and every voice contributes to the ecosystem of this community.
Shoutout as well to the GrowDiaries platform, the broader growing community across platforms, and everyone who continues to support, question, discuss, and share knowledge.
We grow together.
And sometimes even the plants we think we messed up still remind us why we love doing this.
See you next week. 🌱
📡 Please stay tuned they can try and take us down but we never quit https://www.youtube.com/@DOGDOGTHEDOCTOR NEW
🙏 Thank you for your patience and continued support.
FOR DISCOUNT CODES AND MORE JUST FOLLOW THE LINK https://website.beacons.ai/dogdoctorofficial
📲 Don’t forget to Subscribe and follow me on Instagram and YouTube @DogDoctorOfficial for exclusive content, real-time updates, and behind-the-scenes magic. We’ve got so much more coming, including transplanting and all the amazing techniques that go along with it. You won’t want to miss it.
GrowDiaries Journal: https://growdiaries.com/grower/dogdoctorofficial
Instagram: https://www.instagram.com/dogdoctorofficial/
YouTube: https://www.youtube.com/@dogdoctorofficial Deleted by Youtube
Vimeo : https://vimeo.com/dogdoctorofficial Under construction stay tuned ⸻
Explore the Gear that Powers My Grow
If you’re curious about the tech I’m using, check out these links:
🔆 Lighting & Environmental Control
• Future of Grow — Advanced LED lighting technology
https://www.futureofgrow.com/
DISCOUNT CODE: DOG20
• Lumiflora — Under-canopy LED lighting
https://lumiflorade.com/
• TrollMaster — Environmental controllers and automation gear (past collaboration)
⸻
Genetics
• Zamnesia Seeds — Genetics used in this project
https://www.zamnesia.com/
⸻
🌱 Soil, Substrates, Boosters & Root Support
• Plagron — Substrates, bio mixes, and supportive products
https://plagron.com/en/
⸻
🎒 Storage, Curing & Preservation
• Grove Bags — Curing and storage solutions
https://grovebags.com/
⸻
📸 Photography Equipment & Tools
(Not sponsors, but part of my creative toolkit)
• Sony A6700
• Sony full-frame macro lens + few more
• Stacking photography workflow - learning
• iPhone (for behind-the-scenes shots)
We’ve got much more coming as we move through the grow cycles. Trust me, you won’t want to miss the next steps, let’s push the boundaries of indoor horticulture together!
As always, this is shared for educational purposes, aiming to spread understanding and appreciation for this plant. Let’s celebrate it responsibly and continue to learn and grow together.
With true love comes happiness. Always believe in yourself, and always do things expecting nothing and with an open heart. Be a giver, and the universe will give back in ways you could never imagine.
💚 Growers love to all 💚
📸 P.S. – The Eye Behind the Lens
All photos in this diary (for now — except for the ones showing the camera, which I took with an iPhone) are taken with a Sony A6700 paired with a Sony full-frame macro lens and a few more.
Photography is part of the story — it’s how we share the fine textures, the glow, and the quiet details that words can’t always capture.
I’ve also started experimenting with photo stacking — a technique where multiple images, each taken at a slightly different focus point, are layered together to create one perfectly sharp image from front to back.
It’s not digital enhancement or AI; it’s pure photography — a way to reveal the plant’s beauty in microscopic depth, from trichome to petal.
You’ll even see a few shots of "ghost me" capturing the shots — camera, lens, setup — because every grow deserves not just to be cultivated, but documented like art.
FOR DISCOUNT CODES AND MORE JUST FOLLOW THE LINK https://website.beacons.ai/dogdoctorofficial
NEW DISCORD - Official Server Invite Link : https://discord.gg/ksjAkA5T74

Processing
Likes
4
Share


@Green_Thumb
Follow
My oldest girl had her flush this week and its about time for her to finish up. I will continue the journal for my 2nd oldest so stay tuned!
Likes
6
Share


@BLAZED
Follow
Week 7 (10-3 to 16-3)
10-3
Temps: 17.5 to 21.8 degrees
Humidity: 57% to 70%
11-3
Temps: 18 to 21.8 degrees
Humidity: 61% to 65%
Watering #2: 500 ml.
12-3
Temps: 17.5 to 21.7 degrees
Humidity: 57% to 66%
The individual ScrOG project is done!
I attached the screen to the #1, the #2 will be done tomorrow!
I had to do some Supercropping (HST) to the plant to make everything fit.
Set the light to 40% strength with a distance of 60 cm.
I didnt think about the poles of the tent, so its not fitting perfectly, but i will fix that tomorrow!
13-3
Temps: 17.6 to 21.2 degrees
Humidity: 56% to 64%
Watering: Both 1000 ml.
Attached the screen to the #2 and did some supercropping aswell.
The screens fit perfectly now, i am very happy with the end result!!
14-3
Temps: 17.2 to 21.1 degrees
Humidity: 58% to 69%
Watering: Both 330 ml. (Only Calcium added)
15-3
Temps: 17.2 to 21.5 degrees
Humidity: 60% to 71%
Watering: Both 1000 ml.
Set the light from 40% to 45% strength.
16-3
Temps: 17.5 to 21.6 degrees
Humidity: 64% to 70%
Progress of 2 White Widow's in the same tent: https://growdiaries.com/diaries/254339-green-house-seed-co-white-widow-grow-journal-by-blazed
