
Likes
Comments
Share


@TheFattyMcCoy
Follow
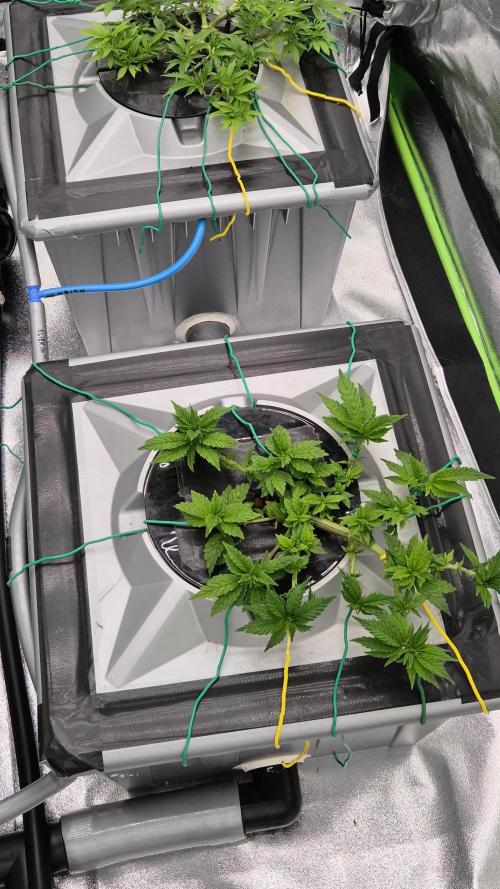
Hey yall! Another week down. A lot has happened.
To start, we up-potted from the red solos into my living soil blend that I have been working on for almost a year. It's so full on living creatures and beneficials. I used to have fungus gnats a lot when working with living soil, it's almost impossible to avoid. .. Then enters beneficials; we have black soldier Flys, persimillis predatory mites, definitely earth worms, most likely a mix of night crawlers.
No more fungus gnats, I highly recommend using beneficial nematodes, cucumeris and persimillis predatory mites are excellent (swirski predatory mites are expensive). Just look at the Soil Food Web and identify what pest you have, then purchase their predators from a trusted insectary.
Anyways I added another 200watt LED and spread out the plants in a 2' X 4' tent. It's extremely dry in my location and having the heat on makes the air even drier. So getting my VPD stable has been an immense challenge. Right now
Also we need to be able to add VPD or at least GD needs a built in calculator to help folks with VPD, Vapor Pressure Deficite.
As of right now I am sitting at 0.85 VPD, so pretty good for today. I have 4 humidifiers and have had to hang moistened towels on the doors of the room I am growing in. It literally has been a huge challenge to keep the humidity high enough for my VPD to be in range for the young plants I have now.
Good thing is my current humidity without running any humidifiers is perfect for the flowering stage, so I can't wait to move this along.
As for topping and training; like I said I really want to move these ladies into flowering sooner than later. I have several reasons to do limited training so I can limit my veg time, also getting this crop done as fast as possible is best for my set up. Until I can get a larger house 🏠 😩 because we got a baby on the way 👶 so need to make space.
I have made compost tea twice this past week, wetting the soil and also spraying the leaves. My sprayer broke so I ended up pouring the tea on the plants gently, I got worm castings on the leaves lol. Gently rubbing that off once they dried. Also I applied the tea at night.
My tea recipe:
Reverse Osmosis water, 2 to 4 gallons
I bubble that with added minerals for a day
Add 2-3 cups of Activated worm castings (To activate the castings I added about 3 gallons of high quality castings with what I consider to be nutrient amendments, SO I add = kelp meal, neem cake, organic coconut flour, organic corn meal, organic wheat flour, and organic cold milled flax seeds and let that sit for a week then add about 2 to 3 cups of that mix to the tea)
I also add biology from about a cup of 2 different soil mixes I have around my compost bin, just trying to get a more diverse biology by adding those two different soil sources. And mind you the grow beds I took the soil from has been organic for many years and has a large amount of beneficials and tons of excellent biology.
Other than that I bubble that for 12 to 24 hours, with as much air as I can get. I use air stones but you really need to clean them off once you are done brewing. I also have an Air Lift with a large air pump that really works great, K.I.S. Organics sells one that works great or you can build one easily with with PVC pipe and a few adapters from any Home Depot or Lowes.
Also I do add DynoMyco to my roots when up-potting. They are an amazing brand that has backed up research, I think they have more propagules per gram of two strains they identified to work great with cannabis. Now having said that, each individual phenotype out of each individual and specific strain/cultivar is going to have different bacteria/fungal strains that it prefers and by growing the same strain, hopefully the same exact cut, and grow 3 to 4 cycles before you truly have the mycelium networks built and fully functional.
What I am saying is stop throwing out "used" soil and go over 7 gallons, bigger the better for biodiversity. Stop buying "new" soil, amend your previous beds and pots. You will see a huge difference. Hopefully I can show you all of this with my Grow.
Anyways please feel free to ask away any questions! This grow is about saving money 💰 🤑 and growing the best clean medicine as possible.


Likes
7
Share

@RBG
Follow
LA is doing lovely, she's was originally the tallest but after folding her like a lawn chair after a big day on the beers her upward growth has slowed right down and she's starting to push outwards like I was anticipating. LA punch is an unreleased genetic from Cali connection. I suggest if you top her to top her once. Relax on the defoilation and let her grow out. She is quiet compact and wants to stay together so you need to try and be forceful to get your way but do be careful. Doesn't like stress in the sense of defoilation and topping early on but handles high PH, high EC and high temperatures so far but obviously not for long otherwise you can seriously stunt your ladies.
Light went from 60% to 90% over Week 5 to Week 6, next 2 days she'll be at 100% ready for flowering.
2 set AC infinity bar lights will go in over this week as well as my scrogg net.
Nutrients this round
Floramax veg1
Floramax organabud
Floramax flowering enhancer ( 1/4 ) dose
Flairforms roots
Sleepz with the fishes ( pythoff )
Cyco platinum series silica
Floramax calmag
E.c 2.2
Ph 5.9-6
Let's gooo


Likes
2
Share

@Tripz88
Follow
They are still seedlings so there’s not much we’re doing except for keeping them moist and making sure everything’s OK as far as the VPD’s humidity and temperatures.
Processing
Likes
14
Share


@CommanderCannabis
Follow
(12-8)Roots are growing. Emily is increasing height everyday. My humidity is really low (low 30's) so I have ordered a small humidifier to put in the A.B.L.E. Grow Chamber. Music selection includes Nirvana, Lou Reed, Joy Division, Fugazi and Led Zepplin. will keep my pH between 5.8 and 6. will also post end of week photos.
(12-9) Added small humidifier to the chamber. It raises the humidity by @ 15% which is OK but I need more humidity for my clone these first weeks. Have ordered a larger humidifier and hopefully that will get me in the high 60's. I'm around 45% at the moment with the small humidifier.
(12-10) The large humidifier did the trick. Got humidity up to 70% and I also installed a drip ring around the top of the container so hopefully that will help the roots grow better.

Likes
8
Share


Likes
110
Share


@SlowpokeFuegobud
Follow
💜 💚 😍🥤💜💜 💚 😍🥤💜💜 💚 😍🥤💜💜 💚 😍🥤💜💜 💚 😍🥤💜
Dear growmies, welcome to week 2!! ❤️
Spraying the babies with Fast Plants Spray every 3 days in the morning, they love it! 💦
Watered once on day 9, added some wee nematodes on day 11 🐛. 💧
Thanks @Fast_Buds for your awesome genetics, growing Fastbuds is always a bit like riding a ferris wheel! Woohooo!! 😜 🙏 💚
Thanks to my sponsors @Green_Buzz_Nutrients, their nutes never ever let me down!! Check out my diaries on how well they work! 💚 😘 In case you want to give them a try, you can find a generous discount code in the setup description further down the road ⬇️
You can find more brand hot updates on my IG, where I share real time events from my growroom, don't miss this! 😝
_______________________________________________________________________
Purple Lemonade FF
As refreshing as cold lemonade on a hot Summer day. 🌞
• Quench your thirst. Just as good as lemonade on a hot Summer day.
• The gentle giant. Up to 550 g/m2 of gorgeous pinkish-purple buds.
• Refreshing for the mind and body. The ideal all-day strain with a perfectly balanced effect.
• Sweet n’ sour terps. Mouth-puckering lemon flavors that’ll hypnotize your taste buds.
• Properly purple. The perfect choice for purple hash and extractions. As refreshing as cold lemonade on a hot Summer day.
Arising from a cross between purple and citrus Cali genetics, Purple Lemonade FF (Fast Flowering) offers a complex high made up of perfectly balanced cerebral and body effects that are ideal for daytime use. Expect an extremely enjoyable high that boosts your mood while deeply relaxing your whole body and getting
rid of muscle pain. This meticulous cross produces up to 550 g/m2 of some of the most beautiful purple buds, with pinkish and reddish hues that will catch everyone’s attention. The beautiful purple buds are ready for harvest in 7-8 weeks and come hand-in-hand with unbelievably sugary citrus terps that are just as refreshing as a cold lemonade on a hot Summer day. It’s the ideal variety for the sweet-tooth stoner seeking strains that deliver both in quality and quantity of resin.
Bud Description 🦔
Purple Lemonade FF grows chunky, spade-shaped buds that boast a whole range of pinkish-purple hues with rich, dark orange pistils shooting out of every direction. This variety stands out for the, oftentimes, lilac trichomes that give them a gorgeous pink tint and make for outstanding purple concentrates. The buds give off a delicious tart lemon aroma that reveals a sweeter, more fruity scent as you break the buds open. Definitely a must for flavor chasers and those looking for pungent terpene profiles.
Smoke Reports 💨
Purple Lemonade FF offers an effect that’s just as unique as the flavor. Expect a potent uplifting high that gives you that energy boost you need to get things done while 100% happy and stress-free. The effect gradually transforms into a wave that works its way along the limbs and through the muscles, deeply relaxing your body and putting you in the right mindset to go through a busy day with a huge smile on your face. This is an excellent all-day smoke as it not only increases energy but can also help combat chronic pain, migraine and stress.
Plant Appearance 💄
This feminized photoperiod variety develops a thick and strong structure, growing a medium-sized main cola with multiple shorter side branches, typical of hybrid strains. Purple Lemonade FF develops fairly short internodal spacing with gorgeous purple buds growing stacked on top of each other, making it the perfect choice for growers of all levels looking to get lots and lots of top-shelf purple weed, as this variety can produce up to 550 g/m2 in a 7-8 week flower cycle.
Grow Tips 🤓
This is a super fast feminized photoperiod version that takes approximately 7-8 weeks to flower with a 5-week vegetation cycle,, this means you can have faster harvests by shortening the veg cycle or have a longer veg cycle for bigger yields. Purple Lemonade FF (Fast Flowering) makes for a great candidate for growers of all levels as it’s a vigorous strain that will thrive with basic maintenance both indoors and outdoors. This is a resin powerhouse so make sure to have your trim bin close by as all the resinous sugar leaves will make for the most mouth- watering hash and extracts.
Flavor 😋
Expect a long-lasting citrus zest that taste just like it smells. Purple Lemonade FF reeks of a delicious blend of sweet fruits and tart citrus that’ll make your mouth water. On the inhale, expect sour flavors that taste just like lemon candy with hints of orange and a really subtle earthy background. And on the exhale, the citrus flavors open up, giving place to a more sugary berry fruitiness that leaves your whole mouth tasting like an extremely sweet weed-infused lemonade.
https://2fast4buds.com/seeds/purple-lemonade-fast-flowering
_______________________________________________________________
Setup:
140x70x200 cm Spiderfarmer tent
2x Monkey 16W fans (not oscillating)
1x Secret Jardin 30W
1x box fan 50W oscillating (on lowest level)
LED
Full Spectrum 320W AGLEX AGL-320W-MA
5,6 kg
foldable, dimmable
864 pieces Samsung LH301H
864umol/s
2,7umol/J
full spectrum white + RED 660nm + IR 740nm
wavelength range 380-780nm
covering 3x4ft
Green Buzz Nutrients https://greenbuzzliquids.com/
❗ Use code GD42025 for generous 25% discount (for orders of minimum 75€)
Biobizz Lightmix + coco + wormcastings + perlite
Carbon Active Granulate Filter 125/360 cm³/h
PrimaKlima exhaust EC 125-400/240 cm³/h
Likes
15
Share


@Messypies
Follow
Auto cinderella jack - Amazing week of growth. There are new nodes exploding from everywhere and its not showing signs of slowing down. They are currently loving the organic nutes and have started showing signs of flowering.
Auto critical cheese - this plant has shot up recently. It was planted a week later that the ACJ but is growing some seriously fat fan leaves. Should be a nice yeilder.
Peanut butter cookies - this girl is looking pretty sorry for herself. I am intentionally trying to keep her as small as possible so that I can get the autos out before flipping into flower but she is gonna be a beast. Will transplant into a final pot in the next day or so.


Likes
11
Share


@Professor_Daank
Follow
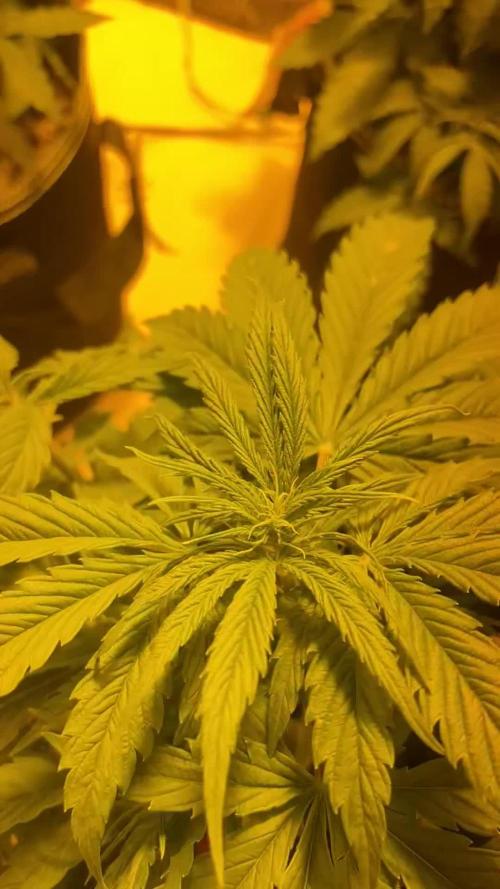
7/20: All three are doing great. I'm hoping to extend Plant 1's vegetation week so that the others catch up to her for the flip, which is eventually coming. I added RapidStart this week. I've heard great things, we shall see. More root, more fruit. Trimmed 2 lower fan leaves that were not getting any light.
7/21: Our time is drawing near for the flip! Are those........ STIPULES?
7/22: LSTing hard. Much good. Nutes niiiice. She's just letting me bend her all sorts of ways for that light.
7/23: LST for you and me, to grow some weed so happily... la la la
7/24: They are just perky tonight!
7/25: Last day of week 4. I started some bloom nutes this morning to prep, and tomorrow I lollipop 'em! I also got a new microscope for the trichomes later on, can't wait to see what's photos and videos I get.

Processing
Likes
1
Share


@sanchelos
Follow
ГОЛУБОЙ СЫР пришлось реанимировать, пересадил
в другую землю,вроде бы болезнь неспеша проходит,но у растения приторможеное развитие,
Likes
4
Share


@Green_Thumb
Follow
How the time has flown by. She completes her flush this week and will start her dry, Sticky, smelly and buds are thick. Extremely happy with how she handled these last few weeks! Excited to taste her.
Likes
Comments
Share


@SkunkyDog420
Follow
Hallo zusammen 🤙.
Sie wächst sehr schön und macht keine Probleme.
Likes
23
Share


@555ABKY555
Follow
the past few weeks the girl scouts have been irrigated and fertilized but the little land used has made them dwarf, I performed lollipopping due to a redness that appeared on the leaves of one in particular now it is the most luxuriant. the skunk has really grown up in the background and the little shade has earned it its luxuriance


Likes
1
Share

@Bones_1986
Follow
Day 21. Fed just over 1.5L only yesterday and they appear to be really thirsty girls with the pot already feeling light however with the slight curling of Leafs maybe suggests slight overwatering.
Im also thinking a very slight mg deficiency so will add a little cal-mag on the next feed.
Gonna wait at least another 24 hours then Introduce bloom and top max. Would like these to stretch a lot over the next week. Already starting to smell. With this tent being in my garage and the outside temps dropping from 10 degrees now down to 0 the temp inside the tent has gone from 27 to 22. Turned extraction fan down to help hold the heat but with the night 600w HPS on 24-0 as well as plenty of inside airflow, absolute no issues.
Day 23
Just shy of 2L per plant. Responding well. Very early signs of flowering, still stretching about 1” daily really wanna see these shoot up over the next 5 days
Day 25 currently 12-14” height.
Plants are thirsty so another 1.7L fed today.

Likes
24
Share


@DeepRootsGrowTrees
Follow
SWISS DREAM ROSE 🌹 CBD AUTO ORGANIC GROW KANNABIA
From seed to harvest this plant was easy to grow she didn't have any issues she made up for lack of height with dense buds down her stem her beautiful purple color offset by green leaves just looked amazing as she was finishing up.
Thank you to KANNABIA as always for your great genetics and support!!!
Thank you to FOOP!! I appreciate your support with this grow!!! FOOP is doing great things with your organic nutrients!!
Thank you to the grow community who has committed, liked and viewed this diary!!

Likes
3
Share


@Kazbrownthumb
Follow
I got really busy towards the end and probably made a few mistakes. Probably cut it down a bit early too but she wasnt able to hold herself up anymore and broke some stems. All in all compared to the outcome of my last grow this one plant doubled my outcome so I dont believe I maybe improving on my growing skills.
I have her curing in jars right now. Out of the sample I have tried I really enjoy it. Smells like candy, tastes like candy with a little extra something something at the end. Smooth, burns clean I couldn't be happier.
Processing
Likes
14
Share


@SunshineBud
Follow
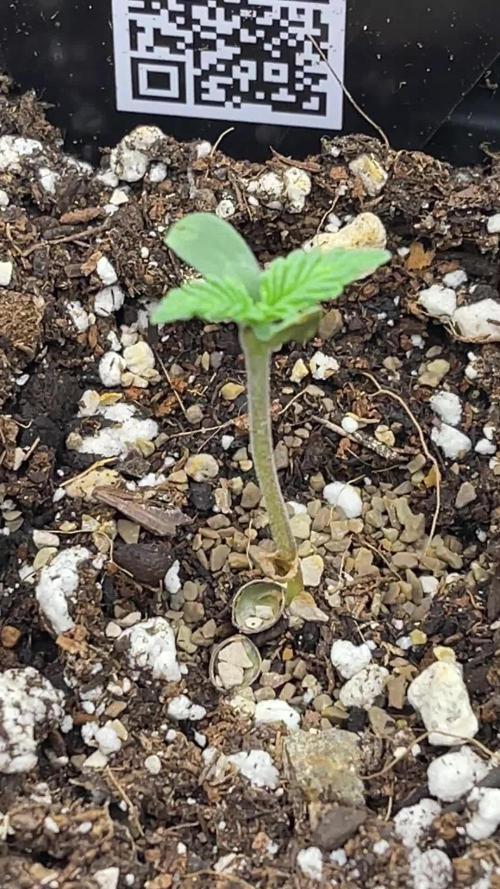
So, this is my first grow, just starting out. After NJ passed recreational weed, I was like you know what... Went on an amazon spending spree and got some seeds from cropkingseeds and this is it!
I let the seeds soak for 18hr in deer park spring water w/ 1 drop of Organic Liquid Seaweed and Kelp Fertilizer Supplement by Bloom City.
At the end of soakage, it didn't look like any had cracked maybe one did not so sure. So I did up the papertowels according to the video and have to say I feel a little nervous/anxious that there is too much water/weight on the seeds and feer drownage. I'm going to keep it on there though. I check the towels a few times throughout the day and am surprised they're very moist throughout the day and next morning still somewhat damp.
24 hours in the towels I check my babies and one had cracked but the rest were still sealed up tight, unwilling to share the goodness that we all so desire, cmon babies crack that shell for papa!
11/12 looked like 1 seed popped, yay! I remoistened towels a bit but didn't wanna soak them. I also put some rapid rooters in water to soak overnight gunna throw the seeds in them in AM... I was going to do it tonight but figured I should wait see if some pop out more.
11/13 OMG upon checking seeds at 07:10 I found the papertowels like bone dry OMG WTF!!! Panic sets in but I just set up the little terrarium with 6 plugs and put the seeds in and tore some plugs off bottom of a plug to cover seedhole with.
11/14 Got a sprout! YES!! The plugs look nice and moist just going to let it go!
11/15 Woke up this mornin, saw a new sprout peeking thru and then another about to! I got ansy and took off the little top plugs and found all the sprouts were coming up! Leaving the top plug off, hopefully thats not a bad idea.

Likes
28
Share


@TeamQuality420
Follow
So this week is the start of flower !! Woooohooo finally get to show what I'm made of !
Step one ) take all the big fan leaves
Step two ) establish a "light line" and take all small shoots that are unable to get the proper amount of light due to their distance from the top of the canopy. * These are the places we all wish would grow ! These are also the places that are at risk of
- hermaphroditism
- mold
- waste of energy for the plant.
** These are also some of the best places to take clones **
Continue to tie and secure everything in preparation of massize buds !
I hope some people looked at this like
" This took way too much off "
I took ALOT. Yes I push , I push hard to know how much they can take . Yes I would say 60% of plants DO NOT like a massive defoliating.
But, the ones who do , you will unlock a yeild like never seen .
It's the risk we take .
One thing I have noticed is when I'm gonna defoli , I don't combone high stress or toping + a bunch of other techniques .
Should have some pretty huge plants by two months !
Thanks for stopping by more notes and pictures to follow .
First week of flower was a great success!!! Unfortunately I did have covid this week so my pictures weren't exactly where I would want them .
For these genetics, it's crazy , they haven't been topped or LST'd and yet they are growing flat at the top !
*** I did have covid this week so my pictures weren't exactly up to par.
So I'll do my.best to make it up with notes ,
- this week very little flower stretch that is definitely a plus for people who want medium sized bushy plants . Not saying that this one won't stretch but so far there has been very little stretching .
- there are ALOT of nice shoots throughout the canopy, plenty of places to take clones *** this genetic clones very well so that is another thing to note ! So great clonability .
The end of week one I have seen very little stretching , in my opinion these could all be considered S1 . It interesting, even with no topping or training these plants NATURALLY grow FLAT! so for all you Screeners out there this is a primal genetic for that !!!
In to week two !!! Here
We
Go !!!
--------------------------
Find these world class genetics at :
https://www.exoticseed.eu/products/exotic-animal#:~:text=What%20is%20Exotic%20Seed's%20Exotic,be%20cultivated%20indoors%20and%20outdoors.
Or
https://www.seedsman.com/eu_en/exotic-animal-feminised-seeds
Find all about the nutrients that fuel this grow on here:.
https://diablonutrients.com/
Absolutely a life-changing nutrient company for me really brought my game to the next level.

Likes
7
Share


@South79
Follow
Just letting her do her thing. Pushing nutes higher no signs of stress or burn. Ppfd 700
Likes
9
Share


@Godsgrower316
Follow
Not a fan of autos so I put it in garden soil but great for not having to do almost anything just started giving her food for flower was just giving her the run off from my other girls