
Likes
Comments
Share


@Jays_Not_Here_Man
Follow
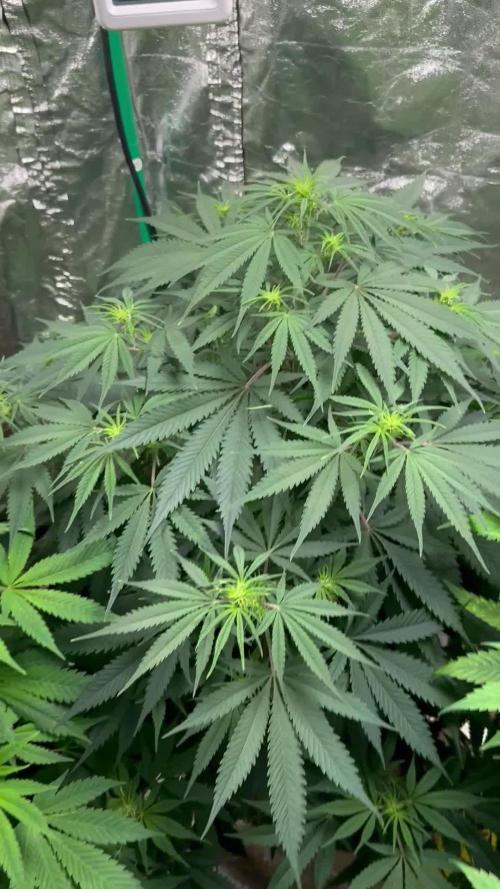
Another week has flown by! The girls are doing great, cruise control this week as I have just been monitoring RH and temps. Trying to keep them as low as possible, I’ve been getting as low as 74 during the day and 68 at night.
I finally took a look a look at the trichomes with my jewellers loop, lots of cloudy, and a few amber around the leaves and top colas, but still lot’s of clear trichomes. I’ve ordered myself a wireless/usb digital microscope to assist with the process, and looks like it will be here just in time to determine harvest day. 😎🎄
I started by eliminating the nutrients at the beginning of the week. I typically allow for 3-4 pure water feeds before I harvest, and at the rate they have been drinking, this should be enough to get through the 7-12 days they have before harvest. I don’t flush, but rather “rinse” with normal water amounts, allowing the plant to use up the remaining nutrients in the soil. This also allows me to recover most of the soil from my grows and reuse ♻️ with other soil mix.
There has been great debate and a great deal of bro science out there for many years, but the recent studies suggest there is no difference in end result when it comes to flushing or using nutrients right until the end, if a proper dry and cure is performed. What do you think? What do you prefer to do? Thanks for reading this far, leave me a comment with your preferred method 👊🇨🇦❤️

Likes
74
Share


@Mr_Maes
Follow
This week we should really see these colas blow up and start stacking really strong. The mixer of 7 hours of sun and 17 hours under my LEDs has really helped my girls grow strong. Nothing compares to good old Mother Nature.


Likes
11
Share


@Boblee420
Follow
A fun week... plants are responding well to the bloom nutrients, getting nice and thick and hard🤫. Going to order a loop soon to start taking a closer at the trichome development. Big girl should be ready within a week a two🤞
Likes
5
Share


@Kinghaze
Follow
Unfortunately, I don't have pictures of the buds when they were dried and cut. But I can tell you they looked very nice
The taste and high were very good.
Verry potent !
Really liked this strain.
Unfortunately, 1 of the 2 blue zushi had
become a mutant.
I made some very nice fresh frozen bubble hash out of it.
The dry weight was :
Blue zushi 1# 96 gram
And from the mutant i made 15 gram of fresh frozen bubble hash, wich was very nice.

Likes
10
Share


@KeiKie90
Follow
1.10.2021 Day 8
Black Haze
Info:
Nutrients: n/a
Water: 300ml
Temperature: 21*C - 29*C
Humidity: 54% - 72%
2.10.2021 Day 9
Black Haze
Info:
Nutrients: n/a
Water: 300ml
Temperature: 22*C - 29*C
Humidity: 52% - 72%
3.10.2021 Day 10
Black Haze
Info:
Nutrients: n/a
Water: 300ml
Temperature: 21*C - 29*C
Humidity: 56% -78%
4.10.2021 Day 11
Black Haze
Info:
Nutrients: 2nd week!
Water:
Temperature: 21*C - 27*C
Humidity: 54% - 76%
5.10.2021 Day 12
Black Haze
Info:
Nutrients: n/a
Water: 300ml
Temperature: 22*C - 29*C
Humidity: 50% - 68%
6.10.2021 Day 13
Black Haze
Info:
Nutrients: n/a
Water: 300ml
Temperature: 21*C - 28*C
Humidity: 51% -72%
7.10.2021 Day 14
Black Haze
Info:
Nutrients: n/a
Water: 300ml
Temperature: 21*C - 26*C
Humidity: 56% - 70%

Likes
58
Share


@pifflestikkz
Follow
Day 78
Day 28 flower
19/07/24 Friday
Started the week with a good watering as she had a double feed end of last week. She took 4L de-chlorinated tap water pH 6 and no run off, added another 1L and see run off forming on all sides.
She is a happy, strong 💪 plant !!
The buds development is nice on this strain! I like to see the calyxes stacked like this, I'll get some macros tomorrow.
Smelling like lemon sherbet it's insane 🤯 or a old school sweety shop.
Day 79
Day 29 flower
20/07/24 Saturday
Nothing to report.
Day 80
Day 30 Flower
21/07/24 Sunday
Big feed again, de-chlorinated tap water pH 6 added nutrients.
Seeing her stack now 🤩
Smells getting stronger daily 🙌 💚
Added a short video.
Day 81
Day 31 Flower
22/07/24 Monday
De-chlorinated tap water only today pH 5.9 and watered in 5L had a little run off. She is getting so thirsty it's awesome!
She is starting to stack them calyxes.
Update on pictures and video 📸🤩
Day 82
Day 32 Flower
23/07/24 Tuesday
FEED again today , De-chlorinated tap water pH 6. Full 5L had about 300ml run off.
She is so thirsty !! 5L a day now.
But it's showing, calyxes are stacking beautifully, the trichomes production is nice and starting to have a magical effect with flash 📸 🤩
Day 83
Day 33 Flower
24/07/24 Wednesday
De-chlorinated tap water pH 6. Did 4L and started to see run off so left at that.
Day 84
Day 34 Flower
25/07/24 Thursday
END OF WEEK
She really has packed on weight this week, thirst and hunger is hard to keep up 😅
Smells phenomenal, looks insane.
Pic+Vid update


Likes
74
Share


@BigCough
Follow
Hello!
First and foremost.. thanks for stopping by!
After many years and dreams of growing I'm finally giving it a go. I will update this "diary" every Sunday with the previous weeks progress. All feedback is welcome as long as it's done in a constructive manner. Please keep in mind this is my first grow and will be learning and making adjustments as I go. I am growing in tent indoors in the Midwest.
STRAINS:
7 Super Skunk
1 Tahoe OG
Possible HiFi 4g & Slurricane clone
EQUIPMENT:
5x5 Vivosun grow tent
1 ViparSpectra P2000 LED (additional LED will be added in 2 weeks.. next payday 🤪)
AC Infinty 6 inch Carbon Filter
AC infinity cloudline T6 fan
3 gallon smart pots
Two 11 inch honeywell "desktop" fans
Vivosun Seedling heat mat
Seed Sarting station
InkBird humidity Controller
8 socket surge protector with built in timer
Ducting
Metal grating
Rope hangers
Zip ties
Solo Cup
Fine mist spray bottle
SOIL/NUTRIENTS
Fox Farms Light Warrior seedling starter soil
Roots Organic Original Soil
Distilled water (room temp with Avg PH 6.3)
Coconut water 50ml/gallon
Roots Organic dry fertilizer lineup
January 11th - ordered 20 Super Skunk feminized seeds from ILGM.com. the order process and payment was easy and intuitive. Was updated by email every step of the way. I did not pay the extra $25 for the ability to track my package, however ILGM did email me once product was shipped as well as when product was out for delivery.
January 25th- Seeds delivered. Pkg was discreet. I would have like to see some type of pkg that took into account the cold weather, however I was home to pick up pkg so it wouldn't sit out in cold.
January 26th- today is the day I attempt my first germination. I decided to germinate 6 seeds using the direct in soil method. Soil I am using for germination is Fox Farms Light Warrior. Watered with distilled water that was at room temperature with an avg PH of 6.2. Germinating in a seed starter tray using a seed heat mat.
January 27th - Watered as needed
January 28th- First seed sprouted. Germaninated an additional 6 feminized super skunk seeds using same method as above. Watered as needed.
Recieved two tahoe OG seedlings from a friend. They are roughly a week ahead of mine. Both seedlings have a little yellowing on leaves. Both seedlings were transplanted into FF light warrior soil. Watered as needed. Placed in tent under ViparSpectra P2000 LED at 25% power 30 inches above. Tent at 71° F 65% Humidity at 18/6 light cycle.
January 29th- two additional seeds sprouted. One seed from first batch pushed itself out from soil and tap root was exposed. Gently placed back in soil. (No change since) Second seed sprouted was from second batch germinated. Watered as needed using coconut water at 50ml/gallon.
January 30th- Two additional seeds sprouted. Both are from second batch. Watered as needed. Added 10inch fan into grow tent set on low.
January 31st- These two as well as sprout from yesterday were transplanted into Solo cups with FF light Warrior soil and moved into tent with same parameters as above except LED was moved to 40% power. Watered as needed.
Feb 1st - started germanting 3 more SS seeds. Dug up the 4 seeds that had not germinated and trying a second time. No water for other seedlings today.
Feb 2nd- no water
Feb 3rd- 1 seedling emerged from the soil!! Watered with coconut water 💧
End of the week thoughts:
I believe I watered both the seeds and the sprouts way too much. Backing off water until soil is dry.
In the future I would like to try germinating in water and paper towel. I like this idea as I know whether or not the tap root pops... currently I'm left wondering 😔
Questions:
At what point are the plants in VEG? Is it as soon as they sprout?
Any idea why some leaves on the Tahoe OG are yellow?
Some new sprouts are also more like green than others.. thoughts?
18/6 or 24 for veg.. thoughts?
Likes
37
Share


@Smoking_Joe_Frasier
Follow
Progress and Observations
In week 6 of flowering, my plants are displaying significant development. The buds are swelling noticeably, and resin production is increasing, filling the grow area with a rich aroma.
Weather Conditions and Plant Health
Unfortunately, the weather in Germany has turned to consistent rain over the next five days, which is less than ideal for the final growth phase. To protect the plants, I've moved them into the greenhouse full-time. This controlled environment shields them from adverse weather conditions, ensuring stable conditions for continued growth.
Pest Management
I'm pleased to report minimal pest issues thus far. Nightly patrols continue to manage the snail population effectively, supported by lettuce leaf traps. There have been no signs of spider mites, aphids, or thrips, providing relief. With the ongoing rainy weather, I remain vigilant against potential snail problems.
Low-Stress Training (LST) Update
The plants I trained with LST have responded positively and continue to develop well. I did some more LST to maximize light to the colas. The canopy remains even, and the bud sites are receiving ample light, allowing for a slight upward stretch to maximize bud growth during these final weeks of flowering. I try not to cut off any fan leaves because I think they're here for a reason. I like to tug them behind the steam or the side branches. Only if the leaves show significant signs of illness or pest then I remove them.
Looking Ahead
As we move further into the flowering stage, my focus will be on maintaining optimal conditions to maximize bud development and resin production. I am also diligently monitoring the humidity levels in the greenhouse, as this is crucial for preventing mold growth. The plants are looking promising, and I’m excited to see how they progress in the coming weeks.
Update 03.07
What is noticeable is that both untrained plants are entering the full flowering mode faster than the trained ones. Have you had similar experiences?
Update 05.07
Today I checked the girls and found the Banana purple punch with the top leaves starting to curl down. After asking the community I found out that everything looks like a starting nitrogen toxicity. But only on that plant. Seems kind of strange that the others having no issues at all despite having the same amount of nutes. I decided to treat the symptoms a once so I flushed with 5l PH water. The first runoff was a little lower (5.5 / EC 1.09) but not really concerning.
Afterwards I give the plant the half amount of the tripart flowering scheme (with added CalMag 2 ml/l PH 6.2).
Thanks again to AsNoriu and Hashy
Stay tuned for updates and like always, feel free to give feedback about things I can improve🍀🥦
Likes
132
Share


@rhodes68
Follow
2/8 Week 13 !
Her drinking is falling, almost a quart less today.
Moving into flush range as the hairs are beginning to curl and seeing some small showings of amber.
Reducing the Bloom nuets to 5ml until I see its time to change again, increasing PK slightly.
Prob two days then go to full PK (15ml) to take her into flush.
Plan a fast flush with an agent to speed things along.
2/9 Fed 5ml/gal CT Bloom A/B 12ml/gal Peak
Another day
2/10 Leaving feeding as is, building nicely leaving the plant positioned as is think this is the best compromise between all the plants in the tent.
Not sure how long this will go at this point, but not cutting her short for anything.
Pics
2/12 Beginning to back off the PK leaving the CocoTek at a low dose. Plan to have the PK gone in a day or so but leaving the CT until flush.
Just following some new ideas on using PKs and Finishers.
Pics and vid of buds using a couple of filters just trying to show these two foot long buds without messing with the dark cycle.
Hope it helps
2/13 Pics that you can actually see!
Due to some issues, one is on this grow (I need to increase potency on Tara), changing out the HPS for MH for a while, may finish under it depends on the other grow.
Looking at the trics I have decided to drop the PK and go to normal levels of Bloom nuets until flush.
Continuing to keep her cleaned out as much as needed so light gets all the way down.
2/14
Pics of the rearranged tent to end the week,
Realize now how much time switching the lights to 12-12 has added to Tara's finishing time.
Had no real choice but its a point learned.
Happy with her progress


Processing
Likes
16
Share


@Jazzvet
Follow
4th week of vegetation. The girl has grown healthy and entered in the blooming phase, and the first pistils are starting to appear. I've increased the dose of bio grow to 0.7 ml per 3 L and I'll continue for 2 more weeks. See you next week happy growing

Likes
73
Share


@PsiloNoid
Follow
Starting week 7 of flower! This might be her last week! She is swelling up some and really packing on the trichomes. Her aroma grows more and more pungent with that deep chem and diesel smell. There are also some amazing fruity notes in the background like sweet berries. More updates soon!


Likes
7
Share

Likes
11
Share


@TherealNICOGREEN
Follow
Alle 3 vokser som de skal, jeg har valgt tage en i 12/12 telt:) og en 18-6 telt:) og den 3 er i 18-6 telt også men , er i en 3.5liter potte. Også ser vi på forskellen igen om en 5-7 dage :) Jeg er SIKKER PÅ DEN I 12-12 telt giver størst uds men mindst ud bytte! Og om vendt ved 18-6. Timer! Håber i nyder at følge med og godt nytår husk NU DE SMP BANGE DYR ! Og HINDANDEN OG JER SELV OG LAD NU VÆRE TÆNDE KRUDT MED JERES JOINTS DET SMADER DEN BARE;) JEG taler DESVÆRRE AF EFARING ;)

Likes
15
Share


@the_big_pink_place
Follow
01/10/22 Everything is Going good, which means something bad is going to happen. Plants were 9 inches at the end of week 4 on day one of week 5 they were topped and defoliated which brought the height to 4.5 inches, So after the shock of having there tops removed they grew 4 inches in one week. Extremely happy I'm keeping track.01/13/22 Defoliated and LST'D the plants.01/14/22 Adjusted LST , removed all branches growing on the underside to allow for proper Growth of other branches. Fingers crossed this should be a decent harvest flipping on week 9.

Likes
12
Share


@Trippin66
Follow
Hi growmies
well found, today the vadi are still full of water so no watering
pheno 2 mimosa is demonstrating her hulk genes too bad pheno 1 can't do the same too much stress for her two feline attacks were too much even runtz suffered only one but in a too premature phase by the way yesterday while I was trying to make it open a little I patched it the plant shows that it is not elastic perhaps a little silica would do me good but I will use it in the next stressful event in another race I implemented on Monday when I watered green sensetion and sugar royal for the two mimosas that the small runtz and the zenzation are now flowering which is doing well even if in two weeks back it reacts well to the lst I hope it can reach large sizes in the next week and then start flowering when it wants
for runtz and zenzation the usual mix remained, calmag 4mlxlt, rizotonic 40mlx10lt and whiteshark 2 spoon x 36lt ph 6.2/6.3 added the scrog net in which the mimosa is having a lot of fun
I'm very sorry about how the other plants have suffered from stress, the feline demon has been banished from the room where the girls sleep
but I won't give up, I'll bring the result home in mid-December, we'll see what nature and my ability are able to do
have a good week and cultivation everyone thanks for the comments and likes never stop growing👍🏼✅