
Likes
Comments
Share


@Stickygreens420
Follow
1/2/2023: decided to give them both another week. They are both slowing down their water uptake and they are both fading hard, but I'd like to see a little more amber tricomes before chopping.
1/3/2023: gave each plant 1 liter of water, mixed with ThermX-70 and Dr. Zymes Eliminator.
1/5/2023: looks like Dr. Zymes did the trick. There is a noticable reduction in fungas gnats. Just in time to chop the plants down, haha. Gave them both .5 liters, basically to wet the top soil. Plan to chop any day now. Very few green leaves left, so it's time. Tricomes could use a bit longer but don't want to chance bud rot. Should have given one last top dress 3 to 4 weeks ago, but I did not expect then to go this long. Also, 5 gallon pots are not big enough for organics. Moving on up in size next round. Going to try an earthbox in this tent.
1/6/2023: last watering today with a little ThermX-70. Going to harvest in a few more days. Been 101 days since they sprouted and the Orange Bubblegum is up to about 10% amber and the Newberry is probably 15% to 20%, so it is definitely about that time to harvest.

Likes
3
Share


@LAShugars
Follow
Had to move her to a smaller space with a weaker light. But she has the entire light to herself. I ended up giving her one more dose of cannacoco A and B and the pk 12/14 also by cannacoco.
Will be flushing her with ph’s water at 6ish going forward. I may harvest her top buds first and give the lower buds some time to catch up.

Likes
13
Share


@Lickey
Follow
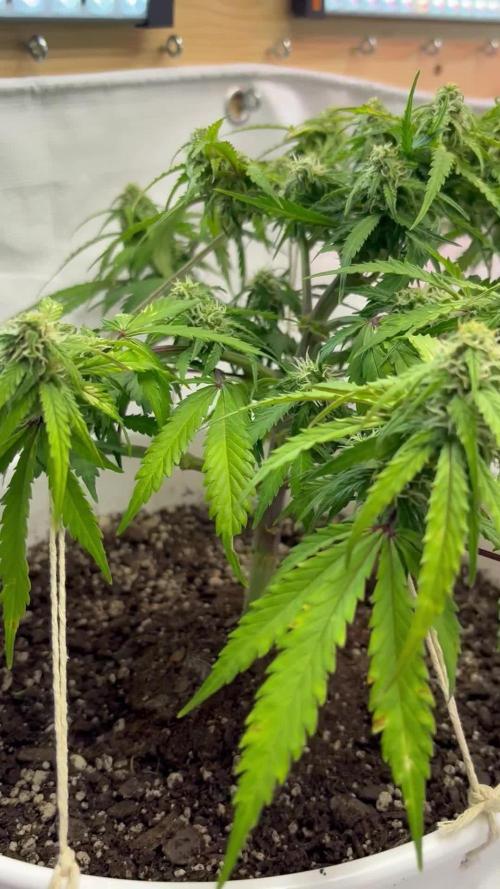
They are really stretching this week. I’m having concerns over some of them not drinking and yellow leaf tips. Not sure what can be causing stress. Ah maybe cold floors as I remove the insulation
Half way through this 3rd week of training they are looking good and thriving

Likes
25
Share


@Ultraviolet
Follow
Replaced nitrogen with omina, omina has 14.0.0. Stretch almost over, growth almost switched to full flowering. Increasing phosphorous and potassium, beauty of nature is it only takes what it needs.
Started to remove some weights as stems starting to show solid reinforcement and are ready to hold fat cola. Fingers 🤞.
Decreased hours of light to 10.
Extended hours of cold @ night from 2 to 6 hours @59 Farenheight with 2 hours both sides @ 70&77 respectively.

Likes
18
Share


@KushAllDayLong
Follow
Week 10! First week of flower! I was eager and may have jumped the plan I had the other day of waiting another week but after some sound advice from a few people that inspired me to flip them to flower and watch them flourish!!
Day 1..fed fox farm trio with some added aloe vera, very little..won't add anymore from here on out..I added some peroxide as well!! I opened the tent this evening and they were praying up to the mary Jane gods!! Just what their daddy wants to see!! Let's get this smoke to the heavens for the loved ones!! Aye!!!
Thanks again to everyone who inspires me and has helped me along the way! Oh and I ordered a trellis net so it should be set up in the coming days!!
I was going to enter the solo cup challenge with the mini Starbucks cup you see but I didn't realize time was ticking and i may end up throwing her away unfortunately as I dont have a tent to put her in with a light set at the right hours or whatever!! She wouldn't survive on 12 12 or would she?
Day 2 of flower - I opened the tent this morning and the girls are reaching for the sky even more! I forgot to mention I made some fresh Aloe Vera tea/juice for the last feeding I did before flipping to flower..next run I'm going to try not using aloe vera on one of my plants to see the differences..I feel the aloe vera has helped my girls alot but I'm not too sure!! I made a video on youtube about how I made it!! If you have some time and are interested in making your own...
Day 3..I opened the tent and BAM!! These girls know how to make you feel good!!
https://youtu.be/ud9Yi-F5HSQ ( one of my high school friends band is called Katastro, Andy Chaves..lead singer, passed away in a tragic car accident this past year and it's been really tough on everyone!! R.I.P Brobro! The link above is a song I listen to, it's helps me through on tough days and sometimes it helps me shed a much needed tear!! I'm here for anyone that is struggling..have a good day!!
Day 4 of flower..Half way through the day I made the video above titled day 4 of flower..they are all looking happy but the Watermelon Zkittelz is really taking off!! If you have any advice please send it my way!!
Day 5 of flower in the books. Plants look healthy, few minor adjustments next watering for one of the girls..but for the watermelon Zkittelz she's taking off like crazy!!
Also I'm doing a SPIDAR FARMER SF1000 NEW YEARS GIVEAWAY (PURCHASED BY ME ) ON MY NEW YOUTUBE CHANNEL. IF YOU ARE INTERESTED COME CHECK IT OUT AND GIVE ME A LIKE COMMENT AND SUBSCRIBE TO ENTER THE GIVEAWAY!! I FIGURED WHEN I UPGRADE MY LIGHT SET UP WHY NOT GIVE ONE AWAY TO ONE LUCKY WINNER!!
FOLLOW THIS LINK BELOW TO ENTER:
https://youtu.be/pqEeoWQjCAM
End of Day 6 of flower - the girls are filling out and stretching high!!! Let's go!!!
THANK YOU!!
CHEERS!!
One love!!

Processing
Likes
2
Share


@MephodMan
Follow
Tap root issues - too long in jiffy block
Still working on dialling in VPD

Likes
10
Share


@RandomStreetMerchant
Follow
Hello, I have had the pleasure of growing this cultivar a few months back. this time I will only be growing 2 both being those awesome seeds from Barney's. I believe that letting these girls have more space will do wonders. as my last grow was quite cramped. that being said, I'm going to try to fill the tent up with the 2 mxop's ill be planting. Mimosa X Orange Punch (MXOP) is a fantastic cultivar and I cannot wait to show you guys how beautiful they get! have a good one!//05/25/23//
Likes
19
Share

@Splashy
Follow
16.01.2026
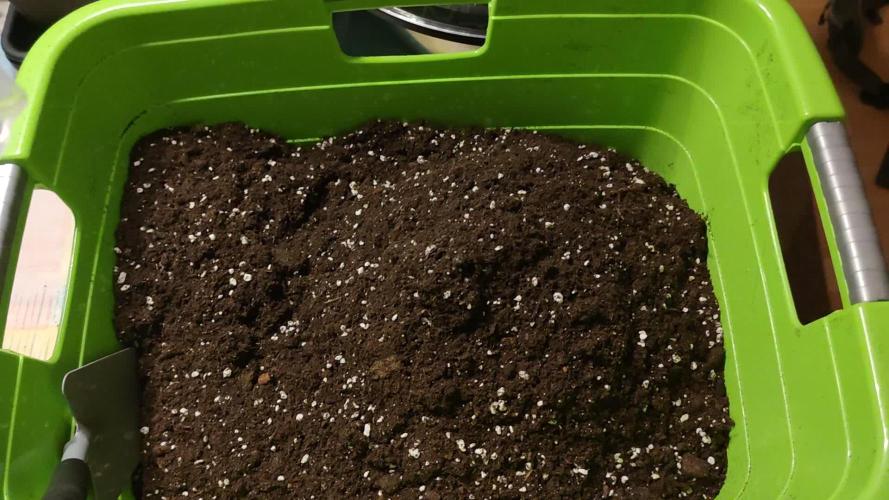
Heute wurde umgetopft in den 11l endtopf. Ich habe biobizz all Mix für den endtopf genommen, da ich noch genug für diesen Durchlauf da hatte. Als dünger habe ich Greenhouse feeding Bio grow genommen , da ich denn all Mix nehme, habe ich die angegebene Menge auf 1,5g/l Substrat verringert und mit der erde vermengt. In das gießwasser habe ich 1g/l Wasser dann noch den Bio enhancer gegeben, wird ab jetzt alle 14 Tage ins gießwasser gegeben. Den ph auf 6,5 angeglichen und das calmag ebenfalls angeglichen mit 1ml/l.
Dieser wird auch mein erster grow sein, in dem ich die neue smarte Steckdose von mars hydro benutze. Mit dabei sind die Sensoren für ppfd, CO2 (das Steuer ich nicht), Substratfeuchte und ec, Luftfeuchtigkeit und Temperatur Sensoren. Ich habe einen luftbefeuchter angeschlossen und lasse das ganze System von der Steckdose steuern. Ich habe meine Luftfeuchtigkeit auf 65 eingestellt und meine Temperatur auf maximal 28°c. Die Abluft geht erstmal nur an, wenn es zu warm oder zu feucht da drinnen wird, sonst ist sie ausgeschaltet. Den Umluft Ventilator habe ich noch mit laufen auf mittlerer Stufe, er ist auf lampenhöhe .
Gegossen habe ich, bis unten drain raus kam, in 500ml Schritten. Es waren ca 3l pro Topf was rein gegangen ist bis unten was raus kam. Jetzt lass ich sie erstmal stehen und fange erst wieder an zu gießen wenn die Substrat feuchte unter 60% fällt. Nächste Woche erhöhe ich die ppfd dann auf 300.

Likes
12
Share


@MadeInGermany
Follow
Harvest day 64
since time switch
to 12 / 12 h
Hey guys :-)
Finally it's time 💚
The lady is done the large leaves have been removed and hung upside down to dry in the dark drying room.
You can now stay there for 11-14 days at a temperature of 18 degrees and 55-60% humidity.
After 11-14 days it is neatly trimmed by hand and placed in jars with boveda packs 58.
After 4 weeks Boveda 58% come in and are ready for testing ;-).
Let's get to the plant 💚.
The smell is great I'm curious about the taste 💚 It is very fruity and has a touch of Tangie 😍
The taste remains on the palate even after a few minutes 👍
The look is very nice even if it looks very loose and not as nice and firm as other buds it is still a 10 out of 10 because of the taste 😀
Their growth behavior was perfect from start to finish 👌
I hope you liked the diary and wish you all a nice week.
If you have any questions, please contact us 💚
stay healthy 💚🙏🏻
👇🏼👇🏼👇🏼👇🏼👇🏼👇🏼👇🏼👇🏼👇🏼👇🏼👇🏼👇🏼
‘Powered by GreenHouse Feeding’
Copy the link for 10% off all Nutrients 👇🏼
http://shop.greenhousefeeding.com/
affiliate/madelngermany_passiongrower/
👇🏼👇🏼👇🏼👇🏼👇🏼👇🏼👇🏼👇🏼👇🏼👇🏼👇🏼👇🏼
Water
💧 💧💧
Osmosis water mixed with Cal/Mag (24 hours stale that the chlorine evaporates) to 290 ppm and Ph with Ph- to 5.8 - 6.4

Likes
38
Share


@Aedaone
Follow
This week started of good except for ph and iron. I'm phing feed and water to 6 but my naturally 7.6 ph water is raising ph. I've realized my water and organic soil don't have iron in them. It's keeping these from greening up properly. I do have blood meal in the soil but not enough. I'll be adding an iron supplement next week when it arrives. Until then I'm going to feed a little masses and blood meal with the ph water. I've had a difficult learning curve switching from coco and salts to organic and soil. #2 got topped on day 1. I'm going to clone this top so I'll have this plant for the future.
Likes
109
Share


@Prototype0181
Follow
Didn't Pay to much attention to em this week😅
Deu to a shopping Spree😉 Got a new light and tent this week 😁
Light: Geeklight Geekbeast pro 630w
Tent: Budbox pro xl 120x120
Expecting a lot from this upgrade stay tuned😉


Likes
6
Share


@Headies
Follow
The little one is catching up and the bigger one is starting to fill out the net
Likes
19
Share


@adam_pawloski87
Follow
Let’s go day 72 from seed!!! Another great week it’s been , 2 Ogreberrys an brucy b been flushing for a week, an the 3 others will continue to get there normal feed of nutrients, they are just not quite ready so they will start getting flushed around next week!! Sweet sweet smell of Grapes And gooey frosty nugs is all I can really say, photos do no justice, some of the craziest fruitiest smelling buds I’ve ever had, Real High quality meds !! Hope you all enjoy an have an amazing productive day as well as a great week!! Peace love an positive vibes to all y’all Cheers 😶🌫️💨💨💨💨💨🤙🏻If there’s any questions, please ask!! 💚🙏🏻💯

Likes
12
Share


@Jays_Not_Here_Man
Follow
The girls have survived another week ❤️ I did a light defoliation and have been monitoring the RH closely. We have had a very damp week here, and the RH kept climbing and had my fan working hard.
They are starting to plump up and fill in 😋. They have also started to slow their drinking habits, instead of watering every three days, it has moved to every 4 now. Just a couple of weeks left, I think I will be harvesting these over Christmas 🎄, and will have some great bud ready for the new year! 🎉🎊🍾

Likes
7
Share


@gablmo
Follow
Finally flower. They are 4 feet now. What am I going to do? I don't want them to burn into the light.


Processing
Likes
7
Share


@Mr_nugs_lover_David
Follow
Looking very good, this ladies are breaking the shield within 48hs since planted as I was expecting, let's see how my beautiful queens develop on this "little run" on a 2x4! Growing with a tsl2000 by mars hydro! 👨🌾💯✌️ Stay tuned guys.

Likes
8
Share


@Staffedition
Follow
Сорт мне понравился.
Единственное не устойчив к плесени.
Если не контролировать вдажность, то плесень обязательно будет.
В целом сорт не плохой.
Рекомендую новичкам


Likes
1
Share

@BossberryFarms
Follow
Welcome to Week 8!!!
December 8 - Decided to scrap the scrOG netting for these 3 plants and stick with LST. All plants don’t look great but I’m just keeping a close eye on them.
December 10 - Watered all three with 10g BLOOM and 3.5g BOOST
