
Likes
Comments
Share


@GODSGIFT_2005
Follow
For LIQUIDS & NUTES ******GREEN BUZZ NUTRIENTS***** organic.
Also i’m using their LIVING SOIL CULTURE in powder form!
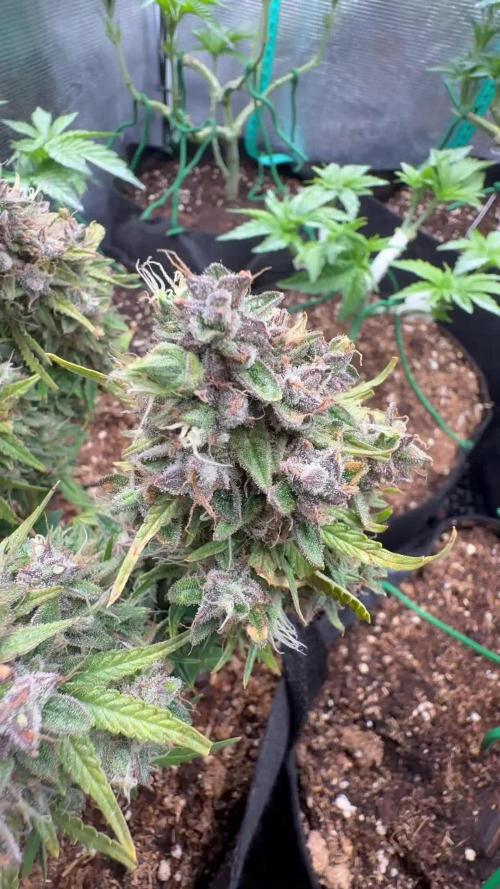
MARSHYDRO ⛺️ has large openings on the sides which is useful for mid section groom room work. 🤩
☀️ MARSHYDRO FC 3000 LED 300W
💨MARSHYDRO 6” in-line EXTRACTOR with speed-variation knob, comes complete with ducting and carbon filter.

Likes
6
Share


@Dengued
Follow
Day 56....buds developing nicely....laid off any nutrients for the last week and considering just one more spirulina feeding, then just well-water for the rest of the grow, with no flush....pollution/haze levels high which might effect the plants

Likes
17
Share


@CanadianFillmore
Follow
Howdy growfessors! Welcome to week 7F in the 4x8 theatre. The ladies are hungry, I've been increasing their feeding and they still want more!
Defoliation performed, removed a lot of small dead or dying leaves from the lower branches.
Not much else to say, thanks for stopping by growfessors 👽🌳💚


Likes
13
Share


@Robeeriegenetics
Follow
Ooooooweeeeeee they’re all doing so good even the extras that I threw in flower with out cloning are doing great .. in just 2 more weeks I’ll throw the donor plants into flower


Likes
43
Share


@TheBulldozerSicily
Follow
Continuiamo solo con overdrive per un altra settimana continuando a controllare sempre i tricomi, aspettando che diventino lattiginosi per cambiare soluzione e far girare l'impianto gli ultimi 7 - 10 gg con solo acqua osmotica a ph 6 per il flush prima di raccolt


Likes
17
Share


@BB_US
Follow
These ladies are solid and filled with tons of orange hairs. The smell is like no other of citrus and fresh cut wood. One week then I am going to flush her.


Likes
2
Share

@hassehujasse
Follow
From beginner to professional. Grow as God raised you and enjoy it!!!
Looking. for harvest as soon she realise her potencial
Likes
17
Share


@FatalFarmer
Follow
Last week of veg, starting 12/12 tomorrow as I'm starting to worry about space.. hopefully stretching isn't too much of an issue.. we shall see. I'm still not happy with my defoliation, I've been mostly removing large/damaged leaves and sucker branches off the bottom of the plants.
I've been experimenting with the fan and scrog placement, placing one large fan oscillating below the canopy and two clip on fans above the tops and mostly using the scrog as a support for branches during flower as I somewhat failed to actually scrog..
Once again, any advice much appreciated and happy holidaze!

Likes
96
Share


@DogDoctorOfficial
Follow
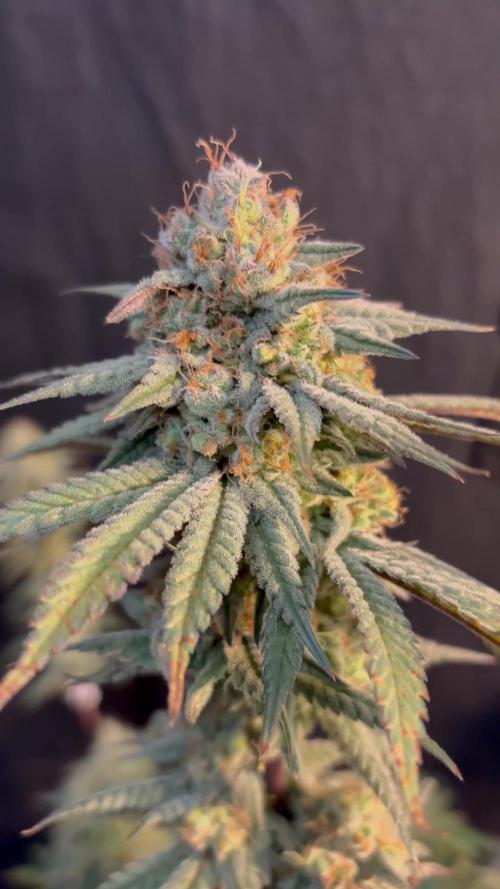
Greetings, fellow cultivators! Today, I'm thrilled to share the grand finale of our journey with the remarkable Big Cheese Auto from Seeds Mafia. At day 81 from seed, she reached the pinnacle of her splendor, and the harvest was nothing short of spectacular.
As I gently snipped each ripe bud, I couldn't help but marvel at the beauty and resilience of our Big Cheese Auto. From the moment she emerged as a seedling, she embodied strength, vigor, and an unwavering determination to flourish. Now, as she hangs upside down to dry for the next two weeks, I'm filled with a profound sense of gratitude for the privilege of witnessing her growth.
Our journey with the Big Cheese Auto has been nothing short of extraordinary. From the excitement of germination to the meticulous care during vegetative growth, from the anticipation of flowering to the aromatic crescendo of the harvest, each phase has been a testament to the plant's resilience and the joy of cultivation.
The journey began with a tiny seed, a promise of potential waiting to be fulfilled. With the nurturing support of the Autopot system and the guidance of Aptus Holland's nutrients, our Big Cheese Auto thrived, transforming into a botanical marvel with each passing week. From the emergence of her first true leaves to the explosion of trichome-rich buds, she captivated us at every turn.
A heartfelt thank you to Seeds Mafia for providing the genetics that sparked this incredible journey. Your seeds have not only produced exceptional plants but have also inspired a community of passionate cultivators. Your dedication to quality and innovation is truly commendable, and I am grateful for the opportunity to cultivate such remarkable genetics.
Before the trimming and curing process begins, I took the time to capture the beauty of our Big Cheese Auto in a special photo shoot. Each snapshot is a testament to her magnificence, a visual ode to the journey we've shared together.
To the entire community, both near and far, thank you for accompanying me on this horticultural odyssey. Your support, encouragement, and shared passion for cultivation have made this journey all the more rewarding. Let's continue to cultivate greatness together!
Thank you for being a part of this incredible journey! Wishing you all abundant harvests and joyful cultivation endeavors ahead!
Genetics -Seeds Mafia Big Cheese Automatic
Light - LUMATEK ZEUS 465 COMPACT PRO
Food - APTUS HOLLAND
All info and full product details can be find in can find @
https://seedsmafia.com
https://aptus-holland.com/
https://lumatek-lighting.com/
As always, thank you all for joining me on this journey, for your love, and for it all. My horticultural odyssey would never be the same without you. Your love and support are cherished, and I feel both honored and blessed to have you in my life

Likes
22
Share


@Farmboyconnor
Follow
Last week for these girls, I'm so happy the way they turned out , started a 10 day flush in the middle of last week , amber tricomes has just started to come in so in a week come harvest it will be around 10-15 amber which is what I was aiming for. The color between all 4 of them is amazing and buds are so fat. Did some light defoliation of the lower fan leafs yesterday and the colors came out even more today. My co2 ran out but got it filled up within 2 days .
Likes
5
Share


@ChitownCannaChica
Follow
Again— my fault on this one— coo po ups and wold have been better if I would have ran individual dwc per auto— screwed them up in the veg/flower transition- regardless the terps are insane

Likes
1
Share

@Ninjabuds
Follow
A-1 of a plant just like the gorilla cookies auto. Massive buds with a huge plant structure. This plant will fill up any space you give it. Giant round rungs all over. Super dank when I was wet trimming the plant about every 2 min I had to clean off the gunk on the scissors this plant definitely has some huge tricombs. It doesn’t look like it but when you cut into it you can really see. There buds are gonna be awae to smoke just like the gorilla cookies auto. This strain has potential to breed with some fire


Likes
42
Share

@DogDoctorOfficial
Follow
Finally my All in one mix arrived and im back to my normal feedings, by this i mean other labels bring up to much the EC in the water, making it harder to had whatever you want to had more 😅😆
Day 5 flower and you can se they wore desperate to flower, they are running and stretching like there’s no tomorrow 😅 lets see how will this afect in terms of space and canopy, so far so good but we are at day 5 and the6 are monsters comparing to the other side of the tent 😆
Day 7 and I’m already looking at them and thinking they need a air cut 😅 this girls are growing and drinking kind a fast 😆 with is a great signal.
For next week i will start increasing the ppfd , my DLI and i will try and bring temps down so that i can bring humidity down also, if you guys follow me you guys know i go by VPD so if i move one parameter, i have to ove the rest 😝💚😁
PPFD - 526 Umol/m2
DLI - 21.0 mol/m2d
VPD - 1.30 kPa
Girls:
SAD f1 @seewtseeds
Badazz Cookies OJ @seedsman
Alaskan Purple @seedsman
Peyote Gorilla @seedsman
Super Glue @anesiaseeds
White Mango @personalfriendstrain
Light Lumatek Zeus 465W compact pro at 75%
All i grow is medecine for myself, nothing to sell, dont even ask !!!!
Stay safe and do it with love for the love ❤️ 🙏
💚Growers Love to you all 💚


Likes
9
Share


@TiRobotProds
Follow
Nous somme à la 6ème semaines de floraison tout se passe comme prévu les bourgeons continuent de gonflés les paramètres sont excellents 24 degrés en température 55% en hydrometrie.
- L'ajout de RQS guano a redonner un coup pouce à la plante les bourgeons ont sacrément gonfler aimer et regarder par vous même. Cet semaine sera aussi la dernière irrigation avec nutes. Ce run est l'une de mes préférée.
Léger carences en azote post-stretch cela es dû a un faible apport de celui-ci mais rien de grave cela indique les derniers semaine de vie de cette dame le rinçage sera simple et éfficace.
L'odeur quelle dégage es fortement fruité cela sent le 🍬 🍬. A plus pour d'avantge d'informations.👍🏼

Likes
49
Share


@masterofsmeagol
Follow
5/24 Woke up on payday to find that my father is in the hospital. My house was robbed a few days before so I guess the hits keep coming. The plants are doing good though. I'm glad I kept them in as we had a frost last night. I moved my cage yesterday onto the asphalt and put the big pallet in. I just need to sanitize the others before they go in the cage. I'm being super cautious. I think tomorrow will be the day I make the switch to the garage while they fill out these 3's.OK.
5/25 Plants were all moved to the garage with the door open for indirect light. It's 54 degrees. At night I'll pull them back in and give them a few more hours under the hps which will also help with heat. Knocked a stem sideways but it'll pop back. Feels good to get things moving. HST seems to being going good.
UPDATE: Went back over at one and noticed that the plant I hit with a wire (or something I didn't see what happened) was almost sideways and really loose. I had tied it to a clip with flagging. That didn't work. I asked a friend and I ended up pinching off the first true leaves then mounded happy drug up around it to keep it upright. It LOOKS much happier. Of course that shit happens to your biggest healthiest plants. Oh well all the 10th planet are doing phenomenal. Can't wait to move these girls to there final homes. Plants went under lights at seven. I'm acclimenting them to the right light schedule. I don't want to jump from 18/6 to 15 hours. They did really good in the cold Temps and wind. The big one I had to fix looks like it's doing great. Once they are hardened and fill these pots they go in their final home.
5/26 Plants did great being in direct sunlight for a few hours and staying in the garage at night. They look super healthy. I'm planning on watering tomorrow. Wondering if I should start to add some silica to strengthen the stalks. Also wondering if I should add more soil to some of the pots like I did to the other one as the stretched a little. This is something I may do tomorrow before I water.
Went back over to switch the lights on and pull the plants back and lock up at 7:30. Forgot my phone of course and these girls were looking amazing. I have to water tomorrow. I coukd add more soul to some of the pots but I'm reluctant due to stem rot. They'll get buried much deeper in there final homes. Don't want to mount up soil and then water and promote rot. Anyway plants are adapting amazing. Dialing the light closer to normal here. This is a great transition place for them to he. I've noticed a few wrinkled leaves but thats to be expected. Oh, I got my free pure Michigan seeds from premium cultivars!!!
5/27 WATERED EVERYTHING TODAY WITH HALF A Powerade BOTTLE APPROX. 16OZ. Plants are in direct light in the mornings and I haven't seem any burning yet. I noticed a small spot on one of the first true leaves but I think it's just a bite from an insect. Everything is green as hell. I'm wondering if I should add fresh soil to the pots but I didn't want to do it on a watering day. Plus the plants will be going in there final homes shortly. Very happy with progress this far.
UPDATE Went over at 1230 and everything looked great. I sanitized the cage AND the pallets. Also bought 3 more 30 gallon grow bags. Once they go in there they will explode! I can't wait. I'm considering ordering netting for moths. Depending on price i might get some. If not I'll keep using the BT.
UPDATE: Went and checked around 430. Temps were in the 70's and they had a few hours of direct sun. No burns evident as of yet. Pallets fit in the cage like puzzle pieces. Now I need to sanitize my grade stakes bamboo and trellis and setthat stuff up. I'm going to screw the grade stakes to the pallets and attach garden rods and bamboo with zip ties and I'll have a horizontal trellis. Once branches are a little bigger I'll begin LST. The plants that I topped AND the ones I FIMed are doing great. The FIMed ones with at least three colas some have four. Hoping the plants took that time growing roots.
5/28 Plants are all standing up tall. They loved that water. Haven't noticed any burns and they get direct sunlight in the mornings. Soon I can put them in the cage and start setting up my trellis and supports. Fan leaves on soms are bigger than my hands. These girls are probably the healthiest plants I've grown. I usually do clones and end up starting with problems. This is great starting with seeds and have no problems.
UPDATE: Went back around two because Temps had reached 92f and rh was only 20%. Nights cool off greatly so it's a dramatic temperature shift. Plants looked great. All standing up looking great. Put plants in at 7:30 ,and continue the light until 9 and have it turn on at 4am. Then they are out by sunrise. Did notice some burning on one of my plants a large fan leaf. What can I say? It was extremely hot. I'm surprised they did as well as they did.
5/29 Everything standing up perfectly looking great. Plantscget an extra hour of sun at night and morning and are on 19/7 with the extra added light. Trying to acclimate and finish hardening off this week. I'd love to be able to at least put them in full sunlight for the day. I think they'd be fine. I'm really impressed with how they are growing. Second guessing not HST all of them. However I think I might light dep a couple. We'll see. I've still got work to do.
UPDATE: put the plants in around 7. One of my lights shit the bed. They are just 150 watt hps but I was using them to finish hardening off my plants and slowly adjust them to the natural light. The on/off switch fell off. I'm sure my cousin can fix it bit the one is pe9bably fine as I'm only going fir a few more days. The thing about having this many plants to choose from is that I can pheno hunt and put the VERY best into the final containers and if I decide too I could light dep.
5/30 WATERED EVERYTHING TODAY WITH HALF A POWERADE BOTTLE. My cousin can probably fix the other light but I don't think it will matter. Within a week I'm going to have these girls in their final homes. I just need to sanitize the trellis and posts and then screw them to the pallets. I'll have this all taken care of before the plants go in the hole. I did notice another burn on a leaf. Def glad I'm taking the time to do this right.
UPDATE: I put the girls in the barn around 7:30 and flicked the one 150 watt HPS light I have working on. I added a half hour more of darkness to try to acclimate them quicker. Light stays on until 9 qnd came back on at four but i changed it to 4:30. I'm usually there by 5. I'm looking through my surveillance cameras and it doesn't even look like the light is on. Of course its super bright out but I should be able to see from that image. Luckily the building the go in has massive windows up top to let light in and windows on every side so the light is probably unnecessary. However due to my bullshit luck last year I'm being as cautious as I can. Tomorrow is supposed to be extremely hot again as is the next day. I think I'll leave the door down a little, open the other and move the plants back so they have no direct sunlight and adding a fan. That way they can continue to recover. They seem bigger everything I see them.
5/31 Another hot day. I figure a few more days (under a week) and I can transplant these girls! Supposed to be 85 today and 90 tomm. It was 45 when I got here. These girls are doing well handling this bipolar weather.
UPDATE: IM AN IDIOT AND THIS IS AN 8 DAY WEEK lol. Maybe I'll do a six day week next time to get back on track. Went back over at two and noticed some burns. Sent a video to a friend andcwith the sun we've had and the weather in the 90's he agreed the damage was minimal. However there was someone there working who opened more doors which let a lot more light in. It's supposed to be in the 90s tomorrow too. I may leave the doors shut. There are windows on everyside and an enormous cone at the top so the get plenty of sun. He also grows and I've been careful to not let anyone that grows go around my plants. I'm going to have to talk with family about this. To be honest I'm kinda pissed. Next watering I may add some kelp me kelp you and start a small nute regimen.
UPDATE Went back over at seven after having a panic attack. Half stoned half asleep. Stupidly I was looking at a plant and thought "shit" the FIM must not have took but in reality I was just stoned and tired so I topped a plant that had already been fimmed so we'll see how that goes. Purple punch is so far behind everything else it's not even funny. There might be one that's doing pretty well and that of course is the one with no HST. Branches on the other strains are thick and ready for LST though. What I think I'll do is transplant the 10th planets and the blueberry cheese ones that are ready and hold off on the rest for a while. Hopfully I'll be able to show plants in final homes next week.

Likes
12
Share


@HerbalBlazer
Follow
All trained nicely new to this so doing the best to my knowledge all seems to be healthy. I've add most the other equipment in the room now aswell
