Likes
Comments
Share


@Myrcene_Dream
Follow
-Removed some larger leaves for better air flow
-Looking close to being done in a week or 2
-Starting to lower humidity as much as possible until harvest

Processing
Likes
9
Share


@Love2Bud_UK
Follow
Bud sites/ pistils starting to pop through now
...really happy with how she has turned out in the end, learned so much from this plant I've become emotionally attached...and took 2 clones
...really hoping they take to (never cloned on my life🤞)

Likes
7
Share


@TheGreenLeopard
Follow
big strong auto, wish i had more space for it. its showing promise .. bud transition started this week. nutrients i find it tough to decide on auto but should be fine .. thanks for visiting.


Likes
3
Share


@Badger161291
Follow
Can anyone give me any tips wat to do from now like topping or anything first time growing
Likes
7
Share


@Ms_Herbalist
Follow
Defoliated it a few days before harvest so plant can focus more energy on buds. Smells very citrusy, very powerful.
Will harvest her in the next few days to start drying process :)

Likes
8
Share


@LokalGrenz
Follow
Really don’t have much to say been a real easy grow even tho temps been getting in mid to high 80’s lately I got a jewelers jewel think it’s cheap cause it’s 10X can’t really see the trichomes to well I seen some amber but I’m sure if it’s not cut down this week may23rd it will definitely be cut next around May 27thish

Likes
50
Share

@SundancerS
Follow
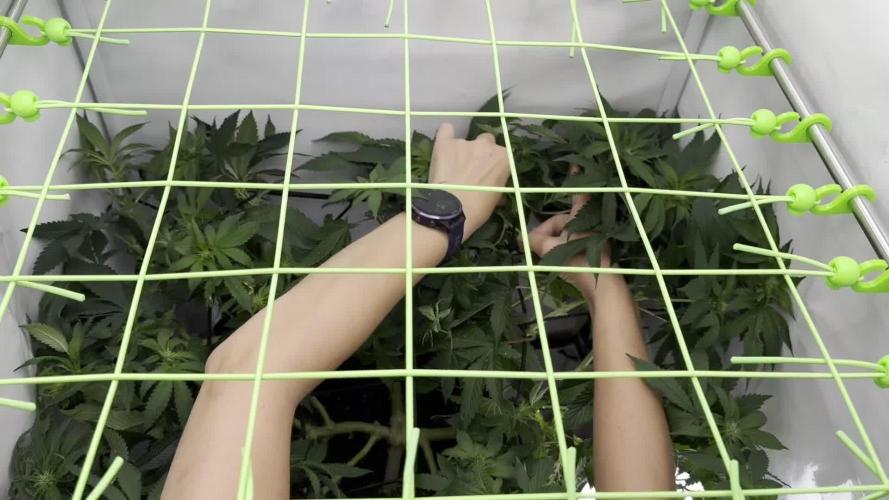
German version below.
This week was all about training for The Tropical Ice Cream One. After having great success with a second SCROG net on our Permanent Marker, we decided to use the same approach for this grow. We picked up a new SCROG system at Mary Jane, and this week it finally got its first real job.
Setting up the net was the easy part. The real work started afterwards. Branch by branch, we carefully tucked every shoot into the second net and repositioned it. Our goal was to create an even canopy so every future bud site receives as much light as possible and can develop to its full potential.
It took several hours of patience, but the result was definitely worth the effort. The height difference across the entire canopy is currently only 2 centimeters. That is exactly what we aim for when building an even SCROG canopy.
Now it is time to keep our hands off and let her do the rest. She handled the training exceptionally well and can now settle into her new shape over the next few days. We are excited to see how the second SCROG net will influence flower development and yield during the coming weeks.
After all the stress from the training session, she was rewarded with an extra serving of Bio Heaven and Acti Vera as a little treat. 😁
________________________________________________________________________________________________________________________________________________________
Diese Woche stand bei der The Tropical Ice Cream One ganz im Zeichen des Trainings. Nachdem wir mit der Permanent Marker sehr gute Erfahrungen mit einem zweiten SCROG Netz gemacht haben, wollten wir dieses Konzept auch bei dieser Pflanze umsetzen. Auf der Mary Jane haben wir uns dafür ein neues SCROG System gegönnt, das nun endlich zum Einsatz kam.Der Aufbau war schnell erledigt, die eigentliche Arbeit begann aber erst danach. Trieb für Trieb wurde vorsichtig in das zweite Netz eingefädelt und neu ausgerichtet. Ziel war es, eine möglichst gleichmäßige Verteilung der zukünftigen Blüten zu erreichen, damit jede ausreichend Licht bekommt und sich optimal entwickeln kann.Das hat einige Stunden Geduld gekostet, aber das Ergebnis spricht für sich. Der Höhenunterschied über die gesamte Zeltfläche beträgt aktuell gerade einmal zwei Zentimeter. Genau so stellen wir uns ein gleichmäßig trainiertes Blütendach vor.
Jetzt heißt es erstmal Finger weg und wachsen lassen. Die Pflanze hat das Training hervorragend mitgemacht und darf sich in den nächsten Tagen in ihrer neuen Form entfalten. Wir sind gespannt, wie sich das zusätzliche SCROG Netz in den kommenden Blütewochen auf Ertrag und Blütenentwicklung auswirken wird.
Nach dem Stress des Trainings hat sie eine extra Portion Bio Heaven und Activera als kleines "Leckerlie" bekommen. 😁
Likes
25
Share


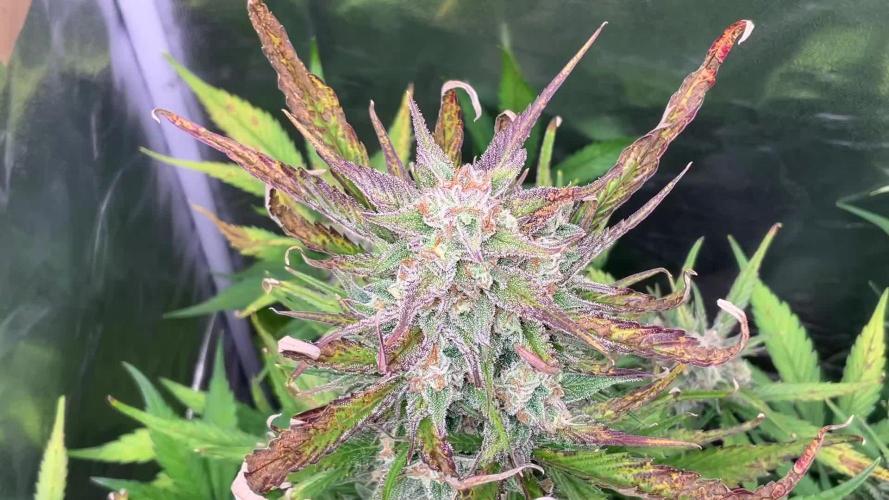
@XperencdGmanXG
Follow
Major issues with calcium def for no reason and a weird re veg, and the utter lack of mould resistance. Plant was tall and buds are huge and dense, let's hope the taste is phenomenal.


Likes
5
Share


@dauntless
Follow
Week 4 starts Sunday July 17, 2022
Plants seem really nice and healthy. I really like Flora Nova, its a great product. 300ppm and the plants love it, even though the Gaia Green is in the mix, it seems to just love this combo, ever since I repotted with the amendments in the soil, and watered with Flora Nova Bloom (mix it crazy well before using) the plants just look really happy and green. It's not an organic product, maybe like 30% organic -- just like me haha.
I think by week's end we will be caught up and ready to intensify lights, threw the SF1000 in the tent finally for more light, but so far just keeping only the Phlizon white light full spectrum COBs on and the RB lights off, and not using the SF-1000 at all even though its mostly white. Despite what Phlizon says, the COBs are great during veg, the RB not so much. I like the COBs so much better than the smaller LEDs for veg.
July 19, 2022
Turned on the SF-1000 to 60% and measured light, I'm happy with it. I have another strain growing next to these and the extra light will help during flower as a side light but it will most likely hit the canopy too. The growth is vigorous right now. Added pics, today is day 28 since they were dropped into water
July 23, 2022
Tomorrow starts week 5, growth is super green, no funky yellow or leaf drama. Stalks are getting much thicker and stronger. Turned the lights up this week, added the 2nd COB, and temps are just fine! Who knew. Anyway, they look like they are very close to pre-flower. Added some tent mates for a future grow, check out the grow area vid. Maybe I forgot to mention added worm castings this week...


Processing
Likes
4
Share


@kevb84
Follow
first flower feeding week 1.added a vid.and a vid of next gen of clons.

Likes
13
Share


@DeepSouthDank
Follow
Super happy with how everything is looking, conditions are perfect, and not an problem in sight! Should be an epic run ✊
Scrog and Fleunce Spydr 650watt are installed and we are intiating the flowering cycle on Sunday October 1st. Took 10 cuts this morning from some of the bigger girls to help shape canopy.
These girls flower fast! Big Budzzz in-coming 😁👌

Likes
13
Share


@KIOSKOdeCHUKI
Follow
No os recomiendo para nada semillas de eurogrow. Este es el 2 cultivo k no sale..ni crece
Likes
19
Share


@MrWolfe
Follow
Day 56 starting flush then another round. No washing machine in the next round.:(
Rotten cookies 8 had 2 stamen that came out of a bract so possible hermaphrodite there. That's why we hunt, number 6 is frosty as heck and 1 and 4 have the craziest bud structure I've seen so far

Likes
9
Share


@JeyGanesha
Follow
Anche a questa runtz gli ho fatto un Super hst ........
Ho porterò delle altre amiche mie (larve di coccinelle) per fargli tenere punte le mie piante sacre😊😉👍💪
....lotto biologica.


Likes
75
Share

@Natrona
Follow
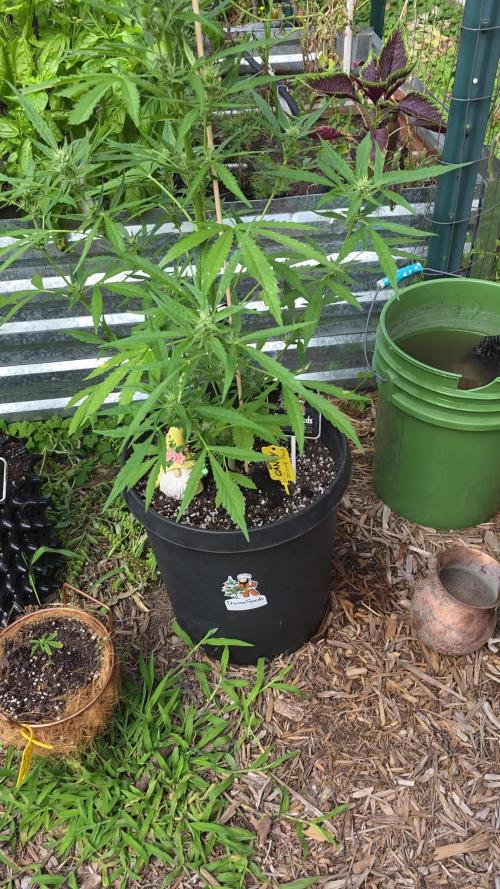
🍬Divine Seeds Auto Contest Candy 🍬Outside Grow
👉Sponsored Grow👈
W8F4
7/20-26
The hot weather returned with humidity and days of scattered thunderstorms. I fertilized once this week with I49 and top dressed with worm castings. No deficiencies so far 😊. Thankfully with all the rain we’ve had this month she doesn’t show any deficiencies or bud or root rot. I fertilized with I49 grow 1 tbsp/gal & 2 tbsp I49 Flower.
With the extreme heat and rain, my auto Candy grew 2 more inches and is now 41 inches. Those inches are mostly buds puffing up with more hairs.
She has some minor bug damage but demonstrates resistance to fungal diseases.
As always, thank you all for stopping by, for the likes and most of all growers love and support.
Stay green, growers love 💚🌿
💫Natrona💫