


Likes
5
Share


@AustinRon
Follow
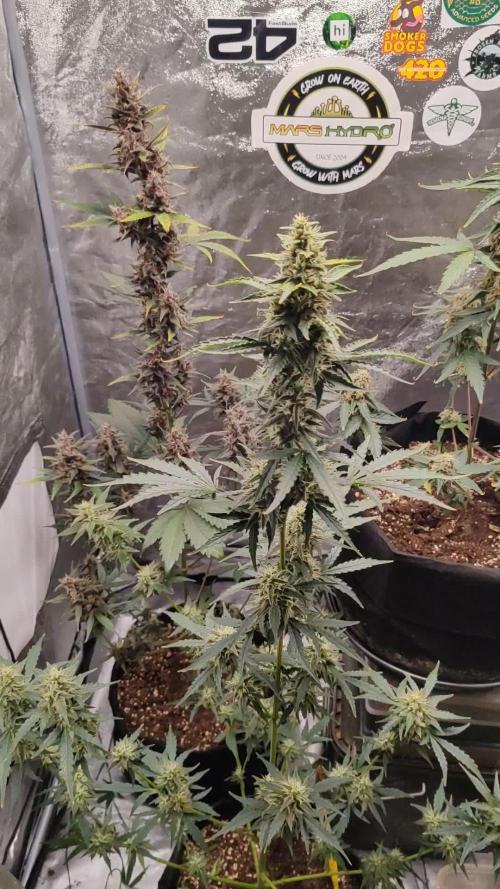
TH 1Q2025 - Week 10 - Flower 7
(ON Haze X Original Haze) X Northern Lights #2
“Todd’s Haze”
Objective
- 8 Female Plants, Topped ONCE @ Flip, 12” when topped
- Modified Sea of Green
Seeds Wet: 1139PM, 28.2.2025
Germinated: 2.3.2025
Flip: 21.3.2025
Harvest: 77 Days, DATE: 6.6.2025
_________________________________________
__
Fri May 9, 2025
TH 1Q25 50:F:7:1
Cleaned Irrigation Manifold Filter - moderate -- light film.
Runoff: [ 1, gal], [ 2.6, mS/cm] # Still with HIGH Runoff EC vs. Input. At a GALLON of runoff, that’s impressive.
__
Sat May 10, 2025
TH 1Q25 51:F:7:2
- [x] Harvest Dehu
- [x] Amount: [ 2, gal]
- [x] Refresh Reservoir
- [x] Water: [ 11.4, L]
- [x] EC: [ 1.8, mS/cm]
- [x] Rooted Leaf Primer A&B: [ 13.5, ml, gal]
- [x] SLF-100: [ 5, m, gall]
Runoff
- [x] Amount: [ 1, gal]
- [x] EC: [ 2.6, mS/cm]
__
Sun May 11, 2025
TH 1Q25 52:F:7:3
- [x] Harvest Dehu
- Amount: [ 3, gal]
- [x] Refresh Reservoir
- [x] Water: [ , ml]
- [x] EC: [ 1.8, mS/cm]
- [x] Rooted Leaf Primer A&B: [ 13.5, ml, gal]
- [x] SLF-100: [ 5, m, gall]
Runoff
- [x] Amount: [ 0.5, gal]
- [x] EC: [ 3.0, mS/cm]
__
Mon May 12, 2025
TH 1Q25 53:F:7:4
- [ ] Clean Irrigation Filter
- [x] Harvest Dehu
- [x] Refresh Reservoir
- [x] Water: [ 1 gal , ml]
- [x] EC: [ 1.8, mS/cm]
- [x] Rooted Leaf Primer A&B: [ 12, ml, gal]
- [x] SLF-100: [ 5, m, gall]
Runoff
- [x] Amount: [ 900, ml]
- [x] EC: [ 3.0 , mS/cm]
__
Tue May 13, 2025
TH 1Q25 54:F:7:5
__
Wed May 14, 2025
TH 1Q25 55:F:7:6
- [ ] Offset Drip rings each plant (for a couple of days) - Shift to opposite side Fridah
- [x] Harvest Dehu
- [x] EC: [ 1.8 , mS/cm]
- [x] Amount: [ 2.5 , gal]
- [x] Refresh Reservoir
- [x] Water: [ 1 , gal]
- [x] EC: [ 1.8, mS/cm]
- [x] Rooted Leaf Primer A&B: [ 13.5, ml, gal]
- [x] SLF-100: [ 5, m, gall]
Runoff
- [x] Amount: [ 2.5, gal]
- [x] EC: [ 1.8, mS/cm] # The ONE Advantage to draining the Res and getting Full Flush … :-}
__
Thu May 15, 2025
TH 1Q25 56:F:7:7
SOP - Photoperiod Flower CalPhos
No Nitrogen mix.
Apply Solution, 475 ml/plant DRENCH SOIL SURFACE
CalPhos Supplement - ( 475 ml/plant)

- [x] CalMag Fuel: [ 20, ml]
- [x] Silica Skin: [ 20, ml]
- [x] Peak Bloom: [ 4, ml]
- [x] Resin Bloom: [ 4, ml]
- [x] Photosynthesis Plus: [ 6, ml]
- [x] Quillaja 60 Powder: [ 0.25, tsp]
- [x] CalPhos: [ 1, tsp]
- [x] Amount: [ 1, gal]
Runoff
- [x] Amount: [ 0.25, ml]
- [x] EC: [ 3.0, mS/cm]
At 1AM - We’d collected 1.5 Gallons of Runoff after application o CalPhos Supplement. Shut off irrigation. Refresh Friday


Likes
5
Share


@Ninjabuds
Follow
Obama runtz x gas tax sad to say both seedlings are super crappy so far. If it was not for the gas tax parent being the best flower ever then I wld just toss these but sometimes the crappy slow growing plants end up being super dank
It's looking like a good start to a week the plants are strong they are getting to the point I can let the dried dry out completely. I'm thinking by the end of this week the plants will be starting to be sold.
Last week I put all the plants into my bigger 2x4 tent with my medicgrow mini sun 2 the 500w version. Only a few of the plants were ready for that light. Seems like the only plants that really have good resistance and have a strong start are the weedseedsexpress.com seeds. Shout out to weedseedsexpress.com for the strong plants.
I ended up putting all the plants back into my 2x2 tent with the 55w amazon light it has alot more blue light in its spectrum. It's kinda weird b4 I switched the plants to the 2x4 tent they were getting 220umol under my amazon 55w led then when I put them under the 500w light 25% strength about 50in from plants and they were getting only about 195umol in that tent but it was stressing most the plants. I assume a larger light has more side lighting hitting the plants. I think when useing larger lights it's good to measure umols from the top but also coming from the sides. I think durring seedling stage they only need about 50% the umols coming from the side the plants as the top is receiving.
When I put the plants back in the small tent about the same umols as they were getting b4 the switch and they were still a little stressed. So for a few days I put the small light at the top the tent giving them 100umols for a few hrs then 130umols the rest the day.


Likes
9
Share


@TheBulldozerSicily
Follow
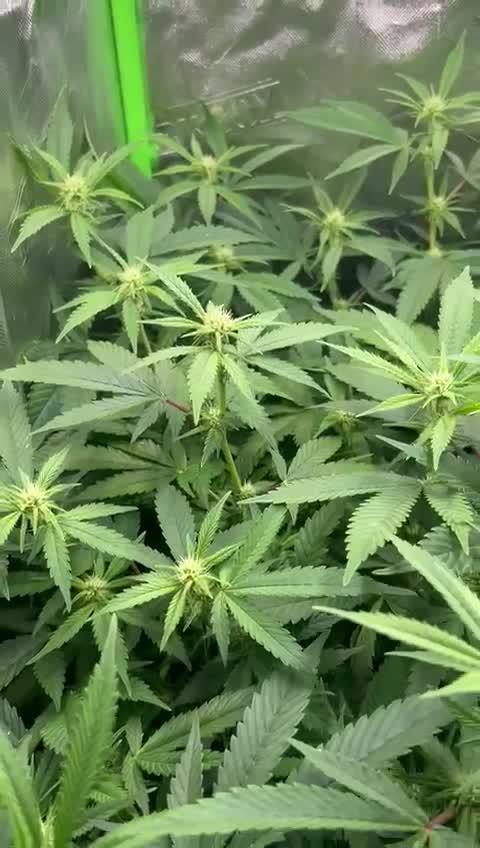
Inizialmente non volevo mettere la rete, e forse era meglio che non la mettevo, perché per metterla mi sono fatto prendere dal panico e ho spezzato molte apicali dato che ancora erano appena formate e molto deboli. Qualcosa du brutto doveva pur sempre a, ma va bene lo stesso fa parte dell'esperienza.

Likes
2
Share


@MarianoDoBom
Follow
Seguimos com as meninas agora no scrog, estão desenvolvendo bem, daqui a pouco começamos com a fase de engorda.


Likes
3
Share


@Paul_on
Follow
Terps on this cultivar are banging ,colours starting to show now some purples and pink plus yellow n green and she still has 3 wks to go , I've added a second Migro Aray 3 ,to try get fatter buds ,hope it works 💪, happy growing Growmies

Likes
3
Share


@Organic473
Follow
They’re coming back nicely after the defoliation.
I feed her and let the soil dry out and the results are here.

Likes
14
Share


Likes
18
Share


@Staffedition
Follow
Привет друзья. Моей растихе сегодня 155 дней
Сегодня перестал кормить и начал проливать чистой водой
20.10 перевёл свет в режим 12/12
Начал применять LST технику на 19 дне, а 18 августа добавил ДЕФОЛИЗАЦИЮ
С 20.08 ДЕФОЛИЗАЦИЮ
С 20.08 LST технику
На сегодняшний день влажность 54%
5.09.2023 заметил высокий Ph 7.9
С 48 дня Ph не ниже 5.8
На сегодняшний день Ph 6.0
Начал кормить с 60 дня Canna Terra Vega
PPM 150
Всем мира и добра!
Не забудь поставить лайк❤️, если понравилась как прошла неделя
И читайте наш TELEGRAM: https://t.me/smail_seeds
#Smail_Seeds 😀

Likes
1
Share


@Kevin_grows_hard
Follow
A huge thank you to AC Infinity! I was the lucky winner of their brand new, just released, ECO FRIENDLY Refillable carbon filter! No more wasting the entire unit when it's not quite cutting it anymore, Available NOW in two different sizes for your convenience on:
THE AC INFINITY WEBSITE https://acinfinity.com/hydroponics-growers/ventilation/refillable-carbon-filters/
As well as on the AC INFINITY STORE PAGE at:
https://www.amazon.com/acinfinity
While you're there make sure you check out the rest of the world class lineup presented to you by AC Infinity and proud supporter Kevin_grows_hard and the GrowAddicts family.
AC Infinity,
There Quality is to infinity and beyond.


Likes
38
Share


@LittleBigTrees
Follow
I've been pulling the top small fan leaves to allow the side's to catch up.
One plant is really tall and stretchy ,
One plant is very short and compact .
The other 4 plants all look very similar to each other at this stage .

Likes
18
Share


@thenotillwizard
Follow
At day 22, the girls has cut their water consumption by over 60%.
the strech is definitely over. The buds are now swelling. The terpenes are showing themselves.

Likes
91
Share


@Salokin
Follow
Gu Guys,
she is continuing to develop as she should, however doesn't seem to be stretching all to much even with lower light intensities. I have therefore decided to push the ppfd to roughly 600 and let her finish her pre flower, no matter if she will fill the entire scrog or not. the roots are bit stained, however, this seems to be nutrient related, no slime or smelly roots thus far and it seems like she is constantly shooting out new ones from the net pot. She is going to be a nice little bonsai bush :)


Likes
Comments
Share

@smoking_hills9
Follow
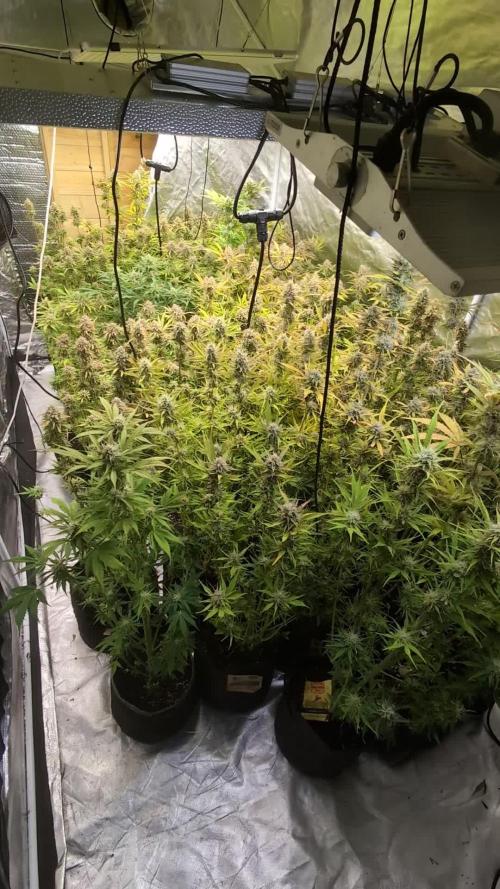
These cali genetics are blowing my mind 🤯 super sticky, very frosty rock dence buds with extra strong smells. All 3 strains are 10 out of 10, very impressed. Done last defoliation few days ago, preparing for the harvest so it's much easier. Stalks are super fat, same as buds.
Got big surprise from Atami, plant food, and many extras. Crazy. Thanks a lot guys. 💚 Start adding you Bloombastic food already. They love it. Smell is mad. I think most of plants ready in week or so.

Likes
55
Share


@w33dhawk
Follow
12.04.21 heute is Anfang der 4. Woche nach dem flip bin begeistert von den Ladys sie sind obwohl sie so viel stress mit machen mussten fleißig am blutenstände produzieren die trichom Produktion hat auch gut eingesetzt jedes mal wenn ich die Blätter unters netz schiebe und wenn ich gegen die Blüten komme kleben meine Hände und wenn das passiert verströmt sie einen angenehm cremigen Duft nach zitrone fast schon limoncello artig.......
13.04.21 hab heute mal wieder gegossen und wie immer jeden morgen Blätter unten halten sonnst war nix weiter....
14.04.21 moin leute der trottel des Tages ist wieder da hab mir heute (2 Tage nach dem gießen) meine gedanken gemacht bezüglich des absetzen der dünge Zusätze aufgrund von Green Sensation hab gedacht 4 in eins dann kann der rest ja weg und bin heute mal zufällig drauf gekommen beim Hersteller auf der Homepage zu gucken und siehe da ich trottel hätte sugar royal ganz normal weiter laufen lassen können werde es dann beim nächsten Guss wieder mit einschieben. Hab heute den Reflektor auf ganz weit gestellt damit ich mit der Lampe weiter runter komme bin jetzt heute auf 30cm an die spitzen gegangen und werde am Freitag weitere 5 cm nach unten gehen also auf 25 cm an die spitzen ran fahren da ich bei offenem wing und 30 cm nur 23,5 Grad an den spitzen habe solange die Pflanzen keine Stress Erscheinungen auf 25cm erleiden und die Temperatur stimmt bleib es dann auch auf 25 cm bis zur Spülung...
15.04.21 habe doch heute schon die Lampe auf 25 cm gesetzt bin wieder zu ungeduldig 24std hat der Tag das ist einfach zu lang für meine Geduld 😁 hab sonnst nur wie immer dafür gesorgt das alles an blattwerk sich unterm netzt hält....
16.04.21 hab es heute mal nur laufen lassen und beobachtet was die Blätter so machen muss morgen eindeutig wieder ran und unters netz stopfen 😒😒....
17.04.21 hab heute wieder die Blätter unters netz gestopft sonnst weiter nix los gewesen. Die Ladys halten die 25cm Lampen Abstand ganz gut aus bis jetzt, Temperatur liegt bei 25,4 Grad also noch vertretbar denke ich. Mal gucken was die Ladys bis Montag zum Licht druck sagen, wenn die spitzen heller werden geh ich zur not lieber wieder nen Stück hoch mit der Lampe.....
18.04.21 hab heut das gleiche wie jeden Tag gemacht, ich hab versucht die Welt-Herrschaft an mich zu reißen 😁😁, ne spass bei seite wie immer Blätter drücken und giessen war heut auch dran. Die Woche lief auch wieder erstaunlich gut hab zwar noch ne ganze ecke vor mir mit den Ladys aber ich bin zuversichtlich......
