The Grow Awards 2026 🏆 


Likes
Comments
Share
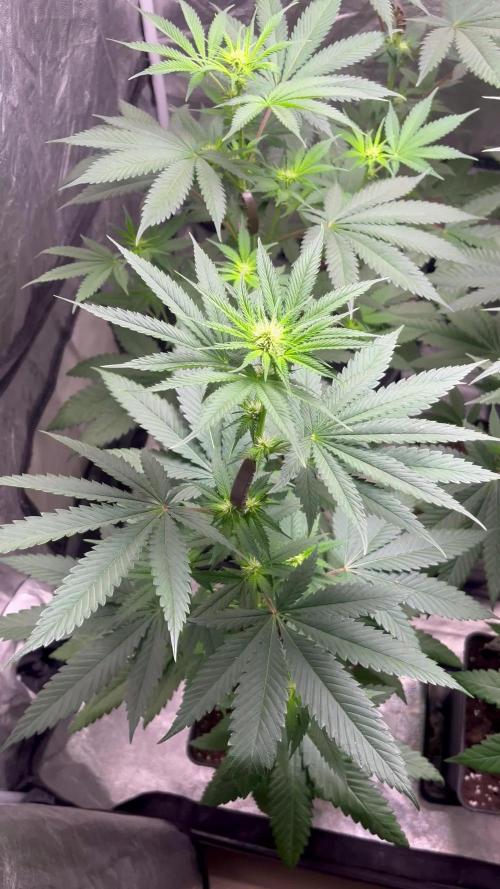
@MiyaguiOkPolilla
Follow
Esta variedad me encanta, huelen genial y sus cogollos son super densos y llenos de resina siempre. Poca tolerancia a los excesos y es muy fácil de estresar. A pesar de todo sigue siendo una de mis variedades favoritas ya que su aroma old school con toques ácidos me fascina!. Actualizaré luego del secado y después notas de humo. Saludos!

Likes
42
Share
@Xi_Ve
Follow
Ending week 1 today!
I am satisfied with how the girls are growing.
Quick summary by days:
note: amount of water is on ALL plants, not just 1
13/9 6.5 PH Water Misting (0,2L)
14/9 6.5 PH Water Misting (0,2L)
15/9 6.5 PH Water Misting (0,3L)
16/9 Since I didn't water my soil when I was planting the seeds, I grabbed some more soil, put it on top just to help with stretching, and then I decided to do a full watering just to get the soil wet.
I grabbed my pressure pump, put in 1,5L of 6.5PH water, voodoo juice + piranha 2ml/L and watered all 9 of them with 1.5L (misting with the pressure pump - I think I will continue to do the waterings like this because it's so easy!)
17/9 6.5 PH Water Misting (0,2L)
I've seen a fungus gnat, so I put up more yellow sticky traps.
18/9 6.5 PH Water Misting (0,2L)
19/9 6.5 PH Water Misting (0,2L)
Caught 4 fungus gnats for now, I hope the bastards didn't lay their eggs. Keeping the vents on.
Temperature this weeks was 24-27, moisture 50-70, average 60.
Mimosa #2 a bit yellowish, keeping an eye on her, hope it's nothing serious.
Everything else is fine, going into week 2! I still won't give them any NPK, just voodoo + piranha + b52 in week 2. Maybe i put carboload or bud candy just to feed the bacteria and the fungus in piranha and voodoo juice, any thoughts on that? I think I will introduce Micro+Grow+Bloom 0,5ml/L in the third week.
Also, there are some white spots on the leaves. I think it could be chlorine? Im watering with tap water, letting it sit for around 12 hours before adjusting PH and watering. Maybe I will let it sit for more this week.
See ya in 7 days, if there aren't any more problems meantime haha

Likes
7
Share
@Danger90946
Follow
Day 43 12/06/2021- Beginning of week five of flower. She should be done soon, she will also get her final feeding soon.
Day 45 12/08/2021- She got her final top dress today from here on out she is on her own all I will do is water with pain water PH to 6.2-6.8 when dry.
Day 47 12/10/2021- She is coming along nicely. Very frosty wish she wasn't a auto so I could of clone her for sure. Today she got a nice treat as it rain in my hometown and that's the water she got. Hoping she is ready by the end of the year. I know she looks funny but she was never topped either.
Day 49 12/12/2021- End of the week, nothing new.


Likes
10
Share
@eldruida_lamota
Follow
Vamos familia, actualizamos la segunda semana de floración de estas Lemon Cherry Runtz de FastBuds.
La temperatura que estuvo entre los 24-26 grados y humedad dentro de los rangos correctos.
En cuanto a las plantas las veo verde sano, estiraron bien y ensancharon bastante también.
Se nota que los nutrientes de la marca Agrobeta cubre todas las necesidades de cada ejemplar.
Las flores empezaron a formarse, por el momento todo correcto, os dejé también alguna novedad y un cambio en la sala, agradecer al equipo de Mars hydro por el nuevo TSW2000. (los últimos 5 años cultive solo con los leds de esta marca)los cuales probé, TS600, TS1000, TS3000, TSL2000.
Llevaba 10 años trabajando en sodio y fue un salto de gigantes cambiar a los Leds, jamás me arrepentiré de ese cambio.
- os dejo por aquí un CÓDIGO: Eldruida
Descuento para la tienda de MARS HYDRO.
https://www.mars-hydro.com
Hasta aquí todo, Buenos humos 💨💨💨
Likes
29
Share
@CrazyFlowers07
Follow
Plantas muy facil de cultivar y muy rapida .. en solo 9 semanas me saque en la #1 85g y en la #2 - #3 unos 50 cada una... en cada foto teneis el seguimento de cada planta desde la semilla a los cogollos.. consejo para todos de el banco de sweets seeds ✌️✌️

Likes
Comments
Share
@KurtThePlantGuru
Follow
This is actually Week 6, little delayed on this diary.
Grease Monkey is performing beautifully, noticing first signs of fade. Was going to give one more feed before I start flushing, as it could definnetly still use some nutrients!
Buds are bulking incredibly, fat golf ball sized nugs, that real of rubber tires, fastfood/garlic burger, with notes of an oil spill or diesel spill.
Super intoxicating aroma, never smelled anything like this before
Packing on frost amazing, bulking up super well. If it wasn't for the Herm, would've been my best grow yet!
Likes
18
Share
@SintrexGrow
Follow
Due to change in weather i moved the red critical Autoflower inside under a grow light and she responed very well.
Hope the buds keep getting fatter and thicker.
The smell is amazing and the colours on these buds are amazing

Likes
23
Share
@DeepRootsGrowTrees
Follow
MATARO BLUE by KANNABIA
Week #11 Overall
Week #10 Veg
This week she's looking good for the heat wave we have had here watering 2 times a day she's under a sun screen to help with the 🌞. Stay Growing!!

Likes
15
Share
@XperencdGmanXG
Follow
Hi Cannafam, its all about the microbes! Brewed a tea for 24hrs, of the soil activator 2.6g, fresh organic kefir 100g, EM1 4ml, aquaponics microbes (fresh semi solid fish waste) 100g. and molasses at a rate of 20g per gal. or 5g per Litre. Once brewed add yucca at a rate of 1ml per gal, then use as a foliar spray and root drench. Just thinking I should have added some worm castings to the mix as well. That's next for next week I guess.


Likes
2
Share
@LoganatorDude
Follow
Day 44-
I need to back off on the water nutes, I am forgetting the soil is strong enough.
I will flush with plain water next time. Maybe I should do a plain water foliar feed? I’m still learning. But I think those B vitamins are keeping their metabolism high! Then I feel the need to spoon feed. After giving them much needed calcium, I start adding other things. Those Epsom Salts plus the amino acids on a plant with high metabolism receiving more B1, all while having lots of amended neem cake in the media, is going to be processing a sh*t load of nitrogen! Back to plain water.
Another idea, maybe I will flush a little bit, and feed just CalMag.
Day 48
I realized I haven’t gotten any pictures in for this week! Not that big of a mistake compared to the one I just corrected!
The video is taken when they are back inside for the night as it a cold windy night, and they could use more light. I am not talking because I am sick and can’t talk to well. But it’s just quickly showing how they look after the whole ordeal I am about to mention.
So I woke up this morning, and noticed all of the plants were showing subtle signs of a deficiency. Different deficiencies too! Some are going on the calcium deficiency, others potassium, some manganese even maybe a few others to be honest. Sometimes I could only see signs in the old leaves, and other times I would see signs in new leaves. Either way “most” of them were looking pretty good. But something about all this variability with different plants was oddly unsettling to me. I figured I had better stick the soil pH meter in there and make sure it’s not a pH issue. And to my horror, pH of barely 4.5!! More like 4.20! But honestly it was that low!!!! A miracle these plants haven’t locked out yet! But how did this happen?
Yes it is all coming together for me. Every water I have been giving feed-water. I have been watering with a little runoff, but not enough runoff to manage what I was putting in!
I’ve been “feed-watering” a lot more than usual because the pots are tiny and it’s super hot and mega dry during the days. Like 75-80 degrees (F) and 10-25% relative humidity lately. So no wonder they are drying out fast. All those salts left behind from last feed. So they built up, apparently pretty high. I didn’t think I was feeding too much, especially because I would get a descent amount to drain out the bottoms every time. Either way, I fed too heavy and flushed too little! So I brought out the foxfarm SLEDGEHAMMER!!!!! Did a quick flush, flushed with plain water to get the sledgehammer out, then a recheck on the soil pH meter. Comes out 6.8! So I gave feed-water at ph of 7 afterwords. They were dry enough before all of this, I conveniently avoided damping issues. Now they will dry out and receive plain pH 7 RO water on next watering.
I still have lots of doubt as if I have any clue what I am doing! But so far so good. I try to support the microbes as much as possible, i definitely could use their support. And it might be because of the microbes, CalMag and fulvic acid, that has prevented lockout. But yeah the fact the pH in the soil was corrected with a flush, gives me a peace of mind. The other three from “The Hondo Titan” diary had high levels of sulfur to lime, the flush did not fix, so I repotted them in new soil with pH 7. Also those hydroton expanded clay pebbles become rich with acidic salts, because the water leaves and all the nutes and minerals are captured and stored with the pebbles. Good in small levels. But if the pot dries out every day, those pebbles will eventually make the pH meter smack the end suggesting less than pH of 3.5!!!!!!!! But no pebbles were used on these girls thankfully!!


Likes
8
Share
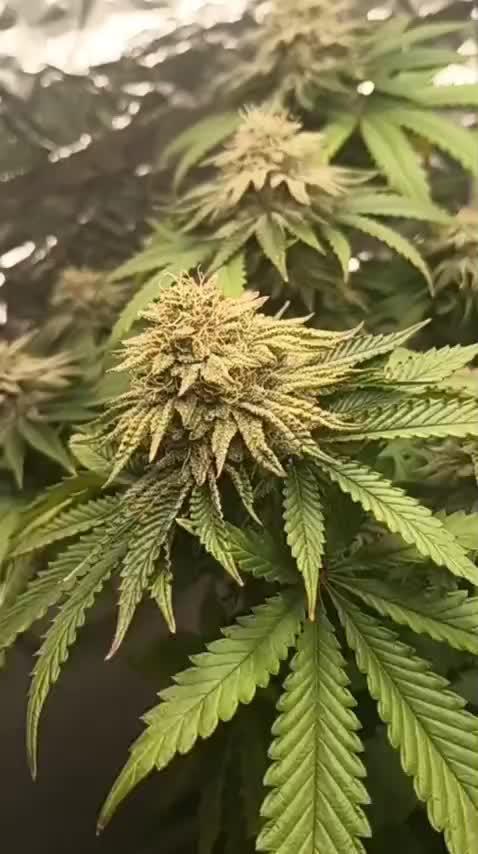
@Smoking_Joe_Frazier
Follow
Week 7: Bloom Phase Launch & Heat Resilience
Update: 04.07.2025 | Day 52
Temperatures peaked at 37°C this week – all plants handled the stress like champions. Zero pest issues. Took them out of the greenhouse to prevent heat stress. Adjusted feeding to address yellowing leaves.
Strain Progress:
Forbidden Runtz
Officially in full bloom mode. Buds forming densely across the canopy with visible resin on sugar leaves. LST created a perfectly even structure. Emits a distinct sweet-fruity aroma when brushed – taste potential is promising. Minor yellowing on lower sugar leaves addressed with Bokashi boost. Otherwise impeccable health.
Green Crack
Caught up to Forbidden Runtz in size. First buds forming across all tops with early resin glimmers. Less bushy than Bruce Banner but likely needs 4-5 more weeks. Aroma present but subtle – awaiting signature mango punch. Strategic tie-downs continue to balance secondary shoots.
Bruce Banner
The standout performer. Bud sites exploding from every node under heavy LST. Top-down view reveals exceptional cola distribution. Responded best to training – poised to yield heaviest in the trio. Genuine testament to FastBuds' genetics.
Feeding Adjustment:
- Crushed Biotabs dissolved in water (50ml concentrate per 10L)
- Added to every watering with Bokashi juice (1:100)
- Targets yellowing while accelerating nutrient release
Next Focus:
- Monitor bud density development weekly and watch out for pests
- Monitor plants for nute deficencies and to ensure the best growth as possible
Catch ya next week.
– Smoking_Joe_Frazier
Likes
12
Share
@AllieO
Follow
3/12: looks like a few weeks left. Buds are dense AF. Leaves are still looking sad. Opted to give light nutrients today. Not going to lie, as much as I love growing, I'm ready for a break!


Likes
45
Share
@HinduGod
Follow
THE SUN GOD HAS BEEN VERY VERY BAD!!!😡 ONLY 2 DAYS OF SUN DURING DIS WEEK LONG STRETCH. TOOK A COUPLE OF THE BIG FAN LEAVES OFF ON DAY 46. DID SOME LST ON A COUPLE OF LOWER BRANCHES ON DAY 48.
PLEASE COME AGAIN!!!!!!
Likes
45
Share
@Secretflower
Follow
Hello my friends,
🍍 May 26.. Day #105🍍
🌻 Flowering Day #42 🌻
6th week of flowering for my three Feminized Gypsy Widow.
Les buds grossissent
It smell very good..
💉 : I don't change anything.. 👍
🔦 : Quantum Board 480 watts at 100% power and 40 cm canopy.
www.exoticseed.eu
That's all for now my friends, thank you very much for coming to see my darlings, feel free to Sub and I will follow you back.
Take care of yourself and your loved ones.
I wish you only happiness with your plants.. 😘
See you soon.. 💨

Likes
9
Share
@newenglandgrowers
Follow
Scratch what I said at the end of last week pests are still around just had some bug fly at me and bite/sting me on the neck now a got a welt on my neck smh, not sure what the heck it was it was some sort of black bug maybe a thrip but I honestly have no idea, did another neem oil drench on the medium only and tomorrow I'm going to use a hydrogen peroxide mixture again that way I can also use it on the tops and undersides of the leaves as well. Some of the roots started to become exposed on the top soil so I added more an inch or two coco to cover the exposed roots. Another successful week I guess the plants aren't dead so onto week 9, Week 4 of flower


Likes
228
Share
@StarLorr
Follow
Welcome to my Pablø Ęscøbar diary.
In this diary:
Seeds: sponsored by Ðivine Șeeds
Media: Promix HP
Nutrients: Advanced Nutrients, Diablo Nutrients.
Light and Weather: Şun☀️and Mother Earth.🌎
___________________________
Feeding:
Tue 23Jul: 4L nutrients pH'd 6.5 and 4L water not pH'd
Wed 24Jul: 9L water not pH'd
Thu 25Jul: 4L water not pH'd
Fri 26Jul: 7L water not pH'd
Sat 27Jul: 4L nutrients pH'd 6.5 and 2L water not pH'd
Sun 28Jul: 10L water not pH'd
Mon 29Jul: 8L water not pH'd
*please note that most water only feedings are 2L at the time throughout the day in bottom saucer*
___________________________
What a beautiful summer that we're having. Just one day last week it was cloudy and colder and got some rain, rest of the week sublime weather.
My Ðivine Ladies are pre flowering and hopefully will be blooming soon, next week update should be FLO fingers crossed😄
______________________________
Pablo got knocked down by wind gust last Thursday, no damage. Added an anti-tilting device all is good now for our big Gal😁
______________________________
Øpi was found with a spider mites nest..squished the squatter with my thumb and index... all 3 Ðivine Gals got the spa treatment, soap insecticide
spray 2 litres each soaked them real good, before flowering it was a smart move😉
______________________________
Thanks for stopping by, likes and comments are appreciated!👊🏻😎
Keep on growin!
Keep on tokin!!!
😙💨💨💨💨💨
