


Likes
46
Share


@eldruida_lamota
Follow
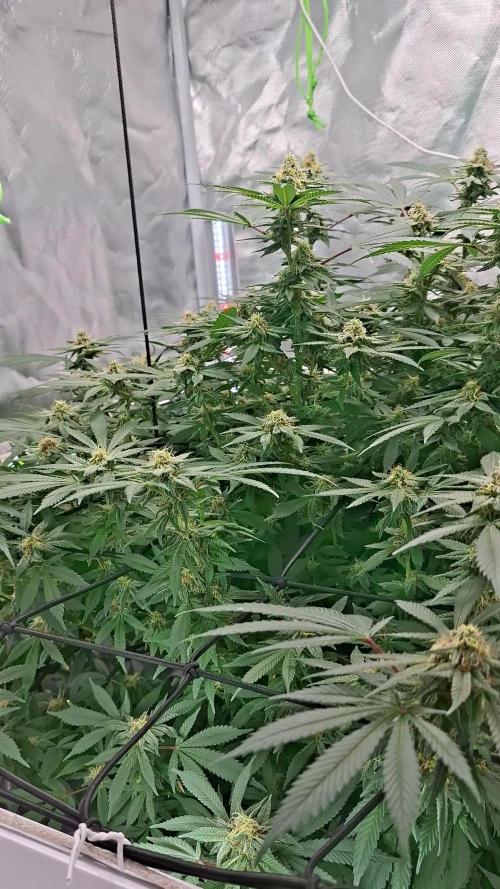
Que hay familia, vamos con la décima semana de floración de estas Candy Rain de Zamnesia, para el concurso POWER BUDS Plagron x Zamnesia CONTEST.
Las flores han terminado de madurar, con 70 dias de floración desprenden unos aromas bastante dulces, en 24 horas me imagino que haré las últimas fotos y las cortaré.
Tercera y última semana solo con agua controlando siempre el Ph, que ahora mismo lo dejamos en 6.
Tragan alrededor de 0.6 litro por planta cada 48 horas.(3 riegos semanales).
La temperatura máxima está en 22 grados y la humedad está entorno al 40%.
Os adelanto, es una planta híbrida predominante indica, es bastante fácil de cultivar, y aunque no sean plantas grandes si produce buenas flores y bien resinadas.
Hasta aquí es todo, en unos días actualizaré la cosecha y la smoke review.
Os comento que tengo un descuento y para que compréis en la web de Zamnesia de un 20%, el código es ZAMMIGD2023
The discount 20% and the code is ZAMMIGD2023
https://www.zamnesia.com/
Hasta aquí todo, buenos humos 💨💨💨


Likes
2
Share


@Mr_nugs_lover_David
Follow
Suuuper sweet and tropical smell, beautiful fragrance of the buds man! By far the sweetest nuggets I have in my garden currently even more than my bslck cherry punch plants, awesome strain, such a beautiful surprise, I'll grow her more times now that I know her, she's fading out perfectly showing purple on the leafs because of the cold weather, and I'm seeing a lot of yellow leafs,let's see what happens at the end! ✌️👨🌾🌱💚

Likes
17
Share

@eldruida_lamota
Follow
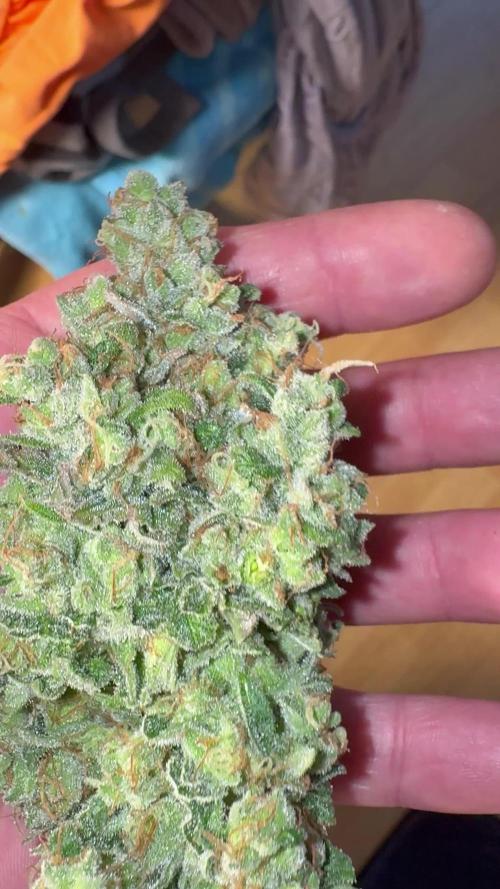
Vamos familia actualizamos la cosecha de las Purple OG KUSH de Dutchfem .
La verdad que el secado muy bien 7 días en Malla y a los botes, 40% humedad y 24 grados es la temperatura ambiental que han tenido en el secado.
Por lo demás de miedo os la recomiendo.
Gracias a DutchFem, Agrobeta y Mars hydro , sin ellos este proyecto no sería igual 🙏.
Agrobeta:
https://www.agrobeta.com/agrobetatiendaonline/36-abonos-canamo
Mars hydro:
Code discount: EL420
https://www.mars-hydro.com/
Buenos humos.

Likes
7
Share


@GRow_M8s
Follow
Not much for this week to report. I was hoping to harvest it in 7-8 weeks of flowering but I dont see it happening. By the look of it in the end of 6th flowering week it will need 3 or more weeks. Almost all pistils are still white but the buds are getting fatter so will be worth the wait.

Likes
3
Share


Likes
11
Share


@Lucidgrower09
Follow
Hey guys this is week 1 in flower for the fat banana. She is growing good now so i think she will become double the size she was before flower. I defoliated her because i don't wanna give her stress later in the flower periode. She gets water every 2 days she is drinking good we gave her callmag pro, sugar royal,power buds and alga bloom from plagron. Its a strong strain ive got no problems so far so lets hope it stays that way😅. Follow me on instagram for mor pictures and videos. Take care and until next week ✌️
Likes
7
Share


@InsideAz
Follow
Plant bothers me because it’s so short and grows huge light blocking leaves. Hard to keep up with but it’s healthy looking

Likes
16
Share


@GeorgeMaas
Follow
Oh girl oh girl, these ladies are having a good time. Switched the light schedule to 12/12 on 13 nov (21 days after germination) Steady growth on all plants still.
I haven't switched the LED lights to flowering mode yet because there's no sign of flowering growth yet. By doing this the plants will stay nice and compact.
Last watering was on 15 nov (5 days ago). I will water again tomorrow. This is my second indoor grow ever (and my first serious attempt), and I refuse to make the same overwatering mistake again ;)
I removed 2 big fan leaves on the top of every plant. My theory is that the soon to become colas will get a bit more light and reach to the canopy quicker, let's see what happens over the next week.
One of the cons of using seeds for a sea-of-green is the possible difference in growth. Luckily not too much difference in height between them so far (please note I corrected their height differences last week by raising some of the plants.
I noticed a glassy, weird look on some of the leaves in the far left corner of the grow tent. After contemplating I realized that my fan was aimed in their direction and the issue might be wind burn, so adjusted the direction (see first photo)
I noticed slightly higher humidity, around 60%. I will keep close attention and take action to lower it if needed.
Likes
35
Share


@SooSan
Follow
90x60x140 (Mars Hydro)
FC-E4800 (Mars Hydro)
Easy2go Aquavalve5 (Autopot)
Living Soil (Demetearth)
Bruce Banner (PEV Seed)
Gorilla GG4 (Ganja Farmer)
Cream Caramel (Sweet Seed)
Gorilla Gelato (Ganja Farmer)
Blueberry (00 Seed)
Kalini Asia (Zamnezia)
Biscotti Mintz (Barney's Farm)
Blackberry Cake (Sensi Seed)
Amsterdam Amnesia (Dutch Passion)
Gelato Cookie (Ganja Farmer)
Purple OG Punch (Ganja Farmer)
Sweet ZZ (RQS)
Rainbow Road (Paradise Seed)
Substrat ~50L:
30L Super Light Mix Biotechnologie
18L coco
2L perlite
1,7kg lombricompost
350g guano de chauve-souris
350g Zéolithe
350g Basalte
170g guano vers de farine
170g biochar
0,7g Endomychorise glomus intraradices
0,7g Bacillus Amyloliquefaciens
Paillage de luzerne alfalfa
Arrosage avec 2ml/L de mélasse de canne 1x par semaine
Pulvérisation avec 1% d’huile de neem


Likes
2
Share


@NocturnalGardner44
Follow
Stretching well, these are looking great! I'm hopeful for a good turnout


Likes
28
Share


@Frenchie
Follow
Hi fellow growers,
for this first week of flowering, everything went smoothly. She took the defoliation from last week well and kept growing strong. She took 8cm during this first week of 12/12, nothing crazy but I hope she is gonna take more this coming week, so that she has pretty long main branches by the end of stretching. I'm glad the smaller branches that occupy the middle grew well and full up this empty space. I'm tucking daily the fan leaves from the main branches to allow a maximum light to reach the branches from the middle.
Last week I was wondering if I had gone too strong on the defoliation and then I read about this schwazzing technique, when one defoliates even more, basically removing most of the leaves, this on the day of switching to 12/12 and then doing this same heavy defoliation 20 days later. So be prepared, in two weeks I'm gonna apply the recommended second heavy defoliation and we'll see how that goes together. 😁
Humidity is around 70% at the moment, it's on the high side but I'm not too worried about it.
For the nutrients, I'm still religiously following the biobizz schedule and so far, so good.
I started this week to log everyday some basic data about the plant, like height, temperatures and humidity. I guess it would be nice to have a little graph at the end to see the evolution of the plant or whatever one wants to do with the data. I think it's good practice too.
-- Stereoscopic pictures --
You might have wonder what the hell are those two pictures where seemingly the same picture is put two times. They actually are stereoscopic pictures or 3d pictures. It's using the same principle as 3d for movies or virtual reality and it tricks your brain into seeing in 3d. Basically each picture is the view from each of our eyes. I made those pictures so it allows to see them in 3d without glasses. Follow along with this little tutorial (The picture "stereoscopy 2" is easier. I find it as well easier on a computer as smartphones have a smaller screen):
- Having the pictures in front of you around 30-40cm (15-20cm on smartphones) from your eyes, start crossing your eyes slowly.
- Both pictures are gonna move toward the middle. The idea is to make both pictures superpose each other in in the middle.
- Start to focus on the superposition in the middle and if necessary, adjust the distance between your eyes and the screen.
- Once it's in focus, you will instantly notice it and see my weed in crystal clear 3d! You can then move your eyes in the picture and enjoy it.
- With a bit of practice, it becomes quite easy to focus (1-2s only)
Even the NASA does it! https://stereo.gsfc.nasa.gov/gallery/crosseyed.shtml
Let me know in the comments if you managed it and if you find it cool or not! 😉
Take care everyone and see you next week!

Likes
58
Share


@Kynareth
Follow
This last week the plant have ended the water of the reservoir so it has consumed itself to keep developing larger buds, on day 72 ut has been harvested.


Processing
Likes
4
Share


