The Grow Awards 2026 🏆 


Likes
Comments
Share
@UnorthadoxDude
Follow
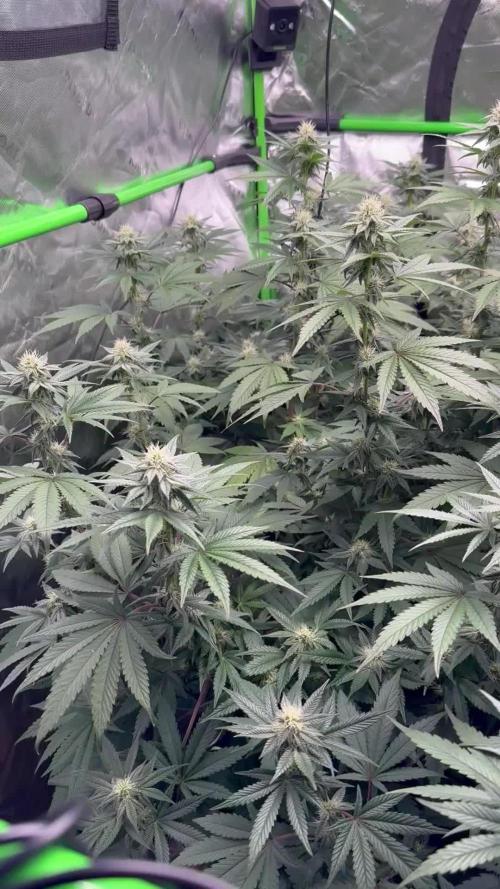
Hey! Welcome to week 8! Karen is mid way through her flowering stretch. Please check back to last week as I update daily so the week is now complete. I count about 20 colas now.
Day 51: Have reconfigured the tent, see video. Karen is now 36cm and still stretching. Karen has more light now. Smell is still there hits you when you open the tent. Fertigated 2l.
Day 52: Height: 39cm. Karen's scent is heavenly. I have reconfigured again and installed some upgrades. Better reflector. Much bigger carbon filter. Increased airflow. Better config. More efficient pot layout. Karen is lovely.
I am grateful to her and for her, so I wrote her a little poem, I hope she liked it.
"Karen! Oh Karen! The phoenix of flowers,
Three lowly weeks she struggled in vain,
Shadowed and starved for five hundred hours,
He slowly wept to witness her pain.
Karen! Oh Karen! I P-H'd your showers,
and in the fourth week you started to gain,
Hallowed and hard you survived as you cowered,
I thought you meek, I was wrong once again.
Karen! Oh Karen! Forgave me my howlers.
She set a pace, a pace she maintained,
Now shes a girl at the peak of her powers,
And so I'm a geek, with buds on the brain."
Day 53: Approx 48h into a simulated dry spell.
Alright I think it is time for Karen to get her first MAJOR defoliation. I will update shortly with photos and info. I will also be doing some gentle LST to separate the colas a bit.
Day 53.5: Defoliation and LST. Finally got chance to photograph that bunda. Enjoy!
Day 53.75: Bit of a fail. Messed up the timer and the lights ended up being off for about 3 or 4 hours. Because I was cooling the room (open window) to keep temperature in the tent down, without any light the temperatures absolutely plummeted as it is sub-zero outside. By the time I realised and turned the lights on, the temp in the main tent had dropped to 14 degrees celsius. Whoops! How is that for mistreating your girl? Defoliated about 80% of her leaves, 4 nodes, significant LST, then stuck her in the cold and dark for 1/6 of a day. Not to mention she is now almost 3 days into a "dry spell". There do not seem to be ill effects, and Karen has already begun to respond to the LST; all the colas that had been changed in angle are now upright again.
The dry spell I keep mentioning, there is a method behind my madness, I have spotted one or two small flies and I think they may be fungus gnats. I am starting to suspect that the 2nd seedling in the Purple OG Punch Auto grow was actually beheaded by fungus gnat larvae. So I am drying out the mediums as much as I dare. I am closely monitoring the plants, so far the only one I have had to break the drought for is Enigma; all the girls in big pots haven't even noticed it's dry yet. How far am I going to push it? Well I will judge it on a plant by plant basis, but quite honestly I am hoping to see physical signs of thirst before I breakdrought. Of all the plants the two I think will respond most strongly to this will be Karen and Bertha, because of where they are. Karen here is actually probably 4 weeks into flowering rather than two, so about now is a good time to give her a little hydration stress. I do not think I will push it past 5 days, as RH is 34%. By now all the plants will be compensating for the lack of moisture and the high temperatures and low humidity. They will be taking more and more moisture out of the coco, and as the coco dries further and further down, those plants that have space will start desperately growing roots to find moisture. Mark my words, 24 hours after I end this drought, every plant in the tent will throw out crazy growth.
Day 54: Ended drought and fertigated 6l, no run off, I will re-fertigate tomorrow. Karen is still stretching her height post LST is now 37cm. The two tallest colas seem to have stopped but the other colas are still stretching.
Day 55: Alright so it has been 5 hours since lights on, and Karen is looking in good shape, all her drooping leaves have perked back up and she has added quite a bit of foliar growth. The colas are all still rising, except perhaps the two tallest. This girl is absolutely loaded with pistils, I'm starting to see trichomes on the sugar leaves, but trich production hasn't started in earnest yet. She has a least 20 colas, and 6 of them are thicker/taller than the primary cola at her tip. Every one of her nodes has reinforced itself with a bulbous growth and these cola branches are swelling rapidly. I am increasingly of the opinion that, all being well, this girl is going to surprise us all with her yield. My first grow, which was just mucking about really, I got 60-70g of the two main plants, and they were just bare sticks with 2 colas. Although her height is less than theirs was, 2/3 of their height was bare stick... whereas every mm of her is befoliaged and living. So in terms of the height of the actual cola I think they were about comparable in usable space on a per cola basis. The main difference being that Karen has 20+ colas whereas they had 2 primary and 2 lower. I know that it is probably unrealistic to expect more than 70g from a single auto grown indoors. Nevertheless my gut tells me this baby could achieve at least 100g, perhaps as much as 150g. The next few weeks will determine that, but given where we were in week 3 I will be grateful for any yield of quality bud. I have dropped the lights down to 18/6 from 'tonight' onwards.
I really have no idea how long we have left for Karen. According the the "brochure" she flowers for 7-8 weeks, with a total crop time of 9 weeks. The problem is I don't know what a total crop time is? Does that mean from seed to finish? If so Karen is clearly not going to be anywhere near that timescale.I am going to go ahead an assume that, for my plant anyway, the first 4 weeks were veg weeks. I think it is fair to count week 5 and 6 as flowering because pistils were popping out very early in week 5 if not before. So that makes this week four of flowering. I am going to assume 8 weeks rather than 7, so I think we have another 4 full weeks give or take a week. On that basis I am expect harvest week to be around week 12 or so. I am not fixed on this though, I am determined not to harvest this girl early.
Day 55: Photos taken 00:00 9/3/23 Strong 24h of veg growth as predicted.
Day 56: Existing leaves continue to swell. Stretch appears to be slowing. I've taken so many media this week that I cannot scroll down far enough to select a recent thumbnail. Probably Karen's biggest week in terms of changes. She is looking like she is going to impress. Height 39cm.

Likes
4
Share
@SuperGluedGrow
Follow
This week was also uneventful, growth has been slow and I'd say its half my fault with PH issues and over feeding which I'm correcting moving forward; and two unstable genetics. I dont have much info on growth patterns for this strain but its supposed to look a beautiful dark purple so I'm gonna breed a male and female hopefully. I'm also looking forward to the fourth phenos straits, I kind of hope its different just to have fourth completely unique phenos.
Likes
18
Share
@Pokan187
Follow
Everything is going smoothly, the buds are getting bigger day by day
All the girls are bug free, they are still looking green
The G13 has the strongest smell followed by the Runtz and the GDP doesn’t smell like anything for now

Likes
12
Share
@yd_grows
Follow
Essa semana alimentei as plantas (45 dias após transplante). Utilizei fertilizante Forth Flor regulando seu PH para 6.8 utilizando bicarbonato de sódio.
Flores continuam desenvolvendo muito rápido e novos pequenos buds continuam aparecendo por toda parte.
A planta ainda continua crescendo verticalmente, o que é impressionante, mas ruim pois está muito perto dos LEDs.
Likes
34
Share
@Hashy
Follow
Comment
🗓️ Tue 7/11/23 (flower day 73 )
📋#4 Slurricane day 127
📋
🗓️ Wed 8/11/23 (flower day 74)
📋#4 Slurricane day 128
📋 defoliation
💧💧💧💧💧💧💧💧💧💧💧💧💧💧💧💧
Water
Method= manually
Feed=water
Volume= 3L each
Easy Ph up=0 drops/L
Ec=0.25H=6.8
Runoff.
Total runoff=1L
Ec=2.4 PH=6.2
💧💧💧💧💧💧💧💧💧💧💧💧💧💧💧💧
🗓️ Thur 9/11/23 (flower day 75)
📋#4 Slurricane day 129
📋 Harvest 600g wet
🗓️ Mon 20/11/23
📋#4 Slurricane dry 11 days
📋 Start trimming Slurricane
Trimmed an hour and a half, 22g so far, nearly half way through.
🗓️ Tue 21/11/23
📋#4 Slurricane dry 12 days
📋 Continue trimming Slurricane
Trimmed 2 hours, 33g from remaining.
Total dry=55g
Larf=10g
Trim=30g
📋 Grow stats
Will be updated as other plants finish.
#1 C-vibez Wet=700g Dry=75g Larf=15g
#2 Runtz Wet=500g Dry=42g Larf=5g
#3 Cherry Pie Wet=494g Dry=36g Larf=1g
#4 Slurricane Wet=600g Dry=55g Larf=10g
Total wet=2294g
Total Dry=208g
Total Larf=31g
Then the hash I get from the larf and trim.
Light started at 49w and eventually settled around 150w mid way through the grow.
208g÷150w= 1.38g/w
Likes
1
Share
@Anthonythegrower
Follow
Purple . I love this stage when the plant starts changing the colors of its leaves and buds.

Likes
18
Share
@Thckaos
Follow
01-11-20 Se cambia la solución y se realiza un lavado de raíces. Para bajar la conductividad de las raíces de 2.25 a 0.2 ms para que la solución nueva sea más efectiva. Se corrige el PH de 6.1 a 5.6. La solución tiene 2.6 ms y 5.6 PH. Se añade una pastilla de CO2.
Se realiza poda apical, LST y deflación.
01-11-20 (2 horas más tarde) Se corrige el PH 6 a 5.6 Conductividad 1.9 ms con los nutrientes ya.
02-11-20 Se corrige el PH 5.8 a 5.6 Conductividad 1.97 ms.
03-11-20 El PH 5.6 Conductividad 2.00 ms.
04-11-20 Se corrige el PH 5.3 a 5.6 Conductividad 1.96 ms.
06-11-20 Se corrige el PH 5.3 a 5.6 Conductividad 1.99 ms.
07-11-20 Se corrige el PH 5.4 a 5.6 Conductividad 1.94 ms.

Likes
3
Share
@macrocefalo
Follow
We arrived in the third week the plants show good vigor and growth. Some cold days 17 Cº may have prevented further growth but we do not have to complain the plants demonstrate to be enjoying food and light. On the 15th the plants presented slightly wilted leaves as day 16 was the day of watering I imagined it was thirsty. But day 16 a few hours after watering the plant still had the same symptoms so I realized that the LED screen was 53 cm from the plant. I increased the distance to 65cm and the plant returned to normal both in force and I managed to correct the diagnosis. I am managing to apprehend some things finally putting into practice.
Likes
52
Share
@SlowpokeFuegobud
Follow
🍮 🤤 ❤️ 🍮 🤤 ❤️ 🍮 🤤 ❤️ 🍮 🤤 ❤️ 🍮 🤤 ❤️
DAY 72
SHE SMELLS LIKE A FRENCH BAKERY, GUYS! JUST NOT FROM THIS WORLD 🤤
Watered with 0.5ml/L Grow + 3ml/L Bloom 💧
DAY 75
Watered with 0.5ml/L Grow + 3ml/L Bloom + Enzym+ 💧
🌱 🙏 Grower love!!!
_________________________________________________________________________
https://hypnoseeds.com/product/cream-brulee-auto/
Cream Brulee Auto
Description
We love our Cream Brulee and wanted to create an even more special variety so everyone could harvest it faster. Introducing Cream Brulee Auto! After a meticulous process of crossing our exemplary variety with our autoflowering genetics of the highest quality; it is ready to shine and captivate all grow spaces. Equally to lovely feminized Indica-leaning sister, Cream Brulee Auto will take over your heart. You’ll want to keep it in constant rotation. In just about 8 weeks it goes from being a seed to a bountiful harvest of sweet and creamy cannabis from the irresistible dessert we know and love.
Appearance and Grow Tips
While Cream Brulee Auto has the same quality and potency as its feminized cannabis predecessor, what stands out is its speed to finish and enormous dense colas. These magical cannabis seeds take around 8 weeks from seed to harvest and can produce up to 500 grams (per plant) of pure happiness. Indica lovers won’t be able to look away, their growth speed will put anyone in a trance!
Make sure to provide this variety with at least 18 hours of light throughout the entire grow and decent pot size, around 3 gallons minimum, so it can grow to its full potential. Due to its ultra-fast autoflowering genetics, we recommend planting the previously germinated seed directly into the final pot to avoid stressing or damaging the roots. LST is always a good idea to increase performance and control any height problems you want to avoid.
Administer nutrients at 1⁄4 of the recommended dose and then gradually increased as the plant grows and reacts. With optimal conditions and treatment, this strain will bless you with beautiful buds of up to 19% THC.
Flavor and aroma
Thanks to its special lineage, Cream Brulee Auto is absolutely packed with the same delicious flavors and aromas. Its autoflowering magic makes it even easier and quicker to grab your delicious dessert cannabis buds. Notes of cream, caramel, together with vanilla, buttered nuts, and coffee will leave stunned even the most experimental cannabis connoisseur.
Effects
After the first delicious puff, you will be in a dream state, deeply relaxed and pleasantly euphoric. Its calming effect makes it better to consume it at night to help you sleep. Similarly, during the day if you are looking for a half-conscious state Cream Brulee Auto will keep you upbeat and happy.
😍
________________________________________________________________________________
SETUP:
° Mars Hydro TS1000 Version 2022
https://www.mars-hydro.com/all-products/ts-1000-led-grow-light
Thanks @coco!! ❤️
° Zelsius 60x60 cm (2x2ft)
° 2x 5W Fans
° PrimaKlima EC 125 400/240cm³/h exhaust fan & Carbon Active Granulate 240cm³/h
° Biobizz Grow + Bloom
° tap water EC 0,26uS upgraded to EC 0,5 with PlantMagic MagneCal - pH 8, nutrient solution downgraded to pH 6,5 with Advanced Hydroponics Minus Bloom
° BioEnhancer every 2 weeks instead of feeding
° from week 4 in the same container Aptus Enzym+ once a week
° Organic tomato soil + perlite
🍮

Likes
18
Share
@BrownsBuds
Follow
Was away again this week but the plants have been fine. I watered them when I left and 5 days later the soil was dry and they needed a water so i fed them 1 litre each yesterday. Today I’ve tried to tie some more branches down to the scrog net to allow more light to all the buds.
I have ordered a new thermostat with a day and night temperature so soon will be able to do lower night temps


Processing
Likes
21
Share
@LittleBigTrees
Follow
Fed once this week with a weak feed including top max.
I use kombucha vinegar as pH down. Water from my tap is ph6.8-7.0 and 38-42ppm so I might start using calmag supliment as the ppm at my old house used to come out of the tap at ph7. 2 and 200-220ppm.
I had 2 plants that didn't like the light at 30000 lux and started bleaching so I took them out.
I've defoliated today day 35 as humidity was getting over 80% and also to let light to the lower bud sights.
Pre flower pistils showed on some plants around day 33 (some still have none) so I'll consider this the end of veg start of flower. The kalimist indica pheno is still not showing pre flower pistils but is always hard to force flowering when it's not mature for some reason. It's always 7-14 days behind everything else 🤔


Likes
6
Share
@Naujas
Follow
56 days!!!!! wow this week it really rained a lot, there were storms during which I had to bring the girl inside so that she wouldn't be broken by the strong wind:) but all that stopped, and the nice weather has already started:) the girl still doesn't show any signs of flowering:) good luck to everyone:).


Likes
18
Share
@DeepRootsGrowTrees
Follow
PURPLE KUSH / KANNABIA SEEDS
WEEK #20 OVERALL
WEEK #8 FLOWER
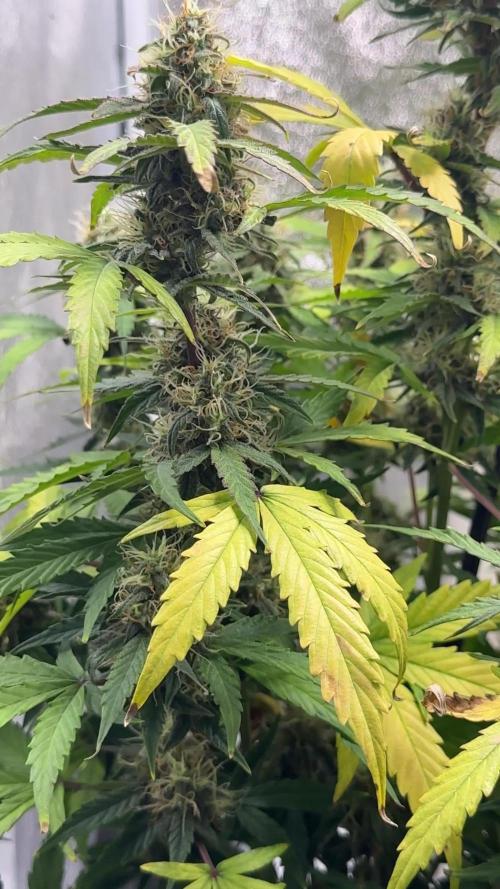
This week she's starting to get some aroma to her and her buds are getting frosty she's got about 2 weeks left before harvest she's got a nice buds structure going on!! Stay Growing!!
Thank you for stopping by and taking a look it's much appreciated!!
THANK YOU KANNABIA!!!
KANNABIA.COM / PURPLE KUSH 💜

Likes
46
Share
@Ned_Schneebly
Follow
Would definitely grow this strain again with some lst work and a large pot from the start I would hope to double the yeild atleast.
I'm a fan of the chunky buds atm and this plant has some nice chunky buds!
The smell is very earthy and a little bit of sweet. Smooth taste and a pretty heavy high! Buds are super sticky.
I have heard alot about fastbuds and I will continue to purchase there seeds!
If it wasn't for mars hydro and there affordable products I wouldn't be here!

Likes
15
Share
@HurlinghCultiveta
Follow
Buenas cultivetas!
Esta semana el clima tampoco ayudó mucho 😞 A pesar de que no llovio, se esperan lluvias los proximos dias y las temperaturas aun no son las adecuadas. Solo tuve 2 o 3 dias a pleno sol. De todas formas seguimos con los nutrientes de vegetacion el preventivo de plagas una vez por semana con jabon potasico, aceite de neem y canela en una solucion liquida. A pesar del preventivo sigo encontrando algunos bichos que muestro en un video.
La tecnica deLST parece estar saliendo bien. Espero no estresarla mucho y que de buenos resultados.
Buen cultivo para todos y gracias por leer mi diario!
Actualización 5/10:
Tengo algunos vecinos gatos que les encanta sacar el sustrato de mis macetas... Por suerte no han desprendido la planta pero casi... Las acomode de nuevo y parecen estar bien. No tuve mucha suerte con este cultivo sumado a mi falta de experiencia.
Likes
15
Share
@Flavors
Follow
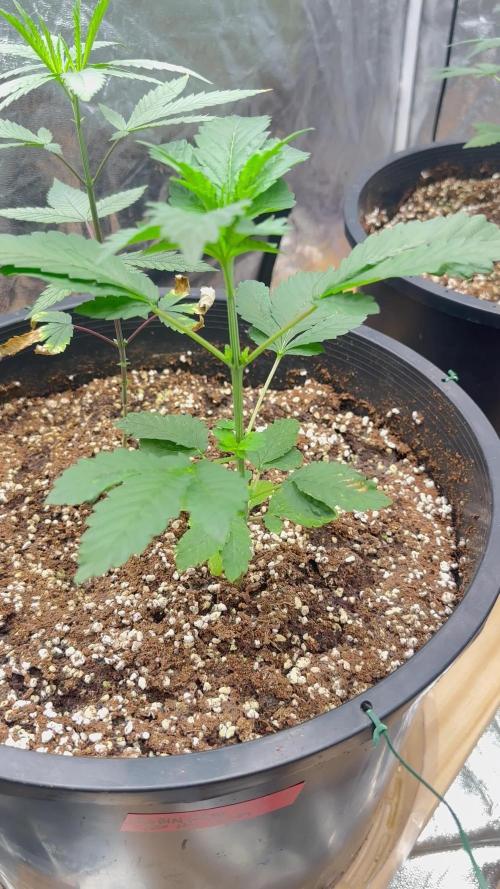
🌱 Week 5 Update! 🌱
The girls are THRIVING and loving their new homes 🏡 — just got transplanted into 10-gallon pots! 💪

Likes
10
Share
@Dendegrow
Follow
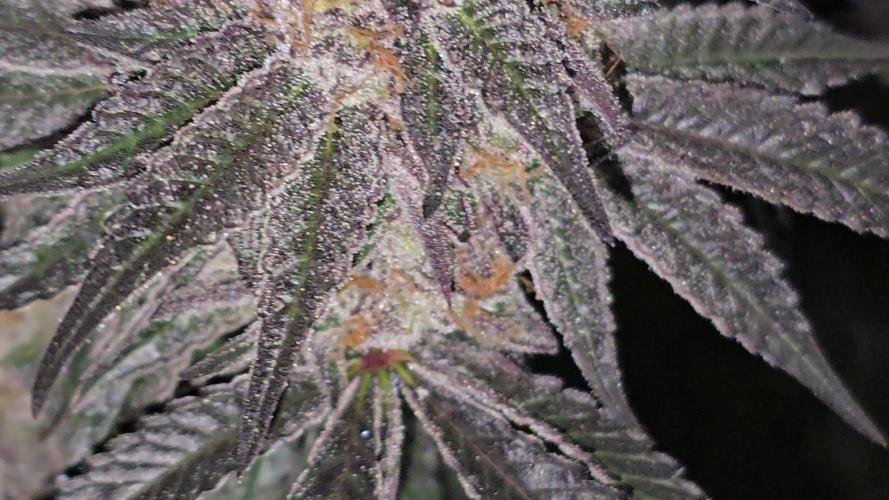
Harvest Report – Blue Sunset Sherbert
The weed turned out absolutely phenomenal!
The colors were stunning – incredibly dark, almost black, with deep purple hues that really popped.
It was harvested at Day 80, with about 20% amber trichomes – just the right timing for a balanced effect.
Check out the pictures – they speak for themselves!
Stay tuned for the smoke report!
---
Erntebericht – Blue Sunset Sherbert
Das Weed ist einfach phänomenal geworden!
Die Farben waren atemberaubend – richtig dunkel, fast schwarz, mit tiefvioletten Tönen, die richtig hervorgekommen sind.
Geerntet wurde bei Tag 80, mit etwa 20% bernsteinfarbenen Trichomen – genau der richtige Zeitpunkt für einen ausgewogenen Effekt.
Schaut euch die Fotos an – sie sprechen für sich!
Bleibt dran für den Smoke Report!
