
Likes
Comments
Share


@Landomagic
Follow
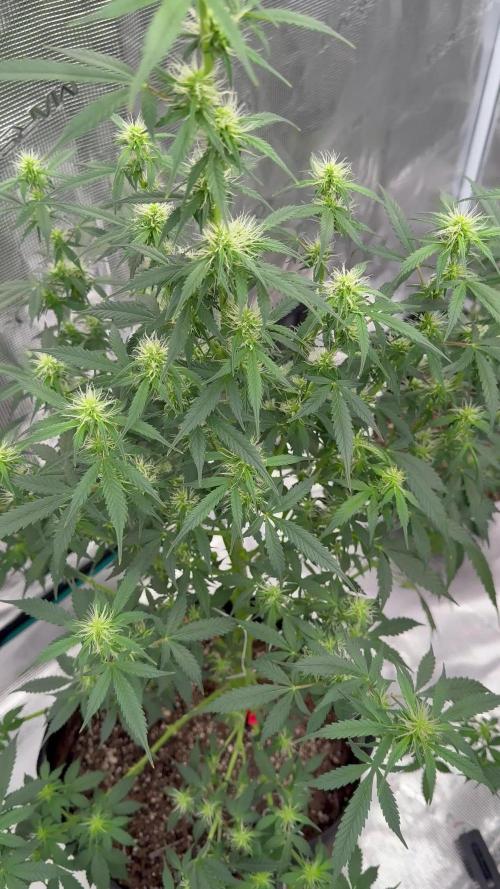
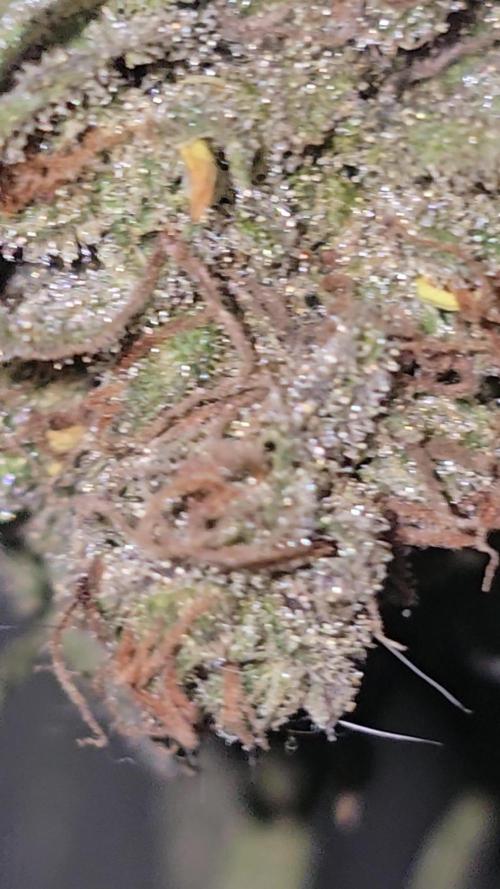
This week is going great. Buds are becoming dense, pretty sure by the end of the week I’m gonna have to add a few bamboo sticks for support. The smell has definitely increased tri comb development has gone crazy new amber ones has already started forming and by the end of the week I’ll look at tri comb development again to see if more has gotten cloudy or amber as I will start to flush when I see 70% amber


Likes
223
Share


@Tropicannibis_Todd
Follow
💩Holy Crap We Are Back At It And Loving It💩
Growmies we are at DAY 49 and she's just killing💀it👌
The Gorilla Punch Is Amazing 👏
👉We are in full flowering mode for the👈 OG 👍 GP 👍 the AF was the hold out but shes finally went into the Preflower Stretch 👈
So Shit , I gave them just a tad to much nutes at the start feeding 👈 But I have since fixed it
So I'm still doing some low stress training 🙃 and some defolation 😳
Lights being readjusted and chart updated .........👍rain water to be used entire growth👈
👉I used NutriNPK for nutrients for my grows and welcome anyone to give them a try .👈
👉 www.nutrinpk.com 👈
NutriNPK Cal MAG 14-0-14
NutriNPK Grow 28-14-14
NutriNPK Bloom 8-20-30
NutriNPK Bloom Booster 0-52-34
I GOT MULTIPLE DIARIES ON THE GO 😱 please check them out 😎
👉THANKS FOR TAKING THE TIME TO GO OVER MY DIARIES 👈
Likes
40
Share


@Tazard
Follow
I could tell within a week of flower that she would probably be a monster. She was always given priority for space and light. When I realized that she was covering 7sqft I realized that she didn’t have enough light and I moved 3 more LED’s to her so as to not be light limited for harvest. Based on 600g/m2 I needed at least 400w for her. I managed to get almost 670g/m2!

Processing
Likes
17
Share


@Hawkbo
Follow
Big one is doing good, my ph meter broke and Hannah Instruments sent me a new probe. When I got it and checked run off everything was fucked up so I did a heavy flush on everything and a feed. Found some shit called Gnatrol on Ebay for the fungus gnats larvae added to the mixidk if it will work tho. Pictures were taken on Day 7 of Bloom.
Likes
2
Share

@NAG420
Follow
Did a boat load of work on her ran out of freaking tie downs will run a garb some this week want to open her up some more. Did some l lollipop also not a lot but enough to get the energy going to the top sites for the next few weeks.


Likes
15
Share


@Deli_Weed
Follow
Esta es mi primer planta que cosechó con éxito, y estoy muy feliz con mi resultado final 😄 obtuve una muy buena cantidad de flores premium con alrededor de 15% de thc (desde mi punto de vista claro 😅)
Tuve algunos problemas durante el cultivo, principalmente que deje que se estirara mucho, debi hacerle LST a la punta principal para que no siguiera aumentando la altura y tener más flores del mismo tamaño, las flores más bajas quedaron chicas y les faltó madurar un poco, también tuve problemas de sobrefertilizacion aun a pesar de que seguí las instituciones de los fertilizantes y de sus indicaciones que me dieron los de servicio al cliente, incluso ya teniendo en cuenta eso siempre use la menos de la dosis de la base ya hasta que crecieron más le fui aumentando, igual creo que es muy cierto lo que dicen de que “menos es más” a la próxima empezaré usando muy pocos nutrientes, aparte creo que si hubiera usado unos leds más potentes, las plantas hubieran aprovechado más los nutrientes, pero igual me sirvió de experiencia, pienso cultivar de nuevo esta genética y sacarle más provecho. Muy recomendada 👌🏻😁

Likes
24
Share


@DeepRootsGrowTrees
Follow
SWISS DREAM ROSE CBD 🌹 AUTO ORGANIC GROW
WEEK #12 Overall
Week #9 Flower
This CBD plant is 👏 amazing first she's just a beautiful plant with her dense purple buds that just pop with the orange hairs and trichomes she even has a nice aroma about her. She's got a few weeks left. Stay Growing!!
Kannabia.com
SWISS DREAM ROSE CBD AUTO

Likes
38
Share


@TheCannaProphet
Follow
--------------------------------------------
~DUTCH PASSION OUTLAW AMNESIA~
--------------------------------------------
Outlaw Amnesia is a top quality old-school Amnesia Haze dominant Sativa that will appeal to both beginners and connoisseur growers alike. She is 80/20 Sativa/Indica with around 20% THC and is a cross of our Super Haze with a very special clone of Amnesia. The high is powerful and fast with a clear uplifting sativa high and a strong Haze accent. The taste is fresh, sour, strong and old-school Hazy. Outlaw will stretch more than most, she can triple in height during bloom, and grows well with the SCROG method.
Although she can be harvested as early as 9 weeks, a full 12 week flower period may be required for best taste, yield and high. She grows well in all grow mediums with perhaps the best yields in hydro where yields of up to 500g/m2 are possible, classifying this as a high production variety.
*description credit to Dutch Passion
OUTLAW AMNESIA (DUTCH PASSION) FEMINIZED DATA SHEET
Breeder: Dutch Passion
Genetics: 20% Indica / 80% Sativa
Parents: Super Haze x Amnesia
Flowering Time: 11-12 weeks
THC: 20%
Yield (Indoor): 450-500 gr/m²
Height (Indoor): 50cm
Available as: Feminized seeds
Flowering Type: Photoperiod
Sex: Feminized
*Specified by breeder when grown under ideal circumstances
--------------------------------------------------------------------------------------------------------------------------------------------------------------------------------------------------------------------------------------------------------------------------------------------------------------------------------------------------------------------------------------------------------------------------------------------------------------------
THE SETUP:
~Planted into Jiffy Peat Pellets that were hydrated with de-chlorinated water with SuperThrive added then ph'd to 6.0 @ 80℉
~Grown 100% organic in 10g fabric pots with Mother Earth 70/30 Coco/Perlite medium amended with 2tbs/g of Down To Earth 4-4-4 / 2 cups/g of Earthworm Castings / 1tbs/g of Dr. Earth Flower Girl 3-9-4, 1tbs/g of Dr. Earth Bat Guano, 3/4 cup of Down To Earth Azomite and 1 tsp/g Down To Earth Fish Bone Meal.
~24hr light cycle during Germination / 19/5 light cycle for Vegetation and 12/12 for Flower
~Straight water ph'd @ 6.2-6.8 when needed and weekly Compost Tea's.
__________________________________________________________________________________________________________________________________________________________________________________________________________________________________________________________________________________________________________________________________________________________________________________________________________________________________________________
WEEKLY UPDATES:
9/13- With approx. 10 weeks of growth behind her now she's going into her 5th week of flower now and let me tell you the pictures don't do her justice... This is one phenomenal cultivar! 😍
She was given Compost Tea yesterday and today was still fairly heavy so I skipped watering and just removed a few leaves to maintain light penetration, turned her pot and sat and chatted with her awhile!
9/15- Well she really must have liked that last batch of Compost Tea as she looks exceptionally vibrant today!
She's continuing on her mission of stacking her flowers, which are developing beautifully and have a delicious earthy/hashy aroma to them right now.
I did not water yesterday, so today I watered with 1.5g of straight de-chlorinated water that was ph'd to 6.5 @ 72℉ and rotated her pot... Damn she is looking great! 🤩💖
9/17- Yesterday I top dressed her with 1/2 cup of Down To Earth Bio-Fish then watered it in with 1.5g of straight de-chlorinated water that was ph'd to 6.5 @ 72℉.
Her flowering is continuing beautifully and she's smelling stronger every day it seems! I'm staying on top of tucking leaves blocking light and turning her pot daily as well.
9/19- Five weeks of flower on the books! We're almost halfway there now, she's stacking her flowers tightly going into Week Six and she's looking phenomenal! 🤩
When I watered her today I added 1 tbsp/g each of Kelp Extract and Fish Emulsion (both liquid) to the 1.5g of straight de-chlorinated water she received, which was ph'd to 6.2 @ 74℉.
~Thanks for stopping in! Things should be getting a lot more interesting in the coming weeks...Stay lifted and be Blessed! 😎🙏~

Likes
36
Share


@BrigadeDesTerps
Follow
Elle est extrêmement résistante 85% d’humidité tous le mois de septembre et beaucoup de jour de pluie, je ne l’ai pas protégé et elle tien le choque à merveille
Les couleurs deviennent sublime elle devient entièrement violet et givrée de trichomes
L’odeur est très fruité on peut pas rêver mieux en termes de terpènes j’ai hâte de goûter ça!
J’en suis amoureux
J’ai mis les données du mois de septembre en photo

Likes
5
Share


@AlienCannaKing
Follow
Stable week just started 12/12, wish me luch for the first ever indoor grow!

Likes
9
Share


@Lifesgarden420
Follow
Another beautiful lady chopped and drying with that whole plant hang really looking forward to these but they are so Frosty and so dense thank you for these amazing genetic and this amazing contest you guys really know how to bring the world together thank you again 💚👑👊🏼😎💨🏼

Likes
27
Share


@Dreamchvser
Follow
We are getting close to the finish 🙃 I’m really happy with how the flower went at the end, as the lady’s are really growing bricks
Buds are really hard to the touch, one smells really earthy with a touch of diesel, one smells like bubblegum mixed with lemon and two smell like pure juicy lemon diesel. I really didn’t except this, but the smell is incredible and the bud structure too.
I’ll start flushing as soon as most of them are milky, I also thought about giving them 3 days of pure darkness at the end, but not sure yet.
Thanks for all your advice and feedback so far :)
Likes
25
Share


@Kingseeds
Follow
MB is amazing strain from exotic genetix ,great teast and aroma and very powerful (absolutely greasy) Heavy yield and bery strong genetics


Processing
Likes
67
Share


@Ironlungs
Follow
Day 33 Update
Wow!! So for the first time I have opened up GROWDIARIES on a computer, and I must say this is a much better layout and easier to use than my cell phone. I will be doing updates like this from now on. So with the help from @DabCrab I finally came up with a nutrient schedule that I will stick to. I have honestly been all over the place when feeding and it was time for a change, so this will start next feed. I also have decided to switch my light cycle to a 12-12 to determine gender of plants, and will revert back to veg cycle once what ever males are pulled out of the room. I plan on vegging for a very long time, have not decided on how many weeks. I guess however long it takes to fill up the scrog net that I made. I will make the light switch at the start of week 6. Merry Christmas from my family to yours! Stay safe, stoned, and happy


Likes
93
Share


@MrJones
Follow
Mr-Jones Shockwave F2
🔹🔹🔹🔹🔹🔹WEEKLY GOALS🔹🔹🔹🔹🔹🔹
🌞Environment - 75/80℉ and 45/50% Humidity
💧 Feeding - Using "Super Coco" amended soil. compost teas, Dechlorinated H20 PH/6.5 Fish Fertilizer, Started feeding the plants because they are only in 1-gallon pots.
🍃Training / towards the end of the week will be Schwazzing the plants, along with cleaning out the bottoms,.
🕷️ IPM - Will be using Green Cleaner" 1 OZ per Gallon, and CannControl from Mammoth alternating between product each month for Integrated Pest Management.
💡Mars Hydro FC 4800 / 480W Led Grow Light - "Instagram: MarsHydro_Aliexpress"💡
🔹🔹🔹🔹🔹🔹🔹🔹🔹🔹🔹🔹🔹🔹🔹🔹🔹🔹
Rambling - These ladies are going great, maybe second-guessing myself but only using 1-gallon pots not sure the nutrients in the Super Coco will carry the plants, going to be Top Dressing with Roots Organics Bloom.
🔹🔹🔹🔹🔹🔹🔹🔹🔹🔹🔹🔹🔹🔹🔹🔹🔹🔹
▶️Sunday 11.29.20 / Top Dressed with Roots Organics Bloom, continuing to water with Dechlorinated H20 PH/6.5, going to be making a super tea after I finish Schwazzing the plants, normally I grow photos in 5 to 7-gallon pots. The New Mars Hydro light is kicking ass!
▶️Monday 11.30.20 / Normal feeding tonight, the ladies are just doing great!
▶️Tuesday 12.01.20 / Normal feeding tonight, the ladies are just doing great!
▶️Wednesday 12.02.20 / Conducted heavy defoliation, Schwazzing tonight, they look great, top dressed with roots organic uprising bloom, and decided to move along with light BioBiz nutrient regiment, growing these gals in 1-gallon pots, the soil nutrients will be depleted.
▶️Thursday 12.03.20 / The ladies have responded well to the defoliation and the started nutrient regiment. I set the 💡Mars Hydro FC 4800 / 480W Led Grow Light to 75% time to watch these ladies just blow up! Will be doing an IPM treatment Saturday morning before lights out.
▶️Friday 12.04.20 / Continuing feeding light BioBiz daily with Weekly top dressing of Roots Organics, the ladies are just thriving!
▶️Saturday 12.05.20 / Plants are doing great after the heavy defoliation, continuing to feed with Bio-Biz daily.
🔹🔹🔹🔹🔹🔹🔹🔹🔹🔹🔹🔹🔹🔹🔹🔹🔹🔹
