


Likes
24
Share


@MrPott
Follow
This is the final week of nutes for the ladies! Time to flush her for the coming week. Also read that Purple Punch needs cold temps at night to turn color. Since I can't do that where I live, an alternative is to flush her with ice water. Giving that a try and will keep you guys updated.


Likes
4
Share


@KhaVigga
Follow
now im start to using many kind of sugar till harvest, beer-fpj-molasses-coconut water...

Likes
18
Share


@eLBowAutoGrows
Follow
Day 57 about to do my first schwazz
Day 60 did a heavy defoliation. Not quite a schwazz. Almost Filled a 2 gallon bucket up with clippings a lot more light and air penetration is available. I think she’ll bounce back nicely
Day 64. As the week comes to an end. I am very pleased with the progress. Canopy is nice and even. You can’t tell which one is the main cola. And for a little 300 watt light even the lower flowers are getting pretty dense. Still a long way to go. I would imagine this one will take over 90 days before see Amber. But we shall see

Likes
11
Share


@DimJesus
Follow
Saludos 🙌 tercera semana completa, aumentando la dosis de los fertilizantes.
Quité los primeros pares de hojas para darle paso a las ramificaciones que se puedes ver en las fotos, está brotando el quinto nudo pero me parece que aún está un poco pequeña para la LST y corte apical, que piensan?
Donde vivo hay muchas variaciones de temperatura pero generalmente el grow se mantiene entre 23° y 29°, la humedad también varía bastante pero no baja de 50% ni sube de 78%.
Ansioso para la floración 🙏 having a lot of fun 💪

Likes
23
Share


Likes
14
Share


@ConspiracyFly
Follow
Week 10 Amnesia
Amnesia 1 (Seedstockers)
With LST
6 weeks of flowering (66 days)
It has 55 centimeters
14L
LED 25 cm
LUX 59.000
This week through carelessness I broke a branch
Amnesia 2 (Seedstockers)
Without LST
4 weeks of flowering (62 days)
It has 60 centimeters
14L
LED 20 cm
LUX 70.000
Gorilla Cookies Auto (Fast Buds)
5 Week (38 days)
It has 11 centimeters
16L
LED 56 cm
LUX 25.000
This Week - Defoliation and LST - Pre-flowering
Godzilla Cookies (Herbies)
4 Week (28 days)
It has 9 centimeters
15L
LED 60 cm
LUX 24.000
This Week - Defoliation and LST
Gorilla Glue Auto (Herbies)
1 Week (5 days)


Likes
4
Share


@Finsfan
Follow
Finally in full flower mode. Ready to start putting on some serious size. I turned the lights up to 80% a couple days ago and they both are taking it well. No light burn yet that I notice.
I'm not sure if I should start bringing the lights closer at 80% or keep the distance but instead
Increase power to 90%. Going to feel it out as we go. Happy so far for sure.
Update: increased light to 100% . No lead burns or weird looking leaves yet.. Just bulking up and very thirsty!
Doing a nutrient/nutrient/water feeding schedule now.

Likes
26
Share


@420DeepGrow
Follow
Gracias al equipo de Seedsman y XpertNutrients sin ellos esto no sería posible.
💐🍁 Bubba Cheescake:
Bubba Cheesecake es un cruce de Bubba Kush anterior al 98 con Cheese Cake (Wedding Cake x Exodus Cheese). Se trata de un híbrido 70% índica con muy buenos rendimientos, alto en THC y bajo en CBD. Bubba Cheesecake prospera en interiores y exteriores. En interior se aconseja un corto periodo de crecimiento vegetativo debido a la cantidad de estiramiento que presentan las plantas. Las plantas pueden crecer hasta una altura de 250 a 350 cm. cuando se deja crecer naturalmente al aire libre. En interior, la floración dura entre 60 y 65 días, con rendimientos entre buenos y altos, de 400 a 550 gr/m2. Las plantas de exterior son capaces de producir entre 700 - 800 gr. peso seco. En las latitudes norteñas, en exterior, los productores pueden esperar cosechar a principios de octubre. Los cogollos son grandes y duros como piedras. Las plantas maduras muestran atractivos colores púrpuras y azules y brillan con una resina pegajosa que cubrirá las manos del cultivador si no tiene cuidado. El componente Wedding Cake agrega dulzura al sabor del regaliz y el aroma es terroso y musgoso. La producción de THC es muy alta con un nivel bajo de CBD. El efecto es intensamente narcótico, fuerte y duradero.
🌻🚀 Consigue aqui tus semillas:
🍣🍦🌴 Xpert Nutrients es una empresa especializada en la producción y comercialización de fertilizantes líquidos y tierras, que garantizan excelentes cosechas y un crecimiento activo para sus plantas durante todas las fases de cultivo.
Consigue aqui tus Nutrientes:
https://xpertnutrients.com/es/shop/
📆 Semana 6:
Buena semana, ellas está consumiendo todos los nutrientes perfectamente, espero que pronto agarre tierra profunda y empiece a crecer como bestia 🐅.

Likes
15
Share


@SmokingDwarf420
Follow
18/09/2023
I'm very eager to harvest, especially since they all seem ready for harvest except for number 3. Like in the previous weeks, I'm hardly cutting anything, just removing the yellow/brown leaves that come off easily when I pull on them. Regardless, I think I'll harvest next week because the small buds in the lowers parts of the plant and not just the sugar leaves are starting to turn yellow/brown.
I forgot to take a picture of the main cola of number 2.
I still can't upload great quality vidéo idk why sorry for that ridiculous amount of pixel in the video.
20/09/2023
I was watching a guy on Youtube talking about harvesting when this idea (See the last picture) came to me... I feel so DUMB for not doing this WHEN I did the LST... SEVEN WEEKS AGO, and right now I would not be struggling with the little delay on number 3.

Likes
15
Share


@HeavyHead
Follow
Last week for these ladies. Kept the soil moisture levels very low leading up and did a final heavy de leaf of pretty much anything that doesn’t have trichomes growing on it and will be shutting the lights and turning the heat off for the last 48 hours.
Keeping a lot of the sweet leaf on to keep the moisture throughout drying and will do a dry trim.
Will be aiming to have a long slow drying period (12-15 days hanging) before I jar them up for curing.
Won’t be adding many quality pictures this week since half the time they’re in the dark but will post harvest pictures as they come down :)


Likes
Comments
Share


@Flauros
Follow
13.10 Day 53
CalMag - 100ppm 0.5ml/l
Bloom - 120 ppm
Pk 13/14 - 400 ppm 1ml/l
Input: 840 ppm
Output: 1010 ppm

Likes
7
Share

@Borberad
Follow
Woche 3
Nachdem die Mädels einen sauberen Start hingelegt haben und sich in der Sonne und an der frischen Luft etwas gestreckt haben geht's zurück ins Keimzelt und dann zu Ende der Woche endlich ins Zuhause für die Veggi und die ersten Blütewochen. Um unseren Livingsoil vollständig fertig zu machen zu machen, fehlen uns noch die Kompostwürmer, diese werden nächste Woche nachgesetzt ca 1 Wurm je Liter.


Likes
160
Share


@GrowingGrannie
Follow
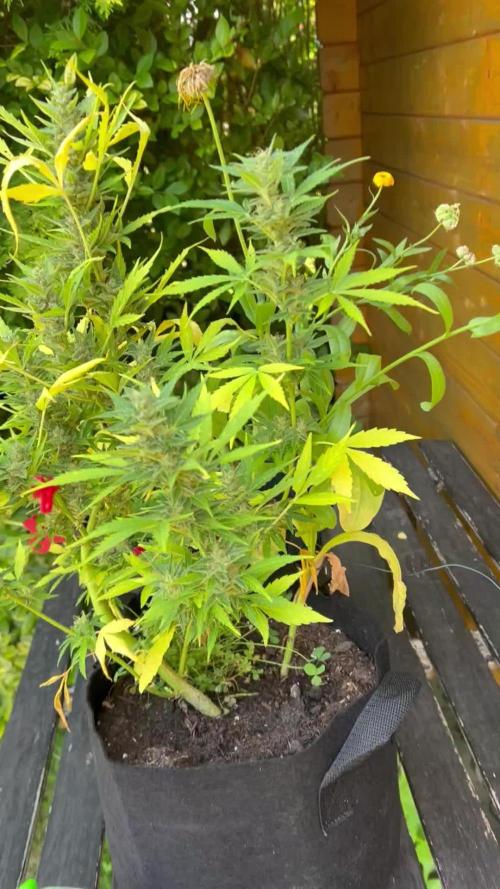
11/29 - At this point in the game, plants don't ever look much different day-to-day! I'm wondering, though, if this one is showing her starting to fade... it's either that or she's needing some stronger PK nutes... any thoughts?
12/2 - I'm going to start winding her down... gotta pick up some Ripen and some Flawless Finish ... Probably going to have to shorten the period of time I use these products but hell, she's pretty used to me screwing up - LOL!
12/03 - so my local grow store was out of Ripen - so I guess I'm going to forget that one... I'm going to let her go until Tuesday when she will be exactly 13 weeks old and start a 3-day flush using General Hydroponics FloraKleen (they also did not have Flawless Finish!).... Planning to chop her next Saturday unless the amber hasn't really made its presence known... We'll see.... I'm just going to go by what she tells me... but it really IS time, old girl... it really is.
12/04 - Doing a bucket change today, she's going to an EC of 0.2-0.4 or thereabouts and I'm not going to worry about the pH - my tap water is about 7.5 so that's what she's getting unless I relent and drop it to the upper 6's - I'm just not going to overly concern myself with it. I think her bulking has finished and SHE needs to finish up. Found a few amber on leaves in the middle of the plant and I know those can really be rather ignored .... but I'm still concerned about the trichs on the main cola - haven't seen much change between milky and clear for a while now... so it's puzzling to me. Maybe the drop in EC will kick her into truly finishing... if it doesn't, I can always bring the EC back up, the pH back down and keep her going... She's always been my "experiment" - always been my "tester" - so why not experiment at this stage of her life as well?!
Likes
4
Share


@Lazuli
Follow
It took its time to fmower but damn what a tree.. the big bud and overdrive really helped push the weight
Likes
226
Share


@Kitties_and_Colas
Follow
~_~_~_~_~_~_~_~_~_~_~_~_~_~_~_~_~_~_~_~_~_~_~_~_~_~_~_~_~_~_~_~_~_~_~_~_~_~_~_~_~_~_~_~_~_~_~_~_~_~_~_~_~_~_~_~_~_~_~_~_~_~_~_~_~_~_~_~_~_~_~_~_~_~_~_~_~_~_~_~_~_~_~_
08/21/21:
🐱 Week 6 is here!! The new growth is coming in a little limey, we insist on reusing Promix so PH is always a bit of a rollercoaster lol.. no sweat, usually a gallon each PH'd to 5.5 with 5ml/gal N solution will get them back to baseline..we seem to have the same issue with most plants grown in our basement during summer, I'm sure the super high humidity and
low evaporation rate has something to do with it... if they don't come around after the adjustment, they'll spend some time under the HIDs, this always straightens them out..we topped the mainline for the last time today
for 8 mains per side, as well as another full round of toppings on the x2 LST plants... thanks for reading if you made it this far and happy growing everyone!!! ❤️🐱💡🌱
~_~_~_~_~_~_~_~_~_~_~_~_~_~_~_~_~_~_~_~_~_~_~_~_~_~_~_~_~_~_~_~_~_~_~_~_~_~_~_~_~_~_~_~_~_~_~_~_~_~_~_~_~_~_~_~_~_~_~_~_~_~_~_~_~_~_~_~_~_~_~_~_~_~_~_~_~_~_~_~_~_~_~_
8/22/21
🐱 Quick update, the mainlined plant is showing signs of calcium deficiency which is odd, with our routine we almost never have Calcium or magnesium issues..its really only noticeable under the florescent lights on this one but we'll have to make changes.. they all have plenty of calcium in their media so I'm wondering if the PH has gone screwy in that pot.. we reuse promix which gets really acidic sometimes and we add lime to buffer this but we guess a lot and may not have used enough (or waited long enough)..I know when our media gets around 5-5.5 calcium deficiency is a huge issue..ill add a little more calcium to be sure and will try using water PH'd higher (6.5-7) and see if this helps anything. Thanks again for reading growmies!!
~_~_~_~_~_~_~_~_~_~_~_~_~_~_~_~_~_~_~_~_~_~_~_~_~_~_~_~_~_~_~_~_~_~_~_~_~_~_~_~_~_~_~_~_~_~_~_~_~_~_~_~_~_~_~_~_~_~_~_~_~_~_~_~_~_~_~_~_~_~_~_~_~_~_~_~_~_~_~_~_~_~_~_

Likes
2
Share


@Giftedwithgab
Follow
Let me tell you about Week 9 😪........
Yup got me re thinking some of my prior choices, I really want to kick over the other 2 plants so I can make room for Garganchula.
I admit I DONT KNOW what Im doing and its starting to show. I LOST control of my tent. They said LST and DEFOLIATE for proper maintenance? REASONS why I lost control now, I know when to admit DEFEAT and I'm defeated.
All I do LST and DEFOLIATION (3hrs), and 1 week later, looks like I did NOTHING.
24 inchs wanted to flip to flower but also wanted 1 more month of VEG. Looks like a bigger tent or early flower, we shall see what the WIFE say🤫🤫🤫
I don't think 🤔 1 plant like 1700 ppms
Burnt tips, funny coloration of fan leaves 🍃 NOT ALL but lower growth. I call SLIGHT nute burn 1550ppms here I come, I really don't know what im doing LMFAO.....
Likes
67
Share


@Ageddd
Follow
This week, Cheese developed a lot of hairs, gave her a good feeding rising the nutes, as this plant eats a lot...
Aroma is getting so intense, for sure this is a true Skunk ^^, but not cheese smell at the moment
By the end of this week started fattening the buds..
She is so healthy...
Talking about irrigations, im doing this in the moorning and later an afternoon flush when the sun goes down(Not flushing since second week of flowering)
--------
Good vibes !