
Likes
Comments
Share


@Tropicannibis_Todd
Follow
💩Holy Crap Growmies We Are Back💩
So what do you say we have some fun 👈 We got some EXOTIC SEEDS 👉 👻👻👻MONSTERMASH👻👻👻 😛
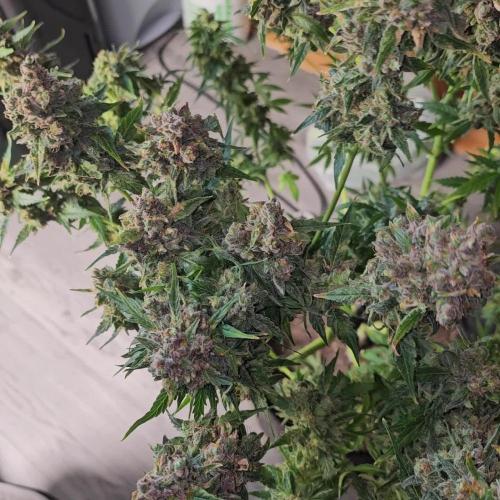
Well my friends we are just at the end now , shes been flushed so her days are numbered 💀💀💀
👉 So folks , she's been quite the little monster , and she's building some nice buds 👈 Shes the only one that hasn't had any real issues 😎
Lights being readjusted and chart updated .........👍
👉I used NutriNPK for nutrients for my grows and welcome anyone to give them a try .👈
👉 www.nutrinpk.com 👈
NutriNPK Cal MAG 14-0-14
NutriNPK Grow 28-14-14
NutriNPK Bloom 8-20-30
NutriNPK Bloom Booster 0-52-34
I GOT MULTIPLE DIARIES ON THE GO 😱 please check them out 😎
👉THANKS FOR TAKING THE TIME TO GO OVER MY DIARIES 👈

Processing
Likes
6
Share


@Jack_Greenstalk
Follow
platinum yeti 3 finally stopped stretch at 34 inches and its closest to bulb at 18 inches from closest top. rest are about 20-22 inches from the bulb


Likes
5
Share


@Squaregrouper
Follow
Overview of the whole grow so far.. everything is looking healthy no signs of mold pest resistance is there with the help of the dragonflies and natural ladybugs and other predators in the garden including garter snakes.. the snakes just coil around the trunk of the trees..
Everyday the odor of the garden grows stronger skunky and sweeter.. Cinderella 99 has the strongest odor and most fragrant buds, followed by the Purple Haze, then the Strawberry Cough then the Afghan hash plant and then DJ Short Blueberry but to be fair the blueberry and the Afghan we're late bloomers as we all know


Likes
25
Share


@Sators
Follow
Day 36. topping for seven branches.
Day 38. Water with 2L nutrients mix.
Day 39. does super cropping for four brunches.
Day 40. Switch to 12/12h

Likes
22
Share


@valiotoro
Follow
I’m in love with the straw gorilla 😍🤩🍓
All the top buds ready✂️
The colors & the smell pouaaah out of this world !!
One more week for the lower buds and finito bye bye

Likes
2
Share


@0JuJu0
Follow
Its finally harvest day, i would give her 1 more week but the leaves are to dead and I'm afraid of the problems that can follow from this, like mold.
Likes
25
Share


@crystal_garden_0
Follow
Great week, buds getting dense. Really frosty, smell incredible hard to describe but Strawberry a bit of lime and fruity, really nice cant wait to try .thanks everyone
Processing
Likes
19
Share


@Skuba
Follow
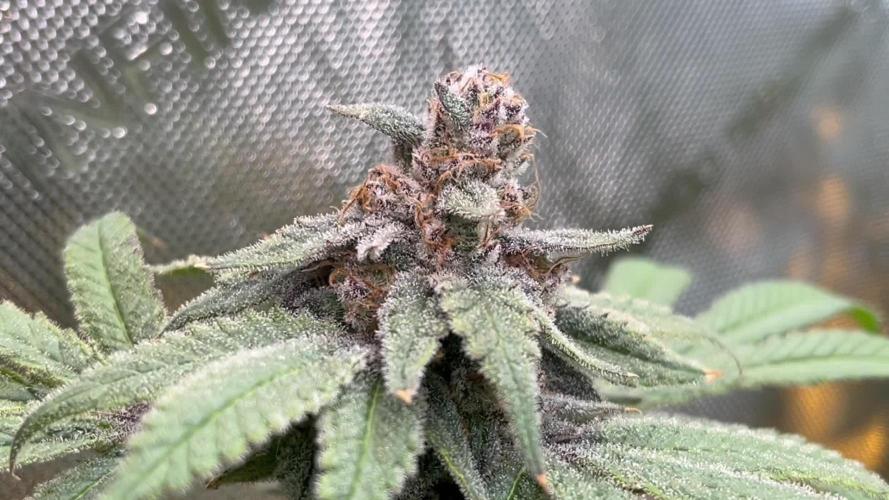
Beginning of week 3 of flower for this girl and wow. She’s looks amazing😍😍. Last feed was about 600 Ppms. Purple looks stunning on this plant.
Likes
57
Share

@Kirsten
Follow
Well 10.7.25 is today, and its harvest time. Hopefully I can update with the dry weight and then also shortly thereafter give you a smoke report!
💚 Dry weight was 5.89 0z / 167g. This has been my highest yield per plant yet. I'm really pleased with this.
🔥Smoke 🔥
I tried some whilst trimming, it has a of citrusy, floral taste, and the smallest wisp of mint. 🍋💐🌿
It is more of a daytime smoke, it is 65% Sativa, very nice and chill, but surprisingly motivational! Just what I needed to trim this lady! 😁
There are some beautiful big, dense, sticky buds. Which I shall certainly enjoy.
This was the first seed pack I bought, and I'm very pleased that I finally popped this seed!
Thanks for coming along on this grow, it has been a journey. We made it though 😁🌱🙏💚✌️🍃
Processing
Likes
10
Share


@Dunk_Junk
Follow
Still going through flowering.
She has stayed short and stocky throughout since week 3/4 actually. About that time I remember watering her with nutrients that must have been too acidic. I'm pretty sure I omitted add ph up. 😭 The damage was done, growth all but stopped. As she is an auto flower there is no time to 'save' her and grow a big plant, so we will go to the end with what we've got.


Likes
16
Share


@BudsBanditUK
Follow
She is budding nicely now, looking like 16 colas once they have fully developed. Now starting to a get sweet smell. Very nice purple colours are now appearing. I cant wait to try this strain.
Likes
12
Share


@BeHappyNtoke
Follow
This week has went by well she is starting to fill in and smelling amazing small nugs but dense with some nice frost appearing she is starting to uptake water a litter more frequently can’t wait to see her over the next few days
Likes
15
Share


@OGcash
Follow
It was the last week with nutrients, from now only water.
6-10% of trichomes already amber.
Это была последняя неделя с удобрениями. Трихомы начали желтеть, пока наблюдаю.

Likes
11
Share


@Leonweed10
Follow
11 dias de nacidas las 13 Royal cookies!!!
Sólo alimentándose con enraizante por ahora!
Likes
14
Share


@CampaCavallo
Follow
2ª Settimana di Fioritura 💐
Eccoli arrivati i fiori spumosi della RUNTZ 💓 di Zamni💙🗿
La giovane cresce bene, regolare e senza carenze! Avanti tutta🔝💪🏻
Abbiamo fatto un po' di training alla pianta in modo da avere Bud di qualità 👍🏻🚜

Likes
12
Share


@cookingwithninja
Follow
day 30 video day 30 note crossed bridal party x pink paradise
day 31 crossed blackberry oreo bigstuff x pink paradise
day34 videos of each, a lot of photos. Rh% high I keep my terps non-volatile. Bridal rubbing sugar leafs smells like some sort of candy watermelon, blackberry neat skunky AF sugar leaf rub, pink is nice mellow I will have to check tomorrow. Dr. Thunder very oily with sugar leaf rub I swear you could deepfry with it. It also smells mellow skunky but will check again tomorrow it may have been terps overload on my fingers regarding thunder and pink paradise aromas. Pink caylaxes have shriveled and accepted pollen locations. I just don't think the seeds will be ready when harvesting in a few weeks. Start week 5 tomorrow and I don't think crosses will be ready so I will figure it out. Pink crosses would be fun next round but I have so many more selections to choose from to grow my next 4.Thunder smells like a citrus cleaner, almost pineapple front notes then a full citrus.
day35 defoliated like madd. no lie so sticky: 2 fingers lifted a ceramic cup like I was spiderman. 1 finger was a struggle.. science

Likes
13
Share


@DudeGrowsWeed
Follow
I consider this the last week of veg, some might call it the first week of flower. But she looks great what ever you want to call it. I continue to be impressed with Seedsman strains. I'll be growing more from Seedsman in the future! 👍

Likes
23
Share


@deFharo
Follow
Bienvenidos cultivadores de marihuana clandestinos, y también a los que tienen la fortuna de no serlo! 👨🌾💦💡🌞🌲
- Purple Shot es el resultado del cruce entre Purple punch, Do-si-dos y Exotic colors (75% Indica /25% Sativa). Variedad de floración rápida, terminando en 8 semanas, de porte robusto y flores muy densas, repletas de resina... completamente de acuerdo! 😋
3M Ω Ʈիҽ Ңɑppỿ ƓrѳωԵի, es una deuda que tenía con esta cepa, un cultivo predestinado al éxito, un diario de cultivo minimalista, no exento de ironía, pero también un auto tributo, porque no tengo abuela, al esfuerzo y concentración de mis 3 años de experiencias orgánicas, donde no faltaron enormes fracasos, y donde hoy, la inseguridad ha dado paso al sosiego... y todo esto, sin soltar el porro de la mano!😈✌️
Bienaventurada la quinta semana de floración, dichosas las diez semanas desde semilla, ella bebe mucho y yo le doy todo lo que necesita, estamos en la misma onda!... que suene la música!!
Y nada más...
SALUDOS A TODOS!!🖐️👨🌾💧💦🌞💡
=================================
Likes
15
Share


@Uwish
Follow
Hello guys,
Here I am again to present you a new run, still with the best leds of the market nevertheless as I changed my growing space from 120x120 to 150x150. So I had to update the material inside...
I will run with 3 EVO 5-150 lamps of 320W or 960W with Bluetooth dimmers.
For the Hydro system, it will be the V-SYSTEM from Alienhydroponics.
In fertilizers I am always with Advanced Nutrients.
I work with osmosis water.
Currently, 4 clones took on 4.
Once the roots are ready, I will transfer the cuttings from the propagator to the V-SYSTEM.
------------------------
since the 16/08, when I transplanted the plants in the RDWC system, I noticed some points that I will mention below and correct next time.
1. The cuttings are too small, allow enough time so that I can completely fill my pots with clay balls.
2. Cut out the bottom of the pots from the cuttings.
3. 3/4 of the cuttings are touching the water, so one is late. Next time when transplanting, add more water, up to the basket in order to immerse all the plants and not to create a difference between each one, consequence now I have 3 that are ready to explode and one that will struggle behind, problem corrected today by increasing the volume of water.
4. The b-52 is a real pain in the ass in RDWC, you have to clean the 2 filters almost every day, with this new soup I'm testing without and I think I'll continue like this just with the base sensi grow A and B, as I use Root rot X, I won't use voodoo juice since all the bacteria would be killed.
5. Use of Voodoo Juice is useless if using Root Rot X which will kill the bacteria.
I don't know why but when I transplanted in the RDWC, I put my set up in growth mode, except that the plants were not ready for it, moreover, I made a FIM on each. So I lost some days, these last days I went back to a ppdf of 150, now that my roots touch the water, I declare growth 0 on 22/08, I will do between 21 and 28 days of growth. And as my roots are doing well and touching the water I'll go to a PPFD of 300
++
