
Likes
Comments
Share


@Goldenbags
Follow
9/3 One of the West Coast OG's, seems to be a bit stunted..the smallest of the lot but has the most pistils so far.
11/3 lsd has started flowering! Have been doing some light defoliation here and there and some lst to open them up.


Likes
41
Share


@Hawkbo
Follow
They grew pretty well. Obviously 1 had alot more veg time and extra training where the other 2 had no training. Could have been better if I had both arms and didnt have the one bad feed where my meter was off and burnt the tips. Easy strain to grow I highly reccomend to any level grower.

Likes
15
Share


@YOZYY
Follow
Middle front was not doing so great but once I feed it some Calimagic and a heavier dose of nutrients it fixed itself just was hungry. Just gonna let them do their stretching till week 2 or 3 then I'm gonna raise the light watts.
Likes
79
Share


@Salokin
Follow
Hey Growmies!
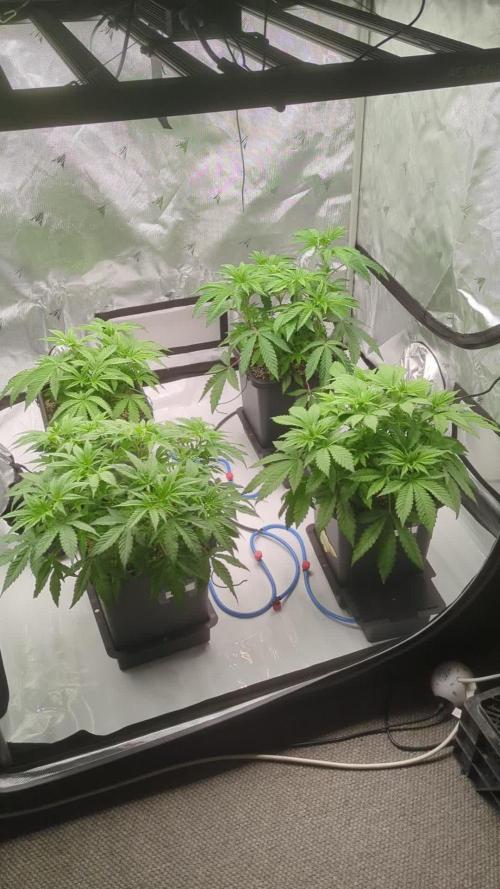
I'm thrilled to share my latest project: two exceptional grow environments, each a lush green haven with 9 plants on plant rollers. We’re employing a blend of Scrog (Screen of Green) and Sog (Sea of Green) techniques. Each plant has its individual ScroG, directly connected to its air-pot, facilitating easy mobility and care within the tent.
As the Room is on the cooler side at the moment, I've set up a Solea infrared heater, controlled by an Inkbird ITC-308 temperature controller, to maintain a cozy climate. Each tent is also equipped with a Spider Farmer Cool Mist humidifier for perfect humidity levels. Initially, I planned for identical setups in both tents, but adaptation is crucial. I encountered a challenge with the UR45 lights due to their single plug and UV/IR switches. To overcome this, in Tent 1, I’ve installed two UR45 lights: one dedicated to IR and the other to UV, each managed by a Meross smart plug.
The Mars Hydro app manages the light and in-line fan controls in Tent 2, though it has its limitations. The ITC-308 takes care of the infrared heater, while the humidifier regulates itself. I'm really into this setup, but I'm already thinking about upgrading to a single grow controller for all devices.
Excitingly, ‘Epic Buzz’ in Tent 1 is competing in the Tent-X Ultimate Grow Challenge sponsored by Trolmaster, who has also sponsored a Tent X Controller for this tent. This addition will greatly enhance our control and monitoring capabilities in this tent.
This grow season is extra thrilling as I’m collaborating with Anesia Seeds and Ganja Farmer Seeds. They've provided some amazing strains. Tent #1 houses ‘Epic Buzz’, ‘Red Banana Pudding’, and ‘Pink Matcha Slush’ from Anesia Seeds. Tent #2 features ‘Caramel’, ‘GMO’, and ‘Bruce Banner x White Russian’ from Ganja Farmer Seeds. I’ll be documenting their growth in individual diaries. Check out these links for each strain's story:
1. Anesia Seeds - Epic Buzz [Grow Diary](https://growdiaries.com/diaries/189991-anesia-seeds-epic-buzz-grow-journal-by-salokin)
2. Anesia Seeds - Red Banana Pudding [Grow Diary](https://growdiaries.com/diaries/189995-anesia-seeds-red-banana-pudding-grow-journal-by-salokin)
3. Anesia Seeds - Pink Matcha Slush [Grow Diary](https://growdiaries.com/diaries/189993-anesia-seeds-pink-matcha-slush-grow-journal-by-salokin)
4. Ganja Farmer Seeds - Caramel [Grow Diary](https://growdiaries.com/diaries/190093-ganja-farmer-seeds-caramel-grow-journal-by-salokin)
5. Ganja Farmer Seeds - GMO [Grow Diary](https://growdiaries.com/diaries/190089-ganja-farmer-seeds-gmo-grow-journal-by-salokin)
6. Ganja Farmer Seeds - Bruce Banner x White Russian [Grow Diary](https://growdiaries.com/diaries/190091-ganja-farmer-seeds-bruce-banner-x-white-russian-grow-journal-by-salokin)
For those curious or seeking inspiration, here’s the detailed equipment list for each tent:
Equipment List for Tent 1:
- Mars Hydro 120x120x200cm Grow Tent Dark Room
- Mars Hydro Smart FC 4800 Samsung LED Grow Light – 480W
- 2 x Mars Hydro UR45 IR & UV LED Grow Lights
- Mars Hydro iFresh 6-Inch Smart Inline Duct Fan
- Spider Farmer 6L Cool Mist Humidifier
- Solea Infrared Heater 500W
- Inkbird ITC-308 Digital Temp-Controller
- 3 x Meross Smart Plugs (for UV/IR light timing)
- Tent X Controller (sponsored by Trolmaster)
- 9 x 12.5L Airpots
- 9 x 30cm Plant Rollers
- 9 x 36cm Plant Saucers
Equipment List for Tent 2:
- Mars Hydro 120x120x200cm Grow Tent Dark Room
- Mars Hydro Smart FC 4800 Samsung LED Grow Light – 480W
- Mars Hydro iFresh 6-Inch Smart Inline Duct Fan
- Spider Farmer 6L Cool Mist Humidifier
- Solea Infrared Heater 500W
- Inkbird ITC-308 Digital Temp-Controller
- 1 x Meross Smart Plug with Consumption Measurement
- 9 x 12.5L Airpots
- 9 x 30cm Plant Rollers
- 9 x 36 cm Plant Saucers
Always happy to hear tips or chat about gear with fellow growers!
Can't wait to update you all as these tents transform
Stay Lifted
Salokin

Likes
Comments
Share


@jojopfoh
Follow
They are really starting to fill out. I am seeing great results after every water and every feed. I will be transplanting them into 2 gallon pots in the next 2 weeks.


Likes
51
Share


@felixthegrower
Follow
Well, it was my first diary here, and I'm really happy to had found this amazing community that is so eager to help!
It gave me the opportunity to win the first giveaway in my life 😂 And it was from RQS! These seeds are in my new grow diary, and I really thankful for all the gift received! A special thank to Pol from the RQS staff!
A special thanks to everyone who watched me grow here, and I hope to contribute with the community more and more!

Likes
41
Share


@Growing88
Follow
Cambio timer a 12/12 cambio spettro,e con il controller cerco di imitare il sole di fine estate,uso le co2 tabs nella soluzione dei nutrienti


Likes
14
Share


@AndrewC
Follow
This week we did a very heavy defoil, the canopy was so thick I was getting worried about bud-rot or something else starting. There is also a decent amount of larf on some of the sides where the bushes where bumping into each other. Next time, I'm only doing 5 in this tent as they could have been bigger with more space. I will do the next layout like a 5 on a 6 sided dice.
Once again, I had Algae try to start. However, I was prepared with H202 on hand. I put 1ml per L in, and it cleared that up in 1 day.
I have decided that after next week, they will get the chop.
By Feb 26th, they will be chopped and weighed wet, then 7 days later, weighed dry!
Likes
6
Share


@Muravushka
Follow
During my previous grow, I harvested and made some bubble hash. Afterward, I dropped the used, wet buds onto this coco, and it seems some seeds sprouted from the leftover material. I’m not even sure if they’re photoperiod or autoflower, but hey—let's roll with it!
Both my pH meter and PPM meter are broken. I have no idea why they keep breaking so often. They’re ADWA meters, and while you can replace the reading elements, the replacements cost half the price of a new meter. It’s frustrating, and I really don’t want to keep buying them every time I start a new grow
Likes
40
Share

@wolfvb
Follow
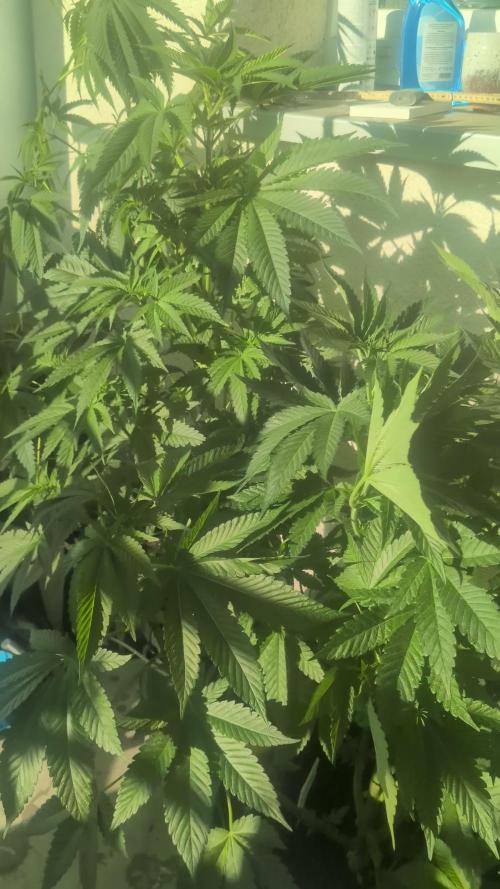
🌿 Khalifa Kush - Sun-Kissed and Stacking! ☀️?
Welcome to Week 10! The Khalifa Kush is putting on a spectacular show out in the natural light. She is soaking up the sun and turning into an absolute jungle of healthy, vibrant foliage.
📈 The Details / Progress Report:
Canopy Density: Just look at how thick she is getting! The internodal spacing is tight, and she is stacking leaves on top of leaves. The structure is incredibly dense, creating a massive, bushy frame with multiple strong tops fighting for the light. 🌳
Foliage Health: The close-up shots show off exactly what we want to see. The leaves are a perfect, rich, vibrant green with deep, healthy ridges and sharp serrations. She is praying beautifully toward the sun, showing zero signs of stress or nutrient deficiencies. 🍃
Sunbathing: The way the natural sunlight catches the texture of those fan leaves highlights just how robust she is right now. She is heavily fueled up and actively converting all that outdoor energy into explosive vegetative growth. ✨
💧 Next Steps:
With a canopy this incredibly thick, the main focus moving forward is going to be keeping an eye on the airflow through the center of the plant. As she continues to bush out, I might need to consider tucking some of those massive fan leaves or doing a very light defoliation to make sure the inner growth sites are getting the light and breeze they need to thrive. For now, I'm just letting her enjoy the great outdoors!
Let's keep it growing! 🌱💨
Processing
Likes
17
Share


@Trueorganics84
Follow
Just starting , This is my soil mix!
Only took two days to break soil pretty sweet!!
Likes
4
Share

@k0nz1
Follow
The ladies are recovering well. Still adjusting the autopot system. PH drift is a serious thing in my container.
In the next days a final defoliation , LST and then flip to 12/12.
BBM is bushy AF
Strawberry AK just perfect for now
Radical Juice one small and one tall


Likes
7
Share

@paetel
Follow
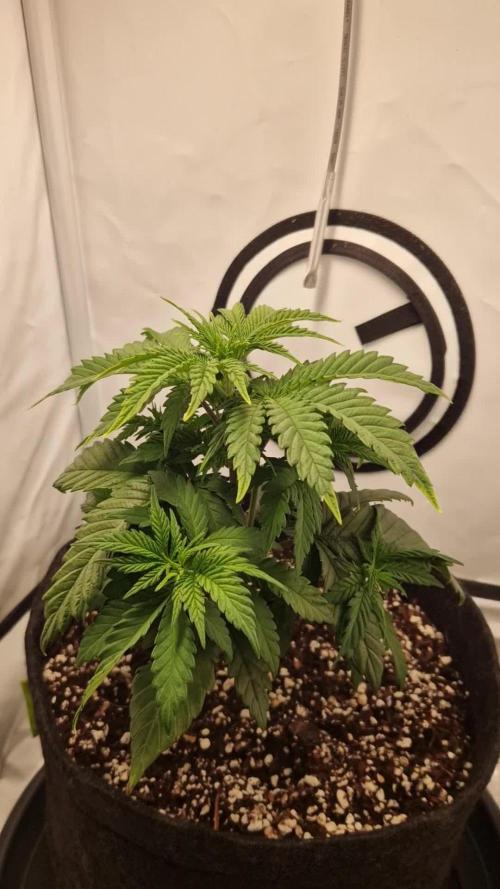
At the beginning of week 4 she started to show yellow leaf tips. My assumption was that it's caused by light stress. I then increased the lamp distance progressively to around 25 cm, PPFD 400. Since the overall growth was satisfying I am not that worried. Maybe someone can chime in with a better analysis.
Different sources say, that this strain could stretch up to 3x. I think I will flip her very soon since my tent is rather small.

Likes
16
Share


@Mr420
Follow
Day 85 not yet maybe three more days
Day 86 thrichoms look good 80% cloudy I see some amber but lots of amber hairs not many white hairs. Two more days chop time.
Day 87 couple more days looking good.
Day 88 she's done thrichoms are way cloudy and some yellow pistils but my scope says she done.
Likes
83
Share


@RunWithIt
Follow
She's chunking up so much and just continues to get smellier and smellier! This plant's been getting compost tea and overdrive/ph perfect bloom only until end of this week, then I'll begin flush!


Likes
12
Share


@Staffedition
Follow
Привет друзья. Моей растихе сегодня 103 дня.
Паутинный клещь побеждаю
На много стало зеленее и пушистей.
Растение пришло в себя.
20.10 перевёл свет в режим 12/12
Начал применять LST технику на 19 дне и продалжаю применять её через день, а 18 августа добавил ДЕФОЛИЗАЦИЮ
С 20.08 ДЕФОЛИЗАЦИЮ делаю каждые 3,4 дня
С 20.08 LST технику делаю каждые 4.6 дней
На сегодняшний день влажность 54%
5.09.2023 заметил высокий Ph 7.9
С 48 дня Ph не ниже 5.8
На сегодняшний день Ph 6.0
Начал кормить с 60 дня Canna Terra Vega
PPM 870
Всем мира и добра!
Не забудь поставить лайк❤️, если понравилась как прошла неделя
И читайте наш TELEGRAM: https://t.me/smail_seeds
#Smail_Seeds 😀
Likes
18
Share


@raulmoat123
Follow
Quick update week 3 flower these girls are putting on weight very very quickly. The blue gelato buds are already becoming dense like stones . Watermelon punch literally is the most satisfying smell I have smelt in a while . Wedding cake is the biggest in my tent and most gassiest plant. The terple inhouse genetics are also massive will show the inhouse section next week , just takes to long to take them out of tent


Likes
5
Share


@RastaRick
Follow
Running 24 hrs. Everyone looks happy and healthy. Light blasting, short internode spacing... When I get a bit of stretch I'll do some LST. Last grow I accidentally topped on LST so I'll take it a bit easy this time around haha
Likes
22
Share


@Aeromax
Follow
Finally those will become mother plants as well since some friends asked me for clones so i will keep up the diaries but i won't switch these ones into flowering yet.
I'm planning to start my clones at the end of this month. I will be doing a main-lining with 15x15 rock wool and FloraFlex stuff 😎
