The Grow Awards 2026 🏆
Likes
Comments
Share
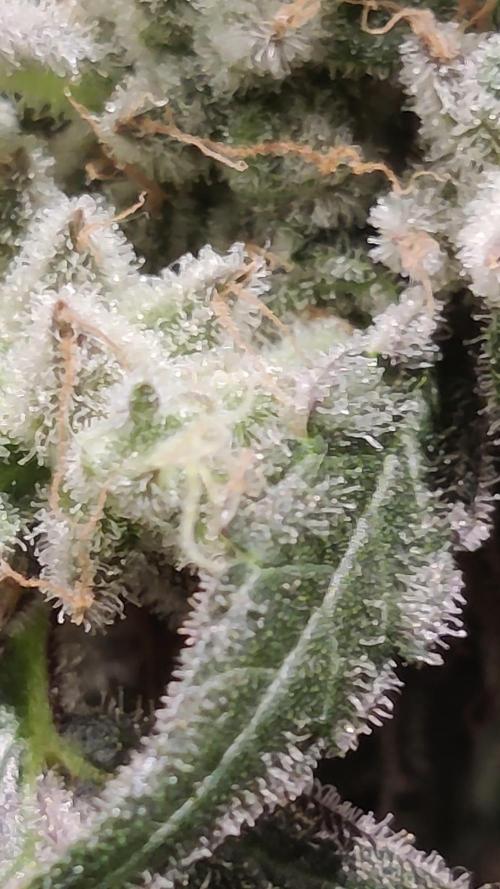
CannaFuel CBD+ sind unsere bisher höchsten CBD-Samen mit einem hohen CBD-Gehalt von 28 % und einem niedrigen THC-Gehalt von 0,5 %. Da diese Samen fast THC-frei sind, können sie in vielen Ländern legal angebaut werden, die den Anbau von Cannabis mit niedrigem THC-Gehalt zulassen. Außerdem taucht das Cannabinoid, über das CBG in aller Munde ist, in Original Sensible Seeds auf. Die Analyse zeigt, dass CannaFuel CBD-Samen einen CBG-Gehalt von 0,37 % produzieren, der im Allgemeinen nach dem Aushärtungsprozess ansteigt. CannaFuel CBD+ sind vollständig feminisierte Cannabissamen und haben eine Indica-Sativa-Linie, daher wachsen die Pflanzen zu einer mittleren Höhe heran, die sich wiederum für den einfachen Anbau im Innenbereich eignen, mit dem zusätzlichen Vorteil einer kurzen Blütezeit von nur 55 60 Tagen. Auch die Produktion lohnt sich mit Erträgen von über 550 m2. Diese therapeutischen Samen mit hohem CBD- und niedrigem THC-Gehalt können auch im Freien angebaut werden und entwickeln starke und robuste Pflanzen, die ihre Knospen gegen Ende des Monats September / Anfang Oktober ernten. CannaFuel CBD+ zaubert einen tief erdigen Duft mit der Dominanz des Myrcen-Terpens, das würzig-pfeffrige Caryophyllen und das nach Pinien duftende Pinen sind ebenfalls sehr präsent mit Zitrusnoten, die sich aus Limonen entwickeln. Dieses starke Terpenprofil liefert auch eine Reihe von therapeutischen Werten, einschließlich entzündungshemmender und stressabbauender Vorteile. CBG (Cannabigerol) kann sich nach der Ernte und nach dem Aushärtungsprozess weiterentwickeln, was diese Sorte zu einer idealen Sorte für Extraktionen und Öl macht. Vom Anfänger bis zum erfahrenen Züchter sind CannaFuel CBD+-Samen die perfekte Wahl für diejenigen, die ein medizinisches Interesse an der Heilkraft von medizinischem Marihuana haben, mit dem zusätzlichen Vorteil eines minimalen THC-Gehalts, diese Samen werden nicht die übliche psychoaktive Wirkung hervorrufen, die normalerweise mit Unkrautsamen verbunden ist und sein kann legal in Ländern angebaut, die Samen mit niedrigem THC-Gehalt zulassen. Cannabinoid-Analyse: 28 % CBD, 0,5 % THC (28 % CBDA; 0,5 % THC) – 0,37 CBG Alle schriftlichen und visuellen Materialien sind nur für Informations- und Bildungszwecke bestimmt. Die ursprüngliche CannaFuel CBD+-Sorte von Sensible Seeds besteht zu 40 % aus Indica und zu 60 % aus Sativa Um die Samen der CannaFuel CBD+-Sorte von Original Sensible Seeds richtig zu lagern, wird empfohlen, die Samen in einem kühlen, trockenen und dunklen, luftdichten Behälter aufzubewahren, der sowohl mit dem Namen der Sorte als auch mit dem Lagerdatum angemessen gekennzeichnet ist, um die Identifizierung und genetische Konservierung der Samen zu erleichtern. Wenn es legal ist, die CannaFuel CBD+-Sorte von Original Sensible Seeds an meinem Standort zu keimen, was ist die beste Technik? Es gibt viele Methoden, um CannaFuel CBD+-Sortensamen zu keimen, wenn die Gesetze in Ihrem Land die Keimung von Cannabissamen zulassen. Die Papierhandtuchmethode ist eine gängige Technik zum Keimen von CannaFuel CBD+-Samen. Eine weitere beliebte und bevorzugte Methode ist das Einpflanzen der Samen direkt in feuchtes Substrat. Damit beide Keimmethoden erfolgreich sind, ist es wichtig, dass die Samen feucht und warm bleiben, aber nicht austrocknen. Wenn Sie die Papiertuchmethode verwenden, vergraben Sie die Samen der CannaFuel CBD+-Sorte, sobald sie gekeimt haben, vorsichtig im Wachstumsmedium. Diese Woche ok ich mich entschieden, ein großes Zelt Mars Hydro 120•120 zu installieren, für eins und eine Lampe mit großer Reichweite FC E4800. Ich habe die Klimaanlage eingerichtet, jetzt liegt die Temperatur bei etwa 24, ich habe zwei Lüfter installiert, um den Secret Jardin Monkey Fan 20w zu blasen, ich wollte sie schon lange kaufen. Die Heizung funktioniert auch! Hoffe es wird bald wärmer 😅
Likes
18
Share
These two have been grooving. The bigger Bush plant vegged almost a week longer then the other. Only change was raised the nutrients to 1/2 dose. And increasing how often I need to water.its about to be a daily thing . They are hungry. I'm not complaining lol. But let's see how they fill out over the next 21days. Roughly at day 55 as of oct 25th !! Appreciate anyone checking in here. If u can leave a comment/like so I can check out what ur growing!!
Likes
31
Share
They looking good, but temp is a little too high. It is what it is One of the plants (In front to the left) is more frosty, with less amber pistils. But overall the trichomes are starting to go from crystal to cloudy. Which is my timing for start flush. 24/7 -Temp 23-26day/21-24night -47%RH (2+-) 25/7 Water day* start of flush Gave them till run through with plain ph balanced water, and topped it off with some light nutrients-mixed water. -Temp 23-26day/21-24night -49%RH (2+-) 26/7 -Temp 23-27day/21-24night -47%RH (2+-) 27/7 -Temp 23-26day/21-24night -47%RH (2+-) 28/7* Water day / flush -Temp 23-27day/22-24night -47%RH (2+-) 29/7 -Temp 24-27day/22-24night -47%RH (2+-)
Likes
17
Share
@Naujas
Follow
She is much prettier than she was a week ago :) I remembered that I have my first grow light, which is more compact and it will give me more space, so I changed my light, now the girl's side branches get light too:) I add a lot of video memes, because I really want to win Iphone16 pro ;) and those who don't take risks don't drink champagne:) good luck to everyone.
Likes
16
Share
Eccoci qui, Settimana all'insegna del Topping e dell'LST per far si che la piccola cresca con cime di serie a! Verrà eseguito scrog a breve non appena si allungheranno le cime. Topping eseguito il 16/01/2024, dopo un giorno ha reagito molto bene, sarà interessante lo sviluppo!!! Grazie a tutti per il supporto ❤️🔥🌲
Likes
6
Share
@Thckaos
Follow
No se cambia la solución solo se corrige el de 6.7 a 5.8 con solución ácida. 28-07-20 se vuelve a corregir el PH de 6.3 a 5.9 30-07-20 PH 5.9 conductividad 1,75
Likes
5
Share
Week 9...I have 2 other plants growing in the tent with these 2 plants and they aren't autos so I had to switch the lighting schedule over to 12/12 for those plants...I haven't seen any affects of the light change for these 2 plants...They smell great I am hoping they will be ready to go in about 3 weeks!
Likes
2
Share
Super happy with this. Strong tropical citrus nose. Dense, frosty nugs. Definitely recommend trying tropicana cookies in your garden
Likes
169
Share
Gorilla came down three days and ten hours ago, had the whole grow room to spare so she was hung whole upside down after just a bit of trimming for the main fan leaves that sort of thing. First day 24°C 60% humidity, second day 26-28°C 50% humidity, third day 25.5 °C 35% humidity. I had the exhaust and the fan going which gave this very nice light indirect breeze on these ladies. Really amazing smell that i had not really noticed until D-day, pistachios and christmas pine. Thought i was golden until i realised they were drying faster than i wanted. Ended up with 65/70% humidity which made these buds kinda airy in a way. Also the way the gorilla grows there were loads of tiny stems everywhere was a killer trying to get them out, ended up mincen some of the buds somewhat. Gorilla glue is absolutely a great auto to run. In ten gal it was tripple the size of my stunted one. 370 wet, hopefully something close to 100 dry - let's see I'll update in a couple of weeks. The gorilla grows bushy quickly, by week 3 it was noticeably more bushy than the rest. Kinda took an extra week to really start flowering then it stretched 20-50 cm a week for four weeks. In all it's close to 1.5 meters in height, loads of colas, maybe twice or three times as many as the GSC. Next time i'm gonna prune the flower nodes further down the cola. The buds themselves are quite thin, but rock solid much harder than any other strain i've grown so far - but this is my first time growen so take that with a grain of salt. The buds are covered in frost, trykes all over, oily oily oily, if you touch the buds your hands smells great for a few hours. Fun ! The trykes started appearing quite early and took a while's longer than the rest to get ripe - like truly ripe. So there were absolutely no ambers, maybe i saw one or two, but basically no ambers - this lady got cut down at the height of potency The grow tent. Once you dial it in it becomes your best friend, but if you're having trouble getting it stable it can become your worst nightmare. I made every mistake in the book. First off i set it up without really testing it with the lights on when using it as a germination room. Worked like a charmed until i turned it on. Took me weeks to figure it out. In the end running the AC the whole time through all of summer until it's very last day. 600W HPS through summer is not something i'm gonna be doing again. With my wing reflector there was nothing i could do except keep the lamps high, led to a lot of stretching. Cool tube is the only way to go. The HPS started flickering half way through veg and it died while I was away. I ended up going through 5 of those small fans until i realized & got a box fan. Once I accidently had it pointing straight at them for 8 hours or more a couple of times on max.… So i got a white 150W fan from china i also got Silent TT 123 W fan and hooked it onto the cool tube. Great fan, huge, black, strong, and with temperature control. I call him big dick cop killer because he's black and beats the heat. get it? Had two 90° bends outflowing for the exhaust and the heat just wasn't getting dissipated quick enough. Both of them together I could rest my hand on the cool tube with ease. i was able to test out temps and lux at various points in the grow room and figured i could have up to 4 degrees difference between the base and the top of the plant, still got it pretty stable. I had differences in lux from several 100 to several 1000 different places in the tent, probably because I was hanging the filter, the fan and the cooltube all crooked by then, but at that point my grow was a slow moving trainwreck. I had everything I needed to dial in my lamp to plant distance too, but couldn’t. I went bio which was nice, but i think I should try synthtetics or a mix next time. The soil spawned some flies which were easy to get rid of. Then when i tried measuring the EC of the soil, i'm afraisd that the soil particulates kind of skew results. Thought the soil could buff out anything really but rhizotonic had the better of me before i could get my PH strips in.... not that it matters but I broke my PH meter pretty quickly anyway. Live and learn ! Watering itself I think is something you should pay attention to, you don’t want to be pouring it out and getting your soil compacted from the water. Seedlings are a different thing, not too much water, don’t keep the medium too wet, maybe watering with precision is something that could be done. Using the liquid ferts was quite tedious, and I have doubts about using all bio in general, using liquid fertilisers regularly in soil, and following the labels. Thing is you shouldn’t really need much of these ferts in soil anyway, yet still got cal mag deficiencies so you tell me! Well there's a fair few things i wouldn't do again, like grow in the heat of summer with a 600W HPS and the AC on. I fumbled around before I had my dimmable ballast, and stressed out the seedlings which is a no no. Once I got the ballast I lowered then raised the intensity from 250 to 600 in three weeks light stressing my poor babies even more. It never occurred to me to plan out a grow, next time i'll definitely plan it out and make sure I'm kitted out a bit better going in. Same for the grow room, avoid bends in the piping, set the thing up a run it before i throw the plants in there, wont hang my filter above that high, and keep the fan on the ground maybe. Grow room wise I’m kitted out, got everything I need, but next time will install some 70 micron mesh in all my intakes just in case. Also never growing without cal mag again even in soil ! I'll probably do straight drops into forever homes directly too, no sense faffing about like the @silverback_guerilla 😂. It's not all bad news though, loads of things i would do again. I would even grow in soil again, especially now i have a bunch of soil ferts from america (thanks @mrs_larimar !!!). I wouldn't mind using the 600W HPS again, worked well enough ! most importantly i will be using TNB CO2 again because it makes a clear difference even if i don't have any of my own grows to compare it to. Another critical thing i did which i'll be using again is the chelation agents, i'm going to want to stay more on top of those and might even use as foliar spray on XXLs between weeks 3 and 4 veg. I ended up spraying rhiz second to third week, will definitely add some cal mag in the foliar spray. Mag sulfur supplement is going in next time too, if you put a lot of light, you need a lot of magnesium, so that's happening again for sure. I’ve been looking at predator insects pretty seriously, ladybugs are a must clearly, but I might throw in some other ones too just to be sure. It's a lot about what you do when you're not growing , learning about it, meeting great folks (see the comments for all my thanks), and enjoying watching a plant grow slowly. I learned so much about a plant that’s been a part of my life since I was eleven, I think I was 15 when I first thought it was silly not to grow, fifteen years later I can’t believe how long it took me to try it out ! Getting a crash course in horticulture, using a tent, and generally learning about the bio-dynamic world that surrounds us was really rewarding. Just got some cool ferts in the mail all the way from America, so thanks to growgreentrees.com and growcaps might try them side by side. Expecting some cool testers soon too so thanks to @pharmaz my boy past the bridge ! I’ll pop those right in FTB5, Auto Zkits, and something else I don’t know yet  cream cookies or lsd35? I really wanted to get out of the dirt with some coco or DWCs but oh well another soil grow can’t hurt ! A big thank you to @mrs_Larimar GD and the folks at trim bag for the gear ! I’ve already got a spinning blade thing, so let’s see how this compares , but at least now I’ve got cool scissors to do all that trimming – bless ! Just wanted to say thanks for holding my hand to a few folks @mrs_larimar of course, thank you so much and looking forward to some fun times on gd; my main man @mudbug great hanging out with you growmie ; @pharmaz and @silverback_guerilla; new friends like @bigdaddyk @valhallasgarden and @slimsativa; My ghost brother @beans, check out his one leaf GONNA MAKE IT GONNA BEAST IT ; Everyone who stopped by to help me @B4RNS of course, @farmerbrett too, @hawkbo, @tryhard, @tonino, @tazard @mad_scientist @spinnergrow, @poleeg1986 – he’s an amazing European canna porno director check out his gorillas my good lord save me; special thanks to all the Growvengers, and the @dudegrowsweed ; @wheetobeme, @experimentgreen, @weedeep, @chi_town_white_boy @chillum_mafia and even @mulch – play your part man bless ! Thanks to Nico @fast_buds for some cool testers, my favorite hat and some fun times on GD ! A final recap of everything I learned (see for yourself in the diary) : never buy a kit, buy local, buy direct, less is more, go big on fans, keep refills around, always add CalMag CO2 and chelation agents, no bends in the pipes, cover your intakes with micro mesh, nail the first couple weeks of flower and it’s smooth sailing, always protect your eyes ! Just one last thing though: have to say it’s pretty great having access to all the best horticuralists from around the world. Shout outs to all my North American and South American grower friends, @russiangrower and all the east European growers, my Scandinavian friends, Spanish and German growers, and African and Japanese growers, I don’t understand everything you’re saying all the time but I like your style ! You won’t know until you grow ! Dassit 🚀000000
Likes
21
Share
Week 9 - Day 63 - 26/11/19 Im so grateful to be a part of this community and to be at this milestone so to speak :) had an amazing time growing this plant, thanks to everyone who had a look or contributed to my diary! Harvest was fun but that little 16cm tall plant stunk my whole house out of cheese when i started trimming her :) Added a few photos and videos of the harvesting, i got a little ball of hash off the scissors which i smoked in a bong and it was nice! very hashy! its taken about 2 hours to finish trimming but ive stored all the trim in the freezer along with the dwarf trim from my last diary :) im making cannabutter and edibles this week. really excited for that. So i hung my drying rack outside the tent beside the passive intake. temps are between 20-22c in the room so it should dry fine and im hoping the passive intake will drag the smell in and keep it sort of fresh in the room :) This diary has got me excited for my Quick One plant as its much taller and has colas like arms :D. Il update in 3-7 days when buds are dried and then il be updating a lot throughout curing :) Day 65 - 28/11/19 Still drying these buds :) they look much smaller now, i smoked a small bud and although its much drier than harvest its still spongy/sticky and stretchy when breaking apart so 2-3 more days drying i think. Smell is wonderful especially if you get it on your hands, its like tropical fruit cheese and the effects of thc are not as pronounced with this strain but i felt very relaxed, no muscle pain etc and no paranoia or anxiety. i havent had a clear relaxed headspace before bed in a very long time. Any 1:1 THC/CBD is a must grow, give it a try if you havent already, i couldnt have picked a better starter medical plant as i love a good old cheese strain :) And i made some cannabutter out of the 59g of sugar leaves i got from this diary and my first diary. il have to upload a few pictures of the process later and let you all know if the cannabutter worked in my brownies :) Day 66 - 29/11/19 Started curing and added a photo to show :) buds were at 59-60% when left in the jar alone for a few hours so i threw in my boveda 58% pack and started burping 5-6 times per day :) i could have cured for a week before adding the boveda pack but i had barely any bud in the huge jar so i thought it would be wise to add the boveda to prevent mold and to keep it curing perfectly! Day 67 - 30/11/19 Posted a picture of a handful of buds :) i smoked a few in a bong and had a joint and it left me nice and medicated! no anxiety no paranoia nicely locked to the couch and sleepy. perfect nightime smoke as it wont trip you out or mess with your head, just a nice happy little mellow buzz! Flavour hasnt really came through yet, not sure what to expect as im a newbie but its slightly like cheese/flowery/herbs. Curing is definitely helping every day! the smell is getting better, buds are getting really smooth and they look amazing also! really excited for the next few weeks curing :) Final Update - Day 69 - 02/12/19 Finally here at the end of this diary and i have to say i loved growing this plant. it was a dark green colour throughout growing and took whatever i threw at it. Buds are nice and dry and curing well. i saved the best buds until last and added a couple of photos of them and a video also! they are covered in trichomes and feel great. Not much of a smell from the buds and it tastes like a sweet floral cheese mixture. Im pretty couchlocked from a bong of this strain so im gonna end this diary here and go relax but many thanks for following along folks and take a look at my other diaries if you get a chance :) Peace!
Likes
5
Share
Likes
13
Share
Bewässerung: 1000 ml alle 2 Tage pH-Wert: 6,1 EC-Wert: 1,2 Temperatur: 22ºC Luftfeuchtigkeit 62% Schädlingsbekämpfung: PPFD: 500 µmol/m²/s DLI: 33 Düngemittel: Mineralischer Dünger 3.5-6-6 PK 13/14 Besonderheiten: Wurden direkt in die erde gepflanzt in einer Kokos-Quelltabletten. -Tag 51 Heute haben wir sie wieder gegossen und Dünger gegeben -Tag 53 Heute haben wir mit effektiven Mikroorganismen und mit Plagron Power Buds gegossen 😜 -Tag 55 Heute haben wir sie mit Wasser und Dünger gegossen, sie entwickelt so langsam ihre Blüten und sieht sehr gut bis jetzt aus 😍
Likes
9
Share
There will be pleasant dreamzzzz around here in the near future, these beauties are covered in crystal and the buds are incredibly dense. They are almost near harvest and they will have a wash when the time comes. These girls have been incredible from day one and I must say, we are WOWED by this strain and the genetics within!
Likes
8
Share
Flowering week 6 ---> Indoor plant: This is the last week of flowering. The flowers are ready to be harvest.💪 I watering the plant only with 4lt of water (pH 6.5). I removed the yellowing leaves. I will wait after all the soil il totaly dry before harvesting. Temperature grow box---> 22-26 °C Umidity grow box ---> 45 - 55 % Outdoor plants: They are in full bloom ready for the harvest😍. This week I watering the plants only with water.
Likes
17
Share
@BLAZED
Follow
Week 3 (14-2 to 20-2) 14-2 Watering: Chemdog#1: 117 ml. Chemdog#2: 116 ml. 15-2 Watering: None. No pictures. 16-2 Watering: Chemdog#1: 126 ml. Chemdog#2: 125 ml. 17-2 Watering: None. 18-2 Watering: None. Today i will transplant the plants, i will mix 70% Coco coir with 30% Perlite. The plants go into 18L AutoPots. I use the Airdome combined with an airstone. I covered half of the airdome with coco, and the remaining half with clay pebbles. The rest of the 18L pot filled with the coco mix, and the plants. I gave both plants a 1.5L topfeed, and into the tent they go! The light is at 70% strength, with a distance of 60 cm. 19-2 Temperature: 25.7 degrees (lights on) 20.4 degrees (lights off) Humidity: 64% (highest) 45% (lowest) Watering: None. Light strength reduced to 60% 20-2 Temperature: 25.4 degrees (lights on) 20 degrees (lights off) Humidity: 64% (highest) 50% (lowest) Watering: None. There is something weird going on with the leaves of the Chemdog #1.
Likes
4
Share
Week 11 for Amnesia Zkittlez by fastbuds, She's on her couple of last weeks before she gets the chop, fan leaves slowly losing colour. Only feeding plain water from here onwards😎 Last week was another hot hot week but we are coming down to the low 30's again for the rest of the upcoming week so think the plants will be happier.
Likes
23
Share
Toda esta fantasía se hace realidad gracias a Royal Queen Seeds y @James por confiar en mí. 🚀💥 Fiel a su linaje genético, la Hyperion F1 ofrece un aroma intenso que está dominado por notas frescas de pino y hierba, junto con un trasfondo terroso y un delicioso toque especiado. Aunque todos nuestros híbridos F1 producen excelentes concentraciones de cannabinoides y terpenos, no hay duda de que la Hyperion destaca entre el resto. Sus cogollos alargados y escarchados producen una resina rica y cargada de cannabinoides (sobre todo THC), y terpenos como mirceno, ocimeno, farneseno, terpinoleno, cariofileno y humuleno. Esto no solo da lugar a un aroma muy fuerte, sino también a un efecto bien equilibrado que combina una relajación física (en gran parte gracias al mirceno y al farneseno) con la euforia, risa y efecto motivador de otros terpenos. Al igual que el dios de la luz del mismo nombre, la Hyperion F1 causa un subidón esclarecedor que se puede disfrutar a cualquier hora del día. 🌻🚀 Consigue aqui tus semillas: https://www.royalqueenseeds.es/semillas-de-marihuana-hibridas-f1/622-hyperion-f1.html 🍣🍦🌴 Xpert Nutrients es una empresa especializada en la producción y comercialización de fertilizantes líquidos y tierras, que garantizan excelentes cosechas y un crecimiento activo para sus plantas durante todas las fases de cultivo. Consigue aqui tus Nutrientes: https://xpertnutrients.com/es/shop/ 📆 Semana 9: Gran semana, la planta parece que ha terminado de crecer y centra toda su energía en desarrollar los futuros cogollos, los erizos 🦔 son apreciables. @xpertnutrients está haciendo un buen trabajo, ella consume algo de sus recursos lentamente como a mi me gusta . Vienen lluvias 😡
Processing
Likes
8
Share
@Joni2017
Follow
Hello everybody 👋🏻 today full moon 🌕. I put the seed in a tupper on top of the router where it gives a good temperature😊. I will put the led at half power (400W) during vegetation and at full power (800W) in flowering Royal Dwarf This variety, which removes the genetics of the first autoflowering plants, is reaffirmed in the sector as a plant of the most interesting. Dwarft genetics comes from the crossing of 2 very specific indications that transmit its main characteristics. RQS crossed a Dwarft with a feminized Skunk to obtain the Royal Dwarft. Finally, he crossed the result with his autoflowering predecessor to stabilize this characteristic. With a maximum height of around 50 cm, and a little branched structure, it becomes a compact and vigorous plant, perfect to cultivate in small spaces, discreetly. With a maximum production of 40g per plant, and notorious for being the most productive genetics of Royal Queen Seeds, it will be a variety of the pleasure of the most impatient growers, being able to achieve an interesting harvest volume without having to wait for a whole harvest cycle . We are talking about a marijuana genetics with a sweet but aromatic taste, and really strong in intensity. The taste picks up the bottom of the Dwarft part, but with the nuances of the Skunk marijuana variety. As for the effect, we will obtain the mental clarity and the socializing effect of the Skunk with a pleasant physical effect coming from the indica part. Of moderate power, it seems a boil recommended for day to day. THC: 13% CBD: Low Yield Indoor : 150 - 200 gr/m2 Yield Outdoor: 30 - 80 gr/plant Height Indoor: 40 - 70 cm Height Outdoor: 50 - 90 cm Flowering time: 6 - 7 weeks Harvest Month: 8-9 weeks after sprouting Genetic Background: Skunk x Ruderalis Type: Sativa 60% Indica 10% Ruderalis 30% Effect: A motivating and inspiring feeling Flavor: Citrus, Sweet Climate: Cold Bio Tabs Now fertilizing your plants will be much easier; we only have to add the Bio Tabs and the other components that are included directly in the pot when we plant, and the rest of the crop will only add water to our pots. In the middle of the crop you have to apply an irrigation with Orgratrex and Bactrex to reinforce the biological activity and that's it. We will have plants as always, the most productive and tasty, totally organic and without having to worry about excess nutrients or fertilize them. Dosage and how to use the Starter Pack of Bio Tabs step by step: Fill our pots to about 3/4 and add 3g of Mycotrex for each pot, no matter the size. More or less are 3 tablespoons of coffee rasas. Then we add another 25g of Startrex (which comes to be 2 tablespoons) every 5L of soil, so if we have 10L of pot then 50g and so progressively. We stir well to mix with our substrate and just fill the pot of earth. Then we make the hole to transplant our plant to the final pot, and in that hole you have to throw another 2g of MycoTrex into the hole itself and we can now transplant our plants. Then we have to add your Bio Tabs tablets, every 5L of earth a tablet on the substrate, if we have 10L then two tablets ... You have to bury them closer to the edge of the pot than in the center. They are buried about 5 cm deep in the substrate and we will have our plants fertilized for weeks. We make a mixture with the last component that remains when we plant, Bactrex. Add 1g to a liter of water and give the first watering with that mixture. From now on, you only have to water with water until the 5th week. At the 5th week, we will have to contribute a new help to our plants, we will add 20ml of Orgatrex and 1g of Bactrex in 500ml of water and stir well. Water only with that half a liter a plant and only once. Add water until the end of the crop, that's that easy.😋👏🏻👏🏻 Biobizz light mix With Light Mix of BioBizz we will be 100% sure of having bought one of the best lands available for your seeds. Saving on the ground is one of the worst mistakes we can make, since we are starting a job that the final result is to seek the highest quality and production. To think that is where the plant will have to live all its days of life so it will have to be of the best possible quality. With Light Mix you will have an excellent substrate, as each land has a different formula and composition, we will find out who will best resist this substrate, according to the climatic conditions where we are going to plant. It is characterized by its high proportion of water / oxygen retention, this soil pulls more towards water retention so it will be perfect for all those who live in warmer areas avoiding having to water the pots so often, it retains a lot of humidity. We will have to be careful with the first days of our plants so as not to soil the land too much, otherwise the roots will not shoot as they should and you could even drown your plants, this advice is worth all the autoflowering genetics that are more sensitive to root problems and excess irrigation. This sack of earth comes very light of nutrients, so this substrate should provide practically nutrients in all phases of the crop from the second week. Composition: Peat moss Perlite Ec: 1.2 Ph: 6.2
Likes
21
Share
Day 12 of flower. Almost done with week 2 of flower and everything is on point. They’re stretching but nothing too crazy. I’m giving them less water but will be watering at least twice per week. They’re steady drinkers. This strain finishes in 8-9 weeks so harvest time isn’t that far away. It’s been a long journey, much longer than it should’ve been but it is what it is. Can’t wait to be finally done with this grow! Catch yall on the next update! ✌️🏾