


Likes
Comments
Share


@Reyden
Follow
Riparto con un altro ciclo only @Fast_Buds con 2 loro Fast Flowering e 2 Auto Fiorenti di cui una CBD 20:1🙌la SF2000 lavora al 60% della sua potenza con una distanza dalla punta delle piante di circa 30cm. Ieri ho effettuato la miscelazione del terriccio con il 4 componenti Dogma Organics che è una miscela di diversi guani, letame bovino, rocce triturate meccanicamente, ceneri arboree e febacee tritate, acidi umidi e fulvici, kierisite e fosfato nat. Tenero,


Likes
18
Share


@Kmikaz420
Follow
Je viens tous juste de couper la plante je repasserai pour compléter le journal.
Voilà après 1 saine de séchage enfin la mise en bocale et le premier joint 😀
La plante est passé de 371g humide à 88g sec (mais il manque à peut près 10g de test ;)
Je repasse après curring pour vous donner mon impression sur l effet et le goût je peut déjà dire que l effet est vraiment méchant se n est pas une weed pour la journée ;)
Je peut déjà dire qu avec 371g (humide) la recolte n est vraiment pas mal du tous avec des belles tête de taille moyenne mais bien dur et surtout une cristallisation et une odeur de fraise 🍓 la folie j ai hâte qu elle seche^^ voilà voilà on se reçoit très vite pour la suite et fin de se journal ..

Likes
269
Share


@JohnnyBlaz3
Follow
Day 135
Flower 73
Flush 6
Remaining?? 2-4?
wow! not really much to say! the end is so close! Picked up some flawless finish to assist with the flush. the buds looks just amazing and the excitement and anticipation is killing me!! This feels like the calm before the storm.
Seeing quite a few clear trichs still with hardly any amber but mostly overall they are milky so i know i'm close. a rough estimate would be like 35 60 5 clear milky amber.
Thanks again! cant wait to post the harvest.

Likes
18
Share


@DeepRootsGrowTrees
Follow
PURPLE KUSH / KANNABIA SEEDS
WEEK #15 OVERALL
WEEK #3 FLOWER
This been another good week for this lady. No issues to report 👌. She's looking good buds are growing and you can see the trichomes!! Stay Growing!!
Thank you for stopping by and taking a look it's much appreciated !!
Kannabia.com PURPLE KUSH


Likes
28
Share


@DudeGrowsWeed
Follow
Nice growth out of these girls in their first 9 days above soil. The Dinafem Critical+ is larger out of the gate, but the Blackberry is showing signs of catching up towards the end of the week. I also notice twisted/wrinkled looking leaves on the Blackberry, but that seems to be common with purple strains at this age. They did need a little water near the end of the week, I added some Recharge to the water and the next day I saw noticeable growth in both girls. It could be coincidence since rapid growth at this age is expected, but I've never had any bad experiences with Recharge. Looking forward to the progress this upcoming week!
Keep on growing!!!

Likes
2
Share


@grungedetox
Follow
Everthing is cool
Pheno 02 is looking good for flower already
I'm keeping them very low with lst so when the strech they don't become a issue. Defoliate some leaves on the number 04 cos they were in the way of the light for the new

Likes
20
Share


@bhanga_garden
Follow
Green House Seeds - Franco's Lemon Cheese! I'm super excited about this one! I'll be documenting the process with this log.
Started soaking the seed this afternoon, I'll let it soak for about 20 hours and then it will go straight into the soil! I have the light on and set to stay on for 24 hours. This way the soil will be nice and warm when I plant the seeds tomorrow. I'll taper off the 24hrs on light cycle around the second or third week of veg depending on how they are coming along.
Seed has sprouted! YAY! I have a camera in my tent right now catching a time-lapse of her coming out of the soil! I will possibly post it tonight!

Likes
2
Share


@Manic4organic
Follow
first vid is from day 22 (if the vid works this time)
looking nice here
23/3/19 day 26
two of the more indica leaning g13 are stacking now, became very hungry in past couple days started to eat a few of her older leaves so gave them a boosting compost tea with added banana ffj for some extra potassium and a new alfalfa sprouts ferment which should aid as a general growth booster, will get some images later to see how they've responded

Likes
25
Share


@Ganjeiro420
Follow
Eai comunidade GD, sejam todos bem vindos a mais uma semana dessa bela menina.
Essa semana tive alguns problemas com falta de nutrientes, as folhas deram uma amarelada, agora corrigi na rega e acredito que daqui uns 3 dias já teremos a melhora.
Os botões estão crescendo bastante e o cheiro está incrível, não vejo a hora de experimentar essa maravilha!!!🍌✅
Likes
12
Share


@JeyGanesha
Follow
Prossime settimane via....anche queste forbidden runtz sono pronte da conciare,🤣❤️💛💚... quest'ultima settimana la notte la sto lasciando fuori in balcone per fargli un buon sbalzo termico..,,.......
Ho tagliato anche quest'ultima forbidden runtz
Likes
37
Share


@The_Projexx
Follow
We did really well this round with this strain even though she grew very different from what Im used too. We ended up with a half pound of some excellent smelling and tasting cannabis!


Processing
Likes
13
Share


@DrewbieDoobieNoobie
Follow
Weeks 3 Think different is in need of some NPK in Higher amounts due to the offset in planting it is ahead by 3 weeks from the blue dream that is now in the tent. I have some bottom leaf die off so i will have to feed them differently the other 4 will get a 200 ppm feeding until the catch up in the veg stage Think Different got a 460ppm feeding today at a PH of 5.8 1 gallon of harvested rain water. I am gonna let them dry out for a few days let the roots dig to the bottom and keep an eye on the color they have got plenty of food and water. I might have over done it. I think looking at your Garden every day routinely will help you catch things before they get to far out of whack.


Likes
6
Share


@Newbie5648
Follow
Time to harvest or leave for longer.
Maybe a few more days?
Should I water on not now or just wait?
Soil is dry.
Please let me know your thoughts!
Likes
Comments
Share

@Greenthumb85
Follow
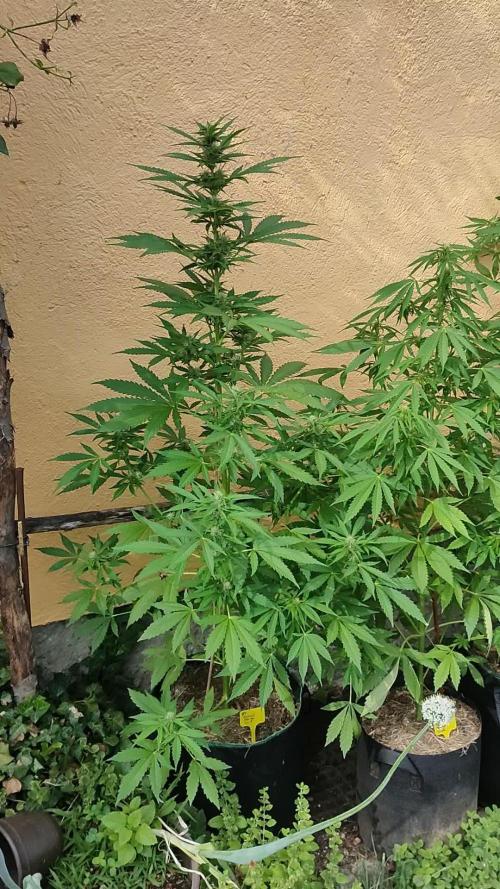
The ladies have grown really tall. All the plants are still in the stretch and are doing really well. I have added another layer of compost and a layer of grass clippings for mulch. I will sort them out with some fresh food this weekend as the first leaves are starting to turn a bit yellow. Bud development is good and the ladies are dealing with the colder temperatures well. The weather is supposed to get warmer again. I think they will get another boost soon and will enjoy a fresh feeding. Happy growing.

Likes
8
Share


@emeraldlabs
Follow
She got her first feeding today. Will likely be only feeding with grow big, potentially 1 more, then switch over to tiger bloom. Everything seems to be going smoothly.
Video/photos taken 35 days after breaking soil.

Processing
Likes
29
Share


@Crazydaver
Follow
Bit of a difficult start to these girls seeing as this is my first grow and all, but they’re still growing and overall looking pretty healthy, good colour, springy, but I’m suspecting nute deficiency maybe but I’ve upped the food so we’ll see how we do!
Now, when to start topping 🤔...
Puff, puff, pass ✌️

Likes
11
Share

@Z420Organics
Follow
Week 11 – Harvest begins 🍂
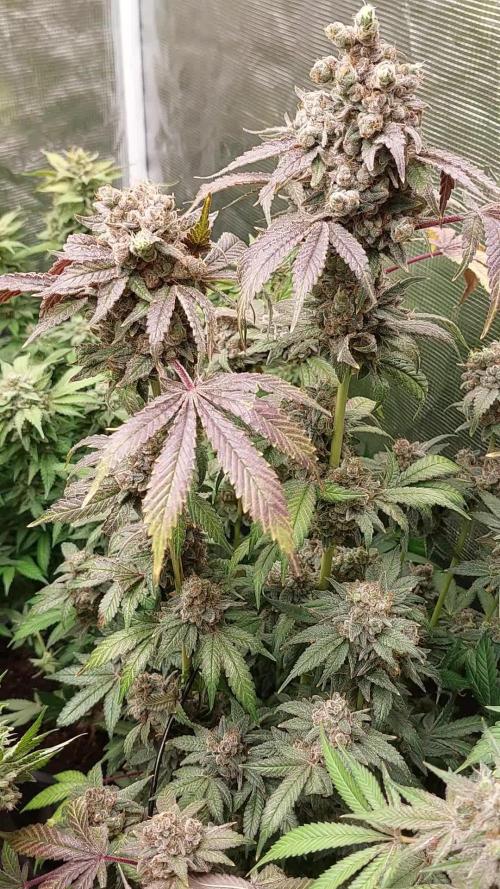
This week marked the beginning of the harvest! Four plants have already been chopped and are now drying in the fridge at 5–9°C for a slow dry. Early testers are already showing strong effects and surprisingly good taste, even before a proper cure.
The rest of the plants definitely need another week to fully ripen. The Mimosa Orange Punch is stealing the show with its incredibly sweet and fruity aroma – you can smell it from a distance!
As for the Fast Buds autos, they’re seriously impressive. As you can see in the photos, they’re stacking beautifully, with tight buds and strong sativa traits – genetics are on point. Can’t wait to see how they finish!
The grow is in its final stretch, and things are looking and smelling amazing.

Likes
93
Share


@MadeInGermany
Follow
Welcome to the Zamnesia Spring Cup 🏆
Hi all 🤗
She continued to do very well this week 😍.
On June 28th she was placed in the flowering tent, where she now has a light duration of 12/12 h.
I am very curious to see how it develops in bloom, and what a smell will end up blowing through the tent 😍.
She still has enough nutrients left, so I will probably only give Monster Bud Mix again in 2-3 weeks :-).
I wish you all a lot of fun with the diary, stay healthy 🙏🏻 and let it grow 🌱🍀
You can Buy This Strain @
www.Zamnesia.com
Zamnesia Spring Cup 🏆🏆🏆
Type:
Runtz
☝️🏼
Genetics:
Zkittlez x Gelato
👍
Vega lamp: 2 x Todogrow Led
Quantum Board 100 W
💡
Bloom Lamp : 2 x Todogrow Led
Cxb 3590 COB 3500 K 205 W
💡💡☝️🏼
Soil : Canna Bio
☝️🏼
Nutrients : Monster Bud Mix
☝️🏼🌱
Water: Osmosis water mixed with normal water (24 hours stale that the chlorine evaporates) to 0.2 EC. Add Cal / Mag to 0.4 Ec Ph with Organic Ph - to 6.0 - 6.3
💦💧
Likes
9
Share


@Growing_Spartan
Follow
Here’s the update:
She’s in week 8 of flower so far and a lot has happened since the last post. Since may 20th 2025, I noticed a small deficiency in the plant but couldn’t quite pin it down as to what it was, fast forward 10 days and I notice that she was getting more deficient and started to show more signs of what it was and once it was clear I ruled it out as a magnesium deficiency since I lacked any in my pot.
I since grabbed some dolomite lime from Down To Earth (OMRI) and sprinkled 5 tablespoons into the top soil and watered with PH’d and dechlorinated water and worked it into the soil with the watering. It’s too soon to say it has any effects so far but I’m hoping my rookie mistake can be fixed.
I do understand I am pretty late into flower for a top dress but the flowers look young still and could go for some more time but if I’m wrong please guide me the right way haha, also I did the top dress on June 4th 2025.
First day of flower flip : April 11th 2025
Current date : June 5th 2025