
Likes
Comments
Share


@w33dhawk
Follow
Moinsen wie man sieht geht es den Damen recht gut, sie fangen an Farbe zu bekennen. am anfang der woche gab es für alle 2,5L wasser+1L wasser mit 10ml/ Pk5-8 und eine leichte entblätterung damit die Luft besser zirkulieren kann da der mittlere Bereich des ScroG Netzes ziemlich dicht aneinander steht ansonsten war nicht viel los diese Woche. Ich denke mal das die Damen noch ca 3 Wochen brauchen werden bis sie ansatzweise fertig sind. Auf den Bildern ist es zwar nicht so gut zu erkennen aber die Damen werden lila schwarz an den blättern und die Knospen bleiben giftig grün nur die Dame vorne links hat nur kleine Flecken die sich lila zeigen aber ich denke mal das wird in der nächsten woche auch noch zu legen so lange die Temperaturen mit spielen! euch noch ne schöne woche ihr growmies


Processing
Likes
2
Share


@Vet4weed
Follow
Week 7 (Feb 15 - Feb 21).
All three plants are doing nicely, and River, our youngest plant, is doing a good job keeping up, but still a couple inches shorter. So, I decided to FIM the older two plants to see if it evens them out, or sends them into a growth spurt. If the later, then I'll give River a FIM next week.

Likes
4
Share


@Ninjabuds
Follow
My Skunk Apple plant's a little behind the others. I think it started flowering a couple weeks later. It's a smaller plant, but it's finally starting to fill out. I'm guessing I've got maybe two weeks left before it's ready to chop.
The past week has been awesome for drying my plants. The weather's been perfect – nice and dry, with just enough breeze to keep things moving. I finally got around to chopping down those two big plants I've been meaning to trim. They're almost ready, just need a little more time to dry out completely. I can't wait to see how they turned out.
Likes
26
Share


@HowtoBubatz
Follow
Today marks the end of the seventh week for my cannabis plant, and things are looking fantastic!
The buds are developing beautifully, swelling up with each passing day. It's incredible to see how much they've grown in such a short time. The first trichomes are starting to appear.🌱💚
I'm also happy to report that the nematodes have done their job effectively. The plant is much healthier now, bouncing back from any issues it had before.
I'm feeling optimistic as I watch it recover and flourish. I can't wait to see how the buds develop further as we head into the final stages!💚

Likes
15
Share


@Shizzlemanizzle
Follow
Topping was great ! Starting now with LST using a wire but gently don’t want to harm the plant they opened up pretty good 🙏🏽 I am increasing water by looks.
Likes
2
Share


@ChiTaN
Follow
The girls develop properly, even "Freako" promises to be interesting despite the hard experiences 💪


Likes
14
Share


@hooolian
Follow
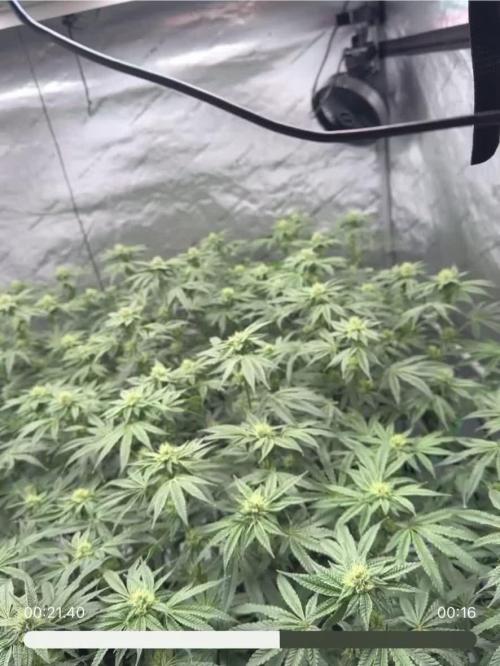
tent 1: as last week - coming along very strong with weighty buds and a lovely fresh white widow aroma forming - trichomes are getting thicker covering the plants with little crystals. may need some more sticks for support in the final weeks. 4 weeks of growth left and last week on the nirvana nutrient. pistils still mostly white
tent 2: as last week also coming along well - trichomes are forming and the colas are looking heavy. nice to see mutli bud heads at the top of the colas on some plants - the mutants as i call them - hopefully showing their big bud genetics - pistals still mostly white.
Tent 3: thankfully no hermaphrodites having been stuck in the light as per last week. the plant has returned to flowering nicely though looks alittle weak - a slight mistake that i do not want to make again - pistals and crowns are showing though and coming through with good progress. will lollipop next week.
Tent 4: way more advanced than tent 3 with multiple pistils and colas blooming nicely - will need to lollipop next week.
Likes
4
Share


@DELTA9_CANNABINOID
Follow
En esta nueva semana, he subido la dosis de Bio-Grow 1ml/l más, la planta en sí a desarrollado un tronco grueso con grandes hojas, lo que viene siendo una índica. No presenta ningún defecto, carencia o exceso.
Espero que en 1-2 semanas empiece a tirar pistilos, os traeré las mejores fotos y videos que pueda, dulces fumadas máquinas.💀.
Likes
14
Share


@MG2009
Follow
03/13/2022
Love the colors on Grape Skunk #1 others are not as purple, again i forgot Biscotti Skunk and lemon og.
03/14/2022
Uploading Biscotti Skunk pic's
I'm really loving 3 particular girls this run,all plants are exposed to PW intentionally I need girls that can take PW with no issues and three plants are spotless. The first is the only Biscotti Skunk that was female of 5 cloning for outside run but will do great in basement without PW issues. The second is lemon og spotless, and the third is the grape skunk thats got most color the second tallest of the grape skunks, cloning for testing in New England zone 7 should get at least one if not all 3 to finish before cold sets in.

Likes
67
Share


@GanjaReaper
Follow
Photos taken at Day 25:
They start to recover and grow again.
Sprayed them with Canna Cure to get more healthy leafs.
Removed the humidifier.
Lets hope they will grow for another week before they go into preflowering.
Thats it for now, new pictures and updates will follow within this week.
Stay tuned!
Update:
Day 28:
Canna cure did his thing. The leafs start to get greener again.
Also my feedings made them grow and recover again.
Removed some lower branches and leafs.
They are back in the race!

Likes
Comments
Share


@OrganicBuds030
Follow
Forbidos wächst klein und buschig, eigentlich genau was ich suche. Bin gespannt ob sie das Topping genauso gut wie Jelly Breath annehmen werden.

Likes
205
Share

@yan402
Follow
This two were part of another diary and got moved out due to space reasons at VW8 and moved back indoors at VW20
https://growdiaries.com/diaries/218151-auto-god-s-glue-grow-journal-by-yan402
13.09.25 VW21 Both are looking good and are developing tighter nodes than when they were outside, I'm going to have to keep cutting them back every once and a while I also applied nematodes against thrips and fungus gnats.
20.09.25 VW22 some spots and some yellow leafs, I think it's a root problem, probably root bound, but both seem healthy and are getting thicker so maybe just top up with Coco coir and give a slight different nutrient schedule less Tri Part Bloom could do the trick MAYBE lol.
27.09.25 VW23 Topped up the pots with extra coco coir and trimmed the side roots a bit, both plants were root bound 📹
03.10.25 VW23 did a HST/LST session 📹
🌱💦🌱💦🌱💦🌱💦🌱💦🌱
Day to day tasks & actions 🌿
🌱💦🌱💦🌱💦🌱💦🌱💦🌱
11.10.25 VW24 – Fed 3l of #1 → 2l runoff
(*RUNOFF reused for tomato plants)
🍶💧🍶💧🍶💧🍶💧🍶
💧 Nutrients in 30L #1
🍶💧🍶💧🍶💧🍶💧🍶
💧 TriPart Micro: 10 → 30 → 40 ml
= 0.33 → 1.00 → 1.33 ml/L
🍶 TriPart Grow: 0 ml
= 0.00 ml/L
💧 TriPart Bloom: 10 → 30 → 20 ml
= 0.33 → 1.00 → 0.67 ml/L
💧 Cal-Mag: 60 ml
= 2.00 ml/L
🍶 Home-made FFJ/FPJ (new fish batch): 30 ml
= 1.00 ml/L
💧 pH Down:
Citric acid (BuxXtrade) — adjust to ~pH 6.0
📦 TOTAL : = 160 ml per 30L = 5.33 ml/L
🍶💧🍶💧🍶💧🍶💧🍶
⚙️✂️⚙️✂️⚙️✂️⚙️✂️⚙️
✂️ Tools & equipment ✂️
⚙️✂️⚙️✂️⚙️✂️⚙️✂️⚙️
✂️ 2× MarsHydro SP3000
⚙️ MarsHydro 150mm ACF Ventilator
✂️ Trotec dehumidifier (big unit)
⚙️ Mini no-name dehumidifier
✂️ Kebab skewers (LST – stainless)
⚙️ Wire + roast skewers (LST assist)
✂️ Scissors (HST)
⚙️ Vacuum (for spills & cleanup)
✂️⚙️✂️⚙️✂️⚙️⚙️✂️⚙️✂️⚙️✂️⚙️
🍒🍭🍬🌈🍒🍭🍬🌈🍒🍭🍬🌈🍒
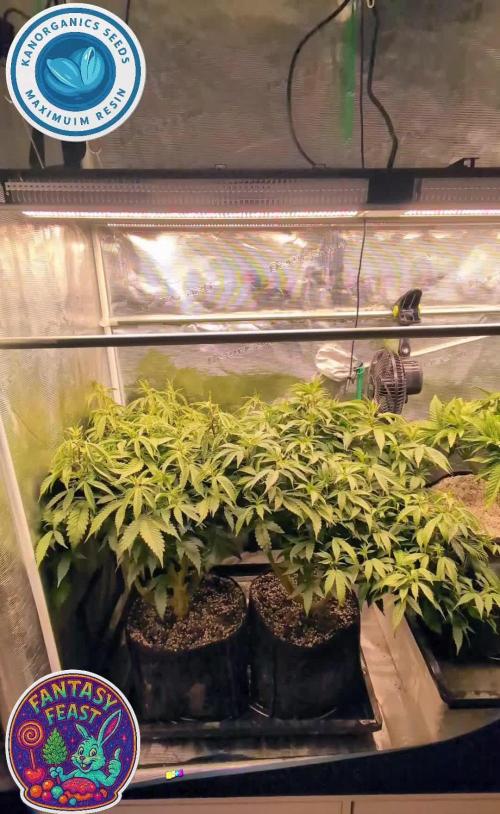
🦄Fantasy Feast ( Seeds)🦄
🌈🍒🍭🍬🌈🍒🍭🍬🌈🍒🍭🍬🌈🍒
Species: Hybrid (Regular)
Genetics: The mother is Unicorn Whip by Dirty Bird Genetics. The father is Charcuterie by Cannarado Genetics.
Effect: Unknown Mixed effect body and head high
Flavor: Some phenos are Skunky gassy fruity, some are fruity sour citrus with a chemical touch and a touch of skunk
Flowering: Estimated 8–10 weeks
Resistance: Strong — Testing phase done


Likes
4
Share

@BabyBilly
Follow
They are healthy and growing strong. Lowered EC slightly based on nutrient solution readings throughout week 4.

Likes
8
Share


@804GrowTent
Follow
3 clones from the diesels and 2 of the trop cherry. All have been Transplanted into new pots and rooted successfully and one of the cloned diesels I have on my new hydroponic set up. Trying to learn hydro for the future when I convert one or all of my tents 😉
2 gal reservoir bin filled with fresh decholrinated water.
Seperate 1gal container I mixed 18ml of canna vega (Yes I know this isn't the hydroponic version of nutrients they offer) with 6ml of photosynthesis plus.
I added this into the resevoir until i hit 600ppms and ph'd to 5.6 water temp was 21°C at time of feed and has risen and is constant at 21-22°C

Likes
14
Share


@Whiteybulger1814
Follow
As for what I've been doing for maintenance, I've been watching and waiting and just adding water when needed into the reservoir, should be less then 2 or 3 days by now


Likes
5
Share


@hi_bengal
Follow
Mephisto Creme de la chem Earthbox grow using buildasoil medium and amendments.
Soaked seeds in water for 18hrs and planted into earthbox. Light hanging at 24" 300 par reading. Keeping humidity between 60/80% Temps running between 75°84°

Likes
10
Share


@UrbanFog
Follow
Final week of flower for some and we will start the harvest. Also we flushed the plants at the start of the week. All the plants got flushed and will be given the final weeks as required. All looks good and frosty.
Lemon Z and Peyote Cookies look out of this world. Gorilla cookies look good but plenty of variation in phenos


Likes
3
Share


@fabialien
Follow
Después de qué las dos sherbet no se dieron, aprovechamos la llegada de un par de Gorilla auto BSF y procedimos a germinarlas. Asi van al dia de hoy! 8/07/2024


Likes
6
Share


@Croqueta_Humana
Follow
Semana 9, se esta haciendo largo
Inicialmente pensé que en máximo 8 semanas estaba pronta para pasar a flora, pero ya vamos por la 9 y quedan 2 semanas mas
La próxima semana estaré trasplantando a maceta de 18-20L, maceta ahora si definitiva
También hare una limpieza de bajos, preparare todo para cuando se recupere pasar a 12/12
Sigo regando con nutrientes de Vegetativo, agua de la canilla reposada por 24hs para evaporar el cloro, que tiene 0.35 de EC asi como sale
Regue con una EC de 1.68 y 5.9 de PH
Gran parte de la superficie ya esta cubierta, no seguire abriendo las ramas, solo dejare que crezcan de altura y terminare de completar el espacio antes de pasar a flora

