
Likes
Comments
Share


@Geili_Seili_fireinfireout
Follow
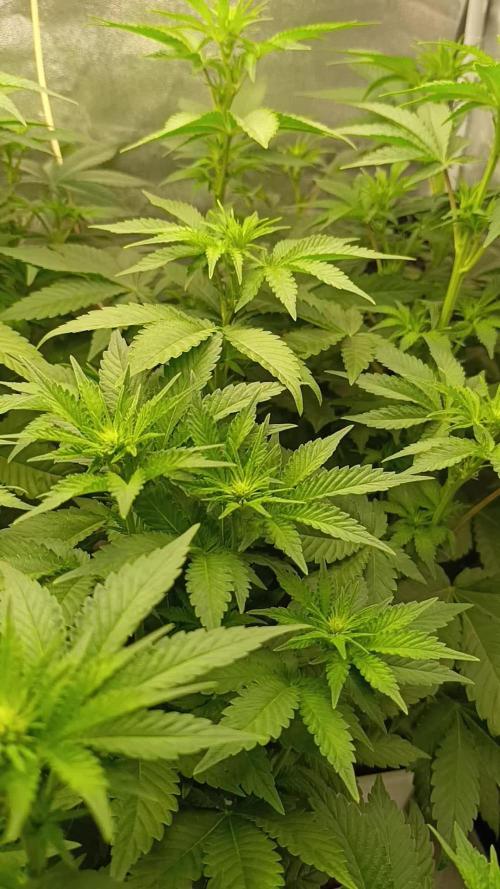
Hatte leider 5 tage massive hitze probleme mit viiiel zuwenig luftfeuchte. Aber 2 tage mit richtige werte und sie schlagen zurück. Alles weeder gut und jetzt schick ich sie lieber mal in den 12/12 modus. Da sie sehr zum spargeln neigen.
Freu mich schon auf die reise mit diesen schönen ladys👌😇
Die besten und saubersten clone gibts wie immer bei ROOTS-FARMS. best in austria and maybe in europe!💚👌🌱


Likes
29
Share


@Gilgamesh15
Follow
-Godetevi il video della presentazione del locale di coltivazione!!!!
-Problema calo PH in stabilizzazione.
-Continua problema di ingiallimento foglie a ventaglio!?!
-Mainlining e manifold in crescita.
-Il controller CO2 Evolution della Etechnics funziona male (fa svuotare la bombola).

Likes
1
Share


@CannaPalatina
Follow
Erster Grow, ohne Schnickschnack.
Den Growroom haben wir aus/in unserem Gästeklo gebaut. Heizung ist drin, Lüftung ist drin, alles gekachelt.
Wir haben einen Boden eingebaut, mit Pressspan-Platten auf einer billigen Holzkonstruktion.
Maße vom Gästeklo sind 90 x 110 cm.
First grow, no frills.
We built the grow room out of/in our guest toilet. Heating is in, ventilation is in, everything is tiled.
We installed a floor with chipboard on a cheap wooden construction.
The dimensions of the guest toilet are 90 x 110 cm.
Likes
17
Share


Likes
6
Share

@Nazgul420Hafoun
Follow
Ahoj všichni 😎
Holky kvetení zvládají ???
Tak za týden+- defoliace
Ať se daří vše 🍀

Processing
Likes
81
Share


@NugLife420
Follow
I received my Mars Hydro lights and they helped a lot. 2 TS-1000's. I supper cropped some of the 12/12 from seed and it looks like something trampled through the garden. Lol. The rest are really stretching now. I hope I the larger ones don't get rootbound. 🤞😁😁😁

Likes
13
Share


@Maryjane23
Follow
Ciao ragazzi!!!
Eccoci e finita la seconda settimana di fioritura le piante hanno smesso di fare lo stretching e hanno iniziato a formare i fiori.
come si vede nel video ho fatto la tecnica chiamata lollipop,ovvero defogliato ed eliminato tutto ciò che non si era ben formato o che non avrebbe preso abbastanza luce.
A livello di fertilizzante ho dato per 1.5 L di acqua
1.5ml di enzimi
2 ml di top bloom
ringrazio per la collaborazione viparspectra adesso è parecchio che utilizzo la loro lampada e devo dire che vedo i risultati. Ottima lampada led nel mio caso sto utilizzando Viparspectra XS2000 in uno spazio di coltura 100x100x200
this well-known brand offers different solutions look at the official website https://viparspectra.eu/
or Search for it on Amazon:
Amazon US: https://amzn.to/30xSTVq
Amazon Canada: https://amzn.to/38udUVe
Viparspectra UE: bit.ly/ViparspectraUE
Viparspectra USA: bit.ly/ViparspectraUS
continuate a seguirmi 💪
lasciate un like 👍
maryjane23😛

Likes
40
Share


@AumShanti
Follow
ॐ
ZOMBIE BRIDE & BRAIN CAKE from RIPPER SEEDS
1m x 1m x 2m tent, 480w led Spider Farmer, REMO NUTRIENTS
9th week of flowering
from 16.12. to 22.12.2024.
Big photo session this week and this week is prolonged for two days :)
Week of heavy flushing and darknessssss
at first they got last honey and water, then after they drinked that they got heavy flush in bathtub with ice cold water untill clear water was runoff,
they needed almost four days to drink that and to dry out, then they got ice cubes and i turned lights out and let them in darknes for three days.
Harvest is near, checking trichomes, they all are milky white with some orange tops,
buds are rock hard and smell of braincakes is so fruitiy and flowery while brides are next lvl smell :)))))))
Take care and much love :)
ॐ

Likes
4
Share

@The_Doctor_Green
Follow
Hola a todos!!
Esta semana he regado con fertilizantes (dia 52)
con 1 litro de agua y 1.5 ml de Top auto - top bloom -top candy
Ph 6.4 ec 600 y 1 litro solo de agua, manteniendo ambos valores de ec y ph respectivamente. Y al momento de drenar seguía alto el ph (7.8) y ec 980ppm.
El dia 55( ayer 07/10/25) volvi a regar pero no controle drenaje, regue con un ph más bajo 6.1 y ec 600ppm.
La planta esta bastante resinosa.😋😋😋.
En cuanto a su altura no creció más, solo se dedico a engordar los cogollos.

Likes
20
Share


@adam_pawloski87
Follow
We are in Flush !! Was giving them GH Flora series + rapid start + cal mag
Likes
39
Share


@J_diaz420
Follow
El día 27 de floración se vuelve a podar brotes bajos y se colocan tutores de varas 👍🍀

Likes
8
Share


@Kirsten
Follow
17.3.25:
I've starred a Hulkberry auto. This was the first pack of seeds I bought! I realised it was mostly sativa, but now I'm ready to give it a go!
Made my soil mix, which I will update next week. Planted the seed into an RQS seed starter plug. Mainly to keep the seed in place when watering.
Join my journey and hang out 🌱✌️
Likes
7
Share


@Genussmittel420
Follow
day 1 - transplanted her into the end pot now.
day 4 - i wanted to spray the soil before watering and i fucked up one leaf in the trigger system of the spray bottle :((((((((
day 5 - started LST training because in dont want to topp her and still stun her in height in the favor of the blue cheese and the trained critical
day 6 - i removed the leaf wich i fucked up so the light can give more energy to the very nice promoteable branches that are supported by the LST also
Likes
34
Share


@Bread_n_Buds
Follow
Our Rainbow Sherbet of course from Zamnesia like all my plants has been the territory of realization for an exceptional mainfolding.
After a topping that would seem very premature at the second internode (But that in autoflowering is also appropriate to delay flowering) I managed very well to make the lateral branches grow parallel to the ground. They form a T with the main stem that comes out of the ground a little. It seemed like it should be low, some joker even joked about it and instead it is becoming a nice little monster. It made the lateral branches start and all that then worked with a successful main lining on which I made the only mistake of leaving a little too much stuff at the bottom that I am cleaning up little by little as I understand that it will not see much light or will not produce satisfactory flowers.
The main stem that runs parallel to the ground is very beautiful to look at and is from the main lining manual.
The structure created with mainfoldindg, mainlining, topping and lst vari is very pleasant, the plant is at medium internodal distance and flowers quickly so it is a plant on which I would feel like recommending these techniques that it is true that they can slow down the harvests but they give a satisfaction to the sight and an unparalleled fun in making them.
We are still using soil, fertilizers and all the additives recommended by Plagron 100% organic. We are still in the early flowering program that maintains the same additives Power Roots, Sugar Royal, Pure Zym and adds the flowering stimulant Power Buds. Obviously the basic fertilizer is now Alga Bloom.
The Green Sensation hero of the late flowering will arrive and at the same time it will be time to remove power roots and a week later the enzymes. (The plant left to grow straight and straight ahead of time has been taking it for a while)
---- Decide on the right soil and calculate your fertilization schedule according to your soil on the official website.
-- www.plagron.com
Try a seed of this variety that drives us crazy..
---- https://www.zamnesia.io/en/11230-zamnesia-seeds-rainbow-sherbet-automatic.html
Zamnesia Description //A cross between Pink Guava, Sunset Sherbet and a hint of ruderalis, Rainbow Sherbet Auto offers a wide range of flavors, effects and more. This 70% indica-dominant strain reaches considerable THC levels (24%) and is suitable for both experienced growers and those taking their first steps in the world of cannabis cultivation.
All the best that mother nature has to offer is on ---- www.zamnesia.com

Likes
22
Share


@TechDCo
Follow
16/08/2024
Lights On!
Mid-day! Looking very colourfull!
17/08/2024
Lights On!
I think my 'plants' are turning gay as they mature! Being very colourfull!
Mid-day check: Took some photos of all the colours 😍 👌 📸
"Daydream; I feel asleep amongst the flowers for a couple of hours on such a beautiful day!" 🎶
18/08/2024
Lights On!
They're Sprouting new pistils!
Going to just judge harvest by what the trichcomes are saying because the buds are still growing! Might be able to push to week 10-
Night time before sleep check!
#Night time before sleep check video! video!
19/08/2024
Lights On!
All is swell!
I've inserted colour coding within all my diaries of/for prior events vier the title for predictions.
I planted On the 1st.
Pablo Pisasso X The Future X Monkey Slapz
The Future = Yellow/Green {Warning!)
Bubblegum GPP = Blue {Blue Lipz)
Monkey Slapz = Yellow {Yellow Fever) SlaPped with a diagnosis of proxy!
Red - Pablo Picasso = Red {Alert! Dangerous Art Show of Chemicals)
20/08/2024
Lights On! I can see some more colours coming through on Peyote Wifi CBD 2:1
Overall; the colours seem more vibrant this evening!
20/08/2024
Mid-day:
Early try cut; just over 1'ounce wet.
"Mind I have been smoking the leaves and the very very early buds underneath, I kept a few branches I could nibble at as I wait! Smoking leaves and very early buds, doesn't get you stoned in that way! But it's very spacey feeling with no buzz! Defdo gets rid of anxiety smoking the leaves alone! FHC is one of my best I've grown in euphoric-wise highs".
21/08/2024
Lights On!
PB is sprouting new pistils and still phattening up! I've dimmed light to 333watts21/08/2024
Lights On!
PB is sprouting new pistils and still phattening up! I've dimmed light to 333watts for the last two weeks; unless they ask and show they csn handle more! They need a rest to mature a little!
21/08/2024
Lights Off!
You can Zoom right into the trichcomes and see that they're all mostly cloudly and clear! 75%25% - I would like about 15-20% Amber
23/08/2024
Lights On!
23/08/2024
Some little FHC early nugs to try! Very colourfull!
23/08/2024
Little early nugs to try!


Likes
3
Share


@BruWeed
Follow
Se secó bastante rápido. En 5 dias. Y metí todo en un frasco grande para que empiecen a curarse. Todo perfecto.

Likes
15
Share


@the_big_pink_place
Follow
01/17/22 Everything's starting to grow again from the LST and defoliation at the end of this week flipping to flower. Tested run off last watering it was 2250ppm, did straight water this watering. *Note plant 4 has had hiccups from the start when it popped out of its seed it's tap root was curled I fixed it with tweezers by pulling the skin off and then placed it into the Coco, it shows the most stress out of the 4 plants and does not respond well to anything I do to it, even with 2250 ppm runoff it's still showing signs of a nitrogen dificiency PH in run off at 6.0 so not sure why it's so finicky . It did get the worse light burn out of the 4 , me being a novice at this I'm not sure if early stress ruins the rest of the grow but I'm starting to think it does from past grows and this one. 01/23/22 Just watered plants , the lockout has been fixed that one plants not eating as much as the other three and due to future harvests suggested mixing was way to high 1200-1300 ppm I had to mix by there measurements then weaken it with water till I reached 800ppm. Thank you everyone who post info for me.


