
Likes
Comments
Share


@Unkraut
Follow
i accidently bought some unbuffered coco and mixed it with my ussual earth, had major calmag problems in mid-flower but i´m still pleased with the results...also had a little trouble with mold at the end due to bad weather and high humidity in the final weeks of the grow, had to remove a few buds and harvest early @ day 55 of flower....but there's still alot of great looking buds left for me to enjoy and all look mostly done...
Just harvested and hung them upside down, currently drying them at constant 19.5-20.5°C and 50-60% RH..will update as soon as they are dry

Likes
44
Share


@The_Good_Twin
Follow
25 Sep 2021
Today I’m starting Week 12 of this grow, and I couldn’t be happier. My 3 Ladies are looking great!
I’m not seeing any negative signs that they’re not loving the increased nutrients. 👍🏻 so far, so good. I’ve moved up to step 7 of my 6 - part Flora Trio feed chart. It doesn’t change anything, so I figured I might as well. They will be getting the same amount they received the last feeding.
They received: CALiMAGic 2ml, FloraMicro 3.8ml, FloraGro 3.8ml, FloraBloom 4.2ml, Floralicious Plus 2ml, and Liquid KoolBloom 1ml.
The initial pH of all 3 gallons was 6.2. I added 2.2ml of pH UP to each gallon which adjusted the pH to 6.7 in all 3 gallons. The runoff ph was different for each (of course). C1 was 5.8, C2 was 6.0, and C3 was 5.7. 🤷♂️ Everything is going great, so…… If it isn’t broken, don’t fix it.
I read an article about “popcorn buds” yesterday, and the importance of pruning them to get the main colas to fatten up better. I figured I’d give it a try, why not. Most of the popcorn buds go into the trim bag anyway, so why not, what do I have to lose? Hopefully not my perfectly healthy plants!
The worry is hurting the plants more than helping them. I trimmed all of the small, lower branches off, as well as many of the smaller branches in the middle that don’t really receive any direct light. The stack was quite big once I was finished. You can see it on the video log I uploaded today.
The temperature in the grow tent today was 84F, with humidity at 54%.
I have the best of hope for a wonderful grow, but I just hope that they respond well to all of the trimming I’ve done today. We’ll have to just wait and see.
Happy growing Growmies!
28 Sep 2021
What’s up Growmies! I have good news…. My plants are still alive and doing well! I was a little nervous after the last feeding and pruning session, but my babies are doing quite well.
The last three days have shown an absolute explosion in pistil development all over all 3 plants! Some of the nodes are showing white and pink pistils, and their growth is lovely. They seem to be responding well to the full nutrient levels, but there are some mild signs of nutrient burn, but only on a few leaves. Most of the plants are still looking marvelous. I’m very happy with how they’re growing and to how they have responded to my trimming 3 days ago.
I haven’t changed anything in their feeding from last time, so I’m just going to list it out here for you all to see. They each received the same amount in their own gallon of water. Each plant took the whole gallon, and the runoff was as expected.
Each plant received: CALiMAGic 2ml, FloraMicro 3.8ml, FloraGro 3.8ml, FloraBloom 4.2ml, Floralicious Plus 2ml, and Liquid KoolBloom 1ml.
The initial pH for all 3 was: 6.2, so I added 2.2ml’s of pH UP to each gallon which adjusted the pH to 6.7 for all 3 as well. My new TDS meter will be here Friday, so all I have for the runoff is the pH. C1 was 5.8, C2 was 6.0, and C3 was 5.6.
I’m going to stop fretting over the runoff pH because it really doesn’t seem to matter a whole lot. However, I’ll still keep track of it nonetheless.
The temperature in the tent today was 84F, and the humidity was 48%. See you in a couple days. Happy growing!
01 Oct 2021
Today I finally received my new TDS meter, and it stopped working after the first use! I was like, “Damn! WTF!!” For real, no bullshit. It sucks.
Anyway; I just felt like sharing my woes with you all. Most likely it’s just me typing to myself.
Today my lovely ladies got the same that they’ve been getting for the past couple weeks. CALiMAGic 2ml, FloraMicro 3.8ml, FloraGro 3.8ml, FloraBloom 4.2ml, Floralicious Plus 2ml, and Liquid KoolBloom 1ml.
The initial pH of all 3 was 6.2. I added 2.2ml’s of pH UP to each gallon which adjusted the pH to 6.7 for all 3. The one time my new TDS meter worked, the TDS of C1 was 711 ppm. It stopped working after that.
The runoff pH was C1 - 5.8, C2 - 6.1, and C3 - 5.7. The temperature in the tent was 84F, and humidity was 47%.
My girls are looking wonderful, but there is some nutrient burn as I mentioned the other day. It hasn’t increased, which is good, but some of the larger fan leaves look like they’re losing a little color. The pistils all over the buds are growing even more, and the light pink hairs are now becoming numerous. They’re very pretty and look healthy.
I’m smoking their Mother right now, which gives me happy thoughts for a wonderful harvest of her children soon to come. 😍🤞
I moved them all out of the tent briefly today for some cleanup and repositioning. They look good standing alone as much as when they’re together. I moved the fans around to give them more space and to improve ventilation and light distribution.
I also did some LST on C1 and C2. I tied some of their longer, yet lower branches up to make them look up to the light instead of being toward the side. 🤷♂️ we’ll see if it makes a difference or not. Today is the last day of week 12. See you in 13.
Take care, and happy growing.

Likes
16
Share


@Kirsten
Follow
Ok so I asked about harvest to you wonderful folks, and decided to chop. I've left PPP3 as she isn't quite at the same stage as the other 2 yet.
So I used the old microwave drying trick. I remembered to put it in for 1 minute on a piece of kitchen towel- Please do NOT do this! It caught the paper and weed on fire and I had to put it out in the sink. (It was only in there for about 15 seconds).
I tried again using a couple seconds at a time. It worked out that time.
I smoked some up, and it's very nice. Tastes peppery and exotic. Smells divine like dank usually does.
7.3.25:
Buds we're ready to trim, I think slightly too dry. Could have done it yesterday, probably.
Weight dry with stems was 1 and 7/8 of an ounce. I'm putting it in my mason jar

Likes
7
Share


@Baboon_Grows
Follow
Apart refilling the reservoir more frequently, it’s the same as usual some tea
Likes
3
Share


@CalGonJim
Follow
7/13 5am MONDAY She sprouted in 3 days!!
7/14 12:03AM Rosetta Stone is vegging now. Rosetta 78 has not sprouted because I forgot to plant that one. Im the best at this.
7/16 3:20 AM Navin Johnson theme song night 1PM Mycorrhizae — Yes, add it now while they’re still young and before nutes ramp up. It’ll help the surviving plants build resilience without adding much (if any) burn risk. Mix it gently into a low-EC or plain pH’d water feed and apply carefully.
7/16, 11:26 PM. I found some super slow motion Christmas music. It’s kind of freaking me out so I’m gonna keep it on.


Likes
Comments
Share


@Mnterpteam
Follow
She stretched a little bit more in the last week, everything very healthy.
Likes
307
Share


@Ju_Bps
Follow
Hello growmies 👩🌾👨🌾🌲🌲,
👋 Hedgehogs coming along, start to have some burning spot, don't know if come from nutes or lamp, so only water for the moment.
💪 Just let Grow for the moment, will do a big defoliation in the next weeks.
💧 Give water each 2/3 day
2 l Water Only
PH @6
💡Mars Hydro - FC 3000
50% 30 cm
Mars Hydro Fan kit
Setting 8
Have a good week and see you next week 👋
Thanks community for follow, likes, comments, always a pleasure 👩🌾👨🌾❤️🌲
Mars Hydro - Smart FC3000 300W Samsung LM301B LED Grow Light💡💡
https://www.mars-hydro.com/fc-3000-samsung-lm301b-led-grow-light
Mars Hydro - 6 Inch Inline Fan And Carbon Filter Combo With Thermostat Controller 💨💨
https://www.mars-hydro.com/6-inch-inline-duct-fan-and-carbon-filter-combo-with-thermostat-controller
Anesia Seeds - High Mars 36% THC🌲🌲
https://anesiaseeds.com/product/high-mars/

Likes
6
Share
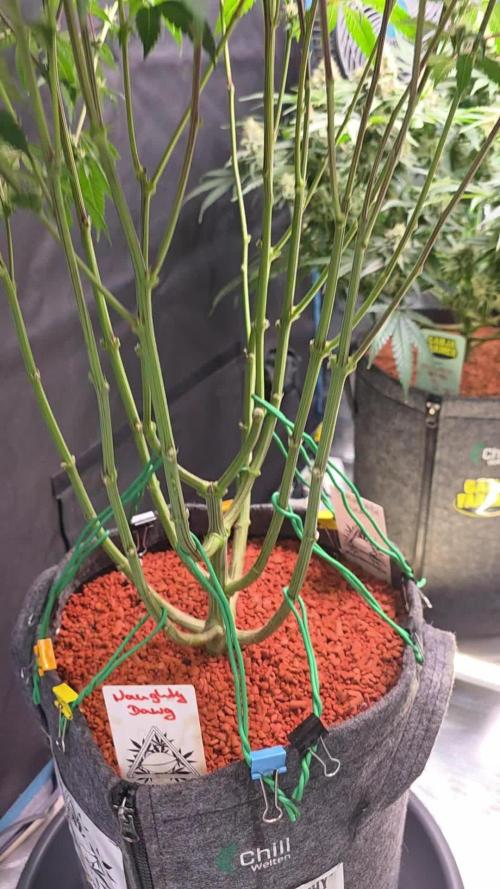

@SecretHerb-Sanctuary
Follow
In dieser Phase gewinnt die Naughty Dawg massiv an Charakter, und die Ausbildung der Fruchtstände rückt nun endgültig in den Mittelpunkt. Ergänzend habe ich für diesen Zeitraum das Zeitraffer-Video des vorangegangenen Stretches beigefügt, auch wenn die Aufnahmen eigentlich nur zufällig beim Filmen einer anderen Lady entstanden sind. Die Pflanze hat inzwischen eine beeindruckende Statur erreicht und fokussiert ihre gesamte Energie sichtbar auf die florale Reife. Die Buds schwellen deutlich an und präsentieren ein kräftiges Smaragdgrün, das von einer zunehmenden Harzbildung begleitet wird. Trotz der vorangegangenen Entlaubung im unteren Bereich zeigt sich das Blattwerk obenrum extrem kräftig und gut versorgt. Die Entwicklung der Blütenstände verläuft absolut planmäßig, und die ersten Trichome beginnen, die Kelchblätter zu überziehen, was den Beginn der intensiven Harzphase markiert
Likes
19
Share


@Groovykenni
Follow
end of week 3 flower so far it’s stacking nicely packing on some trichomes still keeping a very close eye on these gals but so far so good hope it stay that way🌹🌹🌹


Likes
19
Share


@Mazgoth
Follow
If you are going to try this beauty for 2 weeks dont give her 0 nut because you are gonna have 100% nut burn,dont even use root juice or whatever nut you have for early stage but just water,she dont need anything special to grow bigger and bigger just good conditions and right food and you will se the magic to happen,give her more space than i gave because in my situation the roots got on the top and she needed more space BUT she didn't disappoint me😍

Likes
6
Share


@ForbiddenBotanist
Follow
No watering today, soil still a little to moist for my liking. Will probably water with fert when I do though. Raised the netting and rotated the pot so i can continue my SCoG.
thats all for this week.
Any info or tips always appreciated
-
Likes
15
Share


@masterofsmeagol
Follow
8/3 Went over to treat the 10th planet that needed water with plant doctor around 10:30. I was in the garden at 6 but didn't have much time. That plant seems to be curled up or "droopy". It DID need water. I defoliated a few sep leaves off it but I didn't see any today. I guess I don't ever really see the leaves "up" or praying like I do with the rest of tge plants. It's starting to flower like the rest though. Today is the day everything is supposed to get its second or third plant doctor dose but I decided to wait until they need the water. I don't think 24hrs will mean much. I've been staying on top of defoliation but I'm seeing some pillar damage. I'd like to spray bt but what my buddy said about spraying with septoria is still in my head. Maybe I can use citric acid. That way it won't "wash away" spores it will just eat them. At least I think. And I hope lol. Birds get most of the pillars but I hand pick some too. I need to pick up nutes. Wondering if I should just get grow big again. I don't use much but plants are switching to flower and leaves are fading. I have big bloom and kool bloom bit neither have nitrogen. I still need some sort of nitrogen. Especially since that could be a deficiency. Not sure if it's the transition or a condition with the sep. I see some interior small leaves bleeding out and some dying. I'm wondering if what I thought was earwig damage years prior was really a combo of sep and they just ate the evidence. I'm super grateful though. I've got some resilient girls and they're doing well. The special kush in flower is gorgeous as well. Looks like I'll have an early plant. Short flowering time on this strain. Smells pungent.


Likes
93
Share


@Ferenc
Follow
Plants started growing very fast. 20 hours light a day and 140 ml water for 2 plants so 35 ml each plant. (70ml -35ml one plant- morning, and 70ml -35ml one plant evening). From Monday I will start giving 200ml water 100ml in the morning and then the rest in the evening. Ventilation almost 24 hours, They are getting bushy and the color looks healthy green. I am excited. Purple Punch ( the right one) does not have the smell but the Gelato Cookie D'ohpe started smelling from the 3rd week, it is not strong, it is smooth, enjoyable. I still use trigger spray but I stopped triggering directly on the plant to avoid any fungee or toxicity, I just keep the soil moist. I surrounded them with kitchen foil around the lamp to have a more effective light. It reflects the light and the light goes everywhere. This step has been done because I have only the 60w LED each plant so I try to provide the maximum strength this way, and by keeping close distance also. The lamp is not hot so it ain't gonna burn the plant I had checked it before. I just purchased today a 600w LED because these plants look so good so I wanna provide the best circumstances for them. 4th-week 4th day I a just waiting for my delivery my 600 W grow LED light will come. From today I started watering with 50ml each plant 2 times a day so all together 200ml a day. Plus I always use trigger spray for the soil to be kept wet. They are looking better and better. Nice color and bushy appearance. Wonderful. I realized some holes on the Gelato Cookie D'ohpe's leaf but there is no insect I was checking. I do not really know the reason for that. Tonight I will set up the new 600 W LED so I am changing the current 120W. Big Step forward! It is not that easy that I thought, the lamp is great but the temperature raised up a lot, so needed to buy a fan also and the humidity went down. It is not easy to find the proper solution to be acceptable, good temperature and humidity at the same time. So I decided to program a 6/2 schedule, so 6 hours light on and the fan always with 15 min more, and 2 hours off so I do provide 18 hours light and 6 hours darkness but it is divided. The plants can rest after every six hours and use the energy they received. Last day of the 4th week, LST has been done with the Gelato Cookie D'ohpe, both are growing rapidly, let's see what the 5th week brings! End of he week Gelato Cookie D'ohpe is 25cm, Purple Punch is 20cm😇

Likes
28
Share


@Esoteric_growing
Follow
Decided to tie these down rather than the plan to totally fill the scrog net. Reason is i plan on growing some new genetics as I have grown this strain about 6-7 times, as good as it is it’s time for a change.
Planning on running a symbiotic genetics cut of mimosa and some strains from Arctic Genetics


Likes
1
Share


@High_Grade_Dadli
Follow
Was trying to wait until the full moon to harvest but the moon was coming up with water so had to change that plan n guess what harvest this morning pour rain by the afternoon
Likes
8
Share


@Eyesweedshot
Follow
growth is continuing well. I should have packed the substrate a little more. a slight deficiency in mag appeared on 2 subjects that I corrected by spraying neem oil with calmag as well as spraying 0.5ml with liter calmag.
I received the new uv and infrared auxiliary lighting from marshydro that I installed on the rake. I think it's still cheap in terms of wiring and driver.
Finally, I plan to implement an lst this weekend.
thank you all I take all your eminent and less eminent advice;)
Likes
8
Share


@SEGA_Y_Griega
Follow
Genetics: O.G. Kush x Afghani
Yield: 300 – 400 g/m2 (600 W)
Flowering time: 8-9 weeks
Height: 100 cm
THC - Very very high
equipment used:
awning - Mars Hydro 4✖️4
light - Mars Hydro FC E 4800
fan - Secret Jardin 20w monkey fan
ventilation - Soler&Palau TD-350 Silent with temperature and humidity sensor
I am satisfied with the growth and development, the only negative is that it is impossible to keep the necessary humidity and temperature at the same time as the heater is on.


