
Likes
Comments
Share


@Lazuli
Follow
This plant is so easy to grow and train damn look at the frost already 🍏🍏🍹👍🏻

Likes
35
Share


@Pot_Portraits
Follow
More cleaning and also starting to stretch the plant out more to make room for the tops.
I started adding Green Sensation as well.

Likes
6
Share


@mk420
Follow
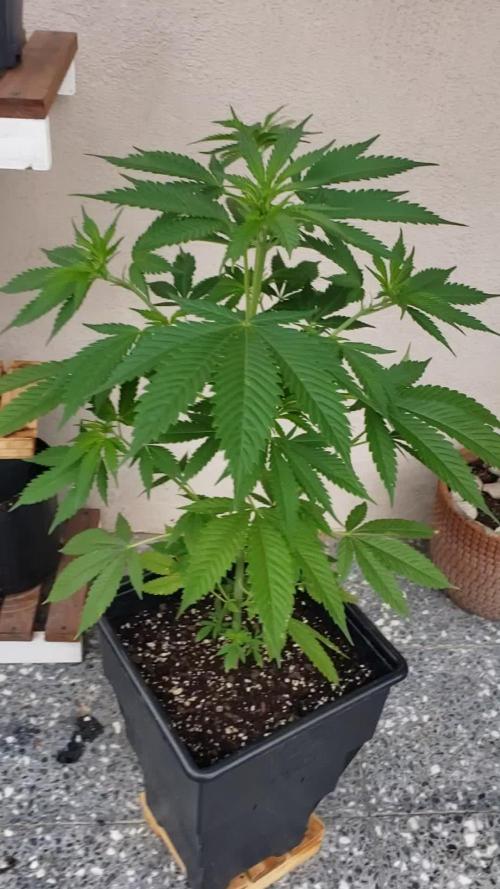
35 days after planting seed.
Plants have bushed out quite a lot more this week and gained some height.
I don't think it is flowering yet, but I expect them to begin soon.
Temps problem has come back the last couple of days I have struggled to get it over 15c.
Plants appear to be healthy apart from what looks like nute burn on a few leaves. Decided to cut back on the rhizotonic this week, will probably cut it out altogether next week.
A few changes to the set up this week, changed light from Meizhi "450w" to a Meizhi "900w" and put turned my autopot system on.
I have noticed there are lots of lower branches developing underneath but are not able to get much light as are under a dense upper canopy of large leaves. would I benefit from any sort of cropping?

Likes
3
Share


@Downunder90
Follow
🌿 Yo, Have You Seen This Grow? Gorilla Cookies FF by Fast Buds Is Looking Fire! 🔥
Man… Gorilla Cookies FF is lookin' like it’s about to go off. You ever smoke Gorilla Cookies? It’s like a sweet punch in the face — in the best way possible.
So check this — it's not your regular autoflower. This one’s Fast Flowering — a photoperiod strain that flips quick. 7 weeks of bloom and boom, you’re lookin' at frosty nugs with that dank cookie-diesel funk. Straight Fast Buds magic.
Genetics That Slap
This strain's a mashup of two absolute legends:
Gorilla Glue × Girl Scout Cookies
That means crazy resin production, chunky buds, and that earthy-sweet-gassy flavor combo that hits different. Like, we’re talking up to 29% THC. Yeah. That strong.
🌱 The Grow So Far (Weeks 1–3)
Organic soil in a 15L pot
300W HID light on 25% power
Perfect temps (23–25 °C) & humidity (~65%)
Bio feeding with Green House nutrients
Already transplanted — and she’s stretchin’ up nice
I checked the pics — she’s still a baby, but those leaves are lush. That deep green, wide fan leaf vibe… no signs of stress, no stretch too early. You can feel the potential just lookin’ at her.
📸 First Glance = Big Promise
Honestly, this one’s got that look. You know the look — when a plant’s just ready to explode into a frosty jungle. I’m tellin’ ya, if she keeps goin’ like this, we’re lookin’ at a full-on terp storm in a few weeks.


Likes
25
Share


@DrGanj
Follow
Started flush now. I'm adding Nature Delight Active Sugar Boost as it's been recommended to boost terpene production. No idea if it will work this late into flower but trying anyway as apparently it has no need to be flushed and is fully organic.
Likes
28
Share


@Felloffthegrid420
Follow
All 7 loooking happy gave one to a friend there all is there forever home this Gorilla grow going be light thank I’m house y’all doing he men killing it

Likes
44
Share


@RakonGrow
Follow
Note : jegliches Zubehör wird in der GermniationsWoche aufgelistet .
Day 29:
+ PPFD 550 * 20h = DLI 39.6
+ Flaschenwasser mit Canna-Boost 1.5Liter
Die war komplett Trocken ... kaum zu glauben lol
Day 30:
Sie alles recht normal aus . Es entfaltet sich noch .
Day 31:
+ Flaschenwasse 2L EC 0.26 PH 7.3
+ + mit Dünger EC 0.7 PH 5.7
+ Drain 0.25L mit EC 0.9 PH 6.8
Fazit : ich übe noch mit dem Dünger und dem "zuviel" an Urgesteinsmehl :))
Day 32:
Das Wetter ist eine Katastrophe . Draussen ist es 21°C mit 90%rH . Hier drinnen sind es im Zelt 26°C und 67%. Im GrowRoom ,also praktisch meine 1 Zimmer Wohnung mit 2x2m Niesche hat so 25.5°C und 60%rH. Luftentfeuchter läuft , sonst geht hier gar nichts, aber der produziert Abwärme .
Will ich nun kalte Luft von draussen wirds hier mit 77%rH geantwortet aber die Temperaturen gehen runter :)) Lass ich es bleiben und entfeuchte , ich habe eine undichte Hütte was die Luftfeuchtigkeit betrifft , dann steigt die Wärme wieder . ES IST EIN TEUFELSKREIS :)) Aber wie gut das ich weiss das auch die ganzen CSC's und auch die Profis ihre liebe mühe haben die Temp und Luftfeuchtigkeit zu regeln . Und nein , ich werde mir keine Klimanalage einauen die beides regeln kann. Ich wollte nicht ewig viel Geld für das Gras ausgeben :))
Also liebe Brüder und Schwester des gepflegten Ganja komsumes und Produzenten , wir sitzen alle im selben Boot . Und jeder versucht der beste Kaptain zu werden :))
P.S. ich weiss, ein neues Bott wäre gut :) Aber dadurch ändert sich nicht das Meer :))
Day 33 :
Das Spiderfarmer Zelt 70x70x140x200cm ist fertig und Einsatzbereit . Meine kleinen Zwerge ziehen um . Im großen Zelt läßt sich die Luftfeuchtigkeit und Temperatur besser regeln. Klingt komisch , ist es auch :)) Aber Ihr müsst auch nicht in denkbar schlechtester Bausubstanz leben und gärtnern :))
Day 34 :
+ Flaschenwasse 2L EC 0.26 PH 7.3
+ + mit Dünger (Terra Vega 3.8ml/l , Rhizotonic 2.0ml/l , Boost 2.0ml/l , CannaZym 2.5ml/l ) = EC 0.7 PH 6.5
+ + Final PH 6.1
Nach einigen Problemen mit der Abluft und der Umluft und die Luftfeuchtigkeit , versuchen die Zwerge sich jetzt im neuem Zelt zu aklimatisieren . Ich drück die Daumen .
Day 35:
Die Düngung war genau richtig . Meine Luftfeuchtigkeit geht auch . Temperaturen sind etwas hoch . Aber Sie entfaltet sich . Videos gibts heute Nacht.
P.S. Da ich mal wieder zu schusselig bin eine Zeitschaltuhr und das Sanlight DIM System richtig zu nutzen , haben wir ein paar Lichtaussetzer gehabt , somit sind nicht an allen Tagen 20h Licht . In der nächsten Woche kommen 18h * PPFD 750 + 1h sonnenaufgang und + sonnenuntergang wird zu DLI 46.29 was etwas über das Limit von 45.00 geht . Schauen wir was passieren wird :))


Likes
19
Share


@CommanderCannabis
Follow
Started 12/12 light cycle. Normal week. watering up to 1.5 L a day. co2 PPM @ 1250. Defoliated due to massive growth and to bring light to the tops.

Likes
14
Share


@oxieg3ngrows
Follow
She was defoliated on 10/21 and is going super hard into the stacking phase. The smell is of straight up chemicals and black pepper. Those giant colas are as big around as a soda can and rock hard. I will definitely have to take them apart to dry them without risking mold.

Likes
346
Share


@Canna96
Follow
This week went pretty well, other than she stretched like crazy and I am now getting worried about running out of vertical space. I also had a few of my bottom leaves get a few brown and yellow spots on them. I did post some pics and asked a question, thank you for the responses, much appreciated! I am thinking about adding my Spyder Farmer LED 100 Watt light into the tent for the nebula auto because it is about 23 inches shorter than the sour diesel. I believe it would only raise my temp about 2 degrees, and possibly lower the humidity by one or two percent. I must say my dehumidifier has been a freaking stud, running 24X7 and not complaining. I should look into adding another unit, it has been in the mid 90's and muggy for about a week. So far I have to say I am super impressed and excited with this setup, the genetics, and with growing this wonderful plant in general. Already planning ahead to my next grow, and what I can do better. I have been enjoying myself and I really appreciate everyone who has taken the time to answer my questions! I am having a blast and am excited to see what this lady will give up in a few weeks!

Likes
10
Share


@sunshinegroww
Follow
Here we go in partnership with Zamnesia and Plagron so far good start ,dont have time to enter the competition so im thinking i will mainline this one

Likes
4
Share


@kilton_420
Follow
la chaleur a affecté les plantes, j'ai eu des apparitions de carence notable
Likes
43
Share


@OutForReal
Follow
Day 10 - I gave her a new 13L pot with garden strore soil : NPK 4-4-4. Add 2grams of Bat guano into the soil
Day 11 - She's doing well so far.

Likes
33
Share


@GreenAutoConsumo
Follow
Como ya he dicho, siempre ofrece resultados increíbles, la he cultivado tanto en interior como en exterior y siempre sale increíble


Likes
109
Share


@ButtersStotch
Follow
-Decided to move the girls around, they were missing out on some AM sun and were blocking each other from direct sunlight. Thank god I had help because they were heavy!
-Really had to tie them up as a ton of the branches started to break at the main stem as they were just getting too heavy.
- BC2, and both WWs have visibly started to flower. Both Blue Cookies show very different phenos 1.
-After a 1 week flush I started transitioning to flowering nutes, will go full strength next week.
-Got rid of 1 caterpillar and put down some ant traps, the biggest pest is the planthoppers, I try and kill everyone I can see, but they keep coming back, there’s not a ton but they’re persistent.
-Excited to see the weight these girls can pack on. This is my 2nd grow ever and 1st outside so I’m learning a lot!
-Thanks for all the help and encouragment!

Likes
Comments
Share

@The_Doctor_Green
Follow
Hola a todos!! Esta semana he trasplantado a esta hermosa planta , la he pasado de una maceta de 3litros a una de 10 litros.
He regado con un poco de top veg, y el resto solo agua😊.
He notado en algunas ramas algunos pelitos blancos, que me hacen tener la ilusión de que es una planta hembra.😊💪🙌
Likes
48
Share


@Regenwurm
Follow
Klima durchweg sehr gut. Aufgrund von dem Umtopfen nur 2 mal reines Regenwasser und 1 mal Zusätze von Green Buzz. Den Ladies geht es auch ohne Dünger in dieser Phase hervorragend. Den Haupstamm HST um die Seitenteilen zu puschen. Lichtstärke auf 35 % erhöht bei gleichem Abstand von rd. 40 cm. Heute Licht auf 40 % erhöht.
Ventilator im Zelt umgebaut um mehr Fläche zu generieren. In den nächsten Tagen wird das erste mal etwas grober entlaubt.


Likes
Comments
Share
@TheCalyxLaboratory
Follow
Karel's Herer Haze - Flower Update 🌿
It’s been a highly productive week in the tent! We’ve made some major moves, and the remaining canopy is looking absolutely fantastic.
📊 Current Stats:
EC: 1.8 💧
pH: 5.8
Light (PPFD): 800 ☀️
✂️ The Boys Are Gone
Mission accomplished! After successfully harvesting the pollen we needed, the male plants have officially been removed from the tent. This frees up all the space, airflow, and resources for the rest of the run.
🌸 The Ladies Take Over
Now that the males are out of the way, the female plants are really stepping into the spotlight. They are doing exceptionally well, looking super healthy, and finally showing what they are truly made of. The bud sites are developing beautifully under the 800 PPFD, and they are loving the current EC and pH levels.
Really excited to see how these ladies swell up and pack on the frost in the coming weeks! 🔥✨
