
Likes
Comments
Share


Likes
11
Share

@TheBulldozerSicily
Follow
Eccoci arrivati a fine ciclo, raccoglierò dopo le ultime foto fatte la mattina

Likes
5
Share


@TheFlowerMan
Follow
So, the fourth week has come to an end. The girls are slowly blossoming. Pineapple had some problems with watering and nitrogen deficiency, if I'm not mistaken. I hope everything will be fine 😋


Likes
37
Share


@Roberts
Follow
It was a interesting grow I had Spider mites in flowering. I treated with lady bugs. Seemed to do the trick. All my other autos got hplvd. This likely had it too at end with close proximity to them. She made it. Great looking plant, and smell. Thank you Mars Hydro. DO NOT BUY AMS. The owner is a convicted criminal, and he stole 550 dollars from me. It's not worth it.
Thank you grow diaries community for the 👇likes👇, follows, comments, and subscriptions on my YouTube channel👇. ❄️🌱🍻
Happy Growing 🌱🌱🌱
https://youtube.com/channelUCAHN7YRZWLPCARHHMIQ7X4G

Likes
17
Share


@420DeepGrow
Follow
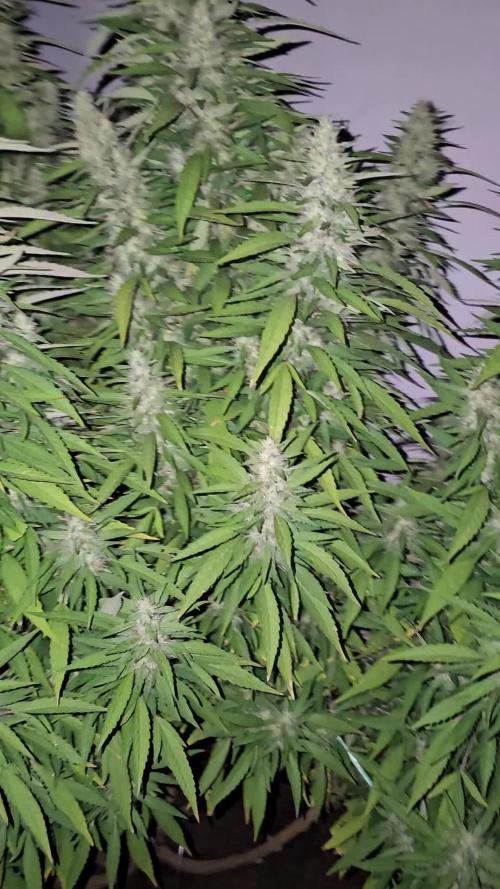
📆 Semana 6
Blue Zushi está mostrando su lado más exótico esta semana.
Los cogollos han comenzado a compactarse con fuerza y se nota una producción de resina que va en aumento. Visualmente, empieza a asomar ese tono azulado que tanto llama la atención en esta genética, sobre todo en las puntas más expuestas a la luz.
A nivel nutricional, sigo con la base de XpertNutrients y ya se nota el empuje adicional de Sticky Fingers, que está potenciando claramente la formación de tricomas y dando un pequeño salto en la intensidad del aroma, que empieza a volverse más dulce y fresco.
Los Adlite están funcionando a la perfección: gracias a su uniformidad, incluso las ramas laterales están sacando cogollos densos y con buena pinta.
Temperaturas estables entre 22 y 25 °C y humedad en torno al 55%, controlada con buena ventilación para evitar condensaciones y problemas en la fase más delicada.
En cuanto a olores, empieza a destacar ese perfil afrutado y ácido con fondo kush, muy característico de la Blue Zushi. Los tricomas están en su mayoría lechosos, por lo que aún queda recorrido antes de pensar en cosecha.
Una planta vistosa y con mucha clase.
¡Seguimos creciendo fuerte! 💪

Likes
2
Share


Likes
Comments
Share


Likes
8
Share


@Eluri
Follow
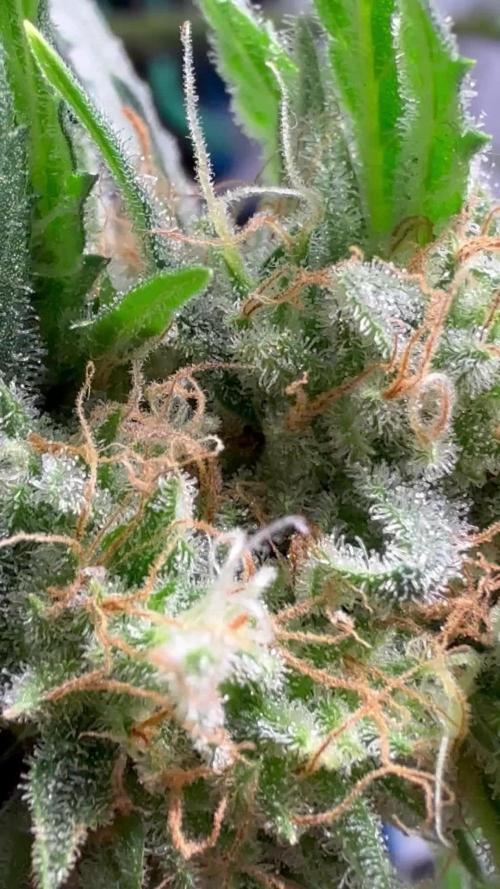
Harvest is coming and the plant is fully ready to it. Trichomes are cloudy and the buds are big and dense. The last 48 hours, plant will be in darkness to rise the number of terpenes and improve smell and flavour and I will not water it anymore. I cutted off the bigger leaves in order to make the plant know that only last hour left. I'm really proud of her and this was a really nice experience. I will repeat it someday, be sure about that.

Likes
Comments
Share

@StayMedicated
Follow
Week 7 flower, about to flush bm 2 as I feel it’s time.. bm 3 and 1 need longer.
All 3 smell and look mad different.
My bad for the shaking will turn the fans off for next vids lol
More pics soon..
Likes
13
Share


@Dunk_Junk
Follow
She grew another 10cm this week!!!
Slow and steady!
Looks like she is making some nice dense flowers, but we'll see in a few more weeks.
I note she is very bushy for an auto. Very similar to an Auto Purple Kouskush I grew a few months back! 💪


Likes
6
Share


@Gromie
Follow
Started the new nutes a few days ago w/ epsom salt. Before that, for a day & a half, I used plain pH'ed water & trimmed off affected leaves. Such a slow grow 😕

Likes
21
Share


@TheStrainAlchemist
Follow
Impressive guys, is outstanding the root growth, this little pot of 1,5L only lasted 3 days, was already root bound and I had to moved them to the final pot, as you can see I left quite a lot of space for the future top dressing.
She looks slightly smaller then the wedding cake even if she started bigger and stronger but the early topping slow down her a lot. She’ll recovery I am sure.
Enjoy fellow growers. ♥️☮️

Likes
105
Share


@WhiteWidow
Follow
I provided you with a close up video of each plant and one video where i go through tent and try to focus some nice buds individually.
Royal jack is the tallest plant in garden and the smell is amazing, sweet, very familiar to me but i dont remember from where haha..
Yesterday i did massive defoliation as there were too much leaves, never seen a plant with tht much leaves, i even removed those with some.crystals to their surface, thats how pissed i was :D
Everything is going well, i will start flushing her soon..


Likes
12
Share


@AtomicOrgy
Follow
All went well this week, apart from my phmeter breaking...
I guess more two weeks of waiting.
The colas are well developed, but the lower flowers ain't. But both are full of tricomes.
Likes
10
Share


@GreenTHC
Follow
Day 62, harvest day. I will update after the drying and curing process. Wish I could've let them go a little longer but had to harvest slightly early. For my first attempt I'm happy with how the ladies turned out! Nice gassy smell, big sticky dense buds, great colours and 81g altogether wet trimmed. Lost one due to growers error but I've learnt a lot for next run. I will be growing one Auto Chem OG along side one Auto NL x BB from Oasis Genetics. Have a great day and happy toking! 🍃💨

Likes
3
Share

@KannaGrowing
Follow
Esta será la última semana donde incorporamos Bio Vega a la dieta de alimentación.
La potencia de las luminarias al 75% y regamos cada tres días aproximadamente alternando entre fertilizante y agua.

Likes
32
Share


@Arcadium
Follow
Had a ton of rain and wind this week, she handled it like a champ, much needed for everything, short lived though. Back to hot and Sunny for at least the next 2 weeks. Flowering is sloooowly coming along, feels like a lot longer this year, or I'm just impatient. 70/30 top dress of Gaia Green PB to AP this week, not sure how much she needs it. Some very minor ant activity after all the rain washed away the DE, reapplied light application.
Haven't been doing any trimming or defoliating this week, barely even lost any leaves on its own, on 2 hrs of drip every 3 days still. She has to be the most maintenance free grow I've ever had. Already have tons of compost going to add to the Hugel next year. On that note, no idea how i'm going to remove that trunk and root system to replant in it next year, any suggestions? Wait till spring then try and dig it up?

Likes
4
Share


@Brothersfromweed420
Follow
Origen: Afganistán
Tipo: Indica / Sativa
Floración: 63 Días
THC: 29%
Cosecha: 400 g / m2
Altura: 150-205 cm
Clasificación:####

Divine Seeds desarrolló Opium como una nueva cepa campeona. Las variedades autóctonas más potentes y resinosas de Afghani Indica se crearon junto con una poderosa sativa brasileña, de la que Opium hereda su brillante sabor a bayas. El genotipo de Opium es un gran trabajo: los criadores estaban decididos a obtener el nivel más alto de THC, hacer que Opium fuera lo suficientemente fuerte para cualquier condición de cultivo y superar los límites de la productividad. Sus creadores describen Opium como la hierba con la que siempre soñaron cultivar.
En el interior, estas plantas se mantienen en su mayoría de altura media (1,5 m), alcanzando hasta 2,0 m en el exterior. Dependiendo de sus limitaciones de altura, Opium se puede cultivar universalmente en cajas de cultivo, balcones, invernaderos y terrazas. Debido a su ascendencia afgana, Opium puede soportar el clima cálido si se le proporciona suficiente agua y algo de sombra. Responde bien a cualquier técnica de entrenamiento: ScroG y SoG, LST, topping y FIM, supercropping. El inicio de la floración se marca con una oleada de crecimiento, cuando las plantas se estiran casi 1,5 veces. El opio desprende un penetrante hedor terroso con matices afrutados. Listo para cosechar en exterior en octubre.
El impacto psicodélico de lapidación con el que te golpea Opium es como estar hipnotizado. Lo suficientemente fuerte para matar los dolores, Opium también es médicamente eficaz contra el insomnio, las náuseas, los trastornos del apetito, los espasmos musculares, los dolores de cabeza, la irritación, la fatiga, los ataques de pánico y la epilepsia. El uso recreativo de Opium significa viajar silenciosamente de una visión a otra. Se consume mejor por la noche.

Likes
18
Share


@gottagrowsometime
Follow
Welcome to my Lemon Orange by GREEN HOUSE SEEDS..
1st set of nodes were removed with 1 fingered leafs they are energy sappers.
Weeks 2-3 Days 9-21
Plant pushing along really fast really nice growers. She's been the one that's taken to the cold temperatures/ low RH the best. She's the biggest. And I'm a wk ahead. But' these past 2 weeks. I FLMING It and moved it into a 7L pot. And then when I felt I had enough shoots I then topped the Fliming just kept throwing out shoots, so after you see 4 very close you usually then top the tops and will be left with tight intersnodea usually resulting in an X shape if grow out. As it just keeps growing up. It has a real nice hight as she stands. The next week I tackle and defoliation her and will attempt to shape her in some fashion. But, I find. GHS strains when topped they rarely need shopping as its takes a natural shape.. but, I do plan t defoliation and LST her.
Enzymes, pure Zym & Alga Grow have been used. Currently she sits in a 7L pot. She'll be moved to an 11l and then I'll decide what way to take her.
Ppm is kept low as the soil is nutrient rich Royal mix. So? I only started adding small amounts of ALGA GROW as it takes a few days for the organic process to work. So adding in on wk 2 was what I did. Enzymes and Sugar Royal was also used. Along with a foliar spray of Vita Race as she looked she needed an iron kick. Looks like Dolomite lime is taken a bit longer. But, with such rapid growth. This plant is only showing slight signs of cal. The others are growing at a normal rate. And the slow but more effective method of slow release calcium over time looks to be doing well. I still use UltraPure Epsom Salt. Its the best source of mag/sulphur 250ppm feeds (that's tap included) with soil aim for 6.3-6.8 ph. Mine is 6.7. Alga feeds were just once a wk. 300ppm (tap included) ph doesn't need checking its organic so usually this nutrient (alga grow) gives 4.5ph, but? It does not need adjusting nor does any organic nutrient from plago when using soil.
Week 1/2 40-42.5 750ppfd
Week 3DLI 43.5-45 800 ppfd.
.
17hrs this is and last 30mins is set at 15% to mimic sunset. Really drops light stress. And have noticed big drop in leaf dropping and much easier plant growth. Helps I've a top lux meter. Money well spent. DLI is so important and I'm hoping to show this with 730nm during pre fower with my fems.
Fems
Super lemon Haxe (Green House Seeds)
NL5 MIST
NEV HAZE
LEMON ORANGE...........
White Runtz (MSNL)
Runtx X layer Cake (BARNEYSFARM)
Ice Cream Cake
RUNTZ ...........
The Sin (Anesia Seeds)
Futher#
Homey mints (Exotic Seeds)
PEYOTE Gorilla (Seedsman)
Mobile Dick (Kannabia)
Sativa Dream..............
Autos
HIGHCLOUDZ AUTO Green House Seeds
ALIENZ AUTO.......
SWISS DREAM ROSE CBD AUTO (Kannabia)
CBDV AUTO
Runtz Auto
Amneia XL Auto
BREAK UP CAKE AUTO
Dosidos Auto
STRAWBERRY HAZE......
EXOTIC SSEEDS
STRAWBERRY COLA Auto 2 phenos
THC BOMB AUTO (MSNL)
Purple Haze Auto
GRANDADDYPURPLE Auto..........
MIMOSA X ORANGE PUNCH AUTO (Barneysfarm)
Lots to try this year.
Thanks to my sponsors GREEN HOUSE SEEDS?
SPIDER-FARMER & MARS-HYDRO. I can see tis plant only needing a few weeks of veg, as I'll have to tame her back soon. As she's on course to be huge.
Much appreciation to all those who stopped by. Drop a like so I can visit your diaries. Either way? I appreciate the support.