
Likes
Comments
Share


@Roberts
Follow
Drunken bitch Slap has been growing really well. She was switched to ph water 4 days ago. I am looking to harvest her in about 8 days. She grew great under the Hortibloom Solux 350. Nice frosty, and sticky colas. Everything is going great. Thank you Hortibloom, and Aeque Genetics. 🤜🏻🤛🏻❄️🌱
Thank you grow diaries community for the 👇likes👇, follows, comments, and subscriptions on my YouTube channel👇. ❄️🌱🍻
Happy Growing 🌱🌱🌱
https://youtube.com/channel/UCAhN7yRzWLpcaRHhMIQ7X4g

Likes
5
Share


@GhostmanGrows
Follow
Friday: Hi there! This week I did'n do much behave of feeding nutrients. Sunday I will defoliate again and switch the outtake fan because of heat and humidity. It was 29,5 degrees in the tent Friday and the airflow can be better. But in the end this is a new tent and a new location at a friends house so I'm trying to bring al factors to the perfect conditions.. Next run it will be Calafornian Snow Autoflowers at this location due that I am not there every day..

Likes
8
Share


@Comfrey
Follow
Everything fine. She likes to eat what she get and she is on the way to build up many flowers. I‘m really waiting for this one. Wanted to buy this strain in my cannabis pharmacy, but it was always sold out. I grow up Tropicana Cookies Auto, too. Tropicana Cookies I could buy one time in the pharmacy and this was one of the best strains I ever vaped, perfect balance between body and head feeling. So let’s see if I can grow my own quality medicine.

Likes
1
Share

@Anthonythegrower
Follow
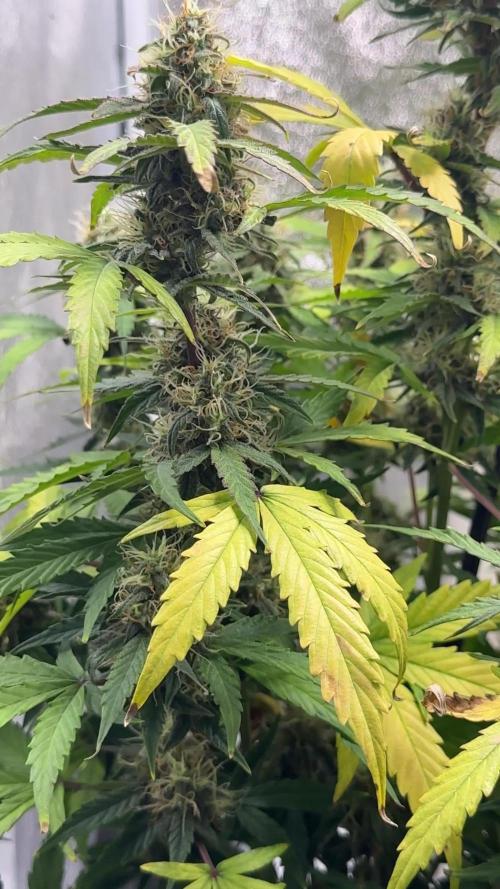
Purple . I love this stage when the plant starts changing the colors of its leaves and buds.
Likes
1
Share


@KannaGrowing
Follow
Esta semana, poca cosa a añadir, tan solo que continuamos como la semana pasada.
Riegos alternos entre abono y agua, según tabla de fertilización de JUJU Royal by BioBizz.
Hemos aumentado la potencia de extracción para evitar olores.
Likes
13
Share


@CalimannpackZ
Follow
Just added Mephisto 3 sour crinkles and 2 double grapes to the equation. It was meant to be 4 sour crinkles but one seed still ent popped so I’m hoping it will! On to the grow where I haven’t trained any plants it’s a fight for space but I’m happy with most of the plants few fast buds wedding still ent properly flowered yet week 7 on but am happy with a couple glues and the 3 runtz the runtz is frosty! The grape Walkers are starting to swell and fill out big time I am happy so far with it all had a couple burns and defincys through the 7 weeks so far but got over them! The grape walkers are the big budded plants then the frosty ones at the back are runtz then the rest are glues! Started defoliating plants


Likes
2
Share


Likes
7
Share


@Mr_nugs_lover_David
Follow
Beautiful pair of haze berries, both phenos #1 and #2 showing strong healthy roots and big leafs, can't wait to flower this ladies out, I Transplanted the plants after 17 days of being planted on February 2nd because the roots were super well developed and I considered that it was the right time to do so. So now they are in their new 11l house.
Likes
16
Share


@osmrducks
Follow
Day 8: Woke up and checked on the ladies, they were bone dry. Hit em with 70 ml of AN Coco Grow diluted in my mix.
Day 9: Got the new lights in today and hooked up. Girls are looking pretty good I think. Still letting em dry out a little. Gonna add a shot of Great White on next water. No nutes will be in this shot.
Day 10: Still looking good. Had to stack some loose Coco around a couple as they had a good stretch going and were leaning pretty good. Also noticed a couple of brown spots on the leaves. I am led to believe after asking questions and researching, it is more than likely nute burn? No more nutes for these girls for a while. I also got a humidifier to raise humidity as it was pretty low.
Day 11: These girls almost double in size every day! They would probably be a little bigger if I hadn't of tried to give em a drink of nutes earlier on! Lesson learned!! Not bad for 6 days out of the ground regardless though, I think. Got a humidifier in the tent and it stays around 50% now. Other than last night it got up to 73%. I need to get that fixed.
Day 12: Nothing new to update other than they look healthy. Think I am gonna let them dry out a touch more before watering.
Day 13: Gave the girls 1 cup of ph 6.0 water this morning. Thermostat battery went out and lucky my girl caught it in time. Temp got to 86° for a couple of hours. Opened the tent for an hour to get the temp back down. Humidity has been hovering around 50% for the most part. Minor fluctuations here and there. Girls are looking good for 8 days out of the earth though!! 💪
Day 14: Looking like they need another drink, dry down to around 1" deep. Gave em 2.25 cups with super diluted Coco Grow and a touch of Great White. 😳 They are doing great! 👍 Looking forward to see what week 3 has in store! Going to build a support to add my 2 CREE lights back in along with the Mars lights.

Likes
7
Share


@Xpie77
Follow
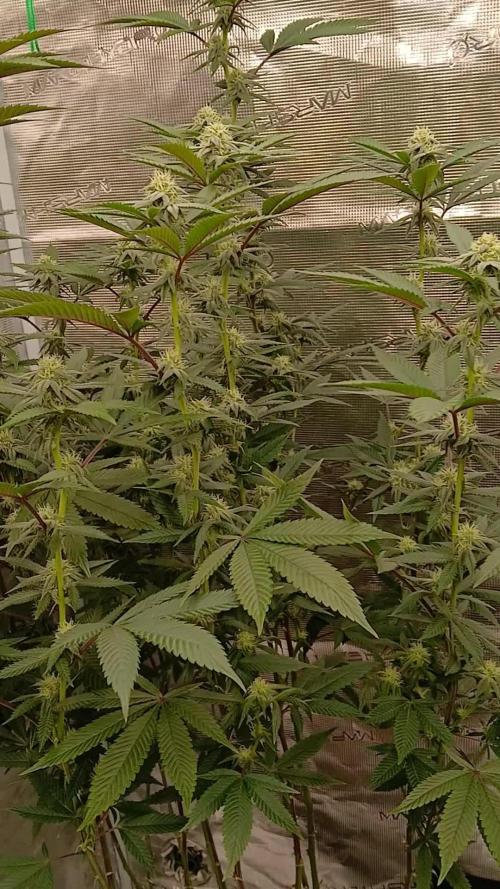
During the second week of flowering for Purple Kush, here’s what you can expect and steps to ensure a successful grow:
Plant Development
1. Bud Formation: Small pre-flower buds (calyxes) will begin forming along the nodes. Pistils (white hairs) may be visible.
2. Stretch Phase: The plant will still be stretching, potentially doubling in height as it transitions into full flowering mode.
Care Tips
1. Lighting: Ensure a consistent 12/12 light cycle. Use strong flowering lights (HPS, LED) with red spectrum dominance.
2. Nutrients: Transition to flowering nutrients with a higher phosphorus (P) and potassium (K) ratio. Avoid overfeeding nitrogen to prevent leafy growth.
Example: 1-3-2 NPK ratio is common in flowering.
3. Watering: Keep watering consistent but avoid overwatering. Allow slight drying of the topsoil between watering.
4. Temperature & Humidity:
Ideal temperature: 65–80°F (18–26°C).
Humidity: Reduce to 40–50% to prevent mold/mildew as buds develop.
Training
If you’re doing any low-stress training (LST), finish this early to avoid stressing the plant during full bloom.
Remove any dying or large fan leaves blocking bud sites to improve light penetration.
Monitoring
Watch for pests like spider mites and early signs of mold or nutrient deficiencies.
Look for healthy, vibrant leaves and steady growth in bud sites.
By week 2, your Purple Kush should show noticeable progression in flower development, setting you up for a good yield in the weeks to come.


Likes
4
Share


@HowtoBubatz
Follow
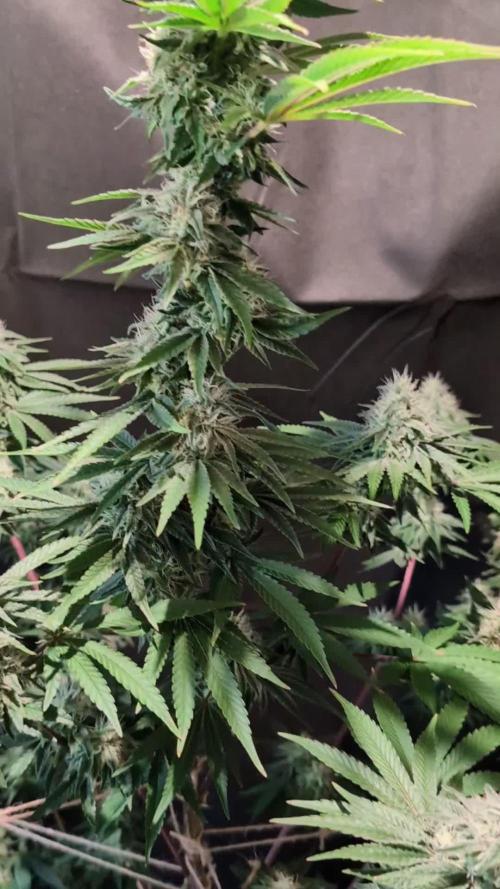
The stretch phase is officially over, and now the plant is shifting its energy toward trichome production!🌱
I’ve started noticing a light scent developing, though it’s still not very intense yet. I expect that to change in the coming weeks.
I did a light defoliation to improve airflow and light penetration, and I plan to do another round in about two weeks.
Interestingly, the fan leaves are starting to take on a slight reddish hue—curious to see how that develops! 💪😊
So far, everything is looking great, and I’m excited to watch the buds bulk up in the next phase!
Likes
26
Share


@BudBoutique
Follow
Welcome to Bud Boutique Grow Diary - really appreciate all your love and support :)
Dont forget to check out my other current grows!
🗓️ This Week:
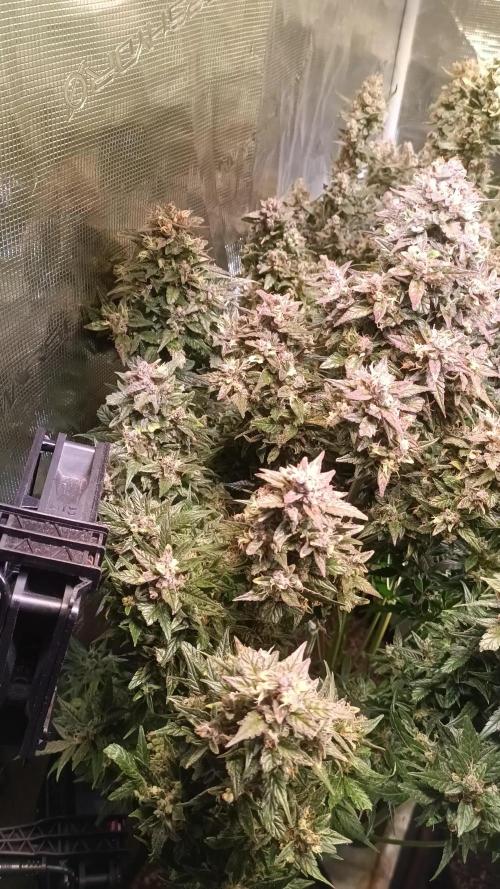
- Day 52: the end is near - fading out colors super beautiful
- Day 53: Trichomes check - looking super good almost all cloudy, a few amber and clear. perfect point to chop
- Day 54: this one is finished, let's chop them !! ✂️✂️✂️
- now its time to dry inside the tent at about 60%rh and less than 20°C/68°F trying to get it even lower for the next 10-14 days - complete darkness needed!!
Thank you for still staying with me 💚
___________________________________________
--- 🌱 Strain (Sponsor) ---
🏷️ Blue Cinderella 99 FF by MSNL
https://www.marijuana-seeds.nl/blue-cinderella-99-fast-flowering
--- 🥗 Nutrients and Feeding (sponsored by APTUS: APTUS Ambassador) ---
🍸 APTUS: full nutrient schedule extreme
-- Regulator, N-Boost, P-Boost, CaMg-Boost, K-Boost, Allin1 Liquid, Startbooster, Topbooster, Enzym+ every feeding
-- Fulvic-Blast, NutriSpray as Foliar each once a week
🔗 https://aptus-holland.com/
--- ♻️ Grow Control (Sponsor) ---
TROLMASTER: TENT-X + LM14 Light Adapter to dim/sunrise/sunset lights + Temp & rH Sensor all remote on App
🔗 https://www.trolmaster.eu/
--- 🚿 PetraGrow (Sponsor) ---
CannaFogger Foliar Spray
🔗 https://www.petratools.com/product/petragrow-cannafogger-atomizer-new-mini-fogger
--- 🏭 Grow Setup ---
💡LUMATEK Zeus Pro 600
* 🏠🌿 Indoor: Homebox 120x120x200cm (4x4)
* 📐🌀 PrimaKlima exhausting Fan 1180m3/h (running on 60-80%)
* 🌀 Can Light Filter 800m3/h & 1x Fanbox 1x Dyson fan for Air circulation
🔗 https://lumatek-lighting.com/zeus-600w-pro-29/
🔗 https://primaklima.com/de/shop/ventilatoren-de/ec-ventilatoren/pk160ec-tc/
🔗 https://canfilters.com/products/filters/
All Likes and comments are highly appreciated!!!
👨🌾 don't forget to check out my Instagram for daily educational content: @budboutiquee
- Bud Boutique

Likes
44
Share

@Irrai
Follow
Finish Line... The first Red Banana Berry needed a bit longer and was today banished from the tent and transferred to the living dead, or also known as cut flower technique (a little phosphoric acid (Ph-) in water). It now spends a few days in the dark next to the tent, metabolizing its chlorophyll. 😍
My new SANlight Stixx 4-100 has arrived for under-canopy lighting. Let’s see if it’s worth it. Additionally, I added two more fans to the tent due to the heat from the Stixx


Likes
3
Share


@Krautbauern
Follow
At Day 33 we started with defolation.
They seem to be very healthy, although there are fungus gnats.
The Ladies have no problem with it.
You already can see the preflower in the last pictures.
Next step will be to send them in the Flower Stage and turn up the lights
Likes
14
Share


@grower1212
Follow
Hoy transplante las 4 RHC a macetero de 3 litros, aproveche de enmendar el sustrato y aplicar QUILLAJA para prevenir plagas.
También les aplique microorganismos estilo drench, si perder una gota de agua.
13-10 han sido regadas sólo con agua desde que fueron transplantadas.

Likes
12
Share

@GoodTimesOrganics
Follow
Hi liebe Community and Welcome Back! 🌿💚
Willkommen zur sechsten vergangenen Blütewoche!
Hier im Bio Tabs NL Grow, erreichen wir aktuell eine höhe von 140cm. Und eine richtig krasse Breite von 70cm.
Insgesamt zeigt sich hier in diesem Grow eine stärkere Blütenausbildung, als bei der anderen Pflanze.
Auf jeden Fall zeigen sich Phenotypische unterschiede in der Gesamtstruktur.
Die Pflanze hat ihren Stretch beendet und konzentriert sich nun völlig auf die Blütenausbildung.
Beide Pflanzen sind jetzt tatsächlich gleich hoch.
Das Aroma hat bei dieser Pflanze einen stärkeren süsslichen Zitrustouch mit nun ausreifend fruchtigen Noten.
Die Umgebungsgegebenheiten sind aktuell gut:
—————
🌞 Temp: 26
🌚 Temp: 18°C bis 19°C
💨 RH: 56%
VPD: 1,10kPa
💡ppfd: 830 mpm
—————
Viele Grüße 👋
Likes
1
Share

@WHITE_sleeper
Follow
In mid-bloom.. lollipopped her at the end of the 3 week stretch phase.. already has frost on the top flowers..

