The Grow Awards 2026 🏆 


Likes
Comments
Share
@Ctrellis90
Follow
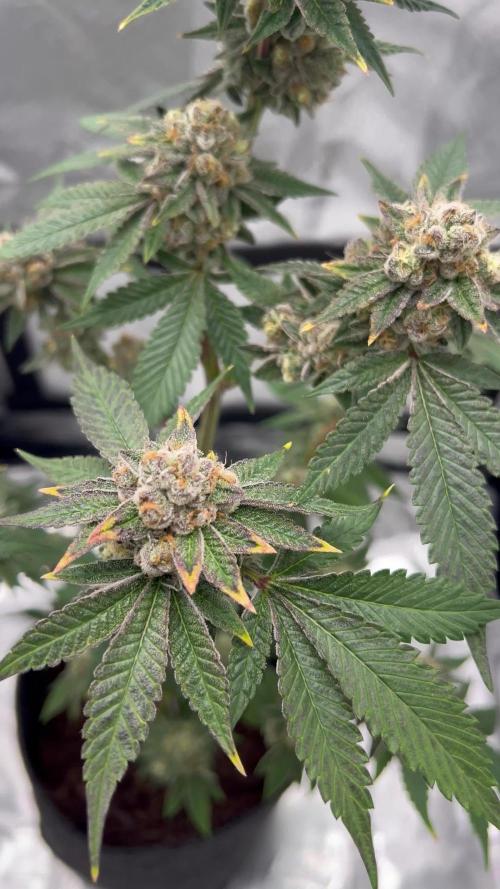
Wow, growing this beauty was amazing. She totally changed my perspective on autoflower cannabis plants! As well Seedsman! You guys rock!
Seriously, I loved growing her from start to finish she took off in her living soil set up. The only thing I would change is having a bigger pot next time and being more watchful of my watering.
But all in all she grew great threw veg, nice and strong branches, deep green and lush growth, and she followed that with a beautiful flower cycle.
What more can I say?!?
Will be looking forward to the next Seedsman competition 😉

Processing
Likes
34
Share
@DudeGrowsWeed
Follow
Sour Diesel Haze is looking beautiful!!! Getting closer to harvest, but still has a few weeks to go. She smells amazing!!! I'm looking forward to the smoke report on this girl - next month! 👍
Likes
57
Share
@DudeGrowsWeed
Follow
Auto Lemon is rocking right along. Bud sites getting bigger and fatter. I purchased some Fox Farms Organic Big Bloom and added it with the Recharge in this weeks feeding. Looking forward to the results. 👍
Likes
17
Share
@eldruida_lamota
Follow
Venga familia que ya viene la cosecha de estas finta F1 de ZamnesiaSeeds, que ganas que tenia ya de darles machetazo, me estaban dando muchos quebraderos de cabeza.
Las flores no son para nada llamativas, una variedad más cruzada con rudelaris, que para mi gusto es perder el tiempo y el dinero invertido en cultivar cosas así… no merece la pena en interior, el ratio de gramo watio se me quedó en 0.5 , de los no peores resultados que tuve en los últimos 5 años.
a sido una genética con la que no disfruté nada cultivarla, es complicada, es bastante sensible.
Las plantas en sí se quedaron enanas y para nada fue lo que esperaba, me recordaron a las autos que plantaba en el 2012…
Agrobeta:
https://www.agrobeta.com/agrobetatiendaonline/36-abonos-canamo
Mars hydro:
Code discount: EL420
https://www.mars-hydro.com/
Hasta aquí es todo , espero que lo disfrutéis, buenos humos 💨💨.

Likes
44
Share
@SooSan
Follow
12/12 + 102 jours
Vu qu’il y a 16 plantes mais que sur growdiaries on ne peut mettre que 8 variétés j'ai divisé en 2 diaries pour le bas de la tente
1️⃣
🏠 90x60x90
☀️ FC-E 4800 => puissance a 75%
🍁
1x Black Bomb / Philosopher Seed
2x Amnesia Lemon / PEV Seeds
1x Blueberry / PEV Seeds
1x Blueberry / 00 Seeds
1x Wappa / Paradise Seed
1x Dark Phoenix / Green House Seed
1x Quick Sherbet / Exotic Seeds
1x Mango Cream / Exotic Seeds
1x Banana Frosting / Sensi Seed
1x Hindu Kush / Sensi Seed
4x Fast Mix / Sweet Seed
📎 https://growdiaries.com/diaries/122084-grow-journal-by-soosan
📎https://growdiaries.com/diaries/124052-grow-journal-by-soosan
2️⃣
🏠 30x60x50
☀️TS1000 => 100w = 54g
🍁
Quick Sherbet - Exotic Seed = 12g
Quick Sherbet - Exotic Seed = 12g
Quick Sherbet - Exotic Seed = 17,5g
Quick Sherbet - Exotic Seed = 12,5g
📎 https://growdiaries.com/diaries/122080-grow-journal-by-soosan


Likes
19
Share
@Black_Widow
Follow
Привет садоводы
мой цветок цветет полным ходом
последний раз я полил его обильно водой и через пару дней буду поливать ripen
есть и небольшые проблемы , сгорают некоторые листики
в общем опять красавица выросла , а смола имеет запах острого сладкого цитруса

Likes
30
Share
@Drgreenthumb627
Follow
white runtz seems to be holding its own in the center of the tent, really impressed with how well it has responded in flower after such a difficult veg phase

Likes
19
Share
@Comfrey
Follow
Day 78
☀️☀️🔥☀️ 16-28 degrees, humidity 45-65%. Tropicana and I start into the 12th week with intense autumn colors and an explosion of fragrances. It‘s very hot during the last days but bu the night temperatures fell more than 11 degrees last night. When I check my plants in the early morning, give them water and attention, a cloud of Tropicanas fruity and floral fragrances surrounding me.
Night 79
⚡️🌈 This will be Tropicanas last night. I found a little bud rott in the main flower. Glad that I made a video inside. I just saw a yellow leaf as a sign and remembered what I read last week about this problem connected with high humidity and very dense buds. I didn‘t follow any hygiene rules and humidity on the balcony was very high for too long period. So this could happen unfortunately.

Likes
3
Share
@Ogbangbang2981
Follow
oh did I add I noticed she showing sex this morning as the sun rises
so this morning Feb 18 6:22am I decided to up my nutrients
with the first bottle of nutrients I mixed was on a early veg level so I just add 2ml of each my fox farms advance nutrients along with some algas ( made with seaweed somewhere on the island ) which is a root stimulant and a few drops less than a teaspoon of molasses. and gave my baby a deep feed hope I dont regret this hope I dont get nut burns .

Likes
1
Share
@Huckleberry39
Follow
Great grow!! Should end up with over a half a pound off of these 2 and the little I harvested about 2 weeks ago. I got 2 oounces dry off of her. They smell amazing and are covered with trichomes

Likes
15
Share
@Rangaku
Follow
She’s frosting up and smelling sweet as , vid captures the lights turning on . Same same next week after a defol

Processing
Likes
77
Share
@BipolarHellas
Follow
Hello world,
🇬🇷
the previous week was training week for Michelle,who was LSTed and for Lucy who was topped...the girls are fine and growing...they also got fed with the Enhancer,which scares me a bit,but everything went well...
WEEK 5:"MAGIC PEOPLE,VOODOO PEOPLE"
☠️Day 29...out in the sun with normal temps and no wind...watered with ph 6,4,about 500 ml...I have changed my water pattern with these girls...I used to water every 3 days with 1,5 L but now I do it daily with less water...What I need now is light...I grow with the sun and the last days haven't been too sunny here...now the weather is changing again...come on Sun,give me some light!Meanwhile when it's sunny it's too windy,so windy that I have to put them inside as they will be seriously damaged...
☠️Day 30...I think instead of topping I may have fimmed Lucy...not sure as I have never done fimming before...Now I inderstand why they call it like that...in my case: Fuck,did I miss???🤣🤣🤣...we"ll see...however new shoots are growing well...
☠️Day 31...as I was watching my girls with pride and love,the sunlight revealed hundreds of tiny white bugs jumping on the soil..I mean they are hundreds...I sprayed with vinegar just the top layer of the soil and waiting to see...
I made a grow question and I got a very interesting advice from a fellow grower...I sprayed with cinnamon extract...hope it will help...
Today I applied LST to Lucy as she is getting very tall and lunky...she's been topped,LSTed and she will be topped again when time comes...
☠️Day 32...windy and rainy outdoors...the girls are inside...Today I adjusted Michelle's LST...
☠️Day 33...the weather is fucked up...one week ago we had 40°C and today it's cold and rainy...summer is not here yet....I realized I Fimmed Lucy instead of topping her as new growth came up on the cut stem...I cut it off again as I can't experiment now,I have never Fimmed before and don't know what to expect...
☠️Day 34...no sunlight for the girls...its very cloudy and may rain again...meanwhile the bugs are vanished...cinnamon and vinegar did their job...
☠️Day 35...finally we have some sun and the girls are outside...they have stayed a bit behind all those days inside without proper light...
the week is ending,thank u all for watching..see u next week ☠️

Likes
124
Share
@Still_Smoq
Follow
📆 Week 10, 23-29 June 2024
23-29 June - Observed and let the plant grow.
📑 Trichomes and resins have developed rapidly and the smell has became intense. All appears well and on schedule for this girl, another 2 weeks of flowering/flush and she will be matured.
🍶 24, 27 June nutrient solution changed
🍽️ 24, 27 June feeding schedule updated
💧 Using reverse osmosis water with EC/TDS at 0
🐉 Nutrient solution EC 1.8 at 75 degrees F
🔆 Light power at 50%, DLI 40 canopy coverage at 18hrs
😤 Using PYPABL, Air Pump, 400GPH
That is it for this week. Thanks for the look, read and stopping by.

Likes
43
Share
@420DeepGrow
Follow
Gracias al equipo de Kannabia Seed y XpertNutrients, sin ellos esta magia no seria posible.
🍁💐 Runtz (Auto):
Si esta cepa se ha ganado su popularidad a pulso, esta versión autofloreciente es digna heredera de sus atributos. No es de extrañar que nuestros criadores hayan acertado con su programa de reproducción, al combinar dos de las cepas más fascinantes de la actualidad: Zkittlez y Gelato.
planta resistente y robusta, de cuerpo esbelto y fuerte ramificación lateral, que se puede cultivar prácticamente en cualquier entorno; pero prefiere los veranos largos y cálidos, tal y como quiere la madre naturaleza, donde bañada por el sol se eleva hasta los 120 cm. para producir unos rendimientos muy gratificantes de 100-150 gramos por planta.
En interior, y tras solo 70 días desde la semilla, también recompensará con cosechas abundantes de hasta 500 gr./m²
Inmediatamente después de encontrarte con ella, lo primero que notarás es su aroma descaradamente afrutado, con un toque tropical cortado con reminiscencias terrosas y amaderadas, que se entremezclan de forma agradable para ofrecer un combo que hace salivar las papilas gustativas.
Ofrece un sabor confitado, refrescante y similar a sumergirse en una piscina de frutas cítricas y flores de fragancia intensa. Al inhalar, obtienes la bondad de la dulzura; al exhalar, el humo se convierte en suave y cremoso, dejando suficiente profundidad en cada bocanada para satisfacer a aquellos que buscan los matices más complejos.
⛽ XpertNutrients: es una empresa especializada en la producción y comercialización de fertilizantes líquidos 🍶y sustratos🐛, que garantizan los mejores resultados y cosechas de la más alta calidad. A través de una cuidadosa selección de materias primas y un proceso de producción avanzado, sus productos son sinónimo de resultados confiables.
🛒 Consigue aqui tus fertilizantes:
https://xpertnutrients.com/es/sobre-nosotros/#:~:text=Xpert%20Nutrients%20es%20una%20empresa,de%20la%20m%C3%A1s%20alta%20calidad.
📆 Semana 5:
Un temporal ha ralentizado el crecimiento, aunque ella sigue creciendo algo mas lento.
No riego esta semana porque hay lluvias constantes que mantienen la humedad en el suelo.
Esta semana creo que apareceran las primeras preflores.
Processing
Likes
30
Share


Likes
4
Share
@Ninjabuds
Follow
The strawberry gorilla is a really pretty plant. The stems are super reddish purplish. All of the leaves are starting to get a red and rainbow color to them. The plant really smells like gorilla glue it’s really nice. The plant is stacking really nicely even without super extreme light durring the strech. It’s definitely prone to stacking large colas. This is a winner I might have to try this plant again in the fut
Likes
33
Share
@GermanGrower416
Follow
Rückblickend betrachtet hätte ich sie auch noch ein paar Tage länger stehen lassen können. Aber da ich kein Sea of Green habe werden nie alle Buds gleich reif sein.
Likes
169
Share
@Hattiwatti
Follow
Hola 🐴
Week went fast and nice. All girls have now roots in water and spare is catching.
Purple nutz is biggest.
Green has most roots.
Edge is growing little weird but lets see.
Spare is spurting.
DLI around 25.
Green and Purple Nutz in timelapse for couple days.
With High Hopes 🍀
Likes
7
Share
@XoticGROW666
Follow
I will b running the SHERBCAKE again to dial her in properly took a lot clones of her so I can’t wait to run her again terps of her is dessert and fuely 🍰⛽️ seeds made by k1 kreationz

Likes
3
Share
@HoneyBlunt42
Follow
This week was the harvest of plants.
Two turned out big and powerful.
One is a short plant with a large central flower.
One could stand and bloom for another two weeks, but it is already cold outside and the flowering will slow down.
And there is no strength to wait.
So I collected. As a result, the wet weight was:
"small" - 82 grams,
"bag" - 185 grams,
"fat top" - 282 grams,
"skinny" - 252 grams.
I wait 10-14 days until drying in an awning without light and with a carbon filter. Temperature 16 degrees


