
Likes
Comments
Share


@AsNoriu
Follow
Day 43. Light is on max output, heat enormous and they RUN !!!! thought intensity will stop them a bit , but i think i do only worse ... We have +30 heatwave in UK, i live in attic , so for 4 more days everything will be out of control.
Watered today. 6.3 phed water.
I love simple and affordable Mars Hydro products, if you can cope with heat TSL2000 can do magic in your tent !
Will update after heat wave us over. Should be in 4 days back to +20 ;)))
Day 45. They GROW !!!! Distance is insanly small, but i have 30 cm of space left, wont move light for a week, then i will try to have 20 cm at least again.
Planing last top up, need two more waterings before it, so it should be on last day of this or first of next week.
Thinking to take down all LST at that time, need pots to breath better, too thin fabric, they dont keep form.
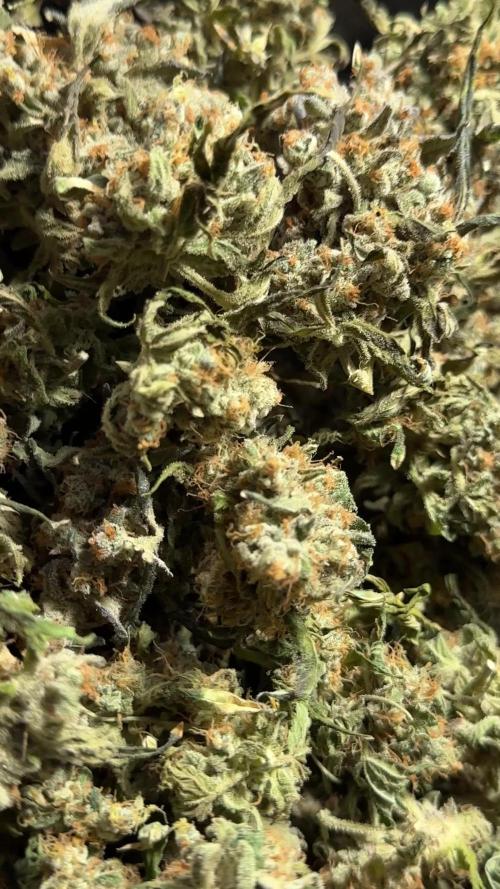
Day 47. Drink every two days !!! 4 liters goes to nothing !!! Huge, still streching, tops almost rubbing TS2000, heat 30 inside, humidity 65-68 ..... will need heavy clearing again !!! Most stacked Cookie i ever grew, fills in very nice !!!
Happy Growing !!!!

Likes
2
Share


@Mr_Terps
Follow
El Xupet Negre von R-Kiem Seeds – Blütephase gestartet!
Gesponsert von Growshop Dampf Mit Stil
Der Strain El Xupet Negre von R-Kiem Seeds hat die Blütephase unter der Nanolux SN630 begonnen und zeigt bereits jetzt ein starkes Wachstum und erste Blütenansätze. Diese kraftvolle Hybrid-Genetik ist bekannt für ihre dichten, harzigen Buds und ihr intensives Aroma.
Aktuelle Grow-Highlights:
✅ Gesunde, kräftige Pflanzenstruktur mit stabilen Seitenästen
✅ Explosives Strecken in der frühen Blütephase unter 12/12
✅ Erste Harzentwicklung erkennbar – vielversprechender Start!
✅ Fruchtig-würzige Terpene kündigen ein intensives Aroma an
Mit der richtigen Kombination aus effizientem Licht, hochwertigen Nährstoffen und optimalem Klima – alles erhältlich bei Dampf Mit Stil – verspricht dieser Grow eine ertragreiche und potente Ernte.
Bleibt gespannt auf die weitere Entwicklung! Schaut bei Dampf Mit Stil vorbei und sichert euch alles für euren perfekten Grow!

Likes
1
Share


@VirginiaGrownExotics
Follow
Smooth sailing just add water soil has made this run easy she’s frosty up nicely and buds are looking great

Likes
3
Share


@Krautbauern
Follow
The seeds germinated after 1-3 days, 1x runtz unfortunately did not germinate.
3 Days after the germination the plants were growing too quickly so I repot them them in deeper and increased the light intensity to 50% = 100 watts.
When repotting in biobizz light mix, the plants were also given a load of Mykorrizah from Great white premium.

Likes
10
Share


@Jackweed77
Follow
È partita alla grande la Diesel auto della RQS....fino ad oggi avevo fatto crescere solo in vaso sotto la sp3000 Marshydrø ora sono curioso di vedere cosa puo fare con l idroponica che è assolutamente il modo di coltivazione dive ho miglior risultati e anche quello che in assoluto preferisco...


Likes
9
Share


@julian100614
Follow
NORTHERN LIGHT AUTO (ROYAL QUEEN SEEDS)
Descripción:
Poco después de conquistar la escena del cannabis en Holanda, la Northern Lights se convirtió en el estándar del cultivo en interior. Su influencia se extendió por todo el mundo y acabaría convirtiéndose en uno de los pilares del desarrollo de cepas de cannabis modernas. Durante los últimos años, las técnicas de cultivo y reproducción han generado versiones de Northern Lights que mantienen las características de esta leyenda mientras añaden algo interesante a la fórmula. La Northern Light Automatic de Royal Queen Seeds es la combinación perfecta entre lo nuevo y lo viejo.
Al tratarse de una cepa autofloreciente y feminizada, la Northern Light Automatic es una planta versátil, perfecta para cultivadores discretos de interior pero también para cultivadores de exterior a gran escala. Tras una breve fase vegetativa, la planta empieza a crecer y a producir gran cantidad de flores, terminando su ciclo de vida en solo 9 o 10 semanas desde que se planta la semilla.
Día 0: He germinado la semilla en un papel humedecido a 30°C con un pH6
Día 1: La semilla abrió perfectamente y la trasplanté rapidamente a su maceta final de 15L geotextil de Royal Queen Seeds y he puesto en el agua de riego Deeper Underground 1ml/l y Atami NRG Roots-C 2ml/l.
Día 2: La pequeña ha cogido 3cm y va creciendo rapidamente. Parece que los nutrientes hacen sus efectos perfectamente
Día 3: después de alcanzar los 3cm hoy hemos regado con el enrraizador para su sistema radicular aportando 1ml/l Deeper Underground y 2ml/l de Atami NRG Roots-C
Likes
8
Share


@Skinnytalls420
Follow
Day 26-21/05/22 everything looking good most of them going into flower now!!!
Day 29-24/05/22 all looking good!!! Gonna start giving bloom nutrients this week.
Day 32-27/05/22 all looking good started to give bloom nutrients. I feel like they should be bigger maybe not?
Likes
5
Share


@Ozgrow
Follow
Plants have stretched more than i thought. Been trying to fill out the screen as best as i can, some have worked better than others. Looks like there are plenty of bud sights. Began pk heavy this week so looking forwsrd to seeing them fatten up. I also gave a light defoliation under the canopy removing skinny stretchy stems receiving little light. I also removed some massive fan leaves that were blocking light from budsights. Not too many just enough to have light penetrate.


Likes
1
Share


@Barcelona_Farmers710
Follow
Booommm! Llegó la hora tan esperada Farmers nuestras flores llenas de resina acabandose de formar, la verdad que estas genéticas ayudan mucho al desarollo del cultivo espero que os guste!! Una locura de olores y terpenos!!💚
Processing
Likes
4
Share


@Ageddd
Follow
Switching to full flower nutrients, she loved the transplant, starting with half the recommended doses, growing some hairs so its te perfect moment to apply some Big One 1ml/l + TopBloom 2ml/l twice a week, to boost hairs growing and to create more bud spots.
She really is turning in to a little bush i really like the structure ^^


Likes
5
Share


@HighOhioAn
Follow
Loving the buds on two of the strains I’ve only had black buds one time before, and it was some of the best, but I’ve ever had super excited for this grow🔥💯


Likes
10
Share


@Chitown_grower
Follow
Starting to see some pretty nasty mag deficiency on the top of the canopy so I fed them some Mag Amped today! Will be watching the tops this week.
Otherwise, they are exploding with weight!

Likes
15
Share

@DogDoctorOfficial
Follow
🌿 Super Silver Haze – Harvest Report (Zamnesia Seeds)
Grower: Dog Doctor
Strain: Super Silver Haze
Breeder: Zamnesia Seeds
Lights: Future of Grow Black Series 600W | ThinkGrow ICL-300 | Lumatek Zeus 465 Compact Pro
Control System: TrolMaster Hydro-X Ecosystem
Medium: Custom Super Soil Mix with Aptus Holland Amendments
Environment: 8x8 Shared Tent | Day Temp 29.6°C | RH 67% | CO₂ 700 ppm
✨ From Seed to Soul – A Legendary Journey
What a ride this one was. From the first spark of life in the Cannakan to the final aromatic breath from the Groove Bags, this Super Silver Haze journey was everything—a perfect reflection of the plant herself: bright, strong, unpredictable, and utterly timeless.
Three seeds were germinated — all three came out strong, though one was shy. From there, two phenos took the lead, both with stunning vigor, hybrid leaves, and perfectly compact growth. Throughout veg and flower, they mirrored each other so closely it felt like growing twins.
There were highs — lush foliage, incredible root growth, and perfect structure — and there were lows — a bout of bud rot, handled quickly and carefully. But like in life, every setback was a lesson. The environment taught us, the plants guided us, and we adapted.
💧 Feeding & Soil
The foundation of this run was a custom super soil charged with Aptus Holland amendments — Mycor-Mix, Micro-Mix, and Substrate Buffer Powder.
Throughout veg and early flower, the girls enjoyed a balanced routine of:
Aptus Regulator – For strength & stress control
Aptus CalMag Boost – Supporting cell structure
Plagron Power Buds, Sugar Royal & Green Sensation – Enhancing bloom, resin & sweetness
Aptus All-in-One Liquid & Top Booster – Brought in at key stages for balance and final push
By the final weeks, we tapered down to pure water — a gentle flush that allowed the plant to use her own reserves. This stage is vital; it purifies the flavor, softens the smoke, and reveals the true essence of the strain.
🌬️ The Harvest
The girls were harvested whole and dried for about 14 days at 60°F (15.5°C) and 60% RH, the perfect “60/60” for slow, even drying.
Branches were ready when they snapped cleanly — a satisfying sound of readiness.
Trimming was done entirely by hand on a Trim Bin, using Zamnesia curved blade scissors — slow, patient, and meditative. Frost everywhere. The gloves were covered in resin, leaving behind sticky charas that smelled like pure nostalgia.
Yields:
🌿 Pheno #1: 153.15 g of dry, dense, frosted flowers
🌿 Pheno #2: 126 g of equally beautiful, slightly sweeter buds
🍋 Aroma, Flavor & Smoke
Open a Groove Bag and you’re met with a wave — sweet citrus, ripe fruit, and that unmistakable Haze spice.
Both phenos share the same terpene fingerprint, but #1 carries a deeper, earthier tone while #2 shines with fruity brightness.
The smoke itself is smooth, creamy, and elegant — full-bodied yet gentle.
Inhale: Fruity citrus sweetness
Exhale: Earthy, classic Haze with a spicy afterglow
It’s like smoking sunshine filtered through memory.
🌀 Curing – Glass & Groove Bags
Curing took place in Groove Bags and glass jars — both excellent, but different in spirit.
Glass jars (Pheno #2): require daily “burping,” opening to let moisture escape.
Groove Bags (Pheno #1): a modern evolution — engineered with breathable film that automatically balances RH. No burping, no fuss, just perfection.
The result? Two styles of cure, both producing world-class aroma and velvet texture.
⚙️ Gear That Shaped the Legend
Zamnesia Seeds – For the timeless Super Silver Haze genetics
Aptus Holland – For balanced, bioavailable nutrition
Plagron – For the bloom magic and resin push
Future of Grow, ThinkGrow, Lumatek – For perfect full-spectrum lighting
TrolMaster Hydro-X System – The digital brain of the grow
Grove Bags – For preserving freshness and flavor
Each piece of gear played a part in writing this chapter.
🌈 Reflections & Gratitude
This run was a story of resilience — of learning, adapting, and never losing faith.
Bud rot appeared, but so did strength. Mistakes came, but so did lessons. And in the end, she rewarded us with medicine so beautiful it transcends the difficulties.
To everyone following the journey — the growers, lovers, haters, dreamers, sponsors, and the Zamnesia family — thank you. This wouldn’t be possible without you.
For the full visual story — from seed to harvest, from green to gold —
🎥 Watch the complete Super Silver Haze grow in 4K on YouTube:
👉 @DogDoctorOfficial
And for more behind-the-scenes magic:
📸 Instagram: @DogDoctorOfficial
📓 GrowDiaries: DogDoctorOfficial
“Every grow, like life, is a cycle.
Some days bring storms, others bring sunlight —
but in the end, what matters is how we grow through them.” 🌿💚
📲 Don’t forget to Subscribe and follow me on Instagram and YouTube @DogDoctorOfficial for exclusive content, real-time updates, and behind-the-scenes magic. You won’t want to miss it.
• GrowDiaries Journal: https://growdiaries.com/grower/dogdoctorofficial
• Instagram: https://www.instagram.com/dogdoctorofficial/
• YouTube: https://www.youtube.com/@dogdoctorofficial
There’s a new series blooming and it’s more than just plants. It’s about process, patience, and paying attention.
⸻
Explore the Gear that Powers My Grow
If you’re curious about the tech I’m using, check out these links:
• Genetics, gear, nutrients, and more – Zamnesia: https://www.zamnesia.com/
• Environmental control & automation – TrolMaster: https://www.trolmaster.eu/
• Advanced LED lighting – Future of Grow: https://www.futureofgrow.com/
• Root and growth nutrition – Aptus Holland: https://aptus-holland.com/
• Nutrient systems & boosters – Plagron: https://plagron.com/en/
• Soil & substrate excellence – PRO-MIX BX: https://www.pthorticulture.com/en-us/products/pro-mix-bx-mycorrhizae
• Curing and storage – Grove Bags: https://grovebags.com/
⸻
As always, this is shared for educational purposes, aiming to spread understanding and appreciation for this plant. Let’s celebrate it responsibly and continue to learn and grow together.
With true love comes happiness. Always believe in yourself, and always do things expecting nothing and with an open heart. Be a giver, and the universe will give back in ways you could never imagine.
💚 Growers love to all 💚
P.S.
Due to the new GrowDiaries upload restrictions, I wasn’t able to include all the photos I wanted for this final week. 🌱✨
If you’d like to see the complete visual story — from seed to harvest — many of the missing shots are shared in the previous weeks’ updates. Please take a look there to enjoy the full evolution of these beautiful Super Silver Haze queens. 🌿💚


Likes
6
Share


@masterofsmeagol
Follow
5/4 I stupidly watered everything this morning. They were pretty much perfect weight for transplant......then I watered them. Oh well. If that's the worst mistake I make I'll be ecstatic. Went back over and found my 1 gal and 2 of those wierd slanty airports that tapers and holds like a gallon and a half and washed them. I mixed up 12 gallons of soil in a garbage bag and mixed it thoroughly with my gloved hands. It's mixed good. Looking at my plants in sadness thinking, "today could've been the day" and noticed a Special Kush of average size I didn't water that weighed in the 220's. I was happy. I filled the pit arpund a cup before removing it leaving the perfect hole. Mykos and water were poured in. Plant came out of the cup REALLY easy. Suprisingly easy. This wasn't totally dry. I was amazed it came out so easy so I kinda rolled it around looking at the roots. I started lowering it in the hole and I felt something break away but it webt DIRECTLY into the hole made for it. I tucked some soil around it but it was pretty tight from packing it around the empty cup. Didn't take a picture but the plant is fine. That was an average size plant too. So I may have to give some of the strains I popped later a little longer before I transplant. After everything's been transplanted I'll need to change lighting again. I think I'll open the window and use the hps and the l.e.d on the days and nights cThat's these girls won't be hardening off. I so wanna go plant those others but my intuition tells me to wait until morning and it's been serving me well. A couple can stay in cups longer. Not much longer but still.
5/5 Transplanted everything but two this morning into 1 gals with 1/2 happy frog half ocean forest. Mykos and water used during transplant. Found put the l.e.d was on for 24hrs for a while. I made sure the timer switch was ON but it was a different cord plugged in. Oh well. All transplants went perfect. I'm picking up an adapter for the outlet so I can plug the power strip into the timer and only use one timer. I had to hang the 150watt hps back up with the 1,000 watt equivelant 105 true watts. I hope this lighting setup works. Chemdog #4 and One MK Ultra will be transplanted later today or later in the morning. I also opened the shade to the south facing window. Shits getting real.
EDÌT: I FINISHED TRANSPLANTING THE LAST TWO PLANTS AND PICKED UP THE ADAPTER SO I COULD HANG THE HPS NEXT TO THE L.E.D. THEY WERE FIBE WHILE I WAS GONE. EASIEST TRANSPLANTS EVER. THEY ALL LOOKED PERKY AND HAPPY SIX OR SEVEN HOURS POST TRANSPLANT. I OPENED THE CURTAIN TO (SOUTH FACING WINDOW) BUT I MADE SURE THE PLANTS WEREN'T IN THE DIRECT LIGHT. EVEN THOUGH IT WOULD PROBABLY BE FINE. LAST TIME I HAD SEEDLING IN DIRECT LIGHT. I'LL PLAY IT BY EAR BUT IM HAPPY.
EDIT 2. Went back over to meditate by the stream and do my qigong. It's 75 and BEAUTIFUL today. The girls will be going out for a few hours on days like this. Anyway when I went in I was surprised to see everything looking nice and happy with praying leaves. Nothing is in direct sunlight but damn that window let's in a lot of light.
5/6 Girls LOVED the transplant! They seem to be all happy. No stress. Easiest transplant I've done. Leaves are praying upwards so I think the lights are approx tje right distance. They'll be going outside soon to harden off. It's been in the 70s but it's rainy now. I'll play it by ear according to weather. I'll continue to monitor lighting and I may lower the hps.
5/7 The soil was super dry when I went over this morning. Everything looked awesome though. I used about a half gallon watering. I don't want to water to run off. I want to keep the nutes IN the soil. It's also easier to fix an undet watered plant than an over watered one. It came out to about a half gaterade bottle on the biggest and half that on the smallest. I'll gradually increase water after I monitor the response. The water sat on the soil for quit a while so they definitely needed it. Looking good so far.
5/8 Soil lookeddry this morning. I think I'm going to up the water. Last time I dod seeds I gave like a pink. Some plants still had a little dampness where I watered that I could see. Others looked dry but happy. I gave the REAL dry bigger ones a small circle around the rootball. Just in case. I'm thinking of lowering the hps slightly so it's at least level with tje L.E.D. That window being open gives tons of light. If u moved them slightly left they'd get DIRECT sun most of the time. I'll be bringing them outside soon to start hardening them off.
EDIT: WENT TO CHECK THE GIRLS AT 5 TO MAKE SURE THEY WERENT DRIED OUT. THESE GIRLS ARENT JUST GETTING BIGGER BY THE DAY THEYRE LOOKING BIGGER FROM MORNING TO NIGHT! ITS BEEN RAINING LIKE CRAZY BUT WE WILL HAVE GREAT WEATHER NEXT WEEK AND I'LL BE BRINGING THEM OUTSIDE. I'M SUPER HAPPY WITH GROWTH SO FAR. ILL PROBABLY HST (TOP/FIM) AT THE NEXT NODE. I WANT THEM TO SETTLE IN NICELY BEFORE STRESSING THEM.
5/9 I may have stupidly uploaded doubles of pictures from today. Soil LOOKED real dry. I gave the plants their first real watering. I still went light. Almost a gallon with all plants. I know many say I should be watering to runoff but I want to keep the nutes in the soul as long as I can I don't want to overwater. I always start out careful. Once they show they xan tolerate it I'll increase water next time. This weekend it will be raining but after that we are getting some real good weather and I'll he taking the girls out to begin hardening off. I also need to take a look and top/FIM the plants now that they are settled. Also need to wash grow bags and sanitize outside.
5/10 It's pouring out. Horrible night and morning but this is about cannabis. After the watering ALL the plants shot up in size! Substantially. Leaves are over the sides of containers. I think I'm somewhere close with the watering schedule. I may bring the hps light down a little. I also NEED to start HST. I need to FIM and/or top these girls. Unfortunately I've been dealing with medical problems of my wife so I haven't got to it. If I get some sleep I may do something this morning or in the afternoon.
