
Likes
Comments
Share


@TOMI08
Follow
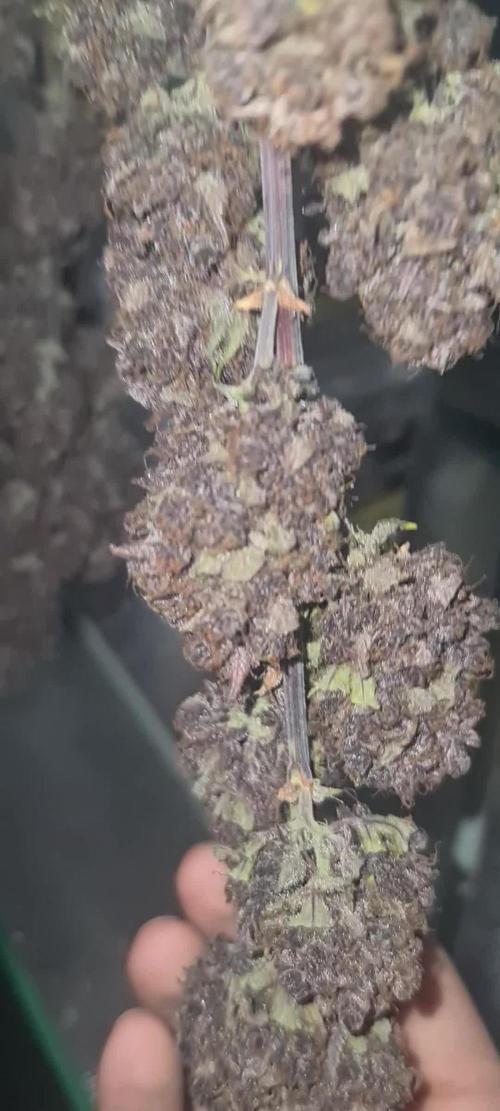
Csak a Trainwrecket videóztam
Sátorban 30celsius és imádják
A Trainwreck elkezdett csilogossá válni de az illata nem erősödik ami miatt aggódok...
Tegnap adtam neki canna pk-t elősször
A héten már superthirve vitamint akarok nekik plussz energia miatt

Likes
30
Share


@Togoutouseg
Follow
La purple haze était vraiment plaisante à cultiver. Une des deux a eu un problème dès le début de croissance, et malgré tout, j'ai réussi à l'envoyer en floraison. Cela montre bien que les variétés de zamnesia sont très bien pour les débutants, elles sont très résistantes. La haze était de taille moyenne. Une odeur très épicée et terreuse, un vrai plaisir au nez. On voit bien que c'est une sativa, elle provoque de grosses crises de fou rire, la première fois que j'ai tiré dessus j'ai tiré trois taf et j'ai rigolé pendant 30 minutes, complètement incroyable. Très cérébrale, pleins d'idées qui nous passent par la tête, elle rend très énergique et n'a pas d'effet de détente sur le corps. Ne pas fumer en soirée avant d'aller dormir, plutôt en après-midi, j'ai beaucoup de mal à dormir si je l'utilise en début de soirée. Attention tout de même, elle provoque pas mal de parano je trouve, typique d'une sativa. En tout cas excellente variété pour aller marcher et profiter d'une belle après-midi. J'ai optenu 45g et 30g en sachant que j'ai eu pas mal de problèmes.

Likes
3
Share


Likes
23
Share


@dataTwiiix
Follow
06/04: Début 3ème semaine jusqu'à présent je suis content de moi, c'est ma deuxième culture. La première a été assez mouvementée et cette fois-ci je me sent plus à l'aise par rapport aux arrosages par exemple. J'ai choisi de ne pas utiliser du allmix par exemple pour pas risquer de brûler mon plant lors de l'engraissâge etc.
06/05: Aujourd'hui "tie down" des branches les plus basses. (LST j 0) + Arrosage à l'eau clair 400ml ainsi que toping des branches basses.
06/06: j'aperçois les premiers pistils la phase de pré-flo est sur le points de débuter je vais augmenter la luminosité petit à petit dans les jours qui viennent pour arriver autour des 70,000Lux en phase de flo.
06/07: je vais revoir mon planing d'engraissage et ajouter un engrais de flo. et du CalMag agent toutes les deux semaines, quand au GHE essential une fois par semaine en foliaire.
06/08: le filet est placé depuis ce matin, maintenant on attends l'étirement floral pour le remplir.
06/09: arrosage +/-500ml avec engrais, j'ai tenté de descendre le filet pour palliser le plant et commencer à diriger le branche dans les trous du filet mais j'ai changé d'avis car je le sentais pas, je préfère attendre le stretch et utiliser le filet quand les branches l'atteindront naturellement.
06/10: finalement j'ai fait un topping hiers soir car le fiming ne semblait pas prendre et le cola continuais a monter et a chaque nouveau noeud j'avais chaque fois que deux branche donc j'ai préferer le topping certaine branche latérale on déjà rejoint la hauteur de deux branche obtenue grâce au topping. je suis étonnée par la vigueur de cette variété qui se remet rapidement de tout stress!
Likes
4
Share


@el_cultivito
Follow
Week 8 (4/11/22 - 4/17/22)
Took 9 cuttings, dipped in Clonex and plugged into presoaked rockwool cubes.
Once rooted, the plan is to take 6 cuttings into the flower tent.
Likes
44
Share


@Roberts
Follow
I am dropping Fast Buds tester FBT 2402 today to germinate. The seed was lightly scuffed on each end. I will be using Xpert Nutrients for the first time on this grow. I will also be using a Medic Grow Mini Sun-2. Thank you Fast Buds, Xpert Nutrients, and Medic Grow. 🤜🏻🤛🏻🌱🌱🌱
Thank you grow diaries community for the 👇likes👇, follows, comments, and subscriptions on my YouTube channel👇. ❄️🌱🍻
Happy Growing 🌱🌱🌱
https://youtube.com/channel/UCAhN7yRzWLpcaRHhMIQ7X4g
If anyone needs to purchase fastbuds here is a link for my affiliate program
https://myfastbuds.com/?a_aid=60910eaff2419
Likes
37
Share


@masterofsmeagol
Follow
Week begins 8/12 LAST FEED 2 gallons 8/12 AFTER A RAINING NIGHT.
8/13 I've found what appears to be septoria on a couple plants. Looks like the weather will be OK tonight so I can apply organocide or something similar before dark. I've seen random pillar damage so this will be a two-for. I also should move the middle plant back and utilize my space more. Ph seems on point around 7.3. Higher in some places of the soil. I've noticed what looks like root issues on my blueberry. Winds were horrible yesterday and this plant doesnt hace a vertical trellis for support. Stem was pretty wobbly for a while but the plant seems to be growing fine. Either that or a jpn beetle munched the top of a bud. That's probably what happened. It was in the low 50's this morning. That's a 40 degree temperature swing in just a few days. This grow season has been the most challenging I've faced. Of course it had to happen when personal, family, and health concerns rear their head. Oh well. I can only do my best.
8/14 Went over at 5am to apply organocide to treat WPM or septoria as well as insecticide for pillars. I got there and one of my healthiest plants had been turning a little lime green now it was drooped over just like the larger GDP. This one is a 9lb kush though and they were doing good. Now it looks like it's dead over night. Maybe it's that liquid kool bloom. The soil seemed dry so I watered the plants. It MIGHT have picked ok a little. I'll have to check tonight. If not something is going on at night or in the rootzone and I really don't know what the fuck is going on. I will post updates and check later tonight. Damn. This has been a real challenging year.
8/15 That plant might be overwatered or not be draining correctly. At least I was able to get underneath it and the ground was dry. It was also hard packed dirt so elevating the bag may help. I'm going to wait a few days and see if things improve. This really sucks. I'm getting that defeated feeling. I need to get out of it though as I'm starting to see flower begin. The blueberry is probably the farthest along. I need to remember to take pictures of the newly developing flowers. Granted I've had numerous medical and other issues that have taken me off my game but losing two plants in one year is pretty shitty. I was able to fix things with COVID last year or the year before so I hope I can at least save this 9lb kush plant. If I lose this plant too it will be a substantial amount of cannabis lost. I need to rearrange my cage as well to make use of the extra space. Maybe I could've overwatered that plant that had been in the rain for a long time. I need to get my water routine down pat instead of doing the "lift the pot" method I have been doing. I went to several different commercial growers and got a bunch of crazy answers. Only time will tell. Last night I finished the organocide application on all the other plants except for the two babies and the drooped 9lb kush. Don't want to stress it further. I'll see how it goes.
8/16 Despite the soil drying out the newest disaster (my 9lb kush) is much worse with chlorosis killing leaves. Stalks and branches seem good. Soil smells musty and a little wetter than the rest. It was roofed to the ground slightly. NO water underneath. I stuck my hand in the bag from a bunch of angles. It's like the same thing that happened with the other one. I added to my surveillance. I also smell bleech and I hace an idea this might not be my doing at all. I can't be detailed but I'll find out one way or another. UPDATE. Went back over after the dentist and plants were dry as a fucking bone and droopy. I mixed up five gallons of phed water and watered everything. Even the 9lb kush that is pretty much dead. The soil was dry though. Everyone is saying overwater but I really doubt that. We had some massive rainstorms bur still. I need to review a game cam I have because unfortunately my cams went on the frits for a couple days (and the dogs went wild during that time around midnight) couple nights in a row. I fucking smell bleech. I'm a good dude and don't really have any enemies but we'll see what the game cam pulls up.
8/17 Of course we are getting a shit ton of rain. I watered yestetday because everything was dry as a bone
I watched yesterday as my blueberry was almost horizontal due to the wind. I added several supports to every branch and a few more up the main stalk. That may be what has been happening. The wind blowing so hard it separates the stalk from the roots. My problems started after I took my windbreaker tarp down. I put it back up for this storm. Or maybe it's just root rot. I dont fucking know. I cut all the dead stuff off the 9lb kush thats pretty mucb dead. Its holding on though. I probably shouldnt have watered that but it seemed bone dry. Maybe further down was wet. I dont know. Extra cams are up. I didn't smell that chemical bleachy smell today so it's probably in my head. I have better peace of mind with the night cams up though.and the dogs though. I've had a visitor this year but he left very quickly.
8/18 We got a shit ton of rain last night. No damage though. I spent what time I had in the garden working on the 9lb kush that looked like it was dieing. I'm not giving up on this one so easy. It seems to want to hold on. Despite the severely overwatered medium (due to this storm) I cam see new growth that looks healthy. The branches also seem stronger. I'm cautiously optimistic. The other one straight up died. So I might be able to salvage this. I'll go over later today and check on it. I debated putting it inside for the storm bur I figured I'd let the rain leech out anything in the medium in case it's locked out or something. At least I've got a couple real healthy ones this year. That NYCSA is amazing. That's a strain I'll probably grow again. Resilient as all all. Vigorous and doesn't seem impacted by things like WPM or other fungal ok infections or diseases like some other strains. I got a great recommendation from my buddy to use pots all the same size. It makes things easier watering. I just used what I had this year. I had bigger pots so I wanted to fill them. That tarp being up I think greatly helped with the wind. It's down now so things cam dry out. Still raining bit not yard and no wind. I think that may have played a large role in killing the 7ft GDP. Wind ripping the stalk away from the roots. Or it could've been a million other things. I'll never know. I do know that I have a better mindset, a great set of resources and I'm learning something new every year. If I can br8ng this plant back to life I'm going to be very proud of myself.....and her. Oh and I'm going to buy new tiger bloom. I'll start beasty bloom (hesitant as it has caused lockout in the past) as it goes better with my other nutes than the liquid kool bloom. Plus I started getting portables around tge time I used the liquid kool bloom. That being said, after two weeks I can see buds where there weren't before so I don't know. Next year I'm using seeds and I'm doing things different. I'm STRONGLY considering rapacaps idea about adding a removable roof for flower. The more I think about it tge better it sounds. That and putting wheels on pallets (buddy suggestion) and I could attach my supports directly to the pallet. I've got a lot of work to do that's for sure. Plants look healthy but I needvto him them again with organocide to fight any fungal stuff or pillars that might be hiding.


Likes
7
Share


@Mr_nugs_lover_David
Follow
I've enjoyed a lot growing this plant, I had to deal at tje end of thr cycle with fungus gntas but she resisted without problems, each day the flowers stink more and more, amazing genetic, I would definitely like to keep on working with this genetic, it's a pleasure to smoke, I recomend you to grow her organically like I did snd you'll see!


Likes
13
Share


@Ieiogrow94
Follow
Eccoci qui...
Finalmente dopo uno stop per il lavoro torno ad aggiornare il diario con il capitolo finale...
Test 1 davvero sorprendente mi ha dato una genetica che è sia veloce che vigorosa vedremmo nei test successivi!!!
Grazie a @Xpertnutrients per la collab e a tutti per il supporto🔥🌲❤️
NE VERRANNO DELLE BELLE
Likes
17
Share


@CanadianFillmore
Follow
Week 4 begins for Mandarin dreams and Divine storm. Both ladies are looking happy and I increased their feed by 1 liter each.
Thank you Mars-Hydro for the TSW2000 light, very happy with the light performance so far.
Thanks for stopping by growfessors 👽 tune in next week for another episode of growfessor theatre!


Likes
7
Share


@DRO420
Follow
Coming into the final weeks here, about a week and a half until harvest. Trichomes are looking just about ready.

Likes
20
Share


@Buddyman75
Follow
I learned a bunch growing these plants and the harvest was well worth the effort it took. 300 watt actual power consumption for lights so I think I'll give this strain another run in the future. The smoke is smooth the smell is potent fruity with a touch of citrus. I dried to 67% then placed buds in a plastic bin for one week burping 4 times a day for 15 minutes then Jared at a humidity of 63% with 62% bóveda packs for one week burping twice a day . After 10 days of I exchanged the 62% packs for 58% packs. Burns smooth and tastes great but I'm going to see what it tastes like in a couple more weeks.
Likes
60
Share


@Natrona
Follow
FBA2502
Week 4 April 20-26 Veg 4
Highlights of this week:
I defoliated the large fan leaves from the main stems. After defoliating, I saw that plant #3 has a short, tight node structure like plant #1, so I pinned her down before she goes into flowering. Plants 2, 4, 5, and 6 are taller than plants 1 and 3. The larger plants 2, 4, 5, 6 show pre flowers with thinner new growth and hairs at the nodes. The leaves are wide and thick. Some have a slight blue tinge. This makes me think I’m over feeding. Apparently, the blended soil has enough nutrients for the autos, so I don’t need to feed right now. At the end of the week, I watered with ph 6.5 water with cal mag and recharge. Lights are 20” from tops of tall plants and 30 from 1& 3.
My general thought for the future grows is to wait until the plant is bigger and see its structure before starting training. #1 has many branches coming into the middle. By beginning with pinning and keeping it at the ground, she will not achieve the stretch around the pot.
I pinned #3 to push out the bud sites from being up against the main stem. It is easier to LST when there is more space between the nodes, so a bit of growth or stretch is required. Training to open the top is needed when the plant is short and tight.
If you want to follow what's happening with my other two FBA2502s see my friend's @Susquihanna diary.
4/20 Hairs on 2, 4, 5, 6 and feeding
Micro ½ tsp/gal
Gro ½ tsp/gal
Bloom ½ tsp/gal
CalMag 1 tsp/gal at full strength
4/21 pics & video
4/22 water only ph6.5. I watered with plain water, it looks like over feeding and they are in are transitioning to flower.
4/24 Water with recharge ½ tsp/g & CalMag 1 tsp/g ph 6.5
pics & vid see blue tinges in leaves.
Plants shot up, doubling in height again this week.
#1 6”, # 2 10”, #3 7”, 1 14 “ 5 14” 6 13”
Your likes and comments are appreciated. Thanks for stopping by.
Growers love 💚🌿
💫Natrona💫
Likes
4
Share

@Nordgrow
Follow
Die Pflanzen fangen schon ordentlich das harzen an.
Größer werden die Pflanzen nicht mehr, ab jetzt werden nur noch Blüten gebildet.
Der Geruch ist sehr außergewöhnlich. Es duftet sehr süß und mit schweren nicht leicht zu identifizierenden Untertönen.
Meringue= hinten links, hinten Mitte, vorne mitte
Frozen Biscotti = hinten rechts, vorne rechts, vorne links

Likes
33
Share

@valiotoro
Follow
When buds are this heavy and this compact, trimming goes fast and smooth exactly the way I like it.
As for bud size… I’d say ostrich egg level


Likes
87
Share


@beenSlayin
Follow
What I thought to be a cal deficiency at first glance appears to be rust fungus or leaf septoria, but nothing rubs off of the spots, which confuses me. I freaked out and tore the hell out of the plant my buddy left on my doorstep, stripped all the freakin spotted leaves. I'm hesitant to toss it, dont know why, I did notice spots on 2 other plants, barely, bastard being one of them. Ill be keeping a great hawk eye on them, ready to pluck anything I notice with a rust spot or toss that one plant out of there if I see too much appear. I need to grab some neem oil as well. Maybe I shouldn't run the tent sealed anymore, as I think it could be a big reason for the fungus. I never let humidity get over 60 and I had pretty decent air movement, but they are squeezed in there. I'm freaking scared.
Nothing rubs off these spots. My run off PH has been low which makes me think calcium still. Guess I'll do some big-time flushing.
Flushed all with 6.8 water until run off reached 6.5, roughly 10-12 gallons each. I'll l feed them tomorrow. Usually, I flush around day 45. I was trying to see if i could get away without doing so, with that scrog n all.
Whew, I was trippin out there there, after reading n shit I got thinking the worst, should've stuck with my original diagnosis. I'm sure they'll be ok.👍
Zipper broke off the tent the other night, so it's now "sealed" with a red blanket🤣
Likes
7
Share


@winn420
Follow
Dropped the ball on my journal but the grow is still going strong and has massively increased in size. will make a new journal asap.
Blue dream auto went VERY hermie, could be stress from me but the entire thing hermied around 2 weeks before harvest, unsmokeable buds, made into keif.
auto colorado was decent smoke FOR AN AUTO 2.5 oz yield
g zkittlez are in harvest currently check new diary
og kush same as g zkittleZ


Likes
53
Share


@DogDoctorOfficial
Follow
Hello, my wonderful green-thumbed friends! Welcome to the Week 5 veg report for our fabulous P.C.R.s. This week has been all about new beginnings and meticulous care, as we continue to nurture these beauties towards their full potential. Let’s dive in!
New Home, Sweet Home
This week, our P.C.R.s made the big move to their new 3x3 tent, and boy, do they love it! Under the bright and consistent light of the ViparSpectra P2000, these plants are set to thrive. The P2000 is a game-changer, offering a full spectrum that mimics natural sunlight, ensuring our plants get the best light for every stage of their growth. It’s like bringing a slice of the sun indoors!
Leaf Love and Clones
We also took some leaves and cuts this week to encourage bushier growth and to propagate new plants. Each cut was carefully treated with Clonex Gel, a rooting hormone that gives our clones the best start. Think of it as a nutrient-packed smoothie for our cuttings, providing all they need to develop strong, healthy roots.
To keep our new clones happy and hydrated, we used Clonex Mist, which is like a gentle rain shower, supplying essential nutrients and promoting robust root development. It’s all about giving them the TLC they need to become the next generation of thriving plants.
TLC and Maintenance
With the move, I made sure to maintain the optimal environment inside the tent. Our TDS is holding steady at 410, with a pH of 5.8 and a temperature of 21°C for watering. These parameters are crucial for nutrient uptake and overall plant health, ensuring our P.C.R.s have everything they need to flourish.
Why We Do What We Do
Understanding the importance of each step is key. The ViparSpectra P2000 not only ensures our plants receive the perfect light spectrum but also helps in energy efficiency, which is great for our environment and our energy bills! The Clonex Gel and Spray ensure that our clones have the best possible start, reducing transplant shock and speeding up root development.
Keeping our grow space clean and organized also helps in preventing pests and diseases, creating a safe and healthy environment for our plants to thrive. It’s all about setting the stage for success and letting nature do the rest.
In Conclusion
Week 5 has been all about setting up our P.C.R.s for success. From the new tent setup to taking care of clones, every step has been filled with excitement and careful planning. The journey is just as important as the destination, and I’m thrilled to see these plants grow and flourish.
Shout Outs
A huge shout out to @aptusholland, our main sponsor, for their incredible products that keep our plants thriving. Another big thank you to @artgenetix for creating the phenomenal P.C.R. strain. And to the wonderful community at Grow Diaries and all our followers, your support and enthusiasm keep us going. Let's continue to grow together!
Until next time, happy growing, and may your gardens be lush and green!
Genetics - P.C.R. @Art_Genetix_Team https://artgenetix.world/
Nutricion @aptusholland https://aptus-holland.com/
LED Power @Lumatek and @viparspectra
As always thank you all for stopping by , for the love and for it all, i fell blessed to have you all with me for one more love journey Thank you Thank you Thank you , you guys are great and have been amazing , thank you for everything !
#aptus #aptusplanttech #aptusgang #aptusfamily #aptustrueplantscience #inbalancewithnature #trueplantscience #dogdoctorofficial #growerslove
With true love comes happiness , Always believe in your self and always do things expecting nothing and with an open heart , be a giver and the universe will give back to you in ways you could not even imagine so !
Growers love to you all
