
Likes
Comments
Share


@Regenwurm
Follow
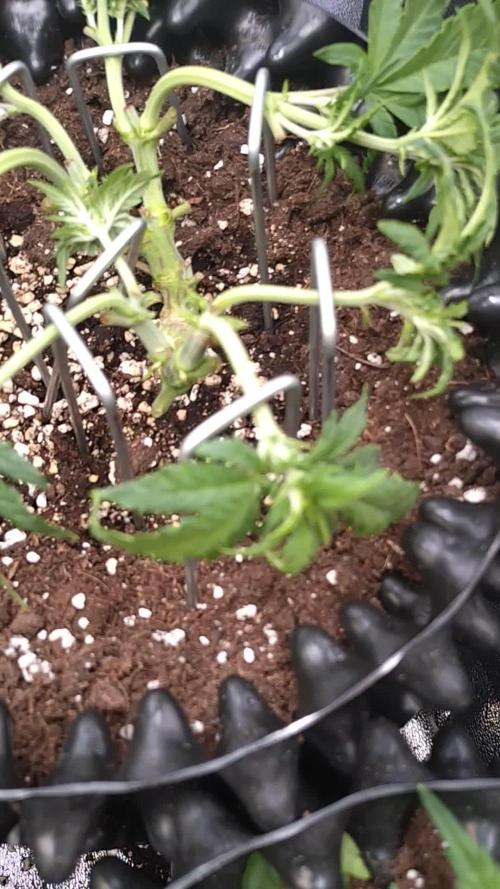
Die Ladies sind wunderbar in der Blüte.
Diese Woche ein leichtes entlauben!
Es sind ausreichend Nährstoffe enthalten (Blattfarbe) , daher nur 2 mal gedüngt sonst nur Wasser!
Außerhalb vom Zelt habe ich einen großen Entfeuchter auf rd 50 % regulieren müssen um im Zelt optimale Bedingungen von rd 55% zu erreichen.
Tage der Keimung = 4 Tage.
Tage in Wachstum = 28 Tage
Tage Blüte=42
Wachstum h = 0 cm
2 mal in dieser Woche mit Purolyt Mischung 1:25 besprüht
Lichtstärke: 95 %
PPFD: ca. 850 umol
Lichtabstand: 40 cm
Std Tag/Nacht: 12/12
Temperatur Tag: ca. 25 Grad
RLF Tag: 55-60%
Temperatur Nacht: 22 Grad
RLF Nacht: ca. 55 %
VPD Wert: ca. 1,00-1,10
PH Wert Wasser/Düngelösung: 6,4
EC Wert: nicht gemessen
Ventilator Oszillation: Stufe 2
Befeuchter: aus
Entfeuchter: Außerhalb Entfeuchter an
Zusätzlicher Entfeuchter: 1 Stk. außerhalb vom Zelt im Raum
Bewässerung: 2* bewässert mit Dünger mit den o.g. Mengen, 3 mal pures Wasser
Purolyt Besprühung: 2 mal
Besprühung Fast Plants Spray: 0 mal
Controlling: Grow Control
Dünger: Greenbuzz Nutrients
Licht: Pro Emit Vollspektrum
Abluft: EC Carbon Active 750 m3
Danke an Greenbuzz
https://greenbuzznutrients.com/de/
Ihr bekommt 25 % Rabatt bei der Nutzung des Codes auf der GB Homepage
https://greenbuzzliquids.com/de/shop/
Code: GD42025
(Mindestbestellwert 75€)

Likes
39
Share


@J_diaz420
Follow
Nuevamente se realizó una pequeña defoliación a hojas que tapen alguna flor 👍👨🌾🍀

Likes
5
Share


@Ninjabuds
Follow
Hey there the 2 pound cake plants are doing well they grew a decent amount sense a week ago. I turned the light up to about 200umol they seem to be able to take more light earlier than photo plants. I'm wandering if I should be giving it even more light I don't want them to be to small when they go into flower they look nice and the leaves are never sagging

Likes
3
Share

@PhinolaGreen
Follow
6. Woche
Das letzte Topping ist ein paar Tage her, denke diese Woche macht sie noch Veg und wechselt in ner Woche in den Stretch. Gab gerade nochmal bisschen Dünger. Ich habe den Green Sensation von Plagron erstmal wieder rausgenommen, da der ja speziell für die Bloom ist und ich nicht will, dass der jetzt irgendwas im Wachstum blockiert 😊

Likes
57
Share


@Zurban_Poison
Follow
Hello everyone! this week, I had to do defoliation all the same .. on that girl I was not going to touch .. the fact is that there were a lot of leaves .. too many .. it was difficult for the plant to breathe .. in short, I did defolation and also took advantage of the fact that the plant itself made a topping))) and with the help of the LST I took 2 central branches to the sides .. from today I will decrease the light regime gradually .. I hope this will help the plants show their gender as soon as possible ..

Likes
4
Share


@nd-grower
Follow
Water was 5.9ph gave some grow big and honey today.. raised lights up as well .
11-27-25 not showing signs of pH issue like the cookies but I did top her this morning so she's not gonna get any water for a few days which is ok with me
11-29+25: growing good 1st signs of flowering 2 days ago..
Water used was pH of 6.1


Likes
54
Share


@MarsHydroLED
Follow
Day 36 of flower
Watering day
3 gallons of water ph to 5.87
With a runoff of 25% to 30% .
1 blue dream
1 I'm pretty sure its Afghan hindu kush not white kush
Grow light: mars hyrdo tsw 2000 at 100% power 24inches above 🌞☀️
Medium: coco coir mix with compost at a 50/50 ratio with 30% perlite added⛰️
Nutrients: fox farm dirty dozen 🦊🚜
Grow space: 4x4x7
Water: tap water (my tap water is allows 110ppm) left out for at least 24hours
Likes
6
Share


@Frosty905budz
Follow
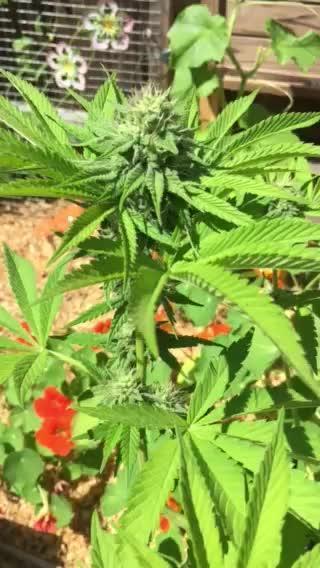
Lots of bud sites , couldn't be any happier how everything is turning out .. with no issues
Likes
61
Share


@WhiteEdge
Follow
26.02.2024
Clean and disinfect tanks and filters with h2o2+vinegar acid +bleach
Start using Silica + PH down to buffer water to 6.5-6.8 PH than adding 25ml AN connoisseur AB.
Mix new batch with 1.7ml AN connoisseur AB + Silica @ 1% H2o2 - total 30l
Donne one pass off long misting 2m with diluted nutrient solution 0.7EC. Flush buckets with diluted solution
PAR 350 PPFD, VPD 0,8, RH 60-62%, Temp Night-21c, Day-24/25c, Leaf temperature 22c, Light distance 75cm, CO2 650+ppm
340w@75cm distance
45s ON time 15min OFF time
PT-Pressurized tank - PH- 5.9 , EC -1.05, Temp-21c
NT-Nutrient Tank - PH -5.85, EC -1.0, Temp-19c
27.02.2024
Topping on all girls, 4 cut par plant
Detailly clean grow room floor, benches and main room floor,
From this week start feeding more, runoff is lower than input
Lower humidity to 58-60%
Girls looking great so far
PAR 380 PPFD, VPD 0.9, RH 58-60%, Temp Night-21c, Day-25c, Leaf temperature 22c, Light distance 75cm, CO2 650+ ppm
360w@75cm distance
NT-Nutrient Tank - PH -5.95, EC -0.9, Temp-19c
28.02.2024
Have timer malfunction, watering didn't work for some time, not affected by roots, still wet when realize defect
Replace all filters, great condition so far.
Think all three girls is going to be huge, hope i will somehow manage to get them to same canopy level with Purple Lemonade and Tropicana Cookies
After topping girls looking healthy,
PAR 360 PPFD, VPD 0.9, RH 58-60%, Temp Night-21c, Day-25c, Leaf temperature 22c, Light distance 75cm, CO2 650+ ppm
380w@75cm distance
NT-Nutrient Tank - PH -6.02, EC -0.84, Temp-19c
Nutrient strength still drooping, next top-up will be a higher strength, around 1.1EC
29.02.2024
Check roots, they start to the bottom off the bucket, still nice and white
Slowly continue to give more power to light, still have more than 1/3 off Diablo strength
PAR 410 PPFD, VPD 0.9, RH 58-60%, Temp Night-21c, Day-25c, Leaf temperature 22c, Light distance 75cm, CO2 650+ ppm
Nutrient Tank - PH -6.04, EC -0.81, Temp-20c
Ph is stabile so far, i don't adjust anything at this point, lets swing a little bit. If start to going above 6.2 i will bring it down with PH-
Humidifier operate less and less, girls make humidity in room
400w@70cm distance
01.03.2024
Again have issue with watering timers (DH48S-S), stop working again, noticed that early so no damage
Will need to invest in better timer for misting, this one is start to malfunction😡
Girls growing fast this week, no problem at all😇 Every day their progress can be seen 😀
Like that girls are almost same height and structure, very uniform growth by any mean👏
Replace all filters and clean UV-c bulb
PAR 460 PPFD, VPD 0.9, RH 58-60%, Temp Night-21c, Day-25/26c, Leaf temperature 22c, Light distance 70cm, CO2 650+ ppm
Nutrient Tank - PH -6.05, EC -0.86, Temp-22c
02.03.2021
Girls start to drink noticeable more water and nutrients, EC drop in tanks by 0.2 in last two days, PH is stabile, going on base side by little
Replace all filters , set Diablo to 440w without changing light height, let it shine 😀
Start to manipulate branches and tucking big fan leaves, recovery from topping is apparent, two new shoots are larger and larger every day
If growth continue with this speed, flowering probably in middle off next week, probably don't want to wait more than that
All three girls looking very similar, really great genetic , very uniform growth and structure
Hot and humid outside condition, thin this year we hit several HIGH Temp Record!
PAR 490 PPFD, VPD 0.9, RH 58-61%, Temp Night-21c, Day-25/26c, Leaf temperature 22c, Light distance 70cm, CO2 650+ ppm
Nutrient Tank - PH -6.07, EC -0.80, Temp-22c
440w@70cm distance
03.03.2024
Top up tank with 5l off fresh solution @ 1.2EC
Nutrient strength still dropping significantly compared with starting , PH rising slightly. Need to adjust at 6.2 to 5.95
Next nutrient mix will be 2ml AN connoisseur AB @ 1.2EC
Replace all filters, little participation on them, mostly from Kelp
Remove couple off leaves from all girls, ones that touching with other plants. Preparing for next week defoliation
Forget to refill Humidifier so for couple off hours RH was 48-50%, girls drink more than usual, water and nutrients.
Maximum PPFD at center is 600, at edges 440 PPFD
PAR 560 PPFD, VPD 0.9, RH 58-61%, Temp Night-21c, Day-25/26c, Leaf temperature 22c, Light distance 70cm, CO2 850+ ppm
Nutrient Tank - PH -5.95, EC -0.84, Temp-22c
480w@65cm distance
Likes
3
Share


@Professor_Shaman
Follow
Day 22 - Hit the girls with their first substantial set of nutes.
Day 23 - It’s a girl!!!! First appearance of calyx and pistils. Biggest day of growth since day 1. Just barely starting to see nutes at the leaf tip… running at full capacity!
Day 25 - watered 3/4 gal; filtered ph’d tap 6.5 ph

Likes
57
Share


@AsNoriu
Follow
Day 85 since seed touched soil.
Trim jail !!!
2.40 cm of hanging buds !!!
Happy Growing !!!

Likes
8
Share


@Mo_Powers
Follow
another week has passed and it is growing and thriving excellently. there has been a lot of sunshine and occasionally the necessary rain from above.
Likes
1
Share


@Kraken85
Follow
1 er Cycle : Ne vous faisons pas attendre plus longtemps, la magnifique Runtz fut atteinte en croisant une Gelato et une Zkittlez. Nous en avons déjà trop dit. La Runtz est le pinacle de la sélection moderne de cannabis, vous offrant l’un des hybrides les plus équilibrés disponibles (50 % sativa et 50 % indica) avec une puissance incomparable et un profil de terpènes dont l’odeur est simplement semblable à un sachet de bonbons aux fruits.
Bon, rentrons dans le vif du sujet. La Runtz reste relativement petite dans la salle de culture, elle atteint une taille modérée située entre 80 et 130 cm. Une de nombreuses choses superbes au sujet de cette variété, c’est son temps de floraison de seulement 8 à 9 semaines. Cela signifie que vous n’aurez pas à attendre longtemps avant de festoyer dans ses têtes violettes et vert-citron recouvertes de résine. Ses rendements aussi sont impressionnants. Avec un peu d’amour et d’attention, la Runtz est capable de produire 450 à 500 g/m² en intérieur. Cultivée en extérieur, vous pouvez vous attendre à récolter à peu près la même quantité par plante, plantes qui seront prêtes fin septembre début octobre.
Une des qualités les plus excitantes et acclamées de la Runtz, c’est bien évidemment son high. En tant qu’hybride très équilibrée, la Runtz vous offre le meilleur des deux mondes. Vous profiterez de sensations de relaxation physiques intenses et profondes, mais pas du genre à vous clouer au canapé. Attendez-vous à vous sentir euphorique, revigoré et créatif, sans la paranoïa et l’anxiété qui accompagne parfois ces effets. Mais ne vous laissez pas berner par l’expression « très équilibrée » : la Runtz est diaboliquement puissante ! Ses fleurs contiennent un incroyable 27 % de THC ! Alors, allez-y doucement avec sa fumée douce comme de la soie, vous planerez pendant des heures.
Mais qu’en est-il de ses saveurs et arômes ? Bon, vous vous doutez bien qu’on vous a gardé le meilleur pour la fin ?! La Runtz porte ce nom pour une bonne raison. Mettre son nez dans un sachet de Runtz, c’est profiter exactement de la même odeur que celle d’un sachet de bonbons sucrés : voilà à quel point son odeur est incroyablement fruitée ! C’est le genre de variété qu’il est difficile de partager et c’est bien pour cela que vos amis seront verts de jalousie. Elle est tout simplement délicieuse. Bienvenue dans la confiserie !
Vous voulez faire vous-même l’expérience de cet arôme spectaculaire ? Alors mettez-la main sur ce trésor du cannabis. Nous espérons que vous l’aimerez autant que nous !
2 ème Cycles


Likes
33
Share

@HinduGod
Follow
WOW LOOK AT DAT!!! DAT PLANT IS GETTING FROST BUILD UP!!! DA SCORE DIS WEEK SUN GOD 5 DAYS RAIN GOD 2 DAYS DAT IS VERY VERY GOOD!!! PLANT IS STARTING TO GET A LIGHTER SHADE OF GREEN DAT IS ALSO VERY VERY GOOD!!!!
PLEASE COME AGAIN!!!!


Likes
1
Share


@Dvrkstvr
Follow
Not much other than yet another super progressive week!
Oppsies tape came off and it was fully healed. I'm shocked.
Went through and defoliated today and grabbed some pictures.
Didn't grab many through the process.
Week 1.5 of flower was solid.


Likes
119
Share


@Natrona
Follow
Week 20 8/11-17
For my outside ladies, Opium, Auto Opium, Fractal, and Lemon Cake not much changed. They and with the trichomes just starting to form and 2 more moths to go. They continue lovin life outside. These ladies are maturing as many fans are yellowing and falling off.
Temps are comfortable following Storm Debby, in the 80s with low humidity. Buds are fattening up, trichomes are minimal at this time but some fragrance is starting to be noticed.
These ladies had a long vegetation phase. They germinated April 1 so I could get them hardened off before I went on vacay. The colas are large, trichomes forming and with 2 more months to go, my expectations for these are heavy yields and sticky dense buds.
Thank you @DivineSeeds
Thanks for the visits, likes and comments, I appreciate all the plant love💚.
Have fun & love what you grow 💚
Sending you good vibes of love, light, and healing 💫
💫Natrona 💫


