


Likes
4
Share

@Dameon0803
Follow
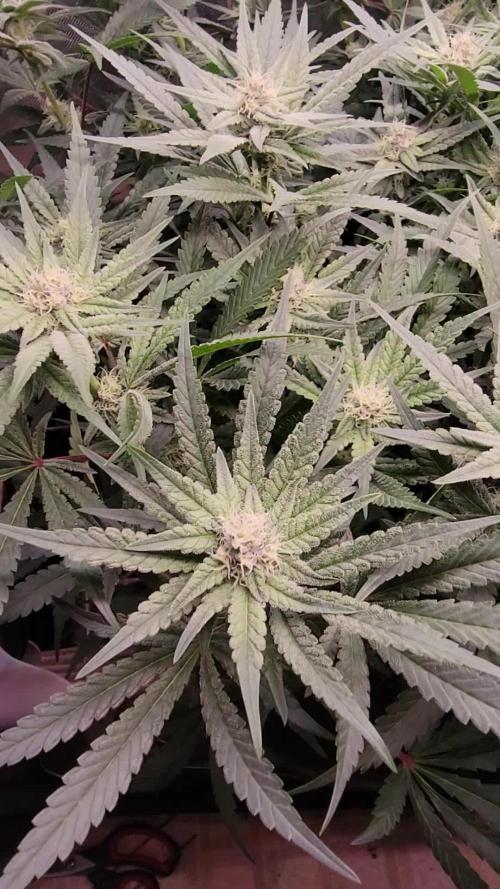
Another easy week. Bud and trichome production seem to be on point. This plant is truly maxed. She is 18 inches with about 12 inches being above the scrog screen. She stretched a little more than expected. She was supercropped in several location and didn't skip a beat. Obviously, the angle of my camera doesn't give the whole picture. But now there's some buds that can be watched in development. I'm fighting night time humidity. My little Vivosun dehumidifier can't keep up. Likely a future upgrade as I'm sure I'll struggle to get to 50% with lights on next week. Temps when my light off could ideally be lower as well. Not enough that I see the need to invest into anything like an A/C. Loving to see the little bits of purple start to come out. I'm sure lower night temps would amplify that. I did a final top dress of Build-A-Flower, an 1/8 cup of Craft Blend, and a topping of Kashi followed by a half gallon watering with the listed nutrients once at the beginning of the week.

Likes
16
Share


@Archieballs
Follow
These girls are taking their time adding weight!! The last Ultimates I did harvested at day 87 there’s no way they are gonna be harvested at the same time. Ultimate #3 has some real issues her leaves are browning and she’s so stunted for the LST on these girls we used a product called bendz they were these little plastic arches you put on the branches to bend them and I honestly think they stopped the uptake of nutrients into the branches so I won’t be using them ever again!!

Likes
9
Share

@Pompeyblue
Follow
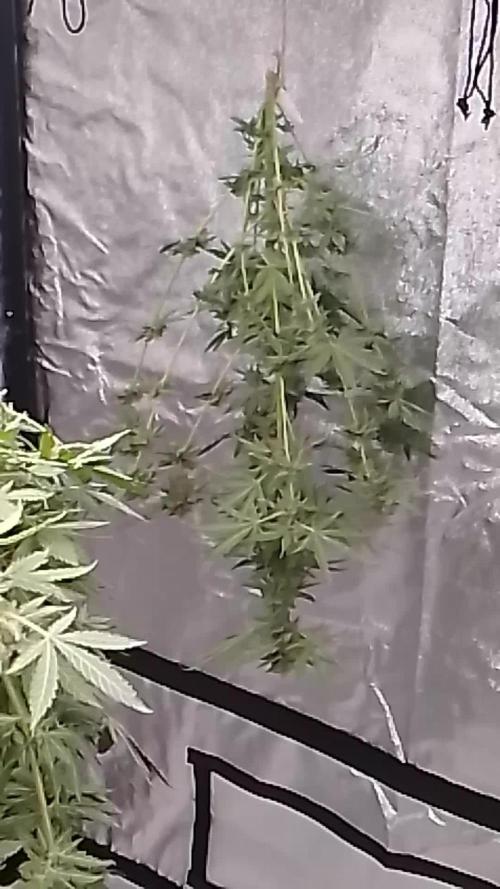
All chopped and hanging
BIG THANK YOU TO @Kannabia I really appreciate the opportunity you gave me to grow and show you're amazing strain's

Likes
13
Share


@Bread_n_Buds
Follow
This is another strain that is going full force and in both technical/free versions, we are talking about the Zookies Automatic by Zamnesia.
Remember that we are growing a plant worked with the techniques indicated and another left to grow without pruning to preserve its speed; in the previous/next diary you will find the other plant of the same variety.
And here we are to tell another story of a monstrous plant. We are Zamnesia but it seems like Jurassic Park. Immense, in a very short time it is putting out a lot of cannabis, you should see it at the end of the day the plant has changed a lot. It is one of those plants that in the first weeks of flowering stretches out. I have come across others beyond measure, it is difficult to keep them under control, but how beautiful!
Comparison is the salt of the experience, so the plant in the other diary will be treated very differently, go and see it to make a comparison.
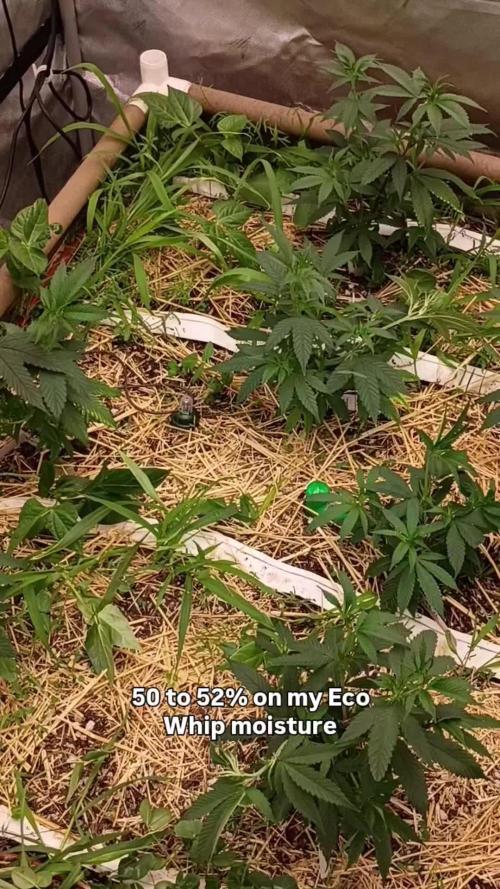
We started the Plagron fertilization program, we are in 100% organic configuration, the soil is made up of recycled Promix + 1/3 fresh soil + 10% Perlite + RQS Mycorrhizae Mix (4 g in the mix, 1 g under the small fiber pot).
In the middle of the week the pre-flowering started so I decided to start the program for this phase: 1 ml/l of Power Roots - 1 ml/l of Pure Zym - 1 ml/l of Sugar Royal - 1 ml/l of Power Buds - 4 ml/l of Alga Bloom
Remember the Green Sensation from the 3rd/4th week of flowering depending on the flowering speed or how you see the calyxes composing, when the calyx is in the swelling phase it is used.
We sprayed 5 ml/l of Vita Race foliar fertilizer once a week.
-------------------------------------------------
https://plagron.com/it
We always have the excellent RQS mycorrhizae running through the soil.
https://www.zamnesia.io/it/5778-mix-micorrhiza-easy-roots.html
Is a top strain of the last few years very high level of thc ---- https://www.zamnesia.io/it/11174-zamnesia-seeds-zookies-auto.html
Brief description of Zamnesia // The result of the cross between Animal Cookies, GG#4 and ruderalis, this compact variety produces top quality buds, maintaining all the charm of a modern US hybrid. Thanks to the hard work of the Zamnesia genetics team, Zookies Automatic is easy to grow, fast flowering and exceptionally vigorous. Regardless of whether you grow indoors, outdoors or in a greenhouse, if you are looking for a stable autoflowering strain that is quick to harvest, Zookies Automatic is definitely the one for you.
Like all Zamnesia autoflowers, Zookies Auto promises rapid harvests of top-quality bud with minimal effort. And she delivers on that promise. After germination, Zookies Automatic plants grow vigorously for around 3–4 weeks. At the end of the pre-flowering phase, plants typically reach a height of between 90–110cm, depending on the size of the pot.
The whole world of cultivation and much more is on Zamnesia: just take a look at the site and you will find "all the best that nature has to offer" in various shapes and colors.
---------------
www.zamnesia.com

Likes
91
Share


@420Highlifecouple
Follow
Well it was definatly another tough week.From battling temps of 34 degrees celcius to too much humidity levels over 70 percent,not to add to the trouble,my light blew.Im lucky a retailer had a MARS FC3000.
In Full flush with mollases and ph adjusted water and ready to pick these guys this week or next.As for the other girl she wasn't thr greatest after all that so she was pulled,hopefully enough for a few spliffs after dry n cure.
Thanks to all y'all guys help on my message list.you know who you are.bloody legends!
https://growdiaries.com/grower/420highlifecouple
https://youtube.com/channel/UCKvjJ_S8nRI2wTc4cx_O1KQ
https://myfastbuds.com/?a_aid=616a33e294e50
With every order you will get a free seed
Join the community on GROWDIARIES
It’s a awesome place to meet cool people, document your grow and learn a lot from fellow growers, happy growing 😊🌱


Likes
11
Share


@goeser
Follow
More details and photos are coming when all buds are dried in about 6-7 days00
Likes
56
Share


@JuanHaze_Arg
Follow
04/04 se levantaron hermosas! Les faltaba alimento a las pobres plantas,
Se realiza fertilizacion foliar y se riega el sustrato con el estimulador de floración big one. 500 cm3 de agua de osmosis + 500 cm3 de agua del grifo + 0.5 ml - cal mag de top crop + 1.5 ml de big one - top crop. EC: 1.1 PH: 6.3.
En 10 días se pasa a flor.
Se agrega al sustrato 20 gramos de bokashi de murciélago 🦇 vegetativo
07/04 se riega con 2 litros de agua( 50% osmosis + 50% canilla) + 1 ml de cal-mag de top crop (una bomba) + 2 ml de oro negro de namaste PH: 6.2 EC: 1.0
Se coloca red para hacer scrog


Likes
6
Share


@ZalySk
Follow
F39: Lovin this plant. Starting to get smellier too. Love the fluffy nug appearance.
F45: plant is starting to get brown hairs. Slowly on the decline now, maybe three more weeks.

Likes
6
Share


@Young_agronomist
Follow
Харвест был тяжелым и занял 3 часа , так как она была огромной .
Как итог 1350 г мокрых и протримленых шишек . Все цветы отлично созрели , даже те , которые находились ниже . Я дал ей достаточно времени созреть и она меня очень удивила
✊🏻🔥

Likes
1
Share

@Bear_Grows_Green
Follow
03/29 Let em dry back for a week fed em a tea turned Blumat back on after calibration and cranked the light and adjustment to environment. Through them into a fit so I turned light back down and cranked vpd again. These girls are being super finicky this time around all root zone issues starting to think it's genetic never dealt with soany root zone issues before
Likes
8
Share


@Lazuli
Follow
April 18:
Thank you MSNL seeds for the package
i germinated as soon they got here 😄
So i start with 2 strains in my small tent, then when the 4x4 is free i will pump it full too with all of these for a few crops, cheers
April 23: they both above ground now
April 20: the seeds have roots and are now planted in 2 liter pots

Likes
3
Share


@Easygrower
Follow
Hello growers day 83 the buds are in the jar I cut her down on day 75 so not bad I like her she didn’t play up one just gave her feed and she loves it I had her on a 20/4 light cycle from the start I gave her water for first 10 days then hit her with bio grow/bloom until I see her first pistols then I gave bio grow/bloom /top max/ bio heaven up till day 61 then I flushed for 2 weeks and cut her down on day 75 all in all I think she done pretty well iv got some nice buds in the jar so happy days until next time be safe and happy growing ✌️

Likes
43
Share


@Master_weeda
Follow
Jour70 suppression des branches inférieures (premier nœud) et arrosage avec 2 litres d'eau ph6. 3
Jour72 arrosage avec 2 litres d'eau ph6. 3
Jour75 arrosage avec 2 litres d'eau ph6.3

Likes
13
Share


@Weedig_Weedigson
Follow
Jetzt geht es zum ersten mal mit Power Buds in die Blüte. Ich bin sehr gespannt. Sonst sehen alle top aus.


Likes
9
Share


@Headies
Follow
fantastic smells coming out of the tent! The purple punch smells delicious. The sour diesel smells dank. The girl scout cookies smells like GSC
Likes
36
Share


@nonick123
Follow
Día 73 (12/08) Riego 500 ml H2O pH 6,55
Todas las plantas muestras las preflores hembras! (excepto LemonPaya)
Día 74 (13/08) Riego 250 ml H2O pH 6,55 . Están muy bien hidratadas
Pequeños ajustes de LST
Día 75 (14/08) Hoy día de lluvias torrenciales
Riego 250 ml H2O pH 6,55
Día 76 (15/08) Detecto mosca blanca en varias plantas. Aplico Spruzit a 10 ml/l ahora que aún no estamos en floración
Riego 500 ml H2O pH 6,55
Día 77 (16/08) Riego 500 ml H2O pH 6,55
La mosca blanca ha desaparecido completamente
Día 78 (17/08) No riego. Mañana a primera hora aplico Top Dress y riego profundo
Va a empezar la floración!
Día 79 (18/08) Alimentemos el suelo con Top Dress! 💥 Aplicamos 4 g/L sustrato de Tasty Flowers TD by Lurpe Solutions.
Total = 84 gramos / maceta
Riego con 1 Litro H2O pH 6,5 con 25 ml/L de Humus de Lombriz Liquido
Aplicación foliar Kelp hidrolizado de Lurpe Solutions a 0,25 ml/l
💦Nutrients by Lurpe Solutions - www.lurpenaturalsolutions.com
🌱Substrate PRO-MIX HP BACILLUS + MYCORRHIZAE - www.pthorticulture.com/en/products/pro-mix-hp-biostimulant-plus-mycorrhizae
