
Likes
Comments
Share


@BillMonroe
Follow
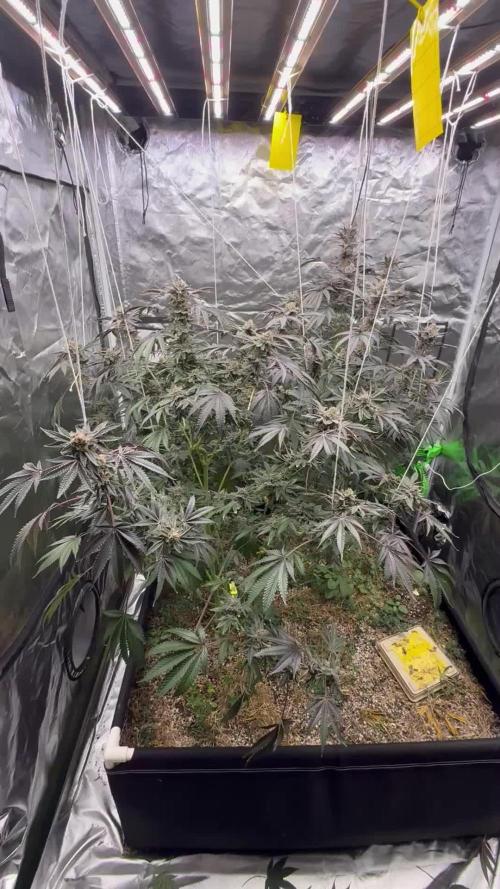
Smooth sailing. It's crowded so it's a challenge to take pictures. These plants have just kept going and going. It's a good grow to me.
I forgot to change it, but the lights have been on 12/12 for 2 weeks.
Dehumidifier and other decisions have helped me to have a pest and plague free grow (knock knock).

Likes
7
Share


@iHateSativa
Follow
Chopped And Hang drying
I lost count of thow many days in flower But I know its over 100 days
I'll be making canna oil with coconut oil
And canna oil with MCT oil

Likes
103
Share


@MG2009
Follow
10/24/2018
Beginning of week #5, flowering stretching is slowing down,and filling out, not much to report on all seems well so that scares me a little. Week 6 and maybe week 7 I will be adding Overdrive by advanced nutrients. Have any of you guy's and/ or gals used it ? I would appreciate any feedback .. Also thinking about upping the bloom by .5ml, any experience with raising nute levels plant looks very healthy, just wondering if anyone thinks it is worth trying. I'am using PH Perfect, grow, micro, bloom, plus overdrive in week #6, and #7, as I'am not sure if it is a 10-12 week plant. Not sure if you seen some 11 FINGER leaves and longer thinner SATIVA like attributes. Much like pollen Father donor grapefruit male (SATIVA)😎
Ps. more pics in morning as my tablet is acting up!
10/29/2018
All is well resin is plentiful even larger leaves are sticky and citrusy( captain cake). Glad I cloned her! Got four starting to root,and ready to transplant transplant. Trading one for swami select green zebra
10/30/2018
Light defoiliating and little supercropping. To even out canopy.
Likes
29
Share


@Jjthejetplane79
Follow
Topdressing with biofish and fishbone meal water in with em1 mix the two meals 50/50 1 cup per plant. Really not much I do other than observe now. Blumats set up all I can do is make occasionally a compost tea with alfalfa meal and ewc lobster compost blend splash of molasses. Em1 2x a month.

Likes
6
Share


@captaincondor
Follow
Hoping to have more space soon when I chop my gg4 sherbert , I have four plants in flower in one tent and its pretty overcrowded and too humid as a result. The gg4 is not fading or maturing as fast as I would like but I guess I'm just gonna have to be patient


Likes
12
Share


@StonedandSteady
Follow
Happy Labor Day Everyone!!!
Full Garden Update: Super Cropped with Low stress Training for Big Bushes and Budz!
AutoBlueberry 12th w/ 7th W/ Flower breed by #DivineSeeds #DivineSeedsSquad #DivineSeedsBreedingCompany
5th feed of #NukeHeads Nutrients #PlutoniumBloom Check out these Lush Ladies and those Awesomely Purple Budz with Trippy Trichomes Growing on! I'm also trying to make and/or convert one of my Budz into a Polyploid (Bigger and More Bulbous Bud) This AB is Flowering out and her Smells are Super Strong of Gasy and Candied Blueberries! I recently Trained down her branches to expose more Bud sites and Removed the Biggest fan leaves to expose the Bud site's to this Glorious #BloomPlusBP1500w #GrowStarQB1000w #OsreeQB1000w Full Spectrum Grow Lights! I've also Super Cropped, Topped um, Defoliated, Leaf tucked, and Implement the 3D's method like my Broski #TigerfishOrganics to remove the Dead, Dying and Diseased leaves!
Origin:Afghani/Thai
Type:50% Indica/ 40% Sativa/ 10% Ruderalis
Flowering:56 days
THC:22%
Harvest:400-550 g/m2
Height:110-150 cm
They were Growing under the #Growatt600w and in my #TopoLite 24×24×48 Grow Tent but I've Upgraded and Updated it to my #OsreeQB100W I'm also using #TNBNaturals #TheEnhancer Co2 Despersal Canister and using thier Ph⬆️⬇️ for my Decolinated Tap Water!
Green and Growing Up Great! She's Growing into her 8th week of Flower! She's Growing in my special blend of ProMix potting mix, a 1/2 bag of Earthworm castings and 2 light handfuls of Diatomaceous Earth mixed Up well for before transplanted! Diatomaceous Earth: Diatomaceous earth is made from the fossilized remains of tiny, aquatic organisms called diatoms. Their skeletons are made of a natural substance called silica. WHAT IS DIATOMACEOUS EARTH?
In a nutshell, DE comes from the fossilised remains of small marine organisms called diatoms. Over a 30 million year period, these hard-shelled algae collected on the bottom of bodies of water, eventually forming into a type of sedimentary rock. Fast forwarding, it wasn’t until around 1836 that a German peasant Peter Kasten discovered the ivory-coloured, powdery substance while drilling a well in northern Germany. Ever since, the usefulness of DE for multiple purposes, including industrial and horticultural applications, has been well-reported. Just sprinkle some diatomaceous earth on top of your soil and watch mother nature's secret weapon work its magic.CONDITIONS THE SOIL
When it comes to growing cannabis, everyone strives to provide the best soil to grow the best plants—but there’s always a way to make it even better. Making the soil a better medium is called soil conditioning, which is exactly what diatomaceous earth does. It works by improving the retention of moisture in your potting soil, holding a large amount of fluid and drying at a rate that’s much slower. This natural soil additive also helps to retain nutrients and allows for better oxygenation of the substrate. NATURALLY CONTROLS PESTS
DE is an all-natural, safe-to-use substance that doesn’t harm the cannabis plant with toxic chemicals. The nature of diatomaceous earth makes it useful against most types of insect infestation you might be experiencing; and unlike chemical insecticides, insects can’t develop a resistance to the effects of DE. So once they’re gone, they’re gone for good. DE is an abrasive. and when used as an insecticide, it gradually scrapes away an insect’s exoskeleton, absorbs the fluids, and dehydrates insects and other critters to eventual death. IMPROVES PLANT STABILITY
When using DE in your soil, it can be especially beneficial as it frees up nutrients so that they are made available to the plants as needed. This works via the silica content of DE being absorbed into the plant tissue, which helps improve the plant’s ability to respond and receive more nutrients as DE activates. This in turn results in greater yields and better stability under small pH fluctuations!
https://divineseeds.net/
https://instagram.com/divine.seeds?igshid=osxe2v7en33v https://divineseeds.net/
Thanks Again to All my Friends, Family's, Teams, Sponsors, Followers and Subscribers!!! Your Genetics are Merry Magnificent, Mega Marvelous and Mighty Medical! Love um!!! I really Can't stress enough how Thankful and Grateful I am of All of you and what you've Shared with Us! Means the World!!! It's definitely a Pleasure being able to Grow with these Phenomenal Grow Lights! Please Enjoy! BudBrothers4-Life! Cheers Famz!!! Much Props and Much Topz!💯🔥 #BloomPlus #Osree #GrowStar #Growatt #TNBNaturals #TNBTeam #GrowYourOwn #Bliss
https://instagram.com/bloom.plus?utm_medium=copy_link
https://instagram.com/growstarstore?utm_medium=copy_link
https://instagram.com/osree.light?utm_medium=copy_link
https://instagram.com/as420.ca?igshid=1f116alw054wp
The Grow Bags: https://www.as420
https://instagram.com/tigerfish_organics?utm_medium=copy_link
TN Tonny Dual headed Clip on Fan Amazon Link: https://www.amazon.com/dp/B07PJH8CDT/ref=cm_sw_r_cp_awdb_imm_6E4BCKYN6HTAASNQDJSM?_encoding=UTF8&psc=1

Likes
2
Share


@Mr_nugs_lover_David
Follow
She smell so so so strong that doesn't even look like an automatic strain,super strong mango smell coming off the flowers,I'm doing a perfect job here,she's happy and she's giving the best of her! 🌱💚#organics

Likes
15
Share


@Dico29
Follow
It’s now showing pistils pretty well, and I got some critical peyote from Barney farms In a napkin right now
There is a little burnt tip on fan leaves I think too much nitrogen since it’s in the big pot and the leaves are dark green. But looks good happy I picked the internodes during preflower too

Likes
7
Share


@Longlivebud
Follow
Getting there but never quick enough lol, being dominant sativa both phenos are slow to mature 60/40 S
Littered with flowers, icey.😎
Still yellowing pretty bad on front left dont know possible lock out? Or needs feed again not trying to feed to heavy...just enough. Added chi chang 2 more weeks going to start flush 1-21


Likes
9
Share


@Bncgrower
Follow
Another week is over, I couldn't update it before because I think the site was having problems... but anyway, the last photos were from June 8th and it's time to harvest. The smell is great and the flowers are very resinous despite being small!
Happy growing! 🌱🌱🌱


Likes
4
Share


@Kynareth
Follow
en lineas generales bien el cultivo. la genetica es buena aunque no esta muy estabilizada. no es resistente a los hongos, la cola mas grande que estaba vencida sobre otras plantas tiene botritis ne la parte baja de cada cogollo con lo que se habran perdido facil 30g en seco.
Likes
12
Share


@MicroHidroGrow
Follow
Última semana. Hice el primer lavado con flawless finish circulando durante unas 12hs. Luego ya puse agua y quedó circulando en proceso de lavado. Es el final y ya estoy ansioso. Esperaba tener listos los esquejes de la próxima camada, pero aún no tengo todos. Así que voy a ver cuantos pongo la próxima vez. Una planta quedó un poco atrasada respecto del resto. Así que voy a ver si la dejo una semana más cuando haya cortado. De todos modos no me preocupa, ya que era la planta que dejé sin guiar ni cortar y era el esqueje más nuevo de todos. Seguiré subiendo algunas fotos por si hay cambios, aunque no creo que haya mucha modificación.
Día 47. Las flores estan muy duras. Parece que va a ser interesante la cosecha. En pocos días estaré cortando.


Likes
5
Share


@Bluemels
Follow
Was soll ich sagen, ich habe den Grow abgebrochen, es schien mir nicht sinnvoll weiter auf Besserung zu warten. Ich starte mit neuen Samen.
Likes
6
Share

@carlitoshaze44
Follow
Así es como empezamos la tercera semana,seguimos con humedad alta pero la vamos controlando..
Estos días da buen tiempo la humedad en la calle será mucho más baja así podré meter aire sin tanta humedad..
De momento todo bien en el cultivo ningún problema hasta la fecha.
Ya podéis ver,y comentar sobre algo que veáis que yo no!
Como dicen! Ven veinte ojos mejor que dos!
🖖
Día 12
Último fungicida prevención mutritis,hongos
humedad.
Primer riego foliar hormonas producción de flores.
🌹
Día 13
Nada en especial solo observar si veo algún cambio tras las hormonas,aún no veo grandes observaciones fuera de lo natural del paso de los días.
En el día de mañana por lo que me recomendó el fabricante se verán los resultados a la vista!
Comentar que seguimos con la iluminación al 100x100 de capacidad
Marshydro sp3000 x2
Hero led Ignator t720
Yxo led 60w ir+un espectro completo
En la siguiente semana me llega el nuevo driver de philips para poder conectar la lámpara de IR que pude adquirir a Yxo nuevamente! Lampara led espectro completo + IR 70w .
Me vendrá muy bien para el pequeño espacio de la puerta que necesita más iluminación para poder desarrollar bien esas dos plantas,de la entrada.
La humedad fue cosa del pasado.
Evite el uso de desumificador eléctrico añadiendo varios de sales,deciros que funcionan muy bien no dan un control exacto pero mantienen una humedad interior estable para todo el periodo de floración!
50% de humedad lo demuestra!
Hoy añadi un poco más de sustrato. 110 litros exactamente sobre la cama de cultivo que tenía de topcrop con humus de lombriz,tierra diatomeas y alimentada con npk.
Después de eso tengo en mi cama de cultivo 810 litros de sustrato para mis 44haze. 💐
Saludos
Día 14
Anulado el intractor,ya que el propio extractor mete aire fresco por las rendijas de ventilación..
En lo largo de la noche iré viendo el resultado en datos..
Ya coloque los soportes para la nueva iluminación que en estos días llega su driver de sustitución
E visto que algunas plantas en estos dos días están en 67-70cm..
Ya colocado el sistema de riego para evitar más pisadas en el cultivo ya que algunas se realentizaron por pisar encima de sus raíces..
Le e metido una pequeña poda de bajos para airear más la zonas bajas del cultivo.
Pequeño riego de folacion con remedio de agua azúcar para dos que estaban más estresadas.
Día 15
Hoy era día de regar pero el sustrato aún parece húmedo en gran proporción aplazare el riego.
Día 16
Hoy me acerqué a ver las niñas en caso de que necesitaran algo..
Se ve todo correcto parece que no tienen mucha sed.. llevamos todo el día de alta humedad y lluvia en el exterior..
Las dejaré hoy sin riego también.
El sustrato está bien alimentado.
Mañana seguramente se presente el armario con una plantación pidiendo agua a gritos!! Jejeje.. así comerán con más ganas!,veremos qué tal..

Likes
10
Share


@Kosta_boy16
Follow
Put on a bit of size this week
Water res dropping at least 8 litres every 4-5 days spiking ppm , warm temps 30 -35 degree during day , seems to be coping propped lid up and angled plant to give other bud sites some light , will def do lst scrog next time around
