


Likes
Comments
Share


@Naveplanet
Follow
I transplanted first time in last day of first week. Let's watch about coming week 😊



Likes
17
Share


@Nicogreen
Follow
Sindsygt godt ramt af mig ❤️ ❤️ ❤️ 0.1 minus grader i nat. I morges 6.8 grader. kl 7dansk tid. Og kl Ca 13. 39.8 grader. Lige nu kl 1645 dansk tid. 23.4. 😉

Likes
93
Share


@PEAKYPLANTERS
Follow
Hi guys, What's up?
Welcome back to Queen Peaky's Flower Gardens
We have decided to further extend this beautiful woman's stay in our tent to continue developing the fantastic buds she has developed
Likes
180
Share


@SlowpokeFuegobud
Follow
DAY 78
Watered with nutes + enzymes 💧
DAY 80
Watered with nutes 💧 Aso added nematodes due to an invasion in the autoflower tent. 🐛
DAY 82
Watered with molasses. 💧 🍭
Pistils slowly turning brown. 😎
LED running at 100%.
Have a great week!! 😘
__________________________________________________
SET UP
240W Fullspectrum LED 660nm 730nm 3500K dimmable
custom exhaust fan 270/320 m³/h
3x Garden High Pro fans 5W
tap water EC 0,25 - adding Calmag to EC 0,4-0,6 - adding pH minus Bloom (AHH) to pH 6,5

Likes
94
Share

@Hologram
Follow
Finally my last harvest of this season and i have to say, Mac finished it like the queen she is.😎👌
No, her yield was not the biggest (she was in 6.5L pot so ..) but the taste is just exquisite! its sweet and earthy .. and the effects are very balanced 👍
Its a hybrid but feel i can still take a nap after a big vape (i tested her yesterday afternoon as well)..so i think indica is the dominat one here.. not sure though.. could also just b i vaped too much (or used too much THC oil yesterday😉 )
Buds are very compact and frosty...
am very happy with this lady..
beautiful flowers she had with all kinds of soft violet and pink colours..
I had to harvest a bit early bc weather was getting very bad and my greenhouse/safehouse was kaput..(note 2 self:
buy new cover!)
But that only resulted in me throwing the lower buds away (another note 2 self: next year, do some HST!)
I can def. recommend her, a beautiful plant to grow and so smooth to vape!
She did great in my lil'garden in Amsterdam with very few sunrays and lots of rain (yeah but i am content. for amsterdam standards it was great👊)
Luckily no caterpillers or WPM this year .. (butterflies knew they where NOT welcome here, with all the demons in my garden 😁.. see diaries of my big demons😉)
The end of summer was real smooth as well, she was able to be in garden till middle of september!🙌
So time 2 hibernate..
Its good bc i need it, think most of u know by now that i am batling MS and grow Cannabis for my medicine (there is none for MS and i cant handle the pain medication..)
and to say it short, it has been..f hard this summer..
I did my diaries for whole summer long anyways, despite the hardships.
..i need 2 recover...(Luckily i grew a lot of medicine ..so winter will b xtra chill😸👍)
Thank you to the select few that supported my work and understood my struggles.
For that small group, I am eternally grateful.😚
U rock!
cyall next year, growbretheren and sistren, but beware for the new shiny Hologram 2.0! ;p
Happy growing4all✊
*wet weight: 107 gr + 15 gr sugarleaves and some small buds for making THC oil
*germination: 03.07 Havest: 13.09
*dry weight: 31 gr + 10 ml THC oil (how 2 make THC oil: https://growdiaries.com/diaries/179107-grow-journal-by-hologram)
*feeding schedule: water with nutes every other day (the other just water)
https://dutch-passion.us/cannabis-seeds/auto-mac-1

Likes
31
Share


@JeyGanesha
Follow
Gorilla 🦍 cookies bellissima plant una delle 2 gorilla si è allungata più dell'altra.cmq continuano a dare il meglio di sé.
Likes
9
Share


@Stoney_Stark
Follow
February 7th: I gave each plant 1 gallon of RO water pH'd to 6.53pH
February 8th: 2.5ml FloraMicro, 1.5ml FloraGro, 2ml FloraBloom, 5ml Ripen. I made one gallon of feed water and gave each plant 1/2 gallon.
February 10th: I gave each plant 3/4 of a gallon of RO water pH'd to 6.5pH.
I will be harvesting these ladies on February 13th.
I cut these ladies down on 2/13/2025, they are currently drying at 68 degrees/60% RH.

Likes
15
Share


@IsseyBukkake
Follow
We've made it to day 28! - 17/12/20
The girls seem to be happy and healthy today.
I won't be feeding/watering them as the pots are still heavy from yesterdays feed.
A few of the girls have started to show sex & the smell has picked up a little bit(inside the tent), so I'm hoping to see some flowering begin this week sometime.
(I've been using my iPhone as my only DSLR lens is useless for focusing on certain depths, but I hate the colour I get using the iPhone... I may be switching back to DSLR unless I can find a better camera app.)
update - day 29 (18/12/20)
Short update today.
Fed the girls today and will probably be feeding/watering every day from here on out, we'll see though.
veg growth has really taken off by now, I'm hoping to see some flowering this week.
update - day 30 (19/12/20)
I fed the girls today.
I need to find a better way to hand water, the plants are so short and bushy its a pain getting in between all the branches.
I wish i left my drip feed system up and running, I will definitely refine it and use it next run.
Update - day 31 (20/12/20)
Fed the girl's straight water today.
I'm going to purchase the pieces I need tomorrow to reconfigure my drip feed system & hopefully have it running by mid-week!
Update - day 32
I attempted to set up my drip feed system today but the plants are too thick around the base to place the halo around :(
I will have to wait until next season to set it up, oh well, I guess its hand watering for the next 5-10 weeks
Fingers crossed these girls start to flower ASAP.
I fed the girls today, everything is looking good so far.
I also moved the plants around to try to make hand watering easier, I had issues trying to water the whole pot instead of just one spot due to plants/branches being in the way.
Update - Day 34 - 23/12/20
It definitely seems ill be watering the girls every day from here on out.
All the girls look fairly happy and healthy, they're getting a bit big for the 5x5 they're in.
It looks like flowering has begun on 2 of the girls, hoping to see some more progress on the others in the next few days.
Thanks for stopping by! 🙏

Likes
10
Share


@CampaCavallo
Follow
7ª settimana di fioritura💐
I bud della bella BLACK MUFFIN di SweetSeeds 💚🐘💚 adesso scoppiano di gioia sotto il sole della MARS HYDRO TSL 2000 🌞
Il raccolto è alle porte🍁🍂✂️ e per la ragazza c'è da bere solo acqua piovan💦💦

Likes
5
Share


@CreoWeed
Follow
Hello nice people!
This week number 6 went pretty good... Colas are building up and bringing out gorgeous colours as you can see in the pictures, purple mixed with pink and orange makes this plant the most beautiful I ever grown.
The smell started very softly and it had a kind of pine arome, sublime.
I've started giving her some Bloombastic and will keep doing so for the whole week.
Stretching seems over and she kept a quite compact size, at 62 centimeters.
That's all lads, I cannot wait to update the next weeks of this marvelous plant.
Ah, I also just harvested and rated my other diary, come and have a look if you have done it yet!
Stay tuned and stay high peeps!

Likes
13
Share

@SuiXideGhXsT
Follow
10 TH FEBRUARY UPLOADED VIDEO ENJOY
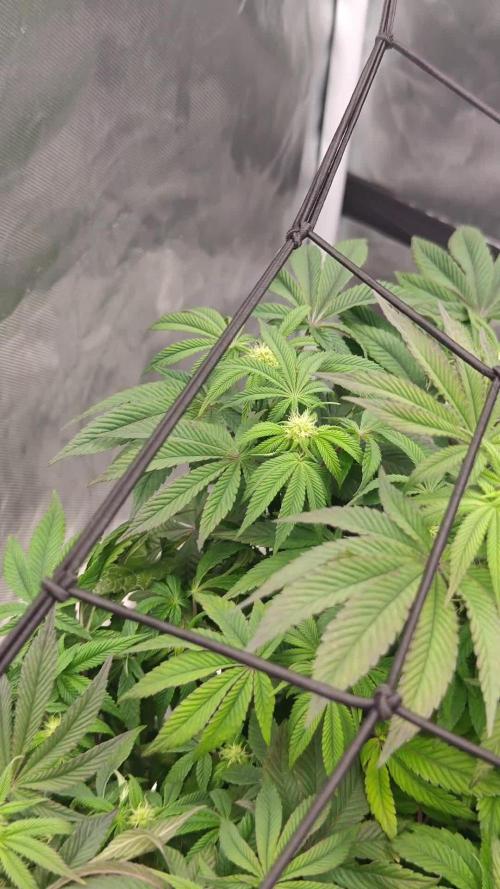
The girls are starting to turn a really beautiful shade of purple.Overall, I think they have turned out to be very beautiful plants so far. Considering we've only just started the second week, she's already showing a lot of color. I think she's going to be something really beautiful.
I've noticed that I sometimes forget to post here. I'm really sorry about that.I'm trying my best to make it run more smoothly.
If you'd like to support me, feel free to check out my Instagram profile. I post updates almost daily in my story (including videos that somehow won't upload here because the resolution is too high / the file size is too large) and occasionally in a social media post as well.
Even just one view would help me a lot; I don't even expect a like. Anyone who wants to can follow me so they don't miss anything. The name is in the profile or would be: SuiXideGhXsT
I thank everyone who takes the time to read or even visit my site. You are the best! I wish you all continued happy growing and please be kind to one another.

Likes
8
Share


@RainerWinklerGrow
Follow
This should be up to week 2-3 of flower, where the Mimosa x Orange Punch, which had the earlier Mutation, started herming on the mutated part, which i noticed a bit too late and it pollinated some of the other buds, i cut all of the affected bud sites of, in the end the furthest away runtz got pollinated but the others luckily barley did and only had like 5-10 seeds in total.


Likes
22
Share


@Canntemporary
Follow
Week 4 of bloom in a diy vertical setup. The space is 10x5 feet and in total 120sqft of canopy space
Likes
12
Share


@Siriuz
Follow
Pretty good pretty much doing great
Hopefully we get to see this lady hgge very soon, we gonna continue to feed her well and make her feel comfortable at all times
Likes
11
Share


Likes
15
Share


@Fan2Grow
Follow
I really glad to see difference between phenotype, everything going so well, thx 4 U support , and happy grow everyone . 🤩🤩
Likes
17
Share


Likes
9
Share


@Headies
Follow
So Friday will be day 70. I messed up a lot, did lst and used big pots so I'm thinking these might go 3-5 more weeks. They smelled so amazing a few times today though. First the purple punch, then the sour diesel, then the girl scout cookies, each gave off aromas one after the other a few times today. The purple punch smalls so sweet and delicious.
Likes
14
Share


@goeser
Follow
At least one if the ladies is ready to harvest. Just made a final check with the microscope and i think she is ready. I could wait a bit more for more amber heads but i think thats ok.


Likes
6
Share

@nonick123
Follow
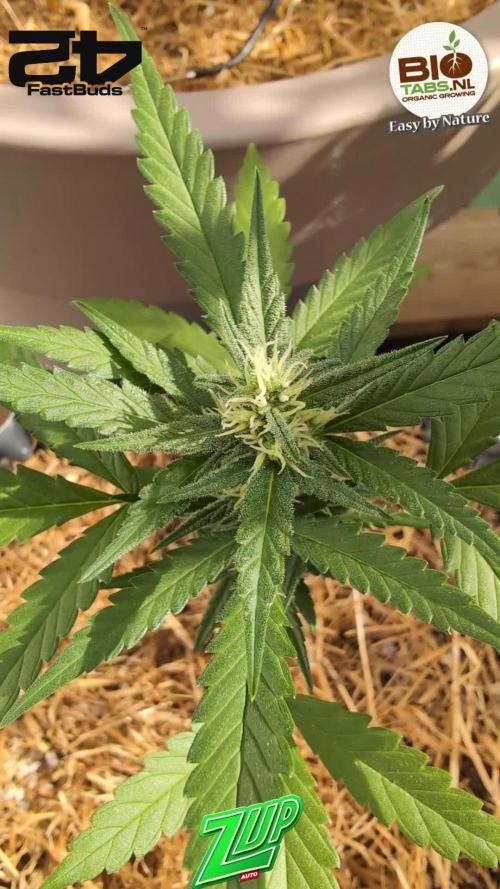
Una pequeña chica que ha salido adelante tras germinar con temperaturas cercanas a los 42 ºC en la horas centrales del día
Por eso está pequeña!
ZUp Auto by @42.fastbuds @42.fastbuds @fastbuds_espana
🚀 FastBuds 15% DISCOUNT code "NONICK" 2fast4buds.com
💦 BioTabs 15% DISCOUNT code "GDBT420" biotabs.nl/en/shop/ @biotabs_official
🌱Substrate PRO-MIX HP BACILLUS + MYCORRHIZAE @promixmitch @promixgrowers_unfiltered