
Likes
Comments
Share


@growerfromnc
Follow
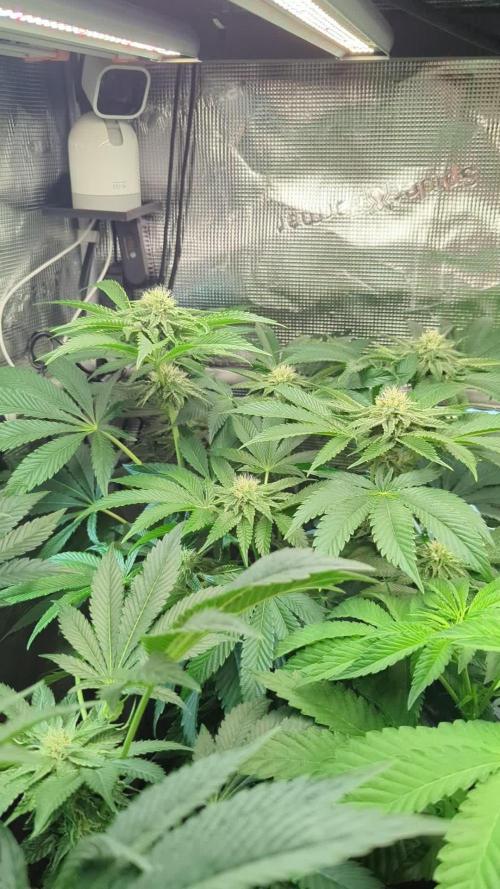
Started showing hairs ........had to cut more fan leaves back for light penertration n staked down branches

Likes
10
Share


@ZombieNug
Follow
Chugging along, slight nitrogen burn off on largest phenotype. Just fattening up for 4 more weeks then choppy chop.

Processing
Likes
28
Share


@Bud_E_grows
Follow
Still progressing. Haven’t fed anything except cal mag water and occasional misting. Slowly lowering grow light, and still dialing in the temp and humidity. This week between 69-73 degrees Fahrenheit and humidity 40%-50%. Occasional leaf tucking
Likes
14
Share


@eldruida_lamota
Follow
Que pasa familia, vamos con la novena semana de floración de estas Rainbow Melón feminizadas de fastbuds.
Vamos al lío, de las 3 plantas, me quede con 2 por espacio, siempre pongo alguna semilla de más por si no abriese alguna por no perder ese hueco del indoor.
También se trasplantaron a su maceta definitiva, en este caso de 7 litros que además provocó un shock que también solucione.
El ph se controla en 6.2 , la temperatura la tenemos entre 20/24 grados y la humedad ronda el 50%.
Las flores están bien prietas y resinosas, sacan unos aromas muy fuertes que no logro describir así, está acabando de madurar, los tonos que se marca son increíbles, no veas como se han puesto.
Hasta aquí todo, Buenos humos 💨💨💨

Likes
4
Share


@mad_nad
Follow
Well.. we are at the finishing line. The buds are not big but looking very delicious!
Only a two cups of water for each plant this week..
Likes
72
Share


@eneRgygrow
Follow
Hello guys :)
Week 7 of flower is here and its just great. i cant wait for christmas 😅
i gave half base nutrients this week but still full booster, next watering will be only water till harvest..
Critical Kush is nearly rdy, Gorilla can take 2 weeks and the OG is coming rly slow but nice

Likes
38
Share


@Ukfarmer420
Follow
Hi guys
So end of week 7 entering week 8.
Blue cheese stinks buds are solid the dark phoenix scrog is frosty asf!!! They still have a way to go yet tho. I reckon by day 70 all will be well and done
There under a 600watt hps light now to finish them off as using the led lights in my pot noodle grow off with wifey. I just started a YouTube channel I will be doing daily videos on my current run, like subscribe and comment on there for shout outs.
Happy growing guys! 😁


Likes
2
Share


@All_about_420
Follow
Die letzten Tage unter 18 Stunden.
Bin froh, dass ich mich entschieden habe alle drei,
statt nur zwei Stück mitzunehmen, wie ich anfangs geplant habe.
Alle drei wachsen mittlerweile wirklich schön, sind stark und gesund.
Das Blattwerk musste schon in bisschen gestutzt werden,
um die Seitentriebe etwas mehr zu beleuchten.


Likes
37
Share


@RFarm21
Follow
Hello growmies!
25/08 - Alimentação Royal Gorilla # 1 : CE = 1,39; pH = 6,3
O gráfico representa a nutrição da RG#1 misturada com 2,5L de água.
25/08 - Alimentação Royal Gorilla # 2 (2,5L): CE = 1,33; pH = 6,1
-BioGrow - 3ml; BioBloom - 5,5ml; TopMax - 2,5ml; BioHeaven - 6ml; Activera - 5ml;
25/08 - Alimentação Queijo Royal # 1 (2L): CE = 1,36; pH = 6,2
-BioGrow - 3ml; BioBloom - 6ml; TopMax - 2ml; BioHeaven - 6ml; Activera - 6ml;
21/08 - Alimentação Queijo Royal # 2 (2L) - CE = 1,54; pH = 6,3
-BioGrow - 3ml; BioBloom - 5ml; TopMax - 2ml; BioHeaven - 6ml; Activera - 6ml;
Likes
21
Share


@SAC87
Follow
So if you checked my entry from last week, I updated it to as the Zkittles ended up being male or hermie.
Day 7: These plants were fed today with 685 ppm with 1.5 ml/L of HOG Micro and Bloom, 1ml/L of Green Planet Rezin, 1ml/L cal mag and 2ml/L of Green Planet GPF Uptake fulvic acid, PH 6.0.
I have been trying to gently move pots and branches to fill the space left by the zkittles and still maintain a level canopy. I have raised the light inch by inch as the plants grow to hopefully have a more tall stacked cola structure. There is 1 light primarily over the Vanilla kush as it seems to want to stretch more than the others and I want to keep its internodes as tight as possible. I have high hopes for the Amnesia Lemon as it’s branch structure could end up producing some solid clusters. The critical kush is similar, Good stacking but lesser branching.
There is buds starting on every plant. I contribute that to the week of 14 hours of light and the 2 doses of HOG red sun which helps stacking and speeds up transition to flower.
I am excited to see what happens with these over the next couple days and long term what these Barney’s seeds can do.
Thanks,
Happy Growing 🌱
I am going to update this entry as the week progresses and see how I like that.
Update: Day 10- I was away from home working my night shifts and returned home to find dozens of nice little budlets have formed. The plants seem quite happy, color is good, which I like to see cuz I always under feed N in the first bit. I did some mild defoliation to open up lowers. Stems are nicely stacking and about 6” over the trellis. I bent down the stretching Vanilla tops to keep canopy as even as possible.

Likes
29
Share


@GrownwithLED
Follow
The veg. continues thru week 6 and the plants grow now very healthy and gain quickly in size and diameter. They love the environment in the HOMBEOX grow-tent and the light-intensity and spectrum of the SANlight LEDs. The two EVO4-120 fixtures are still dimmed to 60%, which is plenty of light for this stage of the growth. My 12 plants are supplied with a water/nutrient-solution from a 'FLEXITANK' 100 liter reservoir via the AUTOPOT-system 'Easy2Grow'. This system has two plants per watering tray and 12 plants fit tightly into the 120x120 cm HOMEBOX tent. I add a little BIO NOVA 'BN-Roots' and 'BN-Zym' to my water and correct it with ph-minus to a ph-value of 6,0. Now the plants can take up all nutrients in the soil they need and continue to grow well. 👍😎


Likes
30
Share


@valiotoro
Follow
Week 9🤓!!
Im entering in the last PuSsSh
Green ZenZaaation💥
FCE-6500 100% + adlite UV IR deep red🔛
Happy growing💚


Likes
95
Share


@DogDoctorOfficial
Follow
Week 5 day 2 from germination And i gave them a first little defoliation yesterday, they have seemed to like it 🤩💚
Week 5 day 3 from germination And all going as normal, I raised my EC up to 0.6, they seems to like it 💚
day 40 from seed And i took some more leafs off, CS2 is now the queen from the Chocolate department and TP2 on the Tropicana department. They all look super happy, i think a couple of days more and i will change them to a bigger pot. For now i will keep giving them all my love and keep hoping for he best 💚💚💚💚
Little battle between Topicanna Poisen from @sweetseeds vs Chocolate Skunk from @00Seeds (just for fun)
TP = Tropicana Poison
CS = Chocolate Skunk
All i grow is medecine for myself, nothing to sell, dont even ask !!!!
Stay safe and do it with love for the love ❤️ 🙏
💚Growers Love to you all 💚


Likes
2
Share
@PapaTerps
Follow
Wizard Fuel - Wizard Trees
Day 70 - Watered with 3L of RO tap water with nutrients, mixed individually, in order and then pH'd to 6.3! She has completed her stretch phase, has developed her bud sites and is now focusing on bulking her flower 🙏🏻I removed a couple of fans leaves to improve general airflow in the tent 💪🏻 She has developed a good amount of trichomes on her buds and her smell has also started to appear - very gas earthy 👌🏻


Likes
7
Share

@Organic473
Follow
I’ve been trimming and adjusting her LST in preparation for flower. She is almost there…I read she stretches during flowering…2 more weeks and I would add her to a 25 gallon pot then flower her.


Likes
53
Share

@DogDoctorOfficial
Follow
Harvest Report: The Swift Journey of Blackberry Auto
Greetings, fellow cultivators! The moment we've all been eagerly awaiting has arrived – the harvest of my Blackberry Auto. This beauty has moved through her life cycle with astonishing speed and grace. Let's take a moment to reflect on her incredible journey from seed to harvest and celebrate the fruits of our labor.
Seed to Sprout: It feels like just yesterday when I planted the tiny seed of Blackberry Auto. Nestled in a Root Riot cube, she sprouted with vigor, her first delicate leaves reaching for the light. The conditions were perfect, with temperatures at a steady 28°C and relative humidity at 95%, creating an ideal environment for her early growth.
Transplanting and Early Growth: As she transitioned to a small pot filled with rich soil and Mycor Mix, Blackberry Auto continued to thrive. The Mycor Mix, with its blend of various mycorrhizae species, worked wonders in enlarging her root system and facilitating nutrient uptake. Her early growth was nothing short of spectacular, setting the stage for the robust plant she would become.
Rapid Vegetative Phase: Blackberry Auto quickly outgrew her initial pot and was soon transplanted into her final home – a 16L AutoPot. This setup allowed her to drink as she pleased, supported by the precise hydration of the AutoPot Aquavalve. With a foundation of Aptus All-in-One Pellets and Mycor Mix Soil, she had everything she needed for explosive growth. Her leaves grew enormous and lush, and her branches spread wide with gentle low-stress training.
Swift Flowering and Stunning Development: Entering the flowering phase, Blackberry Auto didn't slow down. Her buds formed quickly, each one a masterpiece of nature. The colors were a sight to behold – deep purples, vibrant magentas, and hints of dark blue. The aromatic symphony filled the grow room, a testament to her potent genetics and the meticulous care provided.
Natural Brilliance and Final Weeks: Observing her rapid progress, I ceased all feedings to let Blackberry Auto showcase her natural brilliance. Her final weeks were marked by a dazzling display of colors and an incredible pace of bud development. Each day brought new marvels, as her buds swelled and her trichomes sparkled like a constellation.
A Heartfelt Reflection: From the moment she sprouted to her final days of flowering, Blackberry Auto has been a true wonder. Her speed and beauty have exceeded all expectations, and it's hard to believe how quickly she reached this point. This journey has been a testament to the magic of cultivation and the resilience of a well-bred strain.
Acknowledgments and Gratitude: As we celebrate this harvest, I extend my deepest gratitude to @fastbuds_official for creating such a remarkable strain. To Aptus Holland, my main sponsor, your support has been invaluable in nurturing this beauty. A special thank you to Grow Diaries for providing a platform to share this journey, and to the community for your shared passion and camaraderie. 🌱💚
As we move forward, I eagerly anticipate the trim and smoke reports, where we'll dive into the sensory delights of Blackberry Auto. For now, let's revel in the joy of a successful harvest and the extraordinary journey that brought us here.
Genetics Blackberry Auto @Fast_Buds
Food - @aptusholland @aptus_world
As always thank you all for stopping by, for the love and for it all , this journey of mine wold just not be the same without you guys, the love and support is very much appreciated and i fell honored and blessed with you all in my life