
Likes
Comments
Share


@Roberts
Follow
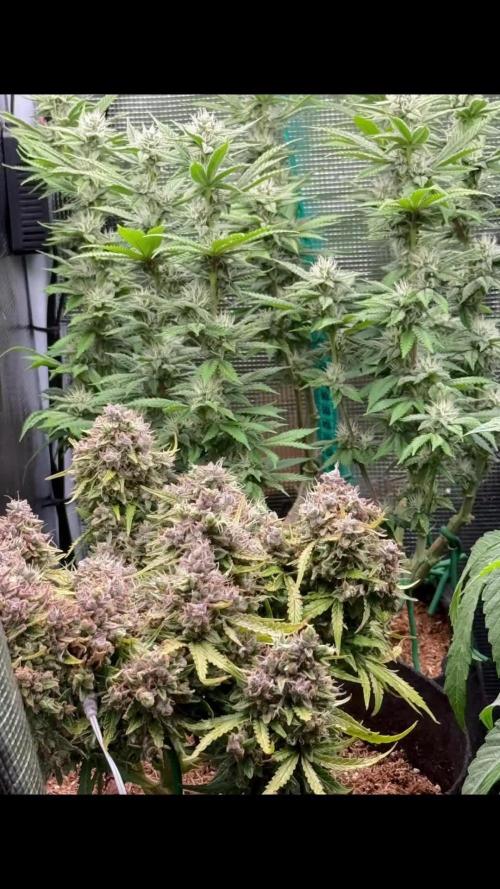
Purple Ryder is doing great. She is bulking and has a nice smell and frosty resin layer going. She is growing great under the Medic Grow Mini Sun-2, in Agrogardens nutrition. I did a solution change on her 4 days ago. Minor ph fluctuations, but it is mostly stable at the moment. Thank you Agrogardens, Medic Grow, and Doctor's Choice 🤜🏻🤛🏻🌱🌱🌱
Thank you grow diaries community for the 👇likes👇, follows, comments, and subscriptions on my YouTube channel👇. ❄️🌱🍻
Happy Growing 🌱🌱🌱
https://youtube.com/channel/UCAhN7yRzWLpcaRHhMIQ7X4g

Likes
43
Share


@Regenwurm
Follow
Den Ladies geht es ganz gut. Sie werden immer hungriger. Das Wachstum läuft gut, ich hoffe das geht so noch in diesem Tempo 1-2 Wochen weiter. Interessant ist, dass die Blackberry und Purple Lemonade eher aussehen wie eine Sativa, und der Hybrid Orange Sherbert bei dem am meisten Sativa drin ist, aussieht wie eine Indica ! Wir werden sehen…. Die Blackberry und Purple Lemonade sind von der Entwicklung ca. 1,5 Wochen voraus. Das Klima ist nach wie vor optimal, sie mögen das Blütelicht wie gesagt sehr gerne. Die aktive Zuluft läuft Konstant während der Beleuchtung. Da die Pflanzen sehr gesund aussehen, werde ich die Düngemenge minimal bis gar nicht korrigieren. Gießintervalle ca. 2,5-3 Tage mit jeweils 2 Liter. LST nur noch vereinzelt, Sie sollen jetzt wachsen, minimal entlaubt

Likes
15
Share


@CG420
Follow
Tras acabar la segunda semana de floración así se presentan las pequeñas.
Hemos ido defoliando alguna hoja de la parte baja de la planta, aireando un poco a las niñas por la zona baja .
Las plantas ya empiezan a mostrar sus primeras bolitas y empezamos a añadir en la solución top Candy y pk13-14 para ver engordar esas bolitas💚.

Likes
25
Share


@EBxAH
Follow
Well week 7 has started and 1 full week into 12-12. This time of year is perfect for winter time flowering. Basha is 26" Steffa is 36" and Wandzia is 27" so I average the height at 30". I think they look pretty damn good for 50 days old, lol. These ladies are currently taking in a gallon a piece every two days now, different from last grow. Also I've been bottom feeding these girls. That's about it for now.
Happy Growing Everyone
✌️❤️😁🍀🎶👽
EB

Likes
45
Share


@chapadux420r
Follow
Wassuuuup my dudes
21 days into flowering and the results from the lst and defoliation are showing up. Multiple healthy tops and even the small nodes under the canopy are growing bigger, if all goes well I won’t have many popcorn nugs but I’ll have just big buds (let’s hope)
I guess this also means they won’t stretch much more but I think some more height would be good for yield, anyway, can’t complain for the 1st grow and this is a process, there are no perfect grows!
This week was also a week to add some more nutrients (the plagron) and it’s working very well for now!
Let’s wait for the next few weeks, can’t wait to see the fatty buds 😂
Tell me what you think!


Likes
6
Share


@pzwags420
Follow
Week 8 has gone well and she is chugging along. She is still putting out new pistils with some turning orange. Calyx's are growing longer and buds are still soft. I'm thinking a min of 10 weeks flowering for her. I removed some leaves on inner canopy to bring some air and light deeper. She is so bushy its hard to even defoliate maybe next time i will remove some more lateral branches... afterremoving the leaves I must have come incontact with a pollen sack as where I defoliated all seemed to be polinated over night and are making seeds :( I will cut my losses and harvest while seeds are still small.


Processing
Likes
11
Share


@ganjaman24
Follow
Sorry guys been lagging on posting because got a lot other stuff going on n I figured this plant would’ve been chopped by now but I must say she’s been filling out quite nicely..I lowered the light hours to try n see if thatll he’ll ripen her a bit faster as I’m looking to replace her with another plant


Likes
43
Share


@TheBudWhisperer
Follow
Medium:
Yep - still gonna beat on the DWC drum. It just gets better and easier every run. Almost religiously changed out the res. every week and this was definitely overkill. Could’ve easily gotten away with every 10 days to 2 weeks. Stuck with peroxide this run again instead of going with bennies via hydroguard or hygrozyme. The results speak for themselves on a 6 week veg. That’s for sure. Still save’n them dolla bills on the nutes too. Minimal nute mixing (as well as simplistic regime) and for what we’re using in each res. - gotta be easily a 50-60% savings on nute consumption vs. more traditional methods. Honestly makes one wonder why organic soil grows are seemingly all the rage. I’ve found terp. Profiles, structure, plant health and of course yields to all be just that much better in straight water. What more can I say, we love our DWC.
Method 🎚️🎚️🎚️
The dueling methods were the whole point of this grow. Our best attempt to illustrate the differences between LST vs. LST/Topping ie. just how significant is the difference in terms of overall production? The truth of this test is a bit of a double edged sword. On the one hand, topping does have a significant effect on overall yield. This fact is regardless of whether or not from seed or clone.That said and when it comes to clones, you still have to be mindful of the drawbacks of further dividing (and thus reducing nug size for) main branches. Our topped clone #2 is a perfect example of this. While the structure demonstrates significantly more branching, the nug sizes are also significantly smaller. As you’ll see in the yield details it does somewhat make up for this through a higher overall weight but it was also a much less manageable plant than #1. Root mass on the topped plant was heavier and bulkier, drinking much more water than its counterpart. And in late flower half the plant was pretty much falling over. While some of this is attributable to the extremely hollow stems (and thus a carbon deficiency), making the most of the grow light proved difficult with the topped plant as bushy as it was. Basic summary - if ur cloning for profit or efficiency, stick with straight LST and grow a whole bunch of em. If I had to do it again I don’t think i would’ve bothered with topping - just for the sake of greater ease🤔🤔🤔. Then again, I’m greedy as fuck when it comes to my yields so I Could totally see myself trying to max everything out and go for broke🤙🤙. 3/5 volume bars for the rating - we accomplished what we were trying to.
Yield/Harvest🌴🌴🌴🌴
Awwwwwe yeah - down to where it counts and these girls were champs💪. While internodal spacing was longer than necessary and overall bud size was smaller than average; these plants pushed out some solid weight👍😎👍. Ran er through a 7 day dry and all jarred up on a slow cure.
Final numbers:
Total yield - clone #1: 5.14oz = 143.92g
Total yield - clone #2: 6.01oz = 168.28g
Approx. est. yield: 600g/m2 divides by 4.8, multiplied by 2 (approx. for 2/3 the cabinets sq/ft) = 250g per 0.41m2
Actual yield: 11.15oz. per 0.41m2 = 312.2g per 0.41m2.
That is some seriously good production right there😎👍😎. The high end avg. for this strain is 650g/m2. When you crush that out to my space and the numbers above, it works to about 270g per 0.41m2. Our actual yield still destroys the high end avg. by almost a zip and a half👍👍👍. The cree cob does it again. Fuck’n jazz hands y’all🙌!
With results like these you could really give the whole grow a 9/10. It’s only an 8 in my book because it’s not my preferred high. Otherwise, any time you’re north of 5+ oz. per plant, it’s a good day at the office👍👍.
Props👊👊👊
No choice but to shoutout Humboldt genetics. These beans have treated me so well and I can’t say enough Good things about the strains this organization puts out👌👍👌. Other than that, thanks to everyone who dropped by for a look and a comment. The convos always good and of course - any questions or enlightened conversation are welcome. Every time I try to take a break from documenting a grow, I end up growing something worth documenting. If your as high as I am right now, you should still be trying to figure out that last sentence.... stay lit y’all. See ya soon on the next one👊👊👊.

Likes
50
Share


@DogDoctorOfficial
Follow
🌱 Week 4 Veg: Thriving Despite the Chill 🌟
As we close out Week 4 of veg, I couldn’t be more impressed with how resilient and strong the Zamnesia Runtz are growing! Despite the freezing cold temperatures outside—evident in some snapshots of my frosty mint plants in the veggie garden—these beauties are thriving in their cozy indoor setup.
The Aptus Holland Nutrient Spray: A Deep Dive
This week, I treated the Runtz to a refreshing shower with Aptus Holland’s nutrient spray, a game-changer in plant health and vigor. Let’s break it down:
• What Is It?
Aptus nutrient sprays are foliar feeds designed to deliver essential nutrients directly to the leaves. They provide immediate uptake, bypassing the roots and giving the plant a quick boost in vitality.
• Why Use It?
Foliar feeding is especially beneficial during veg because it enhances nutrient absorption and promotes lush, healthy foliage. It’s also a fantastic way to supplement nutrients if the roots are growing but not yet absorbing nutrients at peak efficiency.
• What Does It Do?
Aptus sprays improve plant metabolism, strengthen cellular structure, and boost resistance to environmental stresses—perfect for battling those colder temps!
• How I Applied It
I used a fine mist to ensure even coverage across all leaves, aiming for the undersides where stomata are most active. Afterward, the plants looked vibrant and energized, ready to keep pushing those gorgeous leaves.
A New Partnership: Grove Bags and TerpLoc Technology
I’m thrilled to announce a new partnership with Grove Bags! Known for their TerpLoc technology, these bags are a true revolution in cannabis storage and curing.
• Why Grove Bags?
Grove Bags are designed to create the perfect microclimate for cannabis. Their TerpLoc technology helps preserve terpenes—the essential oils responsible for the flavor, aroma, and effects of cannabis—by locking them in while allowing oxygen and moisture to escape.
• How They Work
TerpLoc bags combine several unique layers:
• Moisture Control: Maintains ideal humidity levels to prevent over-drying or mold.
• Oxygen Barrier: Blocks excessive oxygen exposure, which can degrade terpenes.
• UV Protection: Shields the buds from harmful light that can alter their chemical composition.
• Why This Matters
For anyone who’s spent months cultivating a crop, ensuring the harvest cures and stores properly is the final crucial step. Grove Bags will play an essential role in preserving the quality and flavor of this Runtz grow, keeping the terps intact for that unforgettable smoke experience.
A big thank you to Grove Bags for joining this journey. I can’t wait to showcase their role in the final stages of this grow!
Photo Magic: Nikon P900 & Sony A6000
Capturing the Runtz in all their glory is part of the journey, and this week’s shots were nothing short of stunning. Using both the Nikon P900 and Sony A6000 allowed for crisp, detailed photos that highlight the beauty of these young plants. From their vibrant green tones to the intricate structure of their leaves, these images tell the story of strength and potential.
Week 4 Veg: What It Means
Week 4 in veg is a critical time in a grower’s journey. By now, the plants have developed a strong root system and are focusing on building structure. This is when:
• Leaf Development Peaks: Bigger leaves mean more photosynthesis and energy production.
• Growth Accelerates: Plants use this time to set the foundation for flowering, with nodes spacing out and stems thickening.
• Preparation for Transplanting: Root systems are expanding, making it the perfect time to plan for a move into larger pots, as we’ll be doing next week!
Looking Ahead
Next week, the Runtz will graduate to larger pots—not their final AutoPot homes yet, but an essential step for continued growth. This transition will help the roots spread further, setting the stage for a thriving flowering phase.
Community & Gratitude
A huge thank you, as always, to my sponsors and supporters:
• Aptus Holland
• Pro-Mix Soil
• TrolMaster Ecosystem
• ThinkGrow LED
• Future of Grow LED
• CannaKan Germination Station
• Zamnesia and Plagron for making this Eternity Cup journey so special
• Ziggi Papers
• And now, our newest partner: Grove Bags
To the amazing Grow Diaries community, you continue to inspire me daily. I’ve been blown away by the incredible work and creativity I’ve seen in other diaries—it’s motivating and humbling all at once. Good luck to everyone; let’s make this journey one to remember! 💚
Final Thoughts
From the frosty outdoors to the warmth of my grow room, these Runtz are proving their resilience and promise. Each week, I’m reminded of why I fell in love with this strain, and the excitement for what’s to come keeps growing.
Stay tuned for Week 5, where we’ll delve into the transplant process, nutrient updates, and more. Let’s keep learning, growing, and sharing the magic together!
Genetics - Runtz https://www.zamnesia.com/6000-zamnesia-seeds-runtz-feminized.html
Nutrients - Plagron https://plagron.com/en/hobby
- Aptus Holland https://aptus-holland.com/
Controls - Trol MAster https://www.trolmaster.eu/
LED - https://www.futureofgrow.com/en
LED - https://www.thinkgrowled.com
Soil - https://www.promixgardening.com/en
Germination - Cannakan https://cannakan.com/?srsltid=AfmBOopXr-inLXajXu3QFgKXCXXos4F1oEvScjMKIB5MR5dk8-GJ-F49
DOGDOCTOR 15% off
Smoking Papers - https://ziggioriginal.com/
Terpene saver - https://grovebags.com/
As always thank you all for stopping by, for the love and for it all , this journey of mine wold just not be the same without you guys, the love and support is very much appreciloved and i fell honored with you all in my life
With true love comes happiness Always believe in your self and always do things expecting nothing and with an open heart , be a giver and the universe will give back to you in ways you could not even imagine so
As always, this is shared for educational purposes, aiming to spread understanding and appreciation for this plant. The journey with nature is one of discovery, creativity, and respect. Let’s celebrate it responsibly and continue to learn and grow together!
Growers Love To you All 💚
#EternityGrowCup #RuntzHunt #GrowersLove #CannabisCommunity #AptusHolland #ProMixSoil #TrolMaster #Zamnesia #Plagron #ZiggiPapers #Grovebags

Likes
81
Share


@LockDownGrow
Follow
Has cured very nicely the taste and smell is just Amazing , and the effect is so relaxing I can not really give you a negative side effect too this as I absolutely love it ,
Likes
16
Share


@DreamIT
Follow
Sponsored by:
🦎THE HIGH CHAMELEON🦎-💡VIPARSPECTRA💡-💐GREEN BUZZ LIQUIDS💐-🛠️WEDRYER🛠️
🏁 10/8 New sponsor at DreamIT. I am delighted to warmly welcome The High Chameleon to my journals and growboxes. The shipping was fast and the package was nimble. Instead of the usual plastic to keep the seeds in place, I found a nice bag of chopped hemp, a smart and ecological choice. In addition, a very practical grass holder with attached grinder, really practical and comfortable. I will open a diary for each seed that I will try to grow with different types of training techniques, I will decide which ones along the way. So off you go !!
12/8 boom! seed out in 48h. is already very beautiful!
18/8 everything is going beautifully
__________________________________________
Personal advertising (contains affiliate links)
__________________________________________
🦄 Check out The High Chamaleon website, their first selection criterion is the strong signature of terpenes by taking rare strains while being 100% organic and respecting nature. Safe anonymous shipping!
✅ https://bit.ly/TheHighChameleon
__________________________________________
Did you know that Green Buzz Liquids fertilizers are 100% vegan? A complete line of products ready to give the best to each of your plants! Visit the site and see my journals to see how they work 🦄
🤯 And with the code "dreamit" you will immediately receive a 15% discount on your purchases
✅https: //bit.ly/GreenBuzzLiquidsPro
__________________________________________
👀 Are you looking for a good lamp to start with? 👀
🌞Viparspectra has something more than the others, take a look at their site.
⏩ Use "GDVIP" for an extra discount or "DREAMIT3" for an extra 5 %% discount
👀 Search for it on Amazon
✅Amazon USA: https://amzn.to/30xSTVq
✅Amazon Canada: https://amzn.to/38udUVe
✅Viparspectra UE: bit.ly/ViparspectraUE
✅Viparspectra USA: bit.ly/ViparspectraUS
______________________________________________
🌈 Tired of blowing on your weed hoping it dries quickly? Check out the Wedryer website! You will find a well-made accessory that will help your weed dry in just 8-10 days without the annoying risk of finding mold or other annoyances! (no affiliate links)
✅https: //bit.ly/Wedryer_
______________________________________________
📷🥇Follow the best photos on Instagram 🥇📷
https://www.instagram.com/dreamit420/
Backup
https://www.instagram.com/dreamit4200/
🔻🔻Leave a comment with your opinion if you pass by here🔻🔻
🤟🦄💚 Thank you and good growth 💚🦄🤟

Likes
2
Share


@MG2009
Follow
07/02/2019
Calyxs swelling and new pistils popping out everywhere smell is sweet candyish like not floral, and some feulienes as well.some leaves fading and defoiliating as needed. Did reservoir change and added overdrive, I will use week 5 and week 6, and then taper off on nutes week 7, 8, and flush on week 9 and then compare to my last harvest see if I did better.
Thank you for dropping in hope to see some impressive results next week wish me luck 👍
Ps not sure what happend to my nutes but they are as follows PH Perfect G,M,B, plus Overdrive for week 5,6.
07/06/2019
Mid week had to add 2 liters of nutes to top off reservoir GMB,And Overdrive.

Likes
28
Share


@Zurban_Poison
Follow
Hi people.
The plant is in that phase when it gains all the buds and mass as quickly as possible. they are growing every day and it is noticeable.


Likes
2
Share

@Jardineiro_Br
Follow
A planta esta bem robusta, com a copa cobrindo o vaso galhos grossos e o LST funcionou bem a estrutura diferente da mirtilo mas esta bem cheia de galhos que me darão belos botões.


Likes
3
Share


@Waves420
Follow
this is week 5/6 of my super OG autoflower. I would like some feedback as this is my first grow. Using a small areogarden with 10w led and a separate 80/100w grow light. Red blue bulbs.
Not sure the leafs looking that great? What do you guys think? I cut some fan leafs off due to the bottom of the plant not getting so much light. Is this ok to do? Feedback please. Thanks guys

Likes
167
Share


@DeepWaterGrower
Follow
⭐ TrolMaster tracking ⭐
I started to track my crop during week 15, when I got the Tent-X TCS-1 by TrolMaster. First impression was: this is too professional for me, I can't handle setting it up and using it well. Then I started reading some posts on Instagram, I visited their site and in 5 minutes my cultivation experience took a huge step forward with disarming simplicity, I couldn't believe it.
I have uploaded tracking videos from the TrolMaster app for each week from the 15th to the 19th, as well as the two weeks of drying stage.
⭐ Controller Chronicles ⭐
Day after day I appreciated the clarity and precision for data, access to all settings and instant readings by connecting a WIFI router to the controller's LAN port. I loved the possibility to dim my lamps remotely, or even automatically based on the temperature in the box!
🌱 GERMINATION (2 days)
Seeds in a glass of EC 0.4 tap water for 10 hours, then in root riots and under the lamp. They sprouted after 48 hours from dry seed.
🌿 GROWING STAGE (10 weeks and half)
I decided to give these plants a long vegetative growth and this allowed me to do a lot of training on both.
Starting from the 4th veg week I started with defoliation sessions every two weeks, for a total of four during the entire vegetative phase. The last defoliation was done a couple of days before the switch, in order to allow the lower parts of the plant to get as much light as possible.
Furthermore I did Topping on week 6, cutting the apical branch, then on week 8 I did Topping again on several sites, as well as SuperCropping on the highest branches to make the canopy uniform.
The light cycle I used is 18/6 and the last two veg weeks I lowered the light hours to 16/8 first and 14/10 then.
During the veg stage I made 4 DWC change, PH was always between 5.5 and 6, about EC I started with 0.6 and was 1.4 on the last veg week.
🌸 FLOWERING STAGE (9 weeks)
I started this phase after 36 hours of darkness, I then changed the DWCs solution (adding a flowering stimulator).
Then I mounted the ScrOG-net about 50 cm from the base of the plants and I wove the phenotype #1 through the net occupying at least 60% of the available space; the phenotype #2 stretched shortly after the switch and I used the net only to widen the central branches.
They showed the pre-flowers two weeks after the switch, then I made two defoliations on week 3 and 5 flo.
During the last four weeks of flowering (weeks 6-9) I simply paid attention to the PH-EC levels to provide the roots with optimal conditions. I then kept the TEMP-RH-VPD-PPFD values under control and this also thanks to the Tent-X controller by TrolMaster which allows me to provide optimal conditions also above.
I chopped them when trichomes were about 85% milky and 15% amber.
During the flowering stage PH was always between 5.8 and 6.2, about EC I started with 2 and was 2.3 on the last week before flush.
✅ HARVEST
- From dry seed to harvest: 140 days (2 days germination + 75 days veg + 63 days flo).
- Chopped after 4 days flush and 48 hours in dark;
- Wet trim, removed fan leaves.
✅ DRYING STAGE
- Time: 14 days;
- Average: 20° C - 50% RH.
- After that I made a dry trim, removed branches and sugar leaves.
⚖️ DRY WEIGHT
- Phenotype #1: 230 gr buds + 25 gr larf;
- Phenotype #2: 105 gr buds + 50 gr larf.
So, the overall dry weight is: 335 gr buds + 75 gr larf.
✅ CURING STAGE
- Curing is done after 30 days with Boveda 62%.
Processing
Likes
12
Share


@Tazard
Follow
We have a very full tent! Taz’s jungle 😂🤣. Check out the purple purple photos from day 20!!! Everyone looks absolutely beautiful I’m hoping that the white critical will be ready in 4-5 weeks. She’s going to have some fat colas!
