The Grow Awards 2026 🏆 


Likes
Comments
Share
@Tropicannibis_Todd
Follow
🤔🤔🤔🤔🤔Well i was gonna make this diary a little more interactive then normal🤔🤔🤔🤔🤔
👉However Growdiries seems to have other plans 🤔 at this time I can't load any videos 😫 but as soon as GD get there heads out of there @sses then maybe we can get them up 👈
Looks like I've can upload short videos 👉 so I will do what I can my friends 👍
YOUTUBE BACKUP 👉👉👉 https://youtu.be/sSOAJv7cvV4?si=zpF5yDJXlPr-RmeN 👈👈👈
So we are gonna be doing the BIG BAND from Kannabia Seeds , I have grown this before , and loved the terp profile and effects so much that I've decided I need more because it won't be long before I'm out of buds on this one 😁😁
We are now 14 Days in and everything is going great 👍 👈
Except for some watering I haven't really done much 🙃 but plan to do a little maintenance and manipulation of the canopy 👈
👉Soil Medium Provided by ProMix.ca
👉Nutrients Provided by Agrogardens
👉Lighting Provided by MarsHydro.ca
I would like to thank the many growmies for support throughout the years 🙏 So Let's Do This 👊👊👊

Likes
39
Share
@Silverback_Guerilla
Follow
10/19:
I fed today. Only one plant has any signs of deficiency..an Orange Sherbet that needs more Mg than everybody else.
Serious stink now! Wow..gonna have to order another carbon filter..
I shot a little video of the soil remediation amendments I'm using these days. This will be the first time I use the Coast of Maine Lobster Compost. I usually use a different brand with added biochar and mycorrhizae, but I wanted to see what all the fuss is about the efficacy of lobster compost.
Recipe:
About 50 gallons of soil, previously flushed with TPS Liquidsoil to re-establish the microbial population.
1 cu ft - Coast of Maine lobster compost
15 lbs - Earthworm castings
4.5 lbs - Microgrow granular inoculant
4 lbs - Bokashi
4 lbs - Dr Earth Veggie, Tomato, and Herb organic fertilizer
2 lbs. - Nectar for the Gods - One Shot granular fertilizer
2 lbs - granular humic acid plus molasses
1/2 lb - texas greensand
1/2 lb - azomite
1/2 lb - dolomite
10/20:
Halle Berry(Blackberry A) is getting soooo fat..maybe 20" in circumference!
I spotted another couple of nanners on the Strawberry Pie and decided to leave them to do their thing..might be some very interesting hybrids as a result.
It occurs to me that it's almost time to start germinating the next batch of beans...👍
10/23:
Fed them and rotated the edge plants. Switched to Cha Ching.
10/24:
Halle Berry is foxtailing a bit ever since I upped the wattage in the tiny tent. She's fading nicely..I'll probably flush her towards the end of next week.
I started germinating the next batch of beans today, so I'm gonna need these bitches to hurry the fuck up now..
10/26:
Fed them and rearranged a little bit. I dialed back the ONE, increased CaMg and Sweet & Sticky. I flushed Halle Berry with 8 gallons of warm water and LiquidSoil. She's ripe, but I'll let her go another few days.

Likes
14
Share
@MountainFlowers
Follow
I am very happy with the results of this growth cycle. I have improved my techniques for growing plants (LST and topping) and methods for stopping mite infestation. I didn't get a great harvest(not too much big flowers), but I like the result, nice compact and very good smelling buds.I make a wet trimming process and after this I tried for the first time to wash the buds before the drying process, because I use the foliar products to defeat the mites and the result is excellent (the ganja tastes good when I smoke it). Next time I will try to grow bigger and denser flowers to get a bigger harvest💪💪😊. An excellent plant that I would recommend to beginners, who want to experiment without risking too much.

Likes
160
Share
@GrowingGrannie
Follow
11/29 - At this point in the game, plants don't ever look much different day-to-day! I'm wondering, though, if this one is showing her starting to fade... it's either that or she's needing some stronger PK nutes... any thoughts?
12/2 - I'm going to start winding her down... gotta pick up some Ripen and some Flawless Finish ... Probably going to have to shorten the period of time I use these products but hell, she's pretty used to me screwing up - LOL!
12/03 - so my local grow store was out of Ripen - so I guess I'm going to forget that one... I'm going to let her go until Tuesday when she will be exactly 13 weeks old and start a 3-day flush using General Hydroponics FloraKleen (they also did not have Flawless Finish!).... Planning to chop her next Saturday unless the amber hasn't really made its presence known... We'll see.... I'm just going to go by what she tells me... but it really IS time, old girl... it really is.
12/04 - Doing a bucket change today, she's going to an EC of 0.2-0.4 or thereabouts and I'm not going to worry about the pH - my tap water is about 7.5 so that's what she's getting unless I relent and drop it to the upper 6's - I'm just not going to overly concern myself with it. I think her bulking has finished and SHE needs to finish up. Found a few amber on leaves in the middle of the plant and I know those can really be rather ignored .... but I'm still concerned about the trichs on the main cola - haven't seen much change between milky and clear for a while now... so it's puzzling to me. Maybe the drop in EC will kick her into truly finishing... if it doesn't, I can always bring the EC back up, the pH back down and keep her going... She's always been my "experiment" - always been my "tester" - so why not experiment at this stage of her life as well?!
Likes
6
Share
@Mr_nugs_lover_David
Follow
The all 5 seedlings are looking fantastic and very healthy, onenof them its a little too small I think but let's see what happens, stay tuned to see how this 5 dina cookies perform! 💛💚❤️🔝👨🌾

Likes
9
Share
@Piorkeed
Follow
Week 4 (13/02 - 19/02)
During this week I will continue to monitor the training adjusting the ropes in order to allow the development of secondary branches.
I will increase the extractor time to 7 hours in the morning and 8 hours during the afternoon because I noticed that, during the last days of previous week, the humidity increased faster when the extractor was off. The extractor will be at 30% of its capacity.
I will also try to increase the water quantity because the plants are growing well and faster.
No changes to the cooling/heating system parameters.
I will add the Bio-bloom to the pants every two watering days.
13/02 D21: only water sprayed on leafs in the morning.
14/02 D22: watering day. I added 2 ml of Bio-grow plus 1 ml of Bio-bloom to 2 liters of tap water
15/02 D23: today I removed the couple of single leafs to each plant. Sprayed leafs with tap water.
16/02 D24: -
17/02 D25: watering day. I added 2 ml of Bio-grow to 2 liters of tap water.
18/02 D26: leafs sprayed with water. Increased the distance lamp from the top to 30/40 cm. Increased the light power to 100%
19/02 D27: watering day. 2.5 liters of tap water only.

Likes
1
Share
@GERGrowDesigns
Follow
Welcome to veg Week 1 of Sweet Seeds Mental Rainbow F1
I'm excited to share my grow journey with you from my
Sweet Seeds Project . It's going to be an incredible ride, full of learning, growing, and connecting with fellow growers from all around the world!
For this Project , I’ve chosen the Feminized Photo strain Mental Rainbow F1 :
Here’s what I’m working with:
• 🌱 Tent: 120x60x80
• 🧑🌾 Breeder Company: Sweet Seeds
• 💧 Humidity Range: 60
• ⏳ Flowering Time: 7-8weeks
• Strain Info: 22-30%THC
• 🌡️ Temperature: 26
• 🍵 Pot Size: 0.5l
• Nutrient Brand: Narcos
• ⚡ Lights : 600W x 2
A huge thank you to Sweet Seeds for allowing me to try my Best with this amazing collection from Photo Strains they managed to Sponsore . Big thanks for supporting the grower community worldwide! Your genetics and passion speak for themselves!
I would truly appreciate every bit of feedback, help, questions, or discussions – and of course, your likes and interactions mean the world to me as I try to stand out in this exciting competition!
Let’s grow together – and don’t forget to stop by again to see the latest updates!
Happy growing!
Stay lifted and stay curious!
Peace & Buds!

Likes
17
Share
@Dunk_Junk
Follow
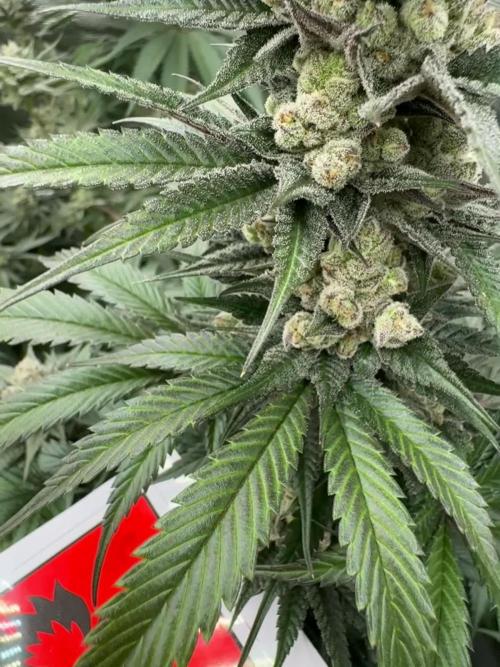
Wow holy cow she turned on the trichomes this week!!!!!!!!!
She's gone from green to white 😍 😂

Likes
28
Share
@Coopmc
Follow
Land race Psychedelic this one did not turn Purple but she tastes purple and makes you feel like the color purple I think Franco and Prince are smoking this stuff in Heaven !

Likes
3
Share
@Organic473
Follow
So far so good…loving her leaf formation. I plan to use the scrog on her and breed her with some regular skunk #1 pollen. My new project.

Likes
51
Share
@nonick123
Follow
Día 92 (20/01) CBD Auto 20:1 #1 - Reviso los tricomas, y a pesar de tener muchos pistilos blancos, detecto un 50% de tricomas nublados / 50% tricomas transparentes
La cosecha se acerca para este monstruo!
Día 93 (21/01) CBD Auto 20:1 #1 - Los cogollos siguen engordando! Never ending lady!
Día 94 (22/01) CBD Auto 20:1 #1 - Los cogollos siguen y siguen engordando. Increible!
Día 95 (23/01) CBD Auto 20:1 #1 - Cada día pistilos nuevos y mayor densidad! 😍💥
Día 96 (24/01) CBD Auto 20:1 #1 - Se acerca la cosecha
Día 97 (25/01) CBD Auto 20:1 #1 - Reviso los tricomas: 49% transparentes, 50% nublados y 1% ambar.
La senescencia general de la planta con muchas hojas amarillas y el estado de los tricomas me llevan a la cosecha!
Día 98 (26/01) CBD Auto 20:1 #1 - Cosecha! 😍💥💨😁
Un viaje apasionante con esta monstruosa planta que ha crecido hasta 1,60 metros tras Supercropping en dos ocasiones, LST en incontables veces, Lollypopping en 2 ocasiones, varias defoliaciones...
Hubiera sido increible tener en tierra madre (suelo) o en una maceta de 21 litros en exterior...
Cogollos estilo sativa, no muy gruesos pero si densos y con forma de bate de beisbol, que en ningún momento paran de formar más y más pistilos nuevos! 💥
El color de los tricomas y la senescencia general de planta nos indica que ya está lista después de 98 días desde germinación
Desprende un olor muy tropical, dulce, como una mezcla de papaya y mango, con un toque picante de fondo
Esperemos a ver con que perfil terpenico nos sorprende después del secado y curado!
Unos colores verde lima durante toda la fase de floración que ha ido mutando a morado en las puntas de los cogollos conforme se produce la senescencia
Esperando a probarla para el efecto 😁
Likes
8
Share
@KingBong_Guerillas
Follow
Welcome the KingBong's first GrowDiary!!🦍🌱
The grow box is still being finished off but I'm happy with results so far. I'll be adding a custom carbon filter In the top corner and also a small intake fan low down... also a door!!
This is going to be a fun experiment hopefully you all enjoy ✌️🇬🇧

Likes
16
Share
@TerpTurtle
Follow
Hang dried for 3 weeks in tent. Goal was to be more patient with the dry & start cure hanging on branch in a tent, my dry tent ranges from 58-61RH & 64-69F

Likes
25
Share
@Dingle
Follow
Another week of decent growth 🌱
All three plants seem to be healthy and are growing quite a lot each day.
Having to adjust the light on a daily basis to avoid too much light exposure.
Some little deficiencies showing here and there but for the most part they are looking good. 🤞🏻👨🌾🏻🤞🏻
✌️


Likes
25
Share
@FriendlyNeighbor
Follow
Day 23
They are getting very hungry/thirsty they take much water and love the higher nutrient content!!! 🙀
Green gelato buds already smell nice a little hint of citrus and they fatten up good...
Sweet ZZ still isnt showing a hint of the stretch I was hoping for ... hopefully she will get enaught light..
Fruit Spirit going fast and better than expected.
I know there are some yellow / brownish leafs....
but i wont pick them unless its bad because i gave her heavy defo all the way and just want her to relax and get fat now for the rest of her life =)
Day 28
Lowered the light about 10 cm to just 35-30 cm distance and so far they like it =)
Also installed a fan under the scrog in the middle of the 4 pots for air circulation under the buds
The Sweet ZZ Finally really developes some flowers (yessss was a bit worryed)
Green Gelato just is a beast 100% love the genetic so awsome!!
no topping just lst and scrog and that girl even goas better than the 2 weeks longer vegged Fruit Spirits.
respect to RQS for breeding that girl cant wait to try the auto version got 5 seeds ready to go =P
Fruit Spirit starts do get some nice berry like smell and looks like shes gonna finish early.
so i guess when they are ready for the chop i will replace them with some autos maybe cookies and blueberry or something will see
week 4 finished untill now im very happy with the outcome 😁
Processing
Likes
14
Share
@DUBDOLLASIGN100
Follow
Patience my friends, patience. At the point monitoring my plants closely for caterpillars or any insect that will effect this stage of flowering.

Likes
15
Share
@BonerChamp
Follow
I would definitely recommend the White Widow Max Auto to a beginner grower! I hope it tastes as good as it looks.

Likes
12
Share
@Cannibalgardens
Follow
Well firstly the team at seedstockers has some great genetics and they perform well , this girl could have been a real producer if it was grown better.. but that being said the customer service was great and so was the strain selection ...She had no real issues except I was growing in a unfinished basement which really hurt me in the beginning and I had hot soil so it was a rough start ...These are weds though and they bounce back as fast as the go down hill ..The plant has a great structure a main fat bud with many side branches that could have really gotten fat ...The colour and the smell is fantastic so is the taste when you smoke her ..she dried for 6-7 days and is easily burned with grey / White ash , flushed for a week prior to harvest .. I would defenitely grow again just in amore stable environment to get the most out of her but with all my mistakes she still gave me some stinky and sticky buds cheers canna family ...

Likes
53
Share
@DogDoctorOfficial
Follow
Greetings, fellow green enthusiasts! Week 3 unfolds like a crescendo in the cultivation symphony, and my Blackberry Auto is not merely growing – she's flourishing into a botanical masterpiece. Join me in this chapter of lush greenery, where every leaf tells a story of meticulous care and bountiful growth.
A monumental shift occurred this week as I sensed the roots had embraced their space, and with that confidence, the AutoPot Aquavalve was turned on. It's a momentous occasion; from now on, my Blackberry Auto dictates her own hydration destiny. The Aquavalve ensures a precise, gravity-fed watering system, allowing the plant to drink at her leisure. It's a botanical utopia where hydration meets autonomy.
As a gesture of extra love, I treated my thriving Blackberry Auto to a Nutrispray shower. While not a necessity, it's my way of pampering her with a nutrient-rich mist – a spa day for the botanical queen. Every droplet whispers, "You're cherished, and your journey is celebrated."
The dance of low-stress training persists, a ballet where leaves are gently coaxed into the perfect formation. Blackberry Auto, the prima donna of this green theater, responds with unparalleled elegance. Each bend not only shapes her structure but also encourages a bushier, more productive plant. It's a dialogue of symbiosis, where I guide her growth, and she graciously accepts the choreography.
Blackberry Auto's aesthetic prowess is on full display – her color is a vibrant tapestry, and her structure an architectural marvel. It's not merely a prediction; it's a prophecy of a beautiful, robust plant reaching towards the zenith of its potential. Each leaf is a stroke of nature's brush, creating a masterpiece before our very eyes.
As I share this journey, I extend my heartfelt gratitude to the creators of the genetics – thank you, Fast Buds, for gifting us Blackberry Auto. To my sponsors who make this journey possible, your support is the fertilizer for this green endeavor. A tip of the hat to Grow Diaries for providing a platform to document and share the magic. And to the community, your camaraderie adds depth to this horticultural narrative. Together, we cultivate not just plants but a shared passion for the botanical world.
Stay tuned, green comrades, for the forthcoming chapters of Blackberry Auto's odyssey. The journey continues, and each leaf unfurls a new verse in the poetic saga of cultivation.
Genetics Blackberry Auto @Fast_Buds
Food - @aptusholland @aptus_world
As always thank you all for stopping by, for the love and for it all , this journey of mine wold just not be the same without you guys, the love and support is very much appreciated and i fell honored and blessed with you all in my life