
Likes
Comments
Share


@GMSgrows
Follow
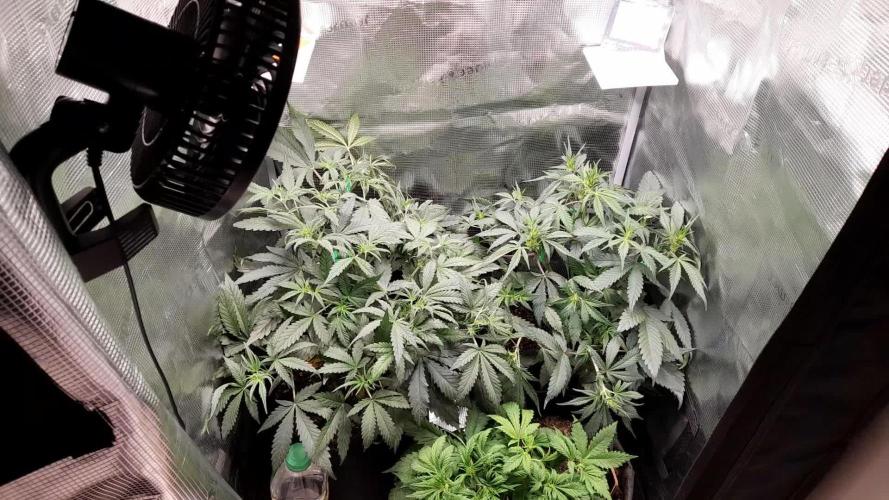
Put the ladies on straight water for this week. Hairs are changing, and most of the trichs are clouded. Have some fox tailing on some of the buds, being so close to the light. Was kind of expecting it, but really, I don't mind a little fox tailing. The top of this AK is thick, hard and full of trichomes. When the runoff water shows under 200 ppm is when these ladies will be coming down. They will be watered, until just a few drops come out the bottom, as to not flush the final ferts out to quickly.
Plants have stayed good and healthy, without losing any leaves throughout the grow. Limbs are bending down from the weight of the flowers. Didn't support anything this time, so quite surprised that the branches were able to support these nugs, as long as they did.

Likes
Comments
Share


@Opulent_Amber_69
Follow
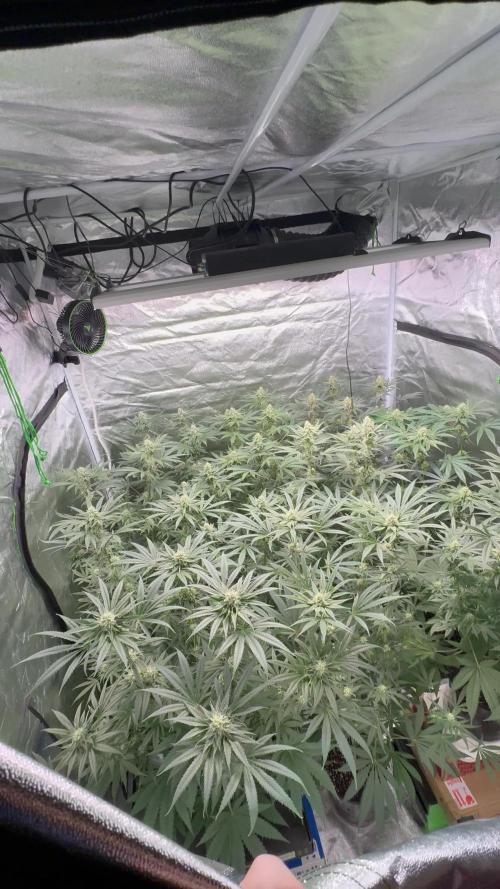
I took these on my Snapchat is why there is so many of them 😅 I'm currently doing the 48 hours of darkness to help produce more trichomes. I did SO MUCH to this plant, it looks like it will DEFINITELY have some weight to it, but you will have to wait until it's dry 😄
Likes
34
Share


@Grey_Wolf
Follow
I smell dogshit 💩
Connoisseur genetics Dogshit deadhead haze
24th Jan 2022
This will be the last week of veg as she transitions into flowering 😀
I dosed her up with enough Bio bloom to last the first 6 weeks then by then I should have some guano
I really hope those long branches fill in nicely with bud rather than being airy we'll have to wait and see.
Thanks once again for stopping by 👍


Likes
12
Share


@mircostuffff
Follow
Sieht bis jetzt gut aus .Gustavo brauch noch ein wenig länger' denke er wird den meisten ertrag bringen lass gern eine Meinung dar ist mein 2ter versuch
Brauchte vllt tipps zum trocken etc


Likes
29
Share


@elevensixty6
Follow
Both plants are currently being flushed, B2 will be ready for harvest the next few days and B1 will still flush for another week. The fade in B2 is incredible, truly my best plant I've grown so far.. best structure, best density, best everything. Looking forward to this harvest for sure. Probably will not post another update until my harvest results in a couple of weeks.

Likes
26
Share


@Hawkbo
Follow
Man rocbudinc continues to impress me more and more with every plant I grow from him. His photoperiods are always my frostiest but I grew a few of his autos and they resembled photoperiods more than any other auto breeder out there. He chooses his cuts to breed with wisely I guess and his autos also grow bigger than most. These are killin it, started flushing the mac and purple candy paint yesterday 8 days shy of day 60.
Took some pics saturday, I added in my slurroc keeper cuz it's been in all the videos and it's pretty.
Likes
Comments
Share

@ThreeLittleHerbs
Follow
I had no pictures of week 4, s now it's 10 days later. The plants are now 1 month and week. Applestrudel (left) and Strawberry-G (right) are close to start to bloom and already stretched a bit. I tie down the outer branches to get more light inside. 😇
Lemon Cherry (in the front) is still has thin, light-green leaves and a short and compact structure. The most branches don't get enough light, but they are too small to tie down. 😑
Light is on 100% - 100W

Likes
181
Share


@GODSGIFT_2005_JM
Follow
🍼Greenhouse Feeding BioGrow & Bio Bloom
🌱GARDEN OF GREEN SEEDS
⛺️MARSHYDRO
The ⛺️ has a small door 🚪 on the sides which is useful for mid section groom room work. 🤩
☀️ by VIPARSPECTRA (models: P2000 & XS 2000)


Likes
32
Share


@blackoutJK
Follow
7/10 - Lowered light just an inch, plants still looked like they were stretching up a bit. Currently at 29"
7/11 - May be light stress, I'm not sure. But a spot has popped up on the older Gelato, which my wife has affectionally named Mal. Also noticing some warping in the leaves, it dosnt look terrible, definitely keeping a close eye on it.
While checking out the girls this morning, found 3 or 4 gnats flying around. Killed them all, will monitor. I am allowing the soil to dry out before I water again, currently the top layer is mostly dry.
7/12 - Everything is looking great today, found 1 gnat this morning. Soil looks dry, stuck a soil moisture meter to the bottom of the cups, reads on the dry/moist line. Will probably water tomorrow.
7/13 - Plants looking good this morning, nice amount of growth overnight. Watered roughly 100ml each, slowly until water started to drip from drainage hole. I poked around the soil before watering, to try to find any gnats and i didnt see any fly up. As soon as water hit the soil, i saw about 3 fly up, tried to kill them. I am going to keep air blowing on the plants, to hopefully keep the gnats at bay. Will be getting some yellow sticky pads as well. The tent has been getting a little warm lately, in the lows 80's, up to 83. I decided to dim the light to 75%, and bring it closer. Light is currently at 75% 24". Overall I am very happy this week.
7/14 - Alright, so it has come down to pest management already. When I checked the girls out this morning, I found a lot of gnats. So I mixed in a little bit of diatomaceous earth into the top 3/4" of soil. Hopefully it doesn't cake up on me when i water next time. The original plan was to wait and ride them out to transplant, but when i saw the amount I gnats, I knew I had to do something. They did not like that at all, ill check back later tonight to see what carnage has been wrought to the gnats.
Other than the gnat problem, the girls have been looking very good. I am a little concerned for Regina, she seems to be growing a little slower, and had some strange coloring in the growing fan leaves. I think she will pull through though. I saw a VPD chart that says my RH should be around 65-70% right now. So I'm shooting for that. I set up a little humidifier inside the tent.
7/15 - So it looks like the DE did the job, I poked around in the soil and couldn't find any gnats. Also I lifted the light up a little, to keep the canopy at 24". I ended up transplanting today, may be a little early, but it'l be alright. Dusted the transplant site and the root ball with great white myko. Added some more DE to the top of the pots to keep the gnats at bay.
7/16 - Nothing really going on today, the ladies are enjoying their new home, lots of growth over night. Didnt see any gnats today!


Likes
19
Share


@Wilstang
Follow
The grow was overall very easy, to sum it up quick she loves neits and can eat heavy. The beginning she started shaky because the first 3 weeks I only gave her pH water since my soil was precharged. She ate right thru and wanted more, more, more. I fed her almost every day and the results speak for them selves, an amazing 167 grams from a 67 day grow, including a strong 2 week flush. Topped her a total of 3 times giving me 10 tops. Overall tall plant but great strong stalk and branches to handle it. An 8 to 10 week stain, harvest right before 9 weeks. 1,000% recommended for all growers wanting that stanky dense Lemon drop. Absolute incredible lineage and smoke 💨. Gonna always be first pick 🍋🔥2412500

Likes
6
Share

@Ninjabuds
Follow
Everything is looking great for now. Busy week. Check back next week for individual photos of he plants will be starting to be pretty fat by then

Likes
8
Share


@hooolian
Follow
20/02: The plants are overall reacting well to the larger dose of nutrients especially the ignitor - there are lots of bud sites throughout. I was under watering some plants which has resulting in wilting stems and leaves - will move onto 1 litre of water every other day from next week. 1 OG kush and 1 White Widow is lagging behind but we'll get there. Good strong stalks mostly for all the plants. Gave the a hefty defoliation this week also trimming the fan leaves and letting light penetrate the lower branches and bud sites.
Likes
5
Share

@DivineBuds420
Follow
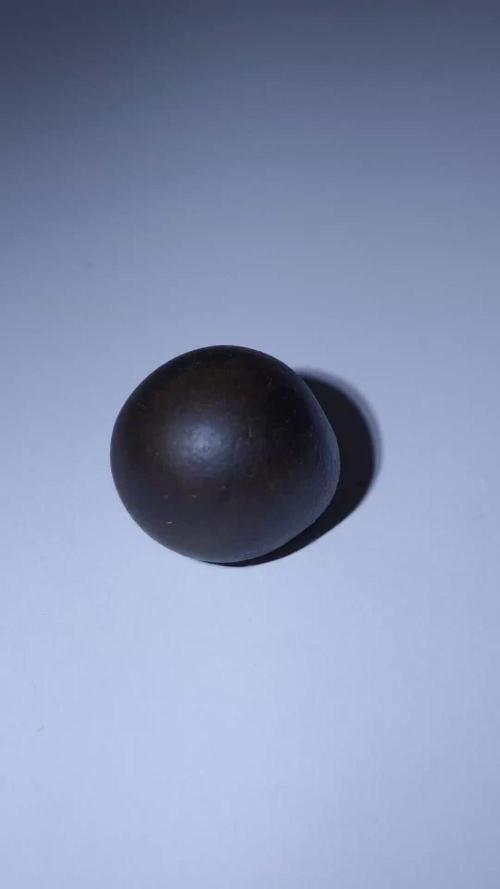
Update – Frisian Dew Trim Hash
Ich habe den Trim aus diesem Outdoor-Run mit der Eiswasser-Methode zu Bubble Hash verarbeitet, inspiriert von Frenchy Cannoli.
Das Material war nicht besonders gut – viele größere Blätter mit wenig bis kein Harz – trotzdem ist gut was rausgekommen.
Der Großteil kam aus den 73 und 25 Micron Bags, in 120/160 war kaum etwas.
Mit längeren Waschgängen wäre evtl. noch mehr gegangen, aber nach ein paar Stunden hat es mir gereicht.
Ich habe das Material getrocknet und zu kleinen "Temple Balls" gepresst.
Update – Frisian Dew Trim Hash
I processed the trim from this outdoor run into bubble hash using the ice water method, inspired by Frenchy Cannoli.
The material wasn’t great – quite a few larger leaves with little to no resin – but still yielded a decent amount.
Most of it came from the 73 and 25 micron bags, while 120/160 had very little.
Could’ve probably pushed it further with longer washes, but after a few hours I called it.
I dried the material and pressed it into small “temple balls.”

Likes
35
Share


@DutchFarmer
Follow
She has returned with two 2 tops
Lets hope she gives me sativa dreams ! 💤 😴
She is so strong 💪 and stable im impressed with Kannabia Genetics !
I LOVE YOU KANNABIA GENETICS! 😍😘
Check out my Cannabis Community, please👇like👇, follow, comment, and subscribe to my YouTube channel👇. ❄️🌱🍻
https://www.youtube.com/@DutchF4rmer
Join our cannabis community community for weekly giveaways 👌
(Discord Server)
https://discord.gg/VMu6rH4a7V
It will be appreciated! ❤️
Happy Growing 🌱🌱🌱

Likes
13
Share


@Phaleg
Follow
Another good week of growth has passed, +20cm (+8 inches) and counting
I noticed that the 3 plants react different to the darkness at night, one of the 2 tallest is the only one to bend the leaves downwards during the night, while the others keep leaves straight.
Plant 1 = 88cm (34")
Plant 2 = 86cm (34")
Plant 3 = 66cm (26")
