The Grow Awards 2026 🏆 


Likes
Comments
Share
@KitaKush
Follow
78 grams roughly 2.8 oz! Pretty happy with that as I’m looking for quality and potency and no longer quantity and quickness.
She has a good amount of frost and super pungent stank radiating off her.
Unfortunately for me I had issues with drying and at one point a few hours of 70% humidity which led to a few areas of mold…I threw away those buds and the rest are top notch..probably my most resinous plant harvested so far and strongest smelling. I also grew a runt which will give me less than an ounce now I know it’s just best to call quits on those stumpy odd growing plants and start fresh.
Lastly my humidity stayed at 52-56% and I should’ve harvested 1-2 days earlier so the buds are much drier/crispier than I’d like. I’m still trying to find a good drying location..one room had that low humidity and my grow room had way too high at 70..will figure it out eventually.
Also 200watt for lighting I can’t go back and change it.

Likes
55
Share
@Wastent91
Follow
Eccoci qua alla prima settimana di fioritura! Non vedevo l ora!! Allora sembra che la pianta si stia riprendendo dalla carenza che le aveva provacato il fogliame più giallo e scolorito, ora invece tutte le foglie delle cime nuove sono di un bel verde brillante, intenso ma non troppo scuro, quindi significa che ha raggiunto un buon equilibrio di assorbimento di tutti i nutrienti, ora non rimane che seguire la scheda di terra Aquatica, e magari aggiungere un poco di calcio e magnesio nel caso si scolorisce ancora in fioiritura, ma secondo me grazie a questi nutrienti speciali, famosi in tutto il mondo, che hanno i gridi enti segreto industriale, sono sicuro e mi aspetto di coltivare l erba di qualità migliore della mia vita! Mi sento davvero orgoglioso del livello che ho raggiunto di capacità di conoscenza di questa pianta fantastica! Ma ho capito che sono solo all inizio della "vera" comprensione di come utilizzare al meglio i nutrienti, per far esplodere di vigore le mie ragazze! Grazie davvero a tutti voi che mi seguite! È merito anche vostro se mi sono evoluto fino al coltivatore che sono ora! Non mi sento affatto un gran maestro, anzi ho ancora milioni di nozioni da imparare su questa pianta di saggezza millenaria! Grazie come sempre a Mars hydro che mi ha dato gli strumenti necessari per far eccellere le mie abilità nel coltivare sviluppare produrre la migliore erba del pianeta a casa mia! 💪😸👊🌱🌿🌲🌴🥦🧑🌾🍀


Likes
85
Share
@CRiSPrGrow
Follow
Weight was on point, really it was and i'm happy with it, going mostly into extracts so i can keep going with learning all about the ancestral rituals of making plant juice. Got the vaporisers from arizer on the way, so i'm smoking twice as many joints in anticipation.
Used smart proteins at the start and half way through flowering.it definitely boosts terpene production and speeds up veg quite a bit,
Harvest went pretty well, it was fun having the boys over for some scissoring . Everybody really enjoyed themselves but i probably should have been stricter with the hygene, would be great to be able to rent out lab space for the day to get that steril environment going you know? Rap music and lab coats !
Love testing out genetics thank you so much , next round incoming ! 🚀
So this grow clearly a very neat grow, kept right on top of things with VPD, always in the optimal ranges even if i had to manually tinker with the mister , the exhaust, the fans, the lights.
Speaking of the lights i applied a "pumping technique" meaning moving the lights up a down : down going into flower, then up then down again towards the end of flower to trigger rippening.
The smart proteins were used through out the grow meaning the veg went nuts, started smelling loud right out of seedling stage, then at flower stretch i think it does help give it a kick, mid flower though it makes the trichomes rippen quicker than the plant can put on biomass, meaning you get strong , ripe colas that come out a bit thin.
Cut and harvested at 30% amber believe it or not, to me that's late but i couldnt believe it when i noticed the plant was ripe at 10 weeks so i let it go on a bit longer.
wet trimmed and dried over 10 days, Jarred and cured for 2 months.

Likes
6
Share
@artems
Follow
Bad Guy's yellowing leaves may indicate a nutrient deficiency or stress, but the buds are healthy and thriving. Keep an eye on the nutrient balance and ensure proper watering to support bud development. Consider adjusting the feeding regimen and providing a calm, stable environment. With care and attention, it should bounce back. Stay positive! 😊🌿

Likes
5
Share
@Bili_R
Follow
Yo community!
A friend of mine just started a Legal Grow in Germany with his roomate under my Supervision, as it is now Legal to grow in Germany.
So I thought about documenting this grow. I've been growing for long time now, but my buddy Bili is a complete newbee at this stuff.
I am positive that this "is gonna be huge".
We plan on growing 6 plants. Bili is gonna be growing 3 and his roomate also 3 plants. Of course Bili will only care for his own 3 plants and his rommate for the other 3 as it is regulated like that by law. It is Germany where everything has to be like this apparently. lol.
This grow will be 2-3 Weeks indoors 51w with low cost 3x17 Watts 4000 k LED Bulbs. (3€ each) Those produce 2500 lumens each, about 147 lm/W
1.45 l pots for the first few weeks indoors.
The plants will then go into 5l pots on the window sill until harvest. faced to the south.
So far the seeds have been placed into water over night. tomorrow we will put them into the soil.
They are all Automatics.
Day 2:
seeds soaked over night. about 16 hours. The Gelato are already opening their shells.. The others are still closed. All sinked to the bottom over night.
We are now planting them into the Soil.:)
We soaked 9 seeds. 3x O.B. 4x Kryptonite and 2x Gelato.
After cutting the dome off the lamps and counting the LED's (81) it looks like these are 0.21w SMD 31lm per LED (manufacturer says 147lm/w). for bulbs really good little LED's. looks like these are cree 2835 J series or similar types. there are cree 4000k J types that are exactly 31lm wich would be exactly what each LED should produce. (2500/81).
Plant in Soil Date was 05 june. 14:00
Today, 2 Days and 10 hours, (58 hours) after planting in soil The 2 Gelatos came to life:) and one Kryptonite
basically 3 full days including soaking time.
08.06 at 1:30 is the beginning of VEG Day one
We will give them 24 hours light.
day 5 after waterglass. Berries still no sign of life.
lamp is at 30 cm distance. no signs of stretching.
At Day 5 Veg we located the berry seeds and put them into paper towel, cracked them open and scraped the shell. we have enough plants now but nothing to choose from in case a plant has weak genes. So we hope a few berries will make it. probably old Seeds.


Likes
92
Share
@DogDoctorOfficial
Follow
🌸 Week 4 Flower Report: Growth, Challenges & Big Changes! 🌸
Hey, Grow Diaries Fam! ✨
We’re here at Week 4 of Flower, and what a week it’s been—packed with challenges, adjustments, and exciting progress! Before diving into the details, let’s start with a note on my flowering timeline. While this is Week 4, I don’t start counting flower days the moment I flip to 12/12. Instead, I wait for the plants to show true signs of bloom. It’s a small but significant distinction that keeps things accurate and aligned with the plants’ development. 🌱
Defoliation: Timing is Everything!
Defoliation is a critical part of the flowering stage, and I typically wait until Day 21. However, this week, I tackled it earlier on Day 17 because:
1️⃣ The room was simply too full.
2️⃣ And most importantly—the Papaya Zoap had other plans!
She’s a fighter—determined, defiant, and constantly reaching for the moon. Despite intense training like super cropping, she’s still pushing upward, nearly outpacing the LED lights. Challenges like this remind us of a simple truth: gardening mirrors life. It’s about resilience, adaptation, and unwavering determination. 💪
This week, I added a second SCROG layer. While this net will support the flowering colas, it’s also there to strategically manage the Papaya Zoap. Why? Because experience has taught me that if she grows out of the LED’s range, she won’t finish properly—and that could disrupt the balance for every other plant in the tent. It’s all about teamwork, even in the garden. 🌟
Defoliation was intense, removing nearly all the leaves with stems to clear space and boost airflow. The tent now looks dramatically different! For the full before-and-after transformation, be sure to check out my YouTube channel—trust me, you’ll want to see this process up close! 🎥✨
Switching to Aptus Holland Minerals
A major milestone this week: I’ve transitioned entirely to Aptus Holland Minerals. 🌊 From now on, it’s just minerals—no more organic inputs. This marks the start of a new chapter, and I’m incredibly curious to see how the plants react to these changes. Here’s the current nutrient mix:
• System Clean: 0.5 ml/L
• Regulator: 0.15 ml/L
• RO Water Conditioner: 0.8 ml/L
• All-in-One Liquid: 2.1 ml/L
I’m keeping the pH at 6.1 and TDS at 556 ppm, and so far, the plants are thriving. This week also included a thorough system clean, ensuring everything runs smoothly as we enter the final flowering stages. 🌿
Bud Development: Pure Magic!
The bud formation across all the genetics is nothing short of incredible. Every plant is thriving, and the canopy is lush, vibrant, and full of potential. I’ve raised the PPFD to 750 for this stage, with temps steady at 25°C and RH at 63%—keeping the VPD dialed in at 1.11. The TrolMaster ecosystem, paired with the AutoPots, makes managing these precise conditions seamless. With more time to focus on the plants, I can give them the daily care they deserve. 💚
Shoutouts & Gratitude
A huge thank you to my sponsors and supporters: TrolMaster, Aptus Holland, Pro-Mix, Cannakan, and the amazing seed banks. Your incredible products and technology make this journey possible. 🌟
To the Grow Diaries community and all my followers—thank you for your energy, love, and even the challenges from the haters. It all fuels this incredible process, and I apprecilove every bit of it.
Special shoutout to Brother Daggadna—check him out on Instagram and show some love! 💚
The plants are heading into the next phase of bloom, and I can’t wait to share how this story unfolds. 🌸✨
As always, stay tuned, stay positive, and let’s keep growing strong together! 🙌
Growers’ love to all 💚
#TrolMaster #AptusHolland #GrowLife #CannabisCommunity #FlowerWeek4 #NeverGiveUp #GrowWithLove #IndoorHorticulture #Defoliation #PPFD #ControlledEnvironment #SCROGNet #DogDoctorOfficial
Discount Codes so you can save big on your next check out 💚💚💚
Kannabia - DOGDOCTOR 30% off
SeedsmanSeeds - DOGDOCTOR 10% off
CannaKan- DOGDOCTOR 15% off
terpyz.eu - DOCTOR 15% off
The Neutralizer - PORKIT5-DOG 15% off
As always thank you all for stopping by, for the love and for it all , this journey of mine wold just not be the same without you guys, the love and support is very much appreciated and i fell honored and so joyful with you all in my life 🙏
With true love comes happiness 💚🙏 Always believe in your self and always do things expecting nothing and with an open heart , be a giver and the universe will give back to you in ways you could not even imagine so 💚
Friendly reminder all you see here is pure research and for educational purposes only
Growers Love to you all 💚💚💚
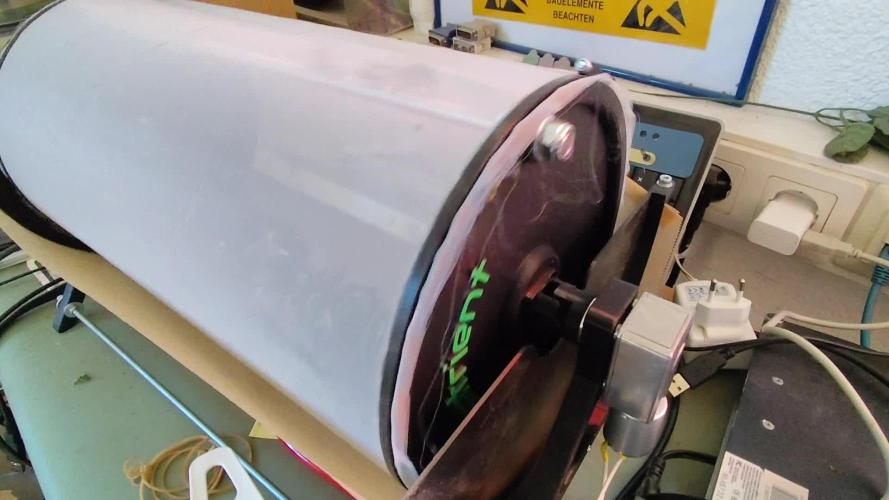
P.S. – A Deep Dive into the ICL-300: Revolutionizing Under-Canopy Lighting
The ICL-300 isn’t just another LED—it’s a game-changer for under-canopy lighting. Unlike traditional LED systems that project light in a single direction, the ICL-300’s 300-degree design ensures even light distribution beneath the canopy. 🌟 This unique feature means that no part of your plant is left in shadow, creating a balanced environment for lower buds to thrive.
Key Tech Specs & Benefits:
• 300-Degree Light Distribution: This design fills the under-canopy space with optimal light, enhancing photosynthesis where it often gets neglected. 🌱
• Full Spectrum Output: Tailored to meet the specific needs of plants at every stage, ensuring quality growth from base to apex.
• Energy Efficiency: Advanced LED technology delivers maximum output with minimal energy usage, keeping costs down and sustainability up. 💡
• Durability & Heat Management: Built with high-quality materials, the ICL-300 stays cool and reliable, even in intense growing environments.
Why It Matters:
Under-canopy lighting is a game-changer for growers aiming to maximize yield and quality. Typically, lower buds receive less light, resulting in larfy or underdeveloped flowers. The ICL-300 changes that dynamic entirely by turning shadows into opportunity. 🌟 With light evenly dispersed across the entire plant, you’re not just growing; you’re sculpting a masterpiece.
For me, the ICL-300 is more than a tool—it’s a partner in innovation. It ensures that every plant in my grow room has equal opportunity to shine, from the top colas to the smallest buds at the base. When paired with a carefully managed ecosystem, like the one powered by TrolMaster, the potential for consistent, top-quality harvests reaches new heights.
This isn’t just about adding light—it’s about adding value, efficiency, and balance to the grow process. I’m beyond excited to see how the ICL-300 transforms the game in my tent, and I can’t wait to share the results with you all! 💚


Likes
3
Share
@CadillacGreen_420
Follow
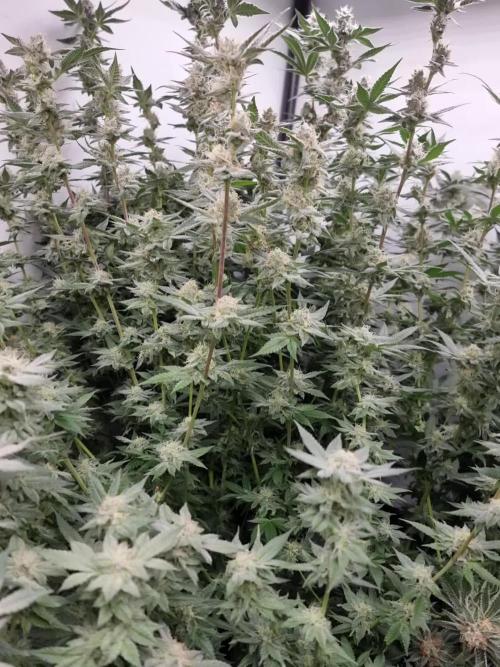
The leaves have started shifting to a lighter shade of green, while some are showing beautiful pinkish-purple hues. The buds are still on the lean side, but I’m hoping for a bit more bulk and density over the next few days. 😀🤞
The flowering progresses smoothly and peacefully. Apollo’s fragrance now unfolds in all its elegance — a truly delightful scent that fills the air, while my mind tries to unravel the delicate pleasures that make up this exquisite creation.
The scent of Apollo F1 is a triumph of fruity sweetness, dominated by notes reminiscent of gummy bears and red fruit syrup, balanced by a subtle floral and creamy undertone. The aroma is dense, sugary, and enveloping — a symphony of fruity esters and terpenes that evoke the irresistible allure of an artisanal candy shop.
Let’s surf in this little sea of green !🏄♂️
Likes
53
Share
@Growbody
Follow
Hallo und herzlich willkommen zu meinem Schlußbericht Outdoor 2025 mit den Sorten Power Flower Feminized, Royal Medic Feminized und Special Kush #1 Feminized, alle 3 von Royal Queen Seeds. Es ist das erste Mal, das ich Töpfe für den Outdoor grow verwendete, bisher waren alle Gorilla grows und direkt in die Erde gepflanzt.
Die URL der Royal Medic Feminized: https://www.royalqueenseeds.de/cbd-samen/148-royal-medic.html
Die Planung für den Grow war, die Samen in easyplug Anzuchtwürfeln keimen zu lassen und danach in 0,6L und 2,2L Plastiktöpfen, dann letztlich in die neuen komplett doppellagigen ROOTIES 15 Liter Wide Version Stofftöpfe umzutopfen. Sobald die Witterung es zuläßt, sollten die Pflanzen an die frische Luft.
Tag 249: Die Blüten der Royal Medic feminized von Royal Queen Seeds haben in den letzten 4 Wochen enorm zugelegt. Wenn ich das viele Laub sehe, bin ich nicht sicher, ob 2 Tage zum Trimmen ausreichen.
Tag 252: Es ist wieder sehr Spät geworden aber die 2 Tage haben gereicht. 134 Gramm nass getrimmte Blüten hat es gegeben. Die trocknen jetzt im Keller in DryFerm Bags bei 15,5°C langsam vor sich hin.
Tag 258: Die Trichommaschine kam zum Einsatz und hat ein gut gefülltes Gläßchen ergeben.
Wenn's dir gefallen hat, schau wieder vorbei ✌️😎
Likes
9
Share
@AustinRon
Follow
Week 10 - Flower Week 3
Ambassador Cartwright
Ambassador Cartwright by IRIE Genetics
Transition to Flower
Afterglow X Arise
(Clementine X Arise) X Arise
((Tangie X Lemon Skunk) X Arise) X Arise
______________________________________
Start of Week: Saturday 10 September 2022 AC3Q 57:F:3:1 to 17 September 2022
Summary:
Plant HeightBeginningOfWeek: [ 20, in]
Plant HeightEndOfWeek: [ 26, in] *TBD*
Temp: 74.8
RH: 70.7
VPD: 0.88 kPa # need to get into the 0.9 -> 1.1 Early Flower
Autofertigation - Enable
- [ ] Growtek RINGS Calibrated
- [ ] Growtek RINGS INSTALLED
- [ ] Growtek OPERATIONAL
LightSchedule: 12/12
amt: [ 1300, ml] #
period: [ 360, min]
frequency: [1, day]
times: { first: 2100, second: 0300 } # Auto Only!!! Otherwise 1.3 @ 2100
Environment:
EC Targets: #
rel.
|
abs (rel + source)
ECseedling:
[0.4, 0.5]
[ 0.7, 0.8]
ECearlyveg:
[ 1.1, 1.4]
[ 1.4, 1.7]
EClateveg:
[ 1.2. 1.5]
[ 1.7, 1.8]
ECearlybloom:
[ 1.1, 1.4]
[ 1.4, 1.7]
EClatebloom:
[ 1.3, 1.6]
[ 1.6, 1.9]
ECripen:
[ 0.8, 1.1]
[ 1.1, 1.4]
ECflush:
[ 0.0, 0.2]
Seedling Early Veg Late Veg Early Bloom Late Bloom Ripen Flush
400* – 500 1100 – 1400 1200 – 1500 1100 – 1400 1300 – 1600 800 - 1100 0 - 200
Fertigation Daily:
- {pid: 4, amt: 1300 ml, ec: 2.0, pHRange: [ 5.5, 6.5], time: 2130}
- {pid: 7, amt: 1300 ml, ec: 2.0, pHRange: [ 5.5, 6.5], time: 2130}
FertigationtheRootedLeafFullRatios: # Flower Week 3
Primer A: [ 10]
Primer B: [ 10]
CalMag Fuel: [ 6]
Silica Skin: [ 4]
Lush Green: [ 4 ]
Root Anchor [ 6]
Peak Bloom [ 4]
Resin Bloom [ 2]
Last Week of Foliar
FoliarMonday:
Solar Wind: [ 2.5, ml, 500, ml]
Silica Skin: [ 2.5, ml, 500, ml]
FoliarWednesday:
CalMag Fuel: [ 2.5, ml, 500, ml]
Lush Green: [ 0.63, ml, 500, ml]
FoliarFriday:
Solar Wind: [ 2.5, ml, 500, ml]
Peak Bloom: [ 0.63, ml, 500, ml] # Cease Begininning Flower Week 5
NEW WEEK
Week's Plan - (Added Veg week to allow SuperCropped Mains HEAL.)
- [ ] Install Growtek Fertigation w/ 8” Rings
- [ ] Run Feed Lines & Cut to Optimal Length
- [ ] Calibrate Feed
- [ ] Install Drain Lines, Cut to Optimal Length
- [ ] Notch Drain Tube end to eliminate vacuum against drain pan
_____
Sat 10 Sep 2022
AC3Q 57:F:3:1
# PM
- [x] As Below
Fertigation:
pid: 4, amt: [ 1300, ml], ec: 2.2
pid: 7, amt: [ 1300, ml], ec: 2.2
LightIntensity: [ 824, µMol/m2/s2]
LightDLI: [53.4, mol/m2/d]
Sun 11 Sep 2022 # AM IS 9PM Local TIme, the Night BEFORE.
AC3Q 58:F:3:2
NOTE:
- We’ve added a couple inches removing all restraints, and having flipped last week. As frequently observed, Both plants were clearly vibrant and vigorous after a nights sleep after restraint removal.
- Zymes/Bonners/Ascorbic Acid - Soil surface, container sides, and container bottom (exposed roots)
- [x] As Below
Fertigation:
pid: 4, amt: [ 1200, ml], ec: 2.4
pid: 7, amt: [ 1000, ml], ec: 2.4
# AM
- [x] Complete Previous Weeks GrowDiaries
- [x] As Below
Fertigation:
pid: 4, amt: [ 1200, ml], ec: 2.4
pid: 7, amt: [ 1200, ml], ec: 2.4
# PM - None
Mon 12 Sep 2022
AC3Q 59:F:3:3
# AM
- [x] As Below
Fertigation:
pid: 4, amt: [ 1200, ml], ec: 2.4
pid: 7, amt: [ 1200, ml], ec: 2.4
- [x] As Below
FoliarMonday:
Solar Wind: [ 2.5, ml, 500, ml]
Silica Skin: [ 2.5, ml, 500, ml]
Tuesday 13 Sep 2022
# AC3Q 60:F:3:4
# AM
- [x] As Below
Fertigation:
pid: 4, amt: [ 1200, ml], ec: 2.4
pid: 7, amt: [ 1200, ml], ec: 2.4
Wednedsay 14 Sep 2022
# AC3Q 61:F:3:5
#AM
- [x] As Below
Fertigation:
pid: 4, amt: [ 1300, ml], ec: 2.2
pid: 7, amt: [ 1300, ml], ec: 2.2
- [x] Apply as Below
FoliarWednesday:
CalMag Fuel: [ 2.5, ml, 500, ml]
Lush Green: [ 0.63, ml, 500, ml]
Thursday 15 September 2022
# AC3Q 62:F:3:6
# AM
- [x] As Below
Fertigation:
pid: 4, amt: [ 1200, ml], ec: 2.2
pid: 7, amt: [ 1200, ml], ec: 2.2
Friday 16 September 2022
# AC3Q 63:F:3:7
# AM
-
# PM
- [x] As Below
Fertigation:
pid: 4, amt: [ 1400, ml], ec: 2.4
pid: 7, amt: [ 1400, ml], ec: 2.4
_______
Saturday 17 AC3Q 64:F:4:1
CEASED FOLIAR Application: 2022-09-17T16:02:06-0500 #
- [X] Complete Week’s GrowDiaries

Processing
Likes
31
Share
@WeedWacker
Follow
Week 11
Jan. 13 - 19, 2020
Jan. 17, 2020
I'm a few days late updating week 11.
So here it goes.
I harvested the 3 Zkittlez plants.
I enjoyed growing these. They didn't get as tall as I'd liked but that was my fault, I kept my lights too close during the early stages of the grow. I learned that these auto flowers don't not need to be LST'd. My Zkittlez #1 I over stressed and it yielded out only half of what the other plants did. Of the other two plants...one was LST'd and the other was left to grow more naturally with very little training. They both yielded within 1 tenth of an ounce of each other.
Final dry weight is 2.5 oz. Could've been better, but it's my first time and I learned a lot. Here's a link to my diary for Zkiitlez if you'd like to check out my first grow experience in more detail. https://growdiaries.com/diaries/44659-fastbuds-zkittlez-auto-grow-journal-by-weedwacker/week/212148
Looking forward to harvesting my Californian Snow plants which still fattening up and putting on major trichomes. No amber trichomes but wow the plants are frosty and they have a strong pungent smell. When the main cola is bent a little sideways it really begins out the smell. The smell is like a gassy fuel, diesel fuel, strong chemically smell. I love it.
CS #3 is giving me some problems. The pics might show it. The leaf tips are curling up and thr leaf edges are turning brown. Not sure if I can correct this befor harvest. It's late into flower. I may just ride it out until then.
I've topped dress once weekly for the last 4 weeks with kelp, and a blend from roots organic for bloom 4-6-3.
Processing
Likes
12
Share
@n00bs
Follow
22/05 Riego con agua pura antes de etapa de floración. Ph 6,5. Algunos signos de sobre fertilización, espero que baje con el riego actual.
26/05 Disculpas por las pocas actualizaciones, semana muy ocupada. Mantenemos riego con solo agua por etapa inicial de sobrefertilizacion en 3 plants. Despues de 2 dias de ultimo riego veo mejora, mañana foto de estado actual. PH 6.5. Aplicado nuevo LST.


Likes
28
Share
@Uwish
Follow
Not much to say about this week.
I still have not taken over ORGA Bloom which is my base and I will not do it until the end of the culture.
We see that the resin is present and that the heads grow. I’m not going to leave it at that, so I’ll tell you what I’m going to do for week seven of flowering.
So I do not take back my base but I keep my additives and I add two products to make my heads swell, Nirvana and Overdrive from Advanced Nutrients to the recommended dosages.
I will also increase my watering volume to 6L of nutrient solution for 14L of substrate.

Likes
9
Share
@HIAZ_urbanbudfarmer
Follow
Hello , GG going well , have upgraded light to a Mars Hydro Fce 4800, 480w . Great fit for my 1m X 1m tent. Currently dimmed down to 150w. Good quality build, looking forward to see what it can do. Increased nutes & feedings to every 2 hours for 15 minutes, will start Lst this week. Till next time , smoke up Gromie's 🤙🤘
Likes
5
Share
@PortkeyCannabis
Follow
I love this girl she is a trooper and she is really coming together nicely

Likes
27
Share
@MoneyMorris
Follow
I’ve been flushing the plants for a week now. The colas have definitely gotten fatter from last week. It’s looking like I’ll be harvesting in 1 more week. Pretty much all the trichomes are milky and I’m starting to get amber ones.

Likes
Comments
Share
@LittleBigTrees
Follow
Feeding full strength with 600ml run off..
Both plants are very different looking to each other, they both have different smells, one is more fruity the other gassy.
Still a couple of weeks to go and they are covered in trichomes.
The tallest one looks like it will finish before the shorter one.

Likes
13
Share
@Chubbs
Follow
420Fastbuds
FBT2311/Week 7
What up grow fam. Happy Easter to all. Weekly update for these two stunning girls. Where in the 3rd week of Flower and they are swelling up nice. I did notice some fad in the leafs so I upped my nitrogen a little and it seemed to stop the problem. All in all Happy Growing
Likes
28
Share
@Schneidersitz
Follow
Die Miniermotten lassen dieses Jahr einfach nicht locker. Aber halb so wild. Bokito war ein starker Kerl mit einem breiten Kreuz.
