The Grow Awards 2026 🏆 


Likes
Comments
Share
@Mr2toke
Follow
06/12/23 - Day 0
Here we go again!!
After a successful run of 3 strains, I've decided to pop a 3 pack of MilkyWay F1 from RQS.
3 seeds are in a wet paper towel, inside a plastic sandwich bag, into a dark warm cupboard. Im hoping they all germinate!!
LET'S GROW!!!
08/12/23 - Day 2 from seed
All 3 seeds have cracked and tap roots have come out, so i've put them in the peat pots.
I mixed coco coir and perlite at 70/30.
I've also decided to add a teaspoon of DYNOMYCO’s Mycorrhizae in each little pot too.
10/12/23 - Day 4
2 out of 3 have sprouted, the 3rd isn't too far behind.
11/12/23
3 out of 3 are out and thriving!! we're well within schedule and we're off to a very good start!!
12/12/23 - Day 6
I've decided to move all 3 into their final pots today! I'm using Plagron AllMix in 12L pots with a nice big drip dish.
Into the tent they go!!!

Likes
84
Share
@bioaccessory
Follow
Не прошло и 8 недель, как растишка наконец зацвела🌿, при этом резко прибавила в росте. Снизил дозу базовых удобрений до половины таблицы, и всё вроде пришло в норму. Кстати, общение с супортом AN оставило неоднозначное впечатление, мне даже показалось что у них на вопросы отвечает бот😃
Уже вижу, что досвет нужно было чуть выше закрепить, но мне пока лень лезть в эти джунгли, может быть позже отрегулирую правильную высоту, уже когда полностью прекратится рост растишки.
В остальном всё хорошо, жду появление одуванов. Только вперед и только вверх! 👆
upd 02.11 Представляю соседок: в левом дальнем углу тёзка LSD от MasterSeeds, ей я на раннем этапе делал FIM-подрезку, которую она толком не заметила, уже 90см и сильно прёт дальше, видимо придется ломать макушку. В левом ближнем углу Super Skunk от Seedstockers, в начале пути сильно тормозила, сейчас вроде нагнала остальных.
👉планирую добавить еще один досвет😎 - диоды deep red специально для цветения, на отдельной планке, оставайтесь на связи👈
Спасибо, что заглянули, и будьте здоровы! 🙏
Продолжение следует ...😶

Likes
58
Share
@Kynareth
Follow
Plant keep growing great.
As you can see at the leaves there are some of the tips of the leaves with bad color, thats because teh EC reached up to 1,8 so I added ph leveled plain water with 0,4 ec to lower the ec to 1,5 and the plant is responding really well, growing faster and with a healthy root system.
The temperature was high also (near 30 degrees celsius) so i moved the lamp upper and i will setup an 100mm fan for extraction. The led panel is really really hot
Likes
9
Share
@Ryno1990
Follow
Wedding glue from fast buds budding along real nice stacking on the trichromes an the gelato auto from herbies starting to get into budding real nice


Likes
3
Share
@Passionatos
Follow
Screwing my homemade rdwc together for a quick leak test . After the roots came out the rockwool cubes I transplanted the plants into the rdwc system.

Likes
3
Share
@Autofutur
Follow
Due to winter and bad isolation in the house I struggle to keep it around 18 C at night and 22 during the day.
Not ideal for this stage but I can't do much more for now.
NCH is described by Memphisto as "rampant seedlings stage" I would confirm that.
Her side branches grew 2cm/1inch today... I think she is waking up

Likes
13
Share
@WeedM8
Follow
Hello m8 welcome to this journey with me in this diary will have very interesting strains hope u find something useful
Persian Girl 🏝️🧞♀️
- [ ] 1st week Veg: germinated in substrate lighting very close so it jets medium high humidity after the 3rd day they started sprouting
- [ ] 2nd week Veg: this week my ventilator broke down and as the temperature stayed very warm nothing developed much
- [ ] 3rd week Veg:fortunately this week i had fixed the ventilation and the temperature has go down a bit allowing the little plants to develop and reinforce
- [ ] 4th week:very good developments in this week I already started feeding a bit two times but i didn’t have to…once was enough
- [ ] 5th week Veg:this week they were very strong green i only had to water them good and keep the ventilators going no stop .They have good hight already ,but as i have to strains together. I want to transplant them when the hight of the other one have stretched… I’m thinking to transplant next week if not the next one Hello m8 welcome to this journey with me in this diary will have very interesting strains hope u find something useful
- [ ] 1st week Fl: first week of flowering they started stretching and looking very heal
- [ ] 2nd week Fl this week I’ve been away i had a friend taking care of them they stretching very well i hope that she starts putting energy into the flo
- [ ] 3rd week Fl
- [ ] 4th week Fl
- [ ] 5th week Fl
- [ ] 6th week Fl
- [ ] 7th week Fl
if this was useful please like and followk

Likes
22
Share
@Spliffi
Follow
Heya🤙👍🤙🌱
This diary is going to show you guys my journey being a contender in a local Cannabis Cup🏆
22 Jan 2024
Got the tracking number for the seeds and packaging this morning. LET'S GOOOO!
Jon Dabs
Check them out here:
https://jondabs.com
@jondabs Instagram
The Sponsors
Check them out here:
Dutch Passion
https://dutch-passion.com/en/
Hydroponic.co.za
https://hydroponic.co.za/hydroponic/harvesting-and-growing-accessories/
Bud Juice
https://www.gohydro.co.za
The Best Grow
https://thebestgrow.co.za
Dynomyco
https://www.dynomyco.com
Nuclear Roots
https://www.nuclearroots.co.za
Photronic
https://shop.photronic.net
Special Thanks to Hydroponic.co.za. I buy all my products from them. Best service.
Daily updates coming...

Likes
10
Share
@CURATI_DA_SOLO
Follow
Questa varietà e la nuova di anesia! Con 29 % di THC! E rimasta più piccola del resto della coltivazione ma forse è proprio per questione di grandezza di genetica anche perché lei sta benissimo....e bello forte e robusta ed ha resistito benissimo ai 3 topping...adesso ha 8 apicali e non è ancora entrata in fioritura...le radici hanno già oltrepassato il vaso in tessuto geotessile...una bomba! Ringrazio indoorline per i fertilizzanti biomabno del quale sono molto orgoglioso! Prodotti italiani di primissima qualità e te ne accorgi anche da.alcune bottiglie che si restringono...simbolo di un fertilizzante pregiatissimo! (Ricco di batteri ecc) li ringrazio anche per quanto riguarda l'aspirazione della growbox in quanto mi ha fatto testare coon piacere il secret Jardin df16...il loro catalogo e infinito e i prezzi molto accessibili! Passate a dare un occhiata trovarete di tutto e lavorando in team ti assicurano un assistenta clienti perfetta!Ringrazio anesia per questa genetica.... e tutto il pubblico di growdiaries per supportarmi nei miei lavoretti! All prossimo aggiornamento 💪🏼💪🏼💪🏼

Likes
5
Share
@AcidBurn_41
Follow
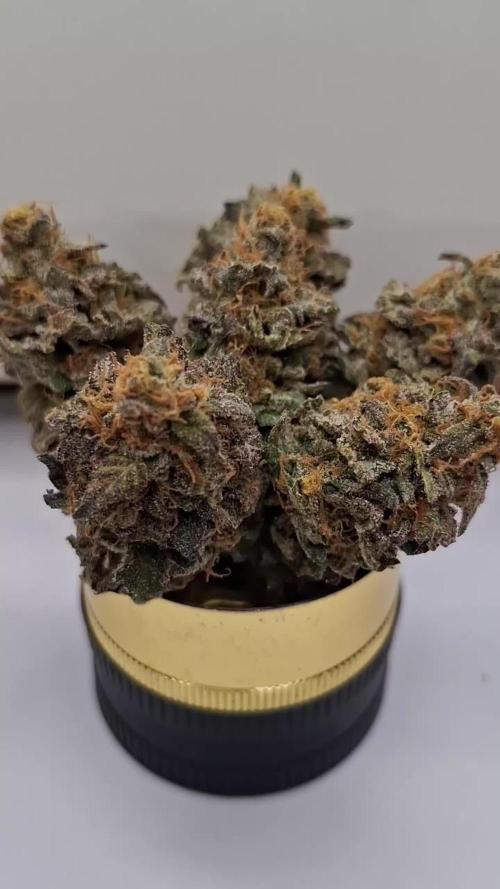
10.01.26
Einen guten Abend ✌️
Da bin ich wieder mit der White Noise von @paradiseseeds .
Das Trocknen ist vorbei jetzt wird Sie ausgehärtet im Glas. Nass waren es 185g nach dem Trocknen 14 Tage im Karton blieben mir an reinen Buds schöne 65g.
Die Buds sind sehr sehr Kompakt voll mit Tricomes sie riechen sehr Süßlich nach kiefer direkt gefolgt von Pfeffer was für die White Window spricht.
Das leicht Minzige nach Beeren stamm wohl von der Thin Mint.
Ein Rauch bericht kann ich euch leider noch nicht geben. Da ich Sie erst in wenigen Wochen genießen werde.
Aber das was ich rieche macht mich freudig auf die erste verköstigung.
Danke an Paradise Seeds für diesen feinen Strain.
Euch danke ich das ihr die Reise der White Noise gefolgt seit ,es wird ein neuen Strain meines Lieblings Züchter geben das steht feste.
Bleibt dran ihr werdet es mit bekommen, wünsche euch ein schönes Wochenende stay high Bleibt gesund.
Mögen all eure Ladys Gesund und prächtig wachsen und euch mit schmackhaften Stuff versorgen 💯🔥
■■■■■■■■■■■■■■■■■■■■■■■■■■■■■■■■■■■■■■
10.01.26
Good evening ✌️
Here I am again with White Noise from Paradise Seeds.
The drying process is complete, and now it is curing in a jar. Wet, it weighed 185g, and after drying for 14 days in a box, I was left with a nice 65g of pure buds.
The buds are very compact and full of trichomes. They smell very sweet, like pine, followed immediately by pepper, which is typical of White Window.
The slight minty, berry scent probably comes from the Thin Mint.
Unfortunately, I can't give you a smoking report yet, as I won't be enjoying it for a few weeks.
But what I smell makes me look forward to the first tasting.
Thanks to @paradiseseeds for this fine strain.
Thank you for following the journey of White Noise. There will be a new strain from my favorite breeder, that's for sure.
Stay tuned, you'll find out about it. Have a great weekend, stay high, and stay healthy.
May all your ladies grow healthy and magnificent and provide you with tasty stuff 💯🔥

Likes
14
Share
@SunshineBud
Follow
Week just starting off and the one baby has still not broken thru so I take matters into my own hands and attempt emergency surgery!!!
I sanitized a Raw loader stick and gently pulled the sprout up. It laid over after and I'm going to give it a few hours before I try to put something to hold it up if it doesn't manage to orient properly. Any advice would be appreciated, This week just started so will edit it throughout the week..
11/18 Transplanted into 1ga pots and gave first n00tz FF 3tsp/GA Big Bloom.
11/19 Ok so my humidy has been plumiting to 33-36% so I tried putting a rag over a fan, putting a rag in a bowl over the inlet and nothing helped so I went to amazon and bought this! https://www.amazon.com/gp/product/B08GQZDS9J It has a gallon or so tank and a humidity sensor so it cycles to maintain humidity.
11/20 Anyways humidifier shows up today and I kicked it up to 80% and its about 70% after 4 hours.. I'll drop it down once the babies get to growing a bit more. I'm actually worried I transplanted too soon. Shout out to my boy Jeff! And a smaller shout out to James!
11/22 So no real changes the last few days, the plants still aren't thirsty so holding off on that. I did rearrange grow tent to allow me to set up a camera to capture time lapse of the process and I had to get some power to it so it doesn't cut off when the lights go out hehe. I mean all is well I guess, I'm still concerned bout my little plants and the one with the crooked stem. Although I'm thinking the more I keep hands off right now the better chance they'll have! Wish me (and my babies) luck!
11/24 So everything looks smooth, today I uploaded a time lapse of the last couple days which if you speed thru it can see movement of the plants which is cool, but I'm stressing that my 3 way meter isn't correct. Its reading like 6-7 on moisture scale after about 7 days of being on the same water/feeding. I am anxious to water again but don't want to overwater...I mean I do feel some moistness if I press down on the soil. I'm quickly learning this is a great means to work on your patience!!! Oh and I'm rapidly losing hope for the bent girl, so sad.

Likes
10
Share
@iLoveGoodWeed
Follow
She is keep growing and not looking to be harvest for next 3-5 weeks

Likes
17
Share
@MasterKush714
Follow
SOOO GANG UPDATE!!!!!!!!!!!
I have put the Strawberry Pie Auto, Zkittles Auto, and the Gelato Auto
On the chopping block, will update those within the next day or so,
The Mimosa X Orange Sherbert is on the left (see photo) and the GMP on the Right!!!!
They are starting to beginning the calix's and white hairs are forming lets GOOO!!!!!!
Processing
Likes
4
Share
@Grownewgenetics
Follow
We arrive on the Last week of the L.A.kush from stranger'seeds, i love These Strain and how beautiful cola's u get, i also take two cuts from it, to grow the Genetic.
I do have still a small blueafghan+ sourdiesel
, Also I think one week more and they're ready to go
Likes
12
Share
@Growing_Spartan
Follow
So this week last week I did 2 waterings of banana peels and then once with Fish Sh!t for more nutrient uptake to fix that calcium issue. I’ve been on top of PH and incorporated gypsum solution to my waterings but they don’t seem to want to uptake the nutes. It seems to be affecting my flower production so I might take an L on my thinner plant but the purple one is doing pretty good ✅ hopefully there isn’t more problems, if you have solutions, please I’m all ears!!
Likes
29
Share
@PlainFieldPuff
Follow
So week 4 of flower has come to an end. I have finally started feeding full nutes with 50% N this morning. Plants seem to be handling it well. The double cola Malasaña in the back has an amazing bud structure, and such a heavy resin production on her, I really wish I had cloned her. I include 3 pictures of that one. Also, I tied down a bunch of taller colas so I could turn up my light to 100% with an even canopy. Buds have not been swelling much this week ! But with the reintroduction of feeding at a regular level I hope to see lots of progress in the coming weeks . Also I noticed substantially heavier trichome production on the plants nearest the UV light, might just be coincidence though. Well have to see the outcome of future grows during a monocrop .

Likes
16
Share
@Chocolopeison
Follow
Estuvimos un poco desaparecido por andar un poco desmotivado pero aquí vamos nuevamente, las nenas van bastante bien en la semana 8 la cambiamos a maceta de 3.5L y aprovechamos de darle GREAT WHITE SHARK, la técnica que usamos es de amarrar el central ya que le hicimos supper cropping y apical a nuestro central, amarramos el apical que le hicimos super cropping y le dimos fuerza a varios brazos. Para ir controlando la altura de los brazos le hicimos poda a pical a los que estaban tomando más altura y así poder ir equiparando los brazos. La verdad que no se cuantos brazos tengo que sacar y aun me quedan unas 4 semanas para poder desocupar mi armario de floración y poder pasarlas a flora, así que intentaremos hacer una muy buena estructura antes de pasarlas a floración. La defoliación la aplico cada vez que saco foto ósea semanal y trato de ir manteniendo de a 4 nudos o 6 nudos
La alimentación se mantiene igual lo que si no se si lo dije pero:
Rhizotonic: Lo estoy usando solo en trasplantes y cuando hago alguna poda.
Cannazym: Lo estoy usando 1 vez por semana.
Orca y Myco Chum: Lo estoy usando 1 vez cada 1-2 semanas
Alimentación diaria: Calmag, silicia, supervit y canna coco a+b
Alimento a cada una con 250-350 cc de solución, 2 horas que encienden las luces y 2 horas antes de que se apaguen. Gracias a esta receta no eh tenido tanta variedad en mi runoff y las nenas se mantienen muy sanas.
Saludos


Processing
Likes
13
Share

Likes
11
Share
@Highgrade_Harvests
Follow
Harvest time has come. This plant grew beautifully and strong. The flowering time was insanely fast hence the "fast" strain. The Gaia green nutrients are where its at. Definitely sticking to organic from now on after this grow. The smell is pungent and stinking up my entire house in a great way! Very resinous buds so I cant wait to use the nug smasher and press some rosin. Overall great grow and learned a lot about the organic process. Next grow is going to be blueberry pie fast. Stay tuned and thanks for following along!

Likes
36
Share
@ganjameister
Follow
The buds are bulking and a slight defoliation was done to expose the inner buds. The next week will be the last week of Nitrogen and flush will begin soon. Harvest in approx. 3 weeks


